说明:
最开始是用的rehat7.2安装12.2.0.1,后面安装GI节点一执行root.sh脚本失败,排查原因,最开始以为是操作系统的问题,换成rehat7.6,同样的出现问题,经过一番折腾,后面通过MOS文献解决问题(如果直接18C,可以避免此BUG)。
一、前期规划
1、软件环境
操作系统:RedHat Linux 7.x 64位
数 据 库:Oracle 12.2.0.1 RAC
2、主机规划

二、安装数据库前准备
1、清除 DNS 中内容
vi /etc/resolv.conf --消除其内容
2、改hosts
Rac1,rac2:
cat >> /etc/hosts< #rac1 192.168.211.151 node1 192.168.211.153 node1-vip 192.168.137.151 node1-priv #rac2 192.168.211.152 node2 192.168.211.154 node2-vip 192.168.137.152 node2-priv #scan-ip 192.168.211.155 scan-cluster EOF
3、关闭iptables
service iptables stop
chkconfig iptables off
service ip6tables stop
chkconfig ip6tables off
systemctl disable firewalld
systemctl stop firewalld
4、关闭selinux
#关闭selinux
sed -i 's\SELINUX=enforcing\SELINUX=disabled\' /etc/selinux/config
setenforce 0
5、关闭NTP
/sbin/service ntpd stop
chkconfig ntpd off
mv /etc/ntp.conf /etc/ntp.conf.org
systemctl stop chronyd
systemctl disable chrnyd
6、关闭avahi-daemon服务
systemctl stop avahi-dnsconfd
systemctl stop avahi-daemon
systemctl disable avahi-dnsconfd
systemctl disable avahi-daemon
7、关闭 NetworkManager
systemctl stop NetworkManager
systemctl disable NetworkManager
三、集群参数配置
1、添加用户目录
#添加用户
useradd -u 54321 -g oinstall -G asmadmin,asmdba,asmoper,dba grid
echo 'oracle' | passwd --stdin grid
useradd -u 54322 -g oinstall -G dba,asmdba,oper oracle
echo 'oracle' | passwd --stdin oracle
#创建安装目录
mkdir -p /u01/app/grid
mkdir -p /u01/app/12.2.0/grid
mkdir -p /u01/app/oracle/product/12.2.0/db_1
#更改目录权限
chown -R grid:oinstall /u01
chown -R oracle:oinstall /u01/app/oracle
chmod -R 775 /u01
2、设置内核参数
#改变内核参数
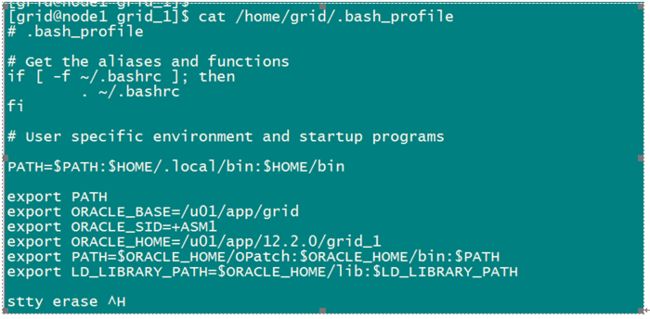
cat >> /etc/sysctl.conf< #Kernel for Oracle 12C fs.aio-max-nr = 1048576 fs.file-max = 6815744 #kernel.shmall = 2097152 #kernel.shmmax = 4294967295 kernel.shmall = 16097152 kernel.shmmax = 128849018880 kernel.shmmni = 4096 kernel.sem = 250 32000 100 128 net.ipv4.ip_local_port_range = 9000 65500 net.core.rmem_default = 262144 net.core.rmem_max = 4194304 net.core.wmem_default = 262144 net.core.wmem_max = 1048576 EOF #使内核参数立即生效 sysctl -p #添加用户资源限制 cat >> /etc/security/limits.conf< #limits for Oracle users grid soft nproc 2047 grid hard nproc 16384 grid soft nofile 1024 grid hard nofile 65536 grid soft stack 10240 oracle soft nproc 2047 oracle hard nproc 16384 oracle soft nofile 1024 oracle hard nofile 65536 oracle soft stack 10240 EOF #编辑配置文件 cat >> /etc/profile< #this is for oracle user if [ \$USER = "oracle" ]||[ \$USER = "grid" ]; then if [ \$SHELL = "/bin/ksh" ]; then ulimit -p 16384 ulimit -n 65536 else ulimit -u 16384 -n 65536 fi umask 022 fi EOF #编辑登陆配置文件 cat >> /etc/pam.d/login< #this is for oracle user session required pam_limits.so EOF #为grid用户添加环境变量 cat >> /home/grid/.bash_profile< export ORACLE_BASE=/u01/app/grid export ORACLE_SID=+ASM1 export ORACLE_HOME=/u01/app/12.2.0/grid export PATH=\$ORACLE_HOME/OPatch:\$ORACLE_HOME/bin:\$PATH export LD_LIBRARY_PATH=\$ORACLE_HOME/lib:\$LD_LIBRARY_PATH stty erase ^H EOF source /home/oracle/.bash_profile #为oracle用户添加环境变量 cat >> /home/oracle/.bash_profile< export ORACLE_BASE=/u01/app/oracle export ORACLE_SID=orcl export ORACLE_HOME=\$ORACLE_BASE/product/12.2.0/db_1 export PATH=\$ORACLE_HOME/OPatch:\$ORACLE_HOME/bin:\$PATH export LD_LIBRARY_PATH=\$ORACLE_HOME/lib:\$LD_LIBRARY_PATH export NLS_LANG=AMERICAN_AMERICA.ZHS16GBK stty erase ^H EOF source /home/oracle/.bash_profile
3、配置NOZEROCONF
#How To Prevent Bogus Entry 169.254.0.0/255.255.0.0 Automatically Added To Routing Table (文档 ID 1161144.1)
cat >>/etc/sysconfig/network< NOZEROCONF=yes EOF
4、选择deadline IO调度
cat > /etc/udev/rules.d/60-oracle-schedulers.rules< ACTION=="add|change", KERNEL=="sd[a-z]", ATTR{queue/rotational}=="0", ATTR{queue/scheduler}="deadline" EOF udevadm control --reload-rules
5、透明大页
1.查看透明大页是否启用
RHEL 6:
# cat /sys/kernel/mm/redhat_transparent_hugepage/enabled
[oracle@rhel 6 ~]$ cat /sys/kernel/mm/redhat_transparent_hugepage/enabled
[always] madvise never
RHEL 7:
# cat /sys/kernel/mm/transparent_hugepage/enabled
[root@rhel 7 ~]# cat /sys/kernel/mm/transparent_hugepage/enabled
[always] madvise never
2.禁用透明大页
RHEL 6:
(1).编辑
/etc/grub.conf 文件,在kernel 那一行后面追加
transparent_hugepage=never
例如:
default=0
timeout=5
splashimage=(hd0,0)/grub/splash.xpm.gz
hiddenmenu
title Red Hat Enterprise Linux 6 (2.6.32-642.el6.x86_64)
root (hd0,0)
kernel /vmlinuz-2.6.32-642.el6.x86_64 ro root=/dev/mapper/rootvg-lvroot rd_NO_LUKS KEYBOARDTYPE=pc KEYTABLE=us LANG=en_US.UTF-8 rd_LVM_LV=rootvg/lvswap rd_NO_MD SYSFONT=latarcyrheb-sun16 crashkernel=auto rd_LVM_LV=rootvg/lvroot rd_NO_DM rhgb quiet transparent_hugepage=never
initrd /initramfs-2.6.32-642.el6.x86_64.img
(2).重启系统生效。
RHEL 7:
(1).编辑/etc/sysconfig/grub 文件,在 GRUB_CMDLINE_LINUX 那一行后面追加 transparent_hugepage=never
例如:
GRUB_TIMEOUT=5
GRUB_DISTRIBUTOR="$(sed 's, release .*$,,g' /etc/system-release)"
GRUB_DEFAULT=saved
GRUB_DISABLE_SUBMENU=true
GRUB_TERMINAL_OUTPUT="console"
GRUB_CMDLINE_LINUX="crashkernel=auto rd.lvm.lv=rootvg/root rd.lvm.lv=rootvg/swap rhgb quiet transparent_hugepage=never"
GRUB_DISABLE_RECOVERY="true"
(2).再使用
grub2-mkconfig 生成grub.cfg配置文件。
# grub2-mkconfig -o /boot/grub2/grub.cfg
(3).重启系统使配置生效。
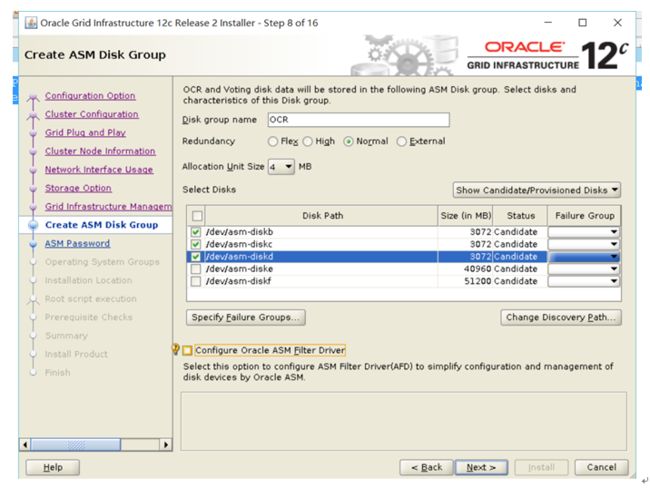
6、准备仲裁磁盘和数据磁盘
for i in b c d e
do
echo "KERNEL==\"sd?\",SUBSYSTEM==\"block\",PROGRAM==\"/usr/lib/udev/scsi_id --whitelisted --replace-whitespace --device=/dev/\$name\",RESULT==\"`/usr/lib/udev/scsi_id --whitelisted --replace-whitespace --device=/dev/sd$i`\",SYMLINK+=\"asm-disk$i\",OWNER=\"grid\",GROUP=\"asmadmin\",MODE=\"0660\""
done > /etc/udev/rules.d/99-oracle-asmdevices.rules
udevadm trigger
udevadm control -R
systemctl restart systemd-udevd.service
ls -lh /dev/asm*
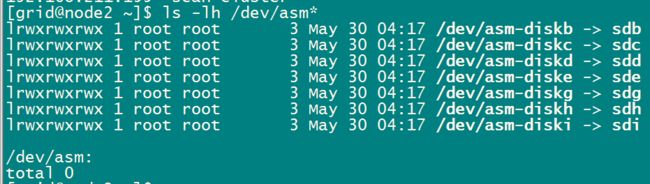
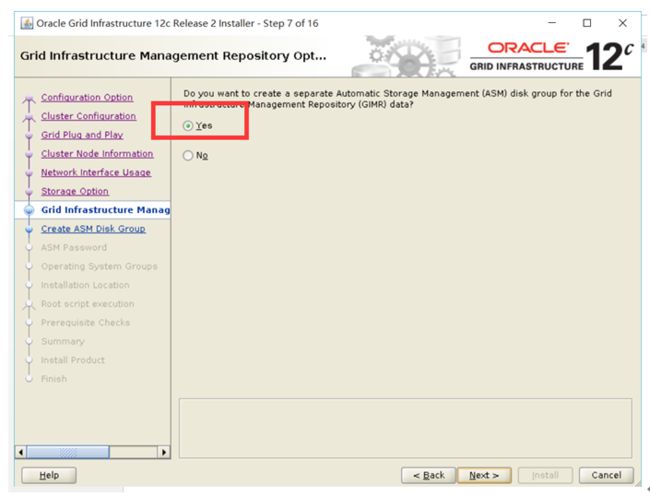
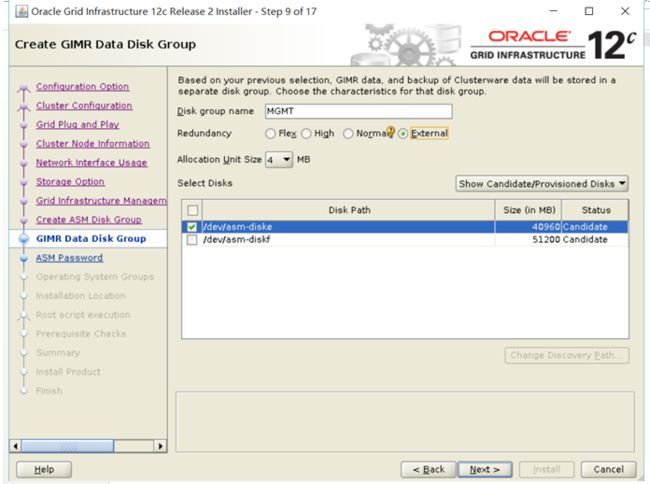
其中,12.2磁盘配置,把MGMT单独分开(建议40+G),否则跟ocr一起安装,每个OCR需要至少30+G。
7、配置YUM
yum -y install binutils \
compat-libcap1 \
compat-libstdc++-33 \
compat-libstdc++-33.i686 \
e2fsprogs \
e2fsprogs-libs \
gcc \
gcc-c++ \
glibc.i686 \
glibc \
glibc-devel.i686 \
glibc-devel \
ksh \
libaio \
libaio.i686 \
libaio-devel \
libaio-devel.i686 \
libX11.i686 \
libX11 \
libXau.i686 \
libXau \
libXi.i686 \
libXi \
libXtst.i686 \
libXtst \
libgcc.i686 \
libgcc \
libstdc++.i686 \
libstdc++ \
libstdc++-devel.i686 \
libstdc++-devel \
libxcb.i686 \
libxcb \
make \
net-tools \
nfs-utils \
smartmontools \
sysstat \
unixODBC.i686 \
unixODBC \
unixODBC-devel.i686 \
unixODBC-devel \
java-1.8.0-openjdk \
psmisc
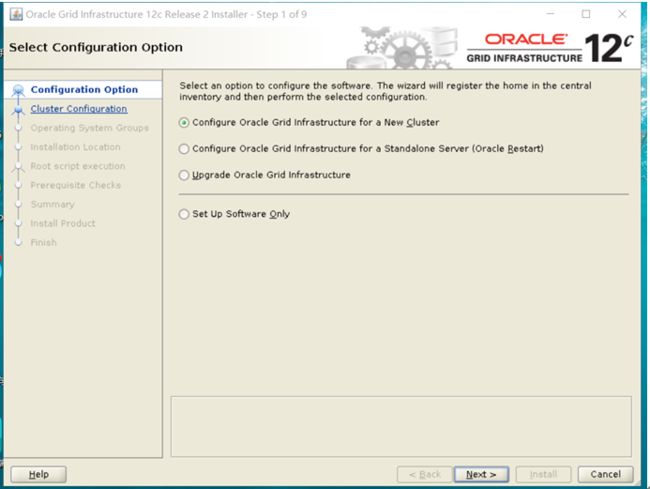
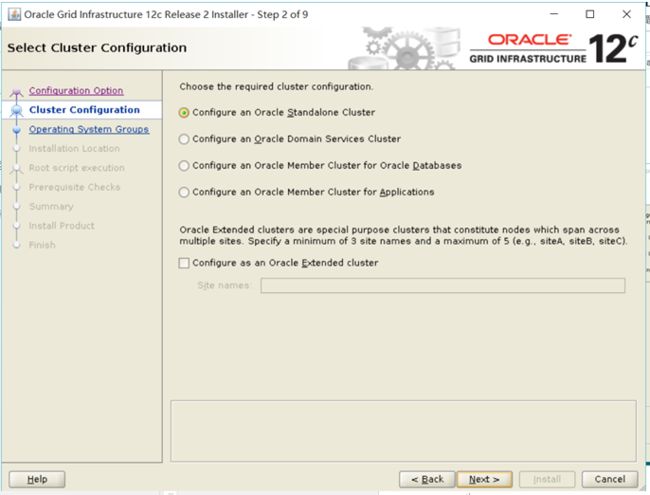
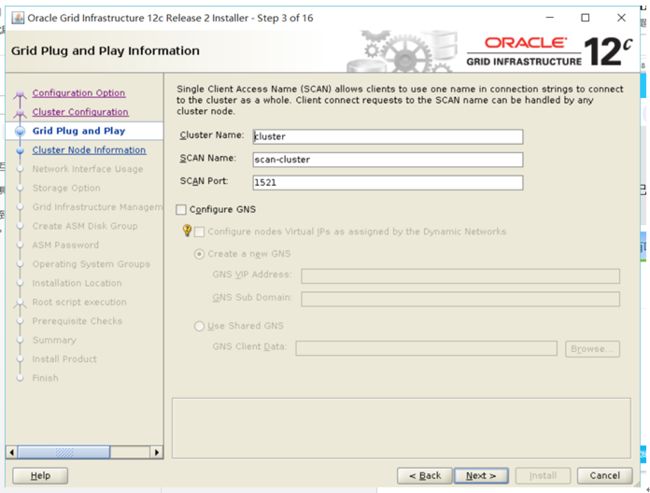
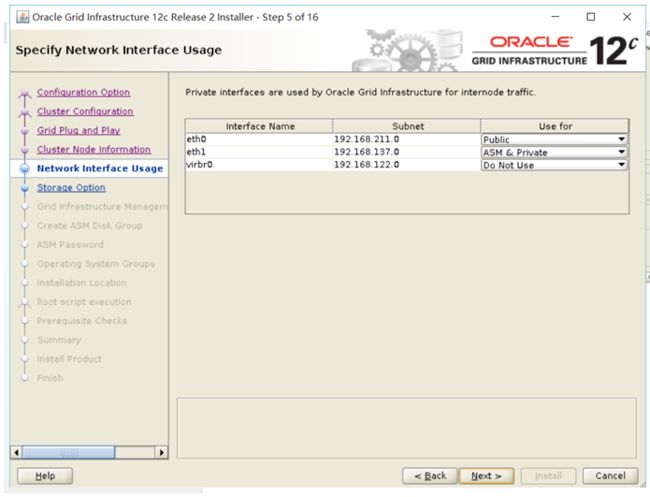
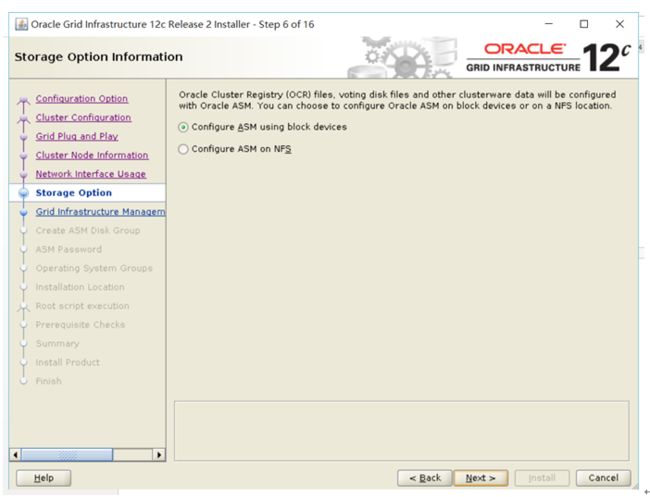
四、安装Grid Infrastucture
1. 预检查
从12.2开始,安装grid,直接把grid安装包解压到$GRID_HOME目录的前一个目录,解压生成grid目录,预检查,安装都可以,并且把MGMT分开。
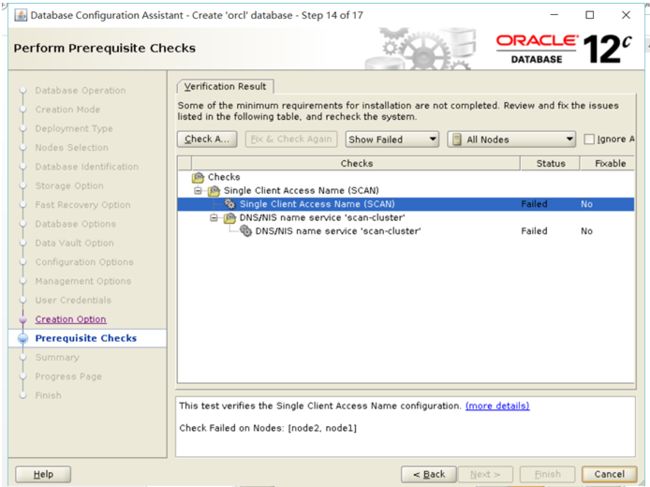
./runcluvfy.sh stage -pre crsinst -n node1,node2 -verbose >/tmp/grid_check.log
查看/tmp/grid_check.log
利用/etc/hosts 域名解析,/etc/resolv.conf 报错可以忽略
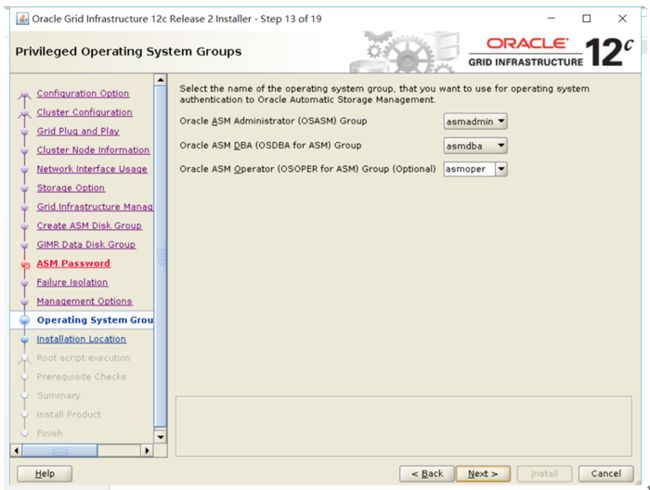
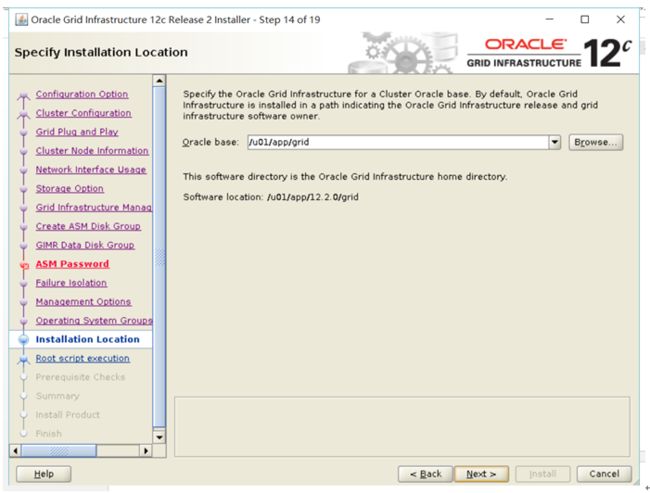
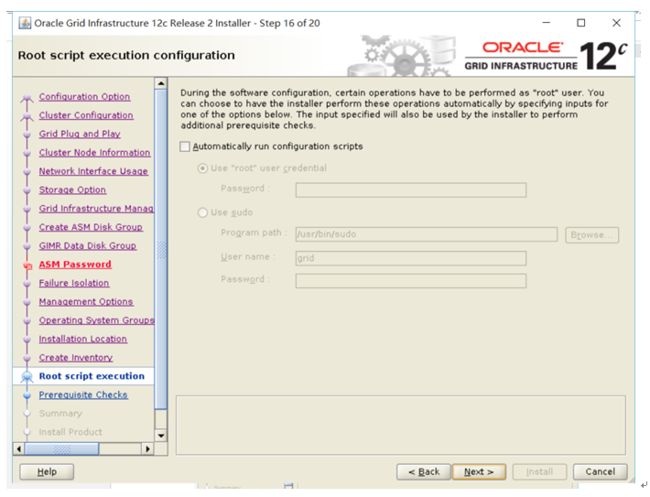
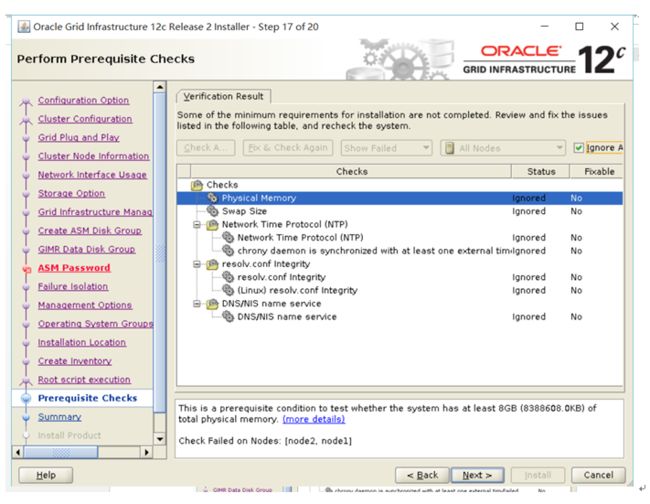
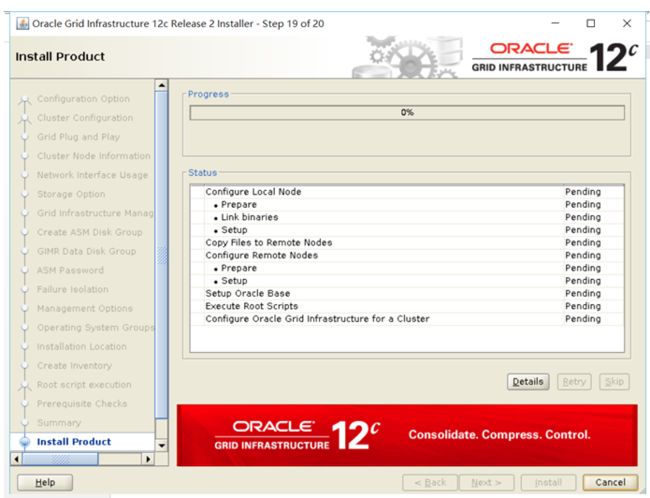
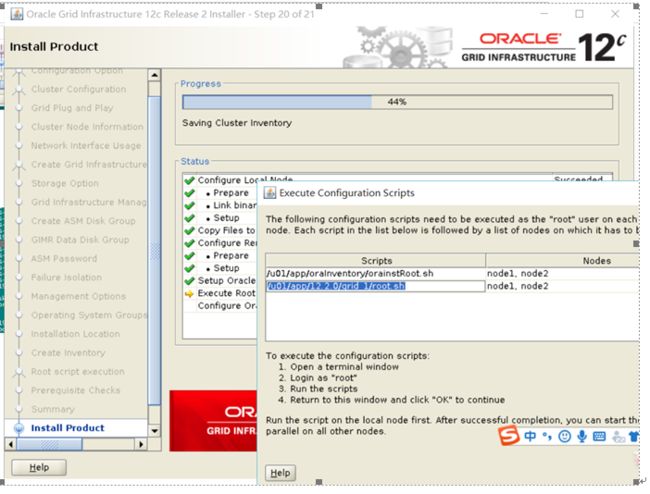
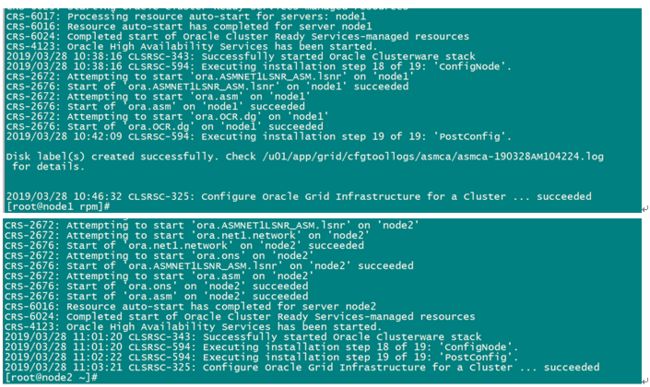
2. 安装GRID软件


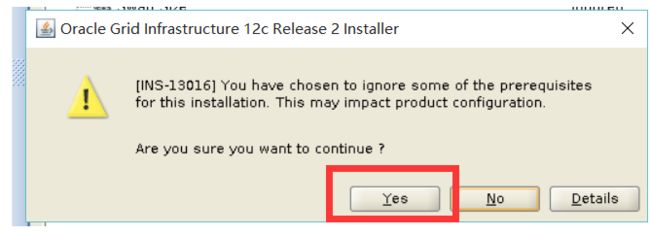

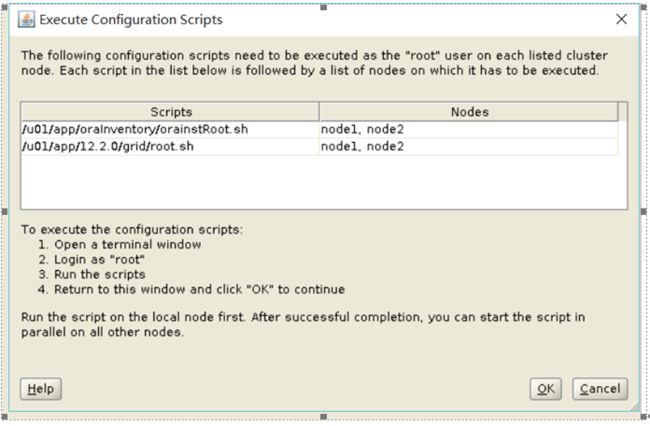
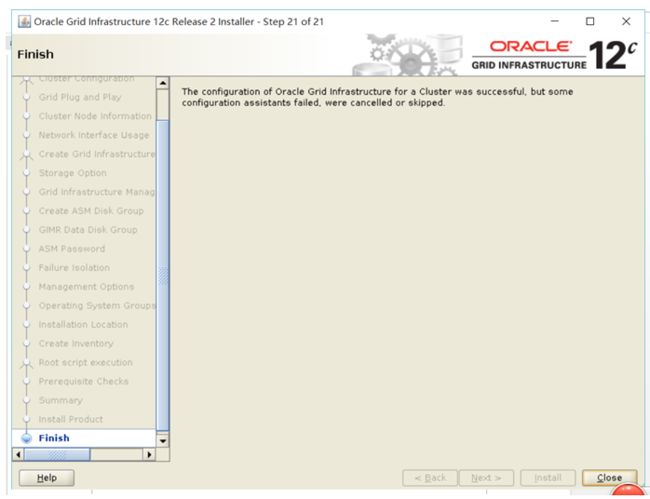
3. 遇到的坑(执行第一个脚本报错)
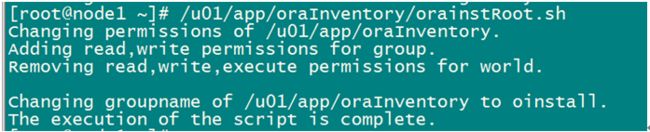
[root@node1 ~]# /u01/app/oraInventory/orainstRoot.sh
Changing permissions of /u01/app/oraInventory.
Adding read,write permissions for group.
Removing read,write,execute permissions for world.
Changing groupname of /u01/app/oraInventory to oinstall.
The execution of the script is complete.
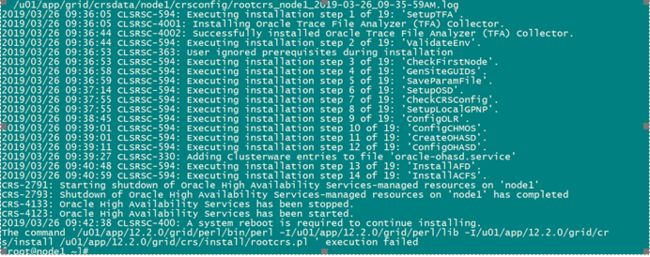
crs 报错:
The command '/opt/oracle/ghome/perl/bin/perl -I/opt/oracle/ghome/perl/lib -I/opt/oracle/ghome/crs/install /opt/oracle/ghome/crs/install/rootcrs.pl ' execution failed
(Doc ID 26247490.8)
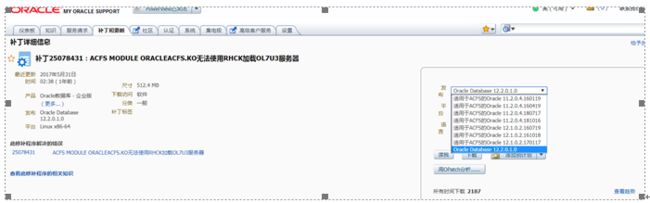
https://support.oracle.com/epmos/faces/PatchDetail?requestId=21111942&_afrLoop=291841035812717&patchId=25078431&_afrWindowMode=0&_adf.ctrl-state=6xvf8wj9o_73

chown -R grid:oinstall 25078431/
cp -r /soft/OPatch /u01/app/12.2.0/grid/
$ORACLE_HOME/gridSetup.sh -applyPSU /u01/app/12.2.0/grid/25078431/
RU下载地址:
https://support.oracle.com/epmos/faces/PatchDetail?requestId=22666334&_afrLoop=334697806899329&patchId=28828733&_afrWindowMode=0&_adf.ctrl-state=1b2lzj24ao_100
opatch 工具下载:
https://support.oracle.com/epmos/faces/PatchDetail?_afrLoop=363488317867689&patchId=6880880&_afrWindowMode=0&_adf.ctrl-state=12eicbce7h_853
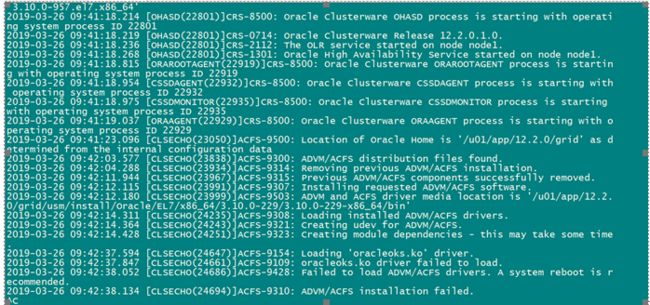
MOS 文档:ACFS Support On OS Platforms (Certification Matrix). (Doc ID 1369107.1)
由于我的操作系统是rehat7.6的,之前是rehat7.2版本,也是第一个脚本报错,创建集群资源的时候,7.2和7.5+的RU需要的不一样,最新的就行了。

官方建议使用OL7 UEK kernel替代,我打上最新RU(11G叫做PSU),如果18C,可以完美避过此BUG。

12.2 Grid Infrastructure Installation: What's New (Doc ID 2024946.1)
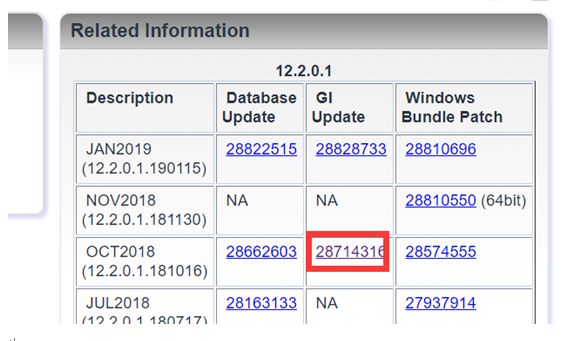
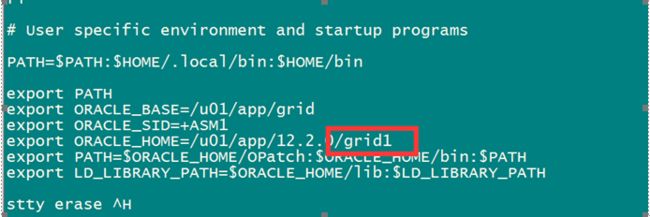
打上补丁需要重新换GRID_HOME目录(真是蛋疼的一笔),即解压GRID软件包到新的GRID_HOME目录。

![]()
logout
[root@node1 soft]# mount /dev/cdrom /mnt/
mount: /dev/sr0 is write-protected, mounting read-only
[root@node1 soft]#
[root@node1 soft]#
[root@node1 soft]#
[root@node1 soft]# yum -y install psmisc

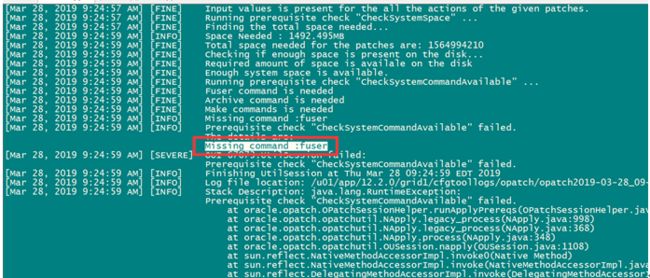
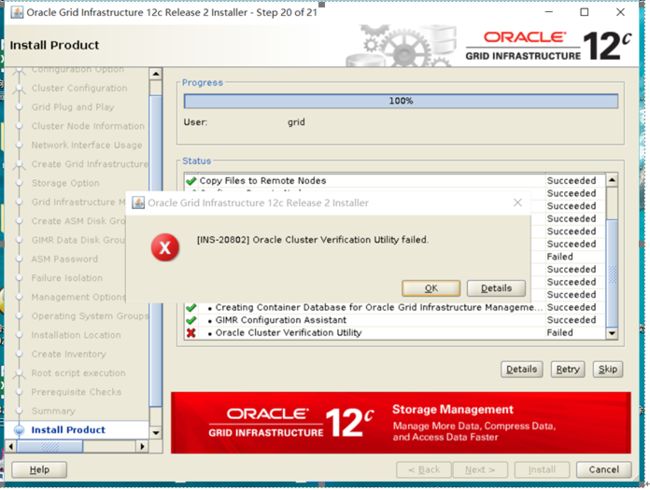
先决条件检查“CheckSystemCommandAvailable”失败(文档ID 1581604.1)
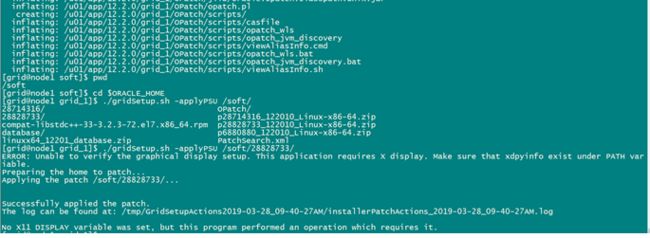
打上RU:
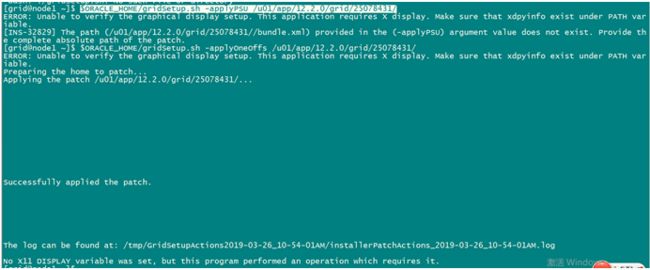
[grid@node1 grid_1]$ ./gridSetup.sh -applyPSU /soft/28828733/
ERROR: Unable to verify the graphical display setup. This application requires X display. Make sure that xdpyinfo exist under PATH variable.
Preparing the home to patch...
Applying the patch /soft/28828733/...
Successfully applied the patch.
The log can be found at:
/tmp/GridSetupActions2019-03-28_09-40-27AM/installerPatchActions_2019-03-28_09-40-27AM.log
No X11 DISPLAY variable was set, but this program performed an operation which requires it.
修改最新的grid home环境变量后,重新安装GRID软件。


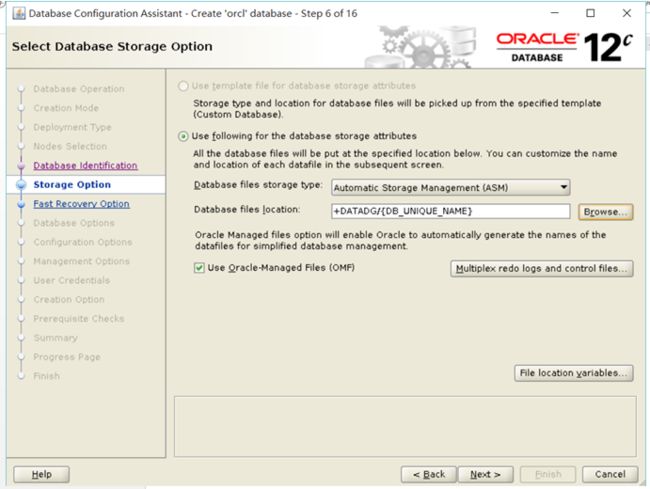
五、手工创建磁盘组


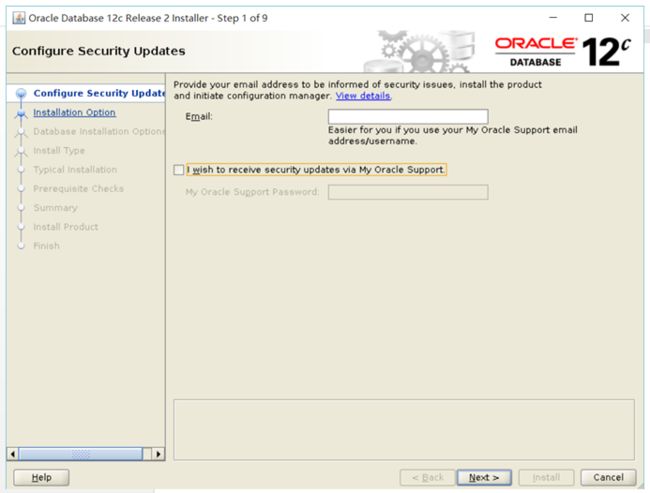
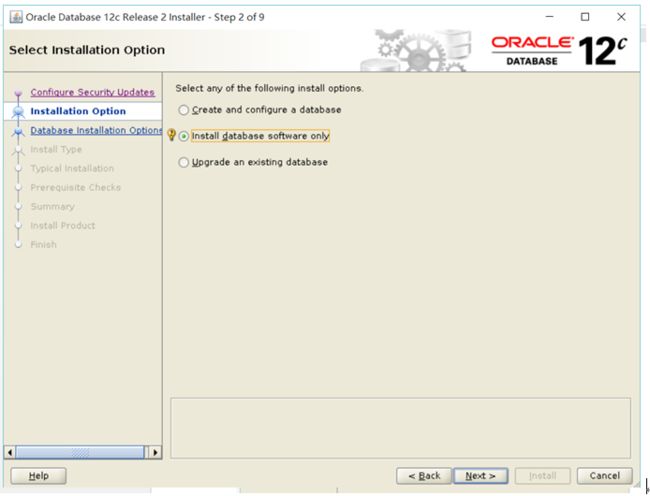
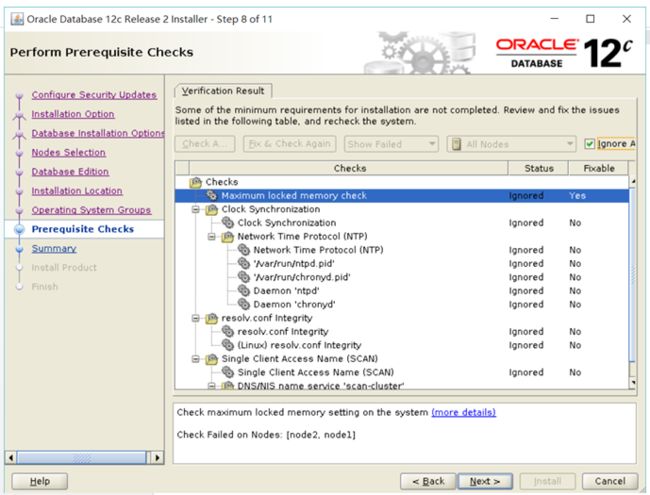
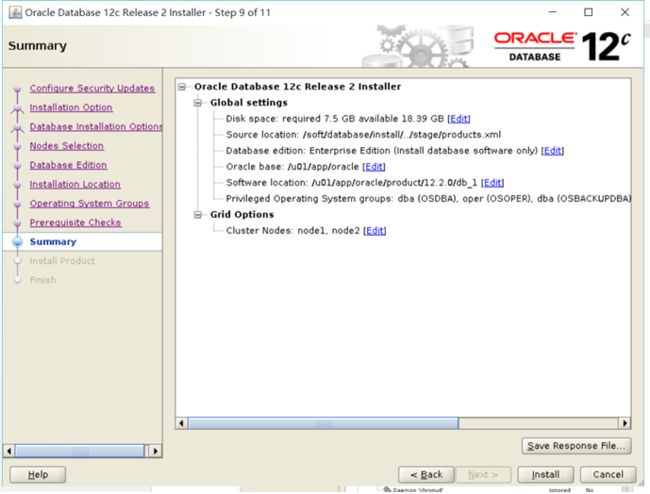
六、安装oracle软件


![]()
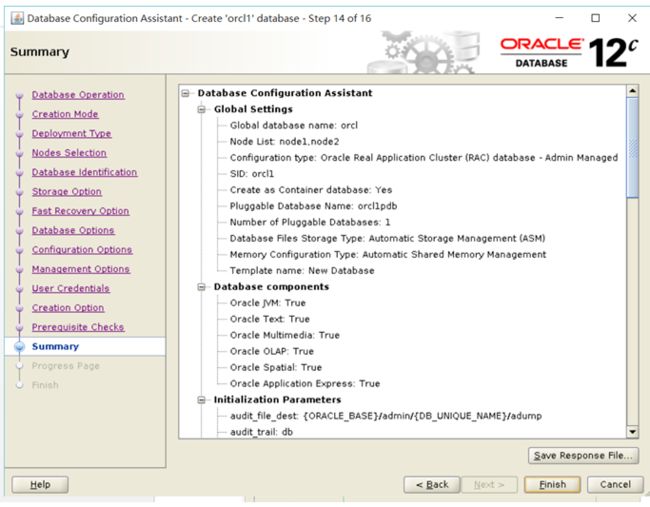
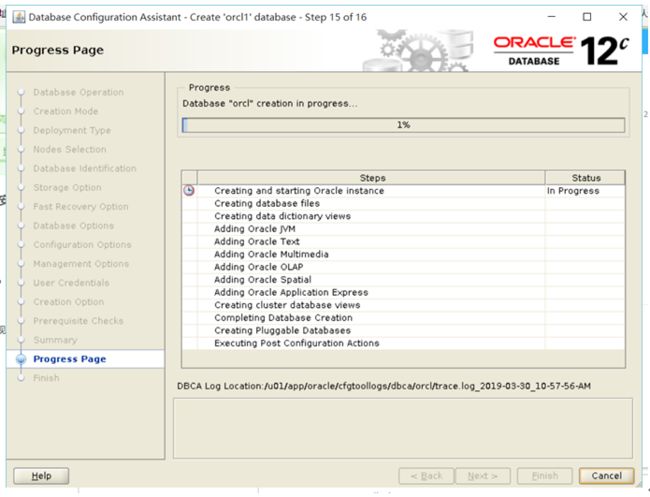
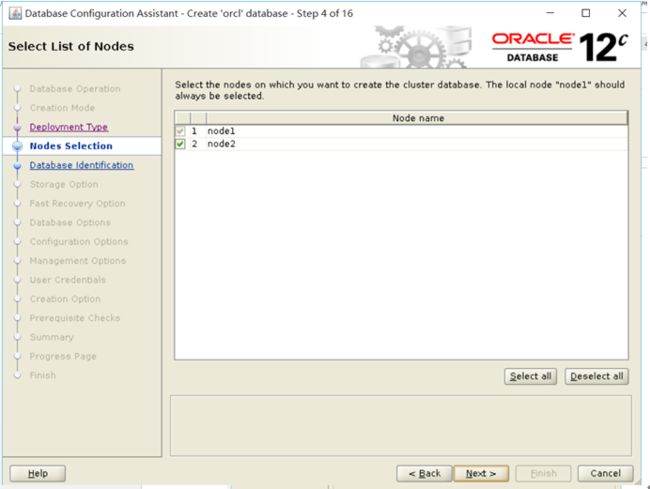
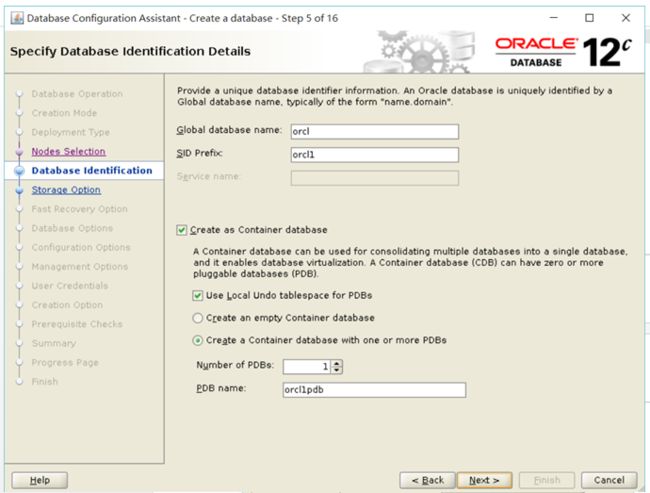
七、创建数据库


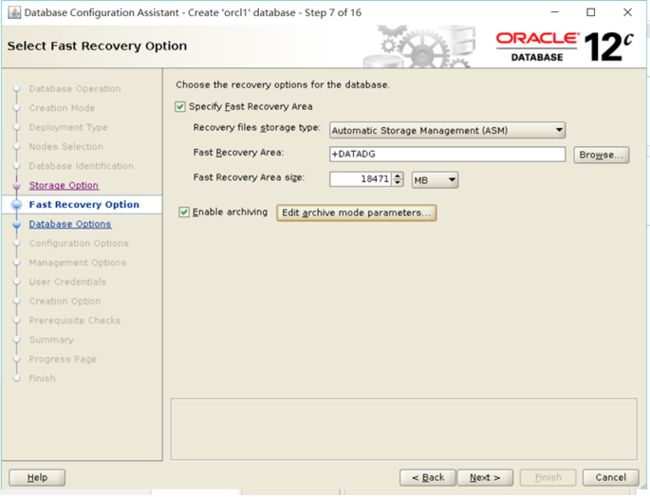
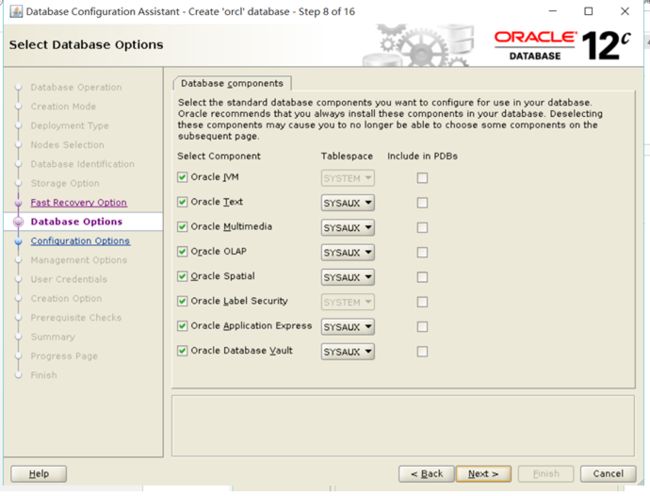

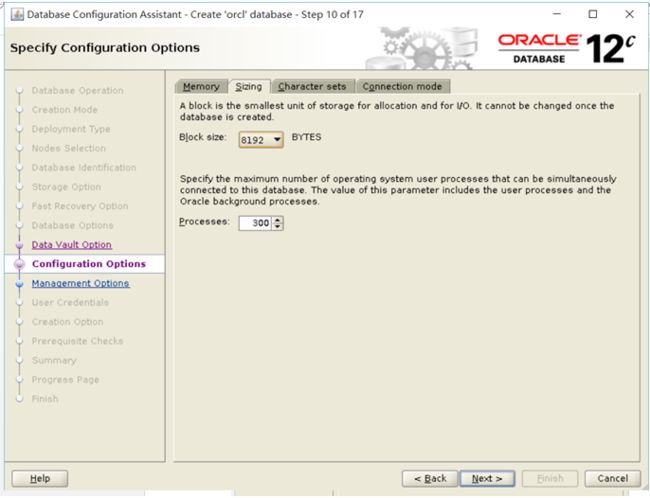
真实环境需要修改参数。