在本系列的之前博客中,我们从没有讲解过操作数据库的方法,但是在实际的工作中,几乎所有的系统都离不开数据的持久化,所以掌握操作数据库的使用方法就非常重要。
在Spring中,操作数据库有很多种方法,我们可以使用JDBC、Hibernate、MyBatis或者其他的数据持久化框架,本篇博客的重点是讲解下在Spring中如何通过JDBC操作数据库。
1. 项目构建失败解决
在讲解JDBC前,我们先解决一个问题,因为本来构建正常的程序在重新构建打包时,竟然报了如下错误:
网上查找资料后,说是依赖的版本有冲突,于是检查了pom.xml中之前添加的Spring的依赖:
    org.springframework
    spring-context
    4.3.18.RELEASE


    org.springframework
    spring-webmvc
    4.3.18.RELEASE


    org.springframework
    spring-aop
    5.1.8.RELEASE


    org.springframework
    spring-test
    4.3.18.RELEASE
    test
其中spring-aop的版本是5.1.8.RELEASE,而其余3个包的版本是4.3.18.RELEASE,将spring-aop版本也修改为4.3.18.RELEASE:
    org.springframework
    spring-aop
    4.3.18.RELEASE
此时重新构建打包,不再报错,打包成功:
不过上面的依赖还可以简化成下面这样的:
    org.springframework
    spring-webmvc
    4.3.18.RELEASE


    org.springframework
    spring-test
    4.3.18.RELEASE
    test
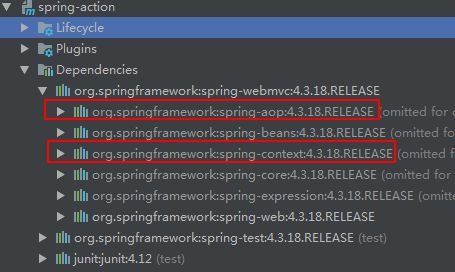
因为spring-webmvc包已经包含了spring-context和spring-aop,因此没有必要重复添加这2个依赖:
2. 配置数据源
首先执行如下语句创建MySql数据库spring_action_db:
CREATE DATABASE spring_action_db DEFAULT CHARACTER SET utf8 COLLATE utf8_general_ci;然后执行如下语句创建表book:
use spring_action_db;

create table Book
(
  book_id     bigint auto_increment comment '书籍id',
  book_name   varchar(50) not null comment '书名',
  author      varchar(50) not null comment '作者',
  create_by   varchar(20) not null comment '创建人',
  create_time datetime    not null comment '创建时间',
  modify_by   varchar(20) not null comment '修改人',
  modify_time datetime    not null comment '修改时间',
  constraint Book_pk
    primary key (book_id)
)
  comment '书籍';
准备就绪后,新建配置类配置下数据源:
package chapter10.config;

import org.apache.commons.dbcp2.BasicDataSource;
import org.springframework.context.annotation.Bean;
import org.springframework.context.annotation.ComponentScan;
import org.springframework.context.annotation.Configuration;

@Configuration
@ComponentScan("chapter10")
public class DataSourceConfig {
    @Bean
    public BasicDataSource dataSource() {
        BasicDataSource dataSource = new BasicDataSource();
        dataSource.setDriverClassName("com.mysql.jdbc.Driver");
        dataSource.setUrl("jdbc:mysql://localhost:3306/spring_action_db");
        dataSource.setUsername("root");
        dataSource.setPassword("root");

        return dataSource;
    }
}
因为我们使用的是MySql数据库,所以驱动名称设置的是:com.mysql.jdbc.Driver。
如果你使用的是其他类型的数据库,需要修改成对应的名称。
因为使用到了MySql驱动,所以我们需要在pom.xml中添加如下依赖,否则在访问数据库时会获取不到连接:
    mysql
    mysql-connector-java
    5.1.46
3. 使用原始的JDBC代码
首先,新建数据库实体类Book:
package chapter10.domain;

import java.util.Date;

public class Book {
    private Long bookId;

    private String bookName;

    private String author;

    private String createBy;

    private Date createTime;

    private String modifyBy;

    private Date modifyTime;

    public Book(String bookName, String author, String createBy) {
        this.bookName = bookName;
        this.author = author;
        this.createBy = createBy;
        this.createTime = new Date();
        this.modifyBy=createBy;
        this.modifyTime=new Date();
    }

    public Book(Long bookId, String bookName, String author, String modifyBy) {
        this.bookId = bookId;
        this.bookName = bookName;
        this.author = author;
        this.modifyBy = modifyBy;
    }

    public Book() {

    }

    // 省略get和set方法
}
然后定义数据访问接口BookRepository,暂时只添加addBook方法:
package chapter10.db;

import chapter10.domain.Book;

public interface BookRepository {
    void addBook(Book book);
}
3.1 新增数据
新建数据访问实现类JdbcBookRepository如下所示:
package chapter10.db.jdbc;

import chapter10.db.BookRepository;
import chapter10.domain.Book;
import org.springframework.beans.factory.annotation.Autowired;
import org.springframework.stereotype.Repository;

import javax.sql.DataSource;
import java.sql.Connection;
import java.sql.PreparedStatement;
import java.sql.SQLException;
import java.sql.Timestamp;
import java.util.Calendar;
import java.util.Date;

@Repository
public class JdbcBookRepository implements BookRepository {
    private static final String SQL_INSERT_BOOK =
            "INSERT INTO book(book_name, author, create_by, create_time, modify_by, modify_time) VALUES (?,?,?,?,?,?);";

    @Autowired
    private DataSource dataSource;

    @Override
    public void addBook(Book book) {
        Connection connection = null;
        PreparedStatement preparedStatement = null;

        try {
            Calendar calendar = Calendar.getInstance();
            calendar.setTime(new Date());

            connection = dataSource.getConnection();
            preparedStatement = connection.prepareStatement(SQL_INSERT_BOOK);
            preparedStatement.setString(1, book.getBookName());
            preparedStatement.setString(2, book.getAuthor());
            preparedStatement.setString(3, book.getCreateBy());
            preparedStatement.setTimestamp(4, new Timestamp(calendar.getTimeInMillis()));
            preparedStatement.setString(5, book.getModifyBy());
            preparedStatement.setTimestamp(6, new Timestamp(calendar.getTimeInMillis()));

            preparedStatement.execute();
        } catch (SQLException e) {
            // 异常处理相关代码
        } finally {
            try {
                if (preparedStatement != null) {
                    preparedStatement.close();
                }
                if (connection != null) {
                    connection.close();
                }
            } catch (SQLException e) {
                // 异常处理相关代码
            }
        }
    }
}
注意事项:该类添加了@Repository注解,以便Spring能够扫描到将其注册为bean。
值得注意的是,在这段代码中,我们竟然捕获SQLException捕获了2次,这是因为connection = dataSource.getConnection();,preparedStatement.execute();,preparedStatement.close();,connection.close();都会抛出检查型异常SQLException,所以方法中必须捕获,否则会导致编译不通过:
Connection getConnection() throws SQLException;

boolean execute() throws SQLException;

void close() throws SQLException;

void close() throws SQLException;
最后,新建单元测试类BookRepositoryTest如下所示:
package chapter10;

import chapter10.config.DataSourceConfig;
import chapter10.db.BookRepository;
import chapter10.domain.Book;
import org.junit.Test;
import org.junit.runner.RunWith;
import org.springframework.beans.factory.annotation.Autowired;
import org.springframework.test.context.ContextConfiguration;
import org.springframework.test.context.junit4.SpringJUnit4ClassRunner;

@RunWith(SpringJUnit4ClassRunner.class)
@ContextConfiguration(classes = DataSourceConfig.class)
public class BookRepositoryTest {
    @Autowired
    private BookRepository bookRepository;

    @Test
    public void testAddBook() {
        Book book = new Book("Spring实战(第4版)", "Craig Walls", "申城异乡人");

        bookRepository.addBook(book);

        book = new Book("Java EE开发的颠覆者:Spring Boot实战", "汪云飞", "申城异乡人");

        bookRepository.addBook(book);

        book = new Book("RabbitMQ实战指南", "朱忠华", "申城异乡人");

        bookRepository.addBook(book);
    }
}
运行测试方法testAddBook(),数据成功新增到数据库:
3.2 更新数据
首先,在数据访问接口BookRepository中添加更新方法:
void updateBook(Book book);然后在数据访问实现类JdbcBookRepository中实现该方法:
private static final String SQL_UPDATE_BOOK =
            "UPDATE Book SET book_name = ?,author = ?,modify_by = ?,modify_time=? WHERE book_id = ?;";

@Override
public void updateBook(Book book) {
    Connection connection = null;
    PreparedStatement preparedStatement = null;

    try {
        Calendar calendar = Calendar.getInstance();
        calendar.setTime(new Date());

        connection = dataSource.getConnection();
        preparedStatement = connection.prepareStatement(SQL_UPDATE_BOOK);
        preparedStatement.setString(1, book.getBookName());
        preparedStatement.setString(2, book.getAuthor());
        preparedStatement.setString(3, book.getModifyBy());
        preparedStatement.setTimestamp(4, new Timestamp(calendar.getTimeInMillis()));
        preparedStatement.setLong(5, book.getBookId());

        preparedStatement.execute();
    } catch (SQLException e) {
        // 异常处理相关代码
    } finally {
        try {
            if (preparedStatement != null) {
                preparedStatement.close();
            }
            if (connection != null) {
                connection.close();
            }
        } catch (SQLException e) {
            // 异常处理相关代码
        }
    }
}
是不是发现它的代码和之前的新增代码几乎是一样的,而且也不得不对检查型异常SQLException捕获了2次,有代码洁癖的人是不是忍不住想重构,哈哈。
最后,在测试类BookRepositoryTest中添加测试方法testUpdateBook,如下所示:
@Test
public void testUpdateBook() {
    Book book = new Book(1L, "Spring实战(第4版)", "Craig Walls", "zwwhnly");

    bookRepository.updateBook(book);

    book = new Book(2L, "Java EE开发的颠覆者:Spring Boot实战", "汪云飞", "zwwhnly");

    bookRepository.updateBook(book);

    book = new Book(3L, "RabbitMQ实战指南", "朱忠华", "zwwhnly");

    bookRepository.updateBook(book);
}
执行该测试方法,数据更新成功:
3.3 查找数据
首先,在数据访问接口BookRepository中添加更新方法:
Book findBook(long bookId);然后在数据访问实现类JdbcBookRepository中实现该方法:
private static final String SQL_SELECT_BOOK =
            "SELECT book_id,book_name,author,create_by,create_time,modify_by,modify_time FROM book WHERE book_id = ?;";

@Override
public Book findBook(long bookId) {
    Connection connection = null;
    PreparedStatement preparedStatement = null;

    ResultSet resultSet = null;
    Book book = null;
    try {
        connection = dataSource.getConnection();
        preparedStatement = connection.prepareStatement(SQL_SELECT_BOOK);
        preparedStatement.setLong(1, bookId);

        resultSet = preparedStatement.executeQuery();

        if (resultSet.next()) {
            book = new Book();
            book.setBookId(resultSet.getLong("book_id"));
            book.setBookName(resultSet.getString("book_name"));
            book.setAuthor(resultSet.getString("author"));
            book.setCreateBy(resultSet.getString("create_by"));
            book.setCreateTime(resultSet.getTimestamp("create_time"));
            book.setModifyBy(resultSet.getString("modify_by"));
            book.setModifyTime(resultSet.getTimestamp("modify_time"));
        }
    } catch (SQLException e) {
        // 异常处理相关代码
    } finally {
        try {
            if (resultSet != null) {
                resultSet.close();
            }
            if (preparedStatement != null) {
                preparedStatement.close();
            }
            if (connection != null) {
                connection.close();
            }
        } catch (SQLException e) {
            // 异常处理相关代码
        }
    }

    return book;
}
是不是发现它的代码和之前的新增、更新代码大部分是一样的,而且也不得不对检查型异常SQLException捕获了2次,有代码洁癖的人是不是已经开始动手重构了,哈哈。
最后,在测试类BookRepositoryTest中添加测试方法testFindBook,如下所示:
@Test
public void testFindBook() {
    Book book = bookRepository.findBook(1L);
    Assert.assertNotNull(book);
    Assert.assertEquals(book.getBookName(), "Spring实战(第4版)");
}
执行该测试方法,数据查询成功:
4. 使用JDBC模板
使用了原始的JDBC操作数据库后,好多有代码洁癖的同学都忍不住开始重构了,因为大部分代码都是样板代码,只有少部分才和业务逻辑相关,好消息是Spring已经帮我们重构过了,Spring将数据访问的样板代码抽象到模板类之中,我们可以直接使用模板类,从而简化了JDBC代码。
4.1 新增数据
首先,在配置类DataSourceConfig中添加如下配置:
@Bean
public JdbcTemplate jdbcTemplate(DataSource dataSource) {
    return new JdbcTemplate(dataSource);
}
然后将之前新建的类JdbcBookRepository上的@Repository注解移除掉。
接着,新建数据访问实现类JdbcTemplateBookRepository如下所示:
package chapter10.db.jdbc;

import chapter10.db.BookRepository;
import chapter10.domain.Book;
import org.springframework.beans.factory.annotation.Autowired;
import org.springframework.jdbc.core.JdbcOperations;
import org.springframework.stereotype.Repository;

import java.sql.Date;

@Repository
public class JdbcTemplateBookRepository implements BookRepository {
    private static final String SQL_INSERT_BOOK =
            "INSERT INTO book(book_name, author, create_by, create_time, modify_by, modify_time) VALUES (?,?,?,?,?,?);";

    @Autowired
    private JdbcOperations jdbcOperations;

    @Override
    public void addBook(Book book) {
        jdbcOperations.update(SQL_INSERT_BOOK, book.getBookName(),
                book.getAuthor(),
                book.getCreateBy(),
                new Date(System.currentTimeMillis()),
                book.getModifyBy(),
                new Date(System.currentTimeMillis()));
    }
}
注意事项:该类添加了@Repository注解,以便Spring能够扫描到将其注册为bean。
很简洁有没有,从之前的代码优化到现在的代码,有代码洁癖的同学估计开心死了。
因为之前测试类BookRepositoryTest中,我们注入的是接口,所以我们不需要修改测试类的代码,即可直接访问到新建的JdbcTemplateBookRepository类的实现方法:
@Autowired
private BookRepository bookRepository;
运行之前的测试方法testAddBook(),数据成功新增到数据库:
4.2 更新数据
在数据访问实现类JdbcTemplateBookRepository中添加如下代码:
private static final String SQL_UPDATE_BOOK =
            "UPDATE Book SET book_name = ?,author = ?,modify_by = ?,modify_time=? WHERE book_id = ?;";

@Override
public void updateBook(Book book) {
    jdbcOperations.update(SQL_UPDATE_BOOK, book.getBookName(),
            book.getAuthor(),
            book.getModifyBy(),
            new Timestamp(System.currentTimeMillis()),
            book.getBookId());
}
然后简单修改下之前的测试方法testUpdateBook():
@Test
public void testUpdateBook() {
    Book book = new Book(4L, "Spring实战(第4版)", "Craig Walls", "zwwhnly");

    bookRepository.updateBook(book);

    book = new Book(5L, "Java EE开发的颠覆者:Spring Boot实战", "汪云飞", "zwwhnly");

    bookRepository.updateBook(book);

    book = new Book(6L, "RabbitMQ实战指南", "朱忠华", "zwwhnly");

    bookRepository.updateBook(book);
}
运行之前的测试方法testUpdateBook(),数据更新成功:
4.3 查找数据
在数据访问实现类JdbcTemplateBookRepository中添加如下代码:
private static final String SQL_SELECT_BOOK =
            "SELECT book_id,book_name,author,create_by,create_time,modify_by,modify_time FROM book WHERE book_id = ?;";

@Override
public Book findBook(long bookId) {
    return jdbcOperations.queryForObject(SQL_SELECT_BOOK, new BookRowMapper(), bookId);
}

private static final class BookRowMapper implements RowMapper {

    @Override
    public Book mapRow(ResultSet resultSet, int i) throws SQLException {
        Book book = new Book();
        book.setBookId(resultSet.getLong("book_id"));
        book.setBookName(resultSet.getString("book_name"));
        book.setAuthor(resultSet.getString("author"));
        book.setCreateBy(resultSet.getString("create_by"));
        book.setCreateTime(resultSet.getTimestamp("create_time"));
        book.setModifyBy(resultSet.getString("modify_by"));
        book.setModifyTime(resultSet.getTimestamp("modify_time"));


        return book;
    }
}
运行之前的测试方法testFindBook(),数据查询成功:
5. 源码及参考
源码地址:https://github.com/zwwhnly/spring-action.git,欢迎下载。
Craig Walls 《Spring实战(第4版)》
6. 最后
欢迎扫码关注微信公众号:「申城异乡人」,定期分享Java技术干货,让我们一起进步。


