---恢复内容开始---
Mybatis入门介绍
一、MyBatis介绍
什么是MyBtis?
MyBatis 是一个简化和实现了 Java 数据持久化层(persistence layer)的开源框架,它抽象了大量的 JDBC 冗余代 码,并提供了一个简单易用的 API 和数据库交互。
MyBatis 的前身是 iBATIS,iBATIS 于 2002 年由 Clinton Begin 创建。MyBatis 3 是 iBATIS 的全新设计,支持 注解和 Mapper。
MyBatis 流行的主要原因在于它的简单性和易使用性。在 Java 应用程序中,数据持久化层涉及到的工作有:将从数据库查询到的数据生成所需要的 Java 对象;将 Java 对象中的数据通过 SQL 持久化到数据库中。
MyBatis 通过抽象底层的 JDBC 代码,自动化 SQL 结果集产生 Java 对象、Java 对象的数据持久化数据库中的过程 使得对 SQL 的使用变得容易。 如
为什么选择MyBtis?
- 最重要的就是消除了很多JDBC是冗余。
- 学习成本很低
- 他能很好的与传统数据库协同工作。
- 支持SQL语句。
- 他提供了与spring框架的集成。
- 它引入的性能较好。
二、JDAC
Java 通过 Java 数据库连接(Java DataBase Connectivity,JDBC)API 来操作关系型数据库,但是 JDBC 是一个 非常底层的 API,我们需要书写大量的代码来完成对数据库的操作。
我先从最传统是JDBC代码写起再来对比引入MyBatis后两者的比较就会显而易见了。
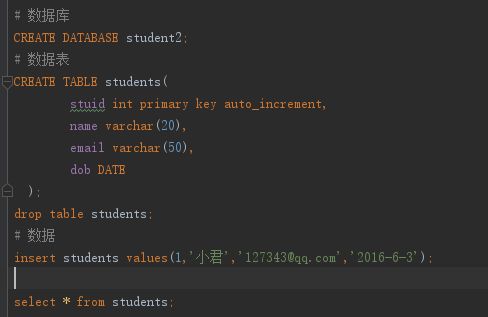
第一步:创建数据库
第二步:Student实体类
 1 package com.nf;
 2
 3 import java.sql.Date;
 4
 5 public class Student {
 6
 7     private Integer stuid;
 8     private String name;
 9     private String email;
10     private Date dob;
11
12     public Integer getStuid() {
13         return stuid;
14     }
15
16     public void setStuid(Integer stuid) {
17         this.stuid = stuid;
18     }
19
20     public String getName() {
21         return name;
22     }
23
24     public void setName(String name) {
25         this.name = name;
26     }
27
28     public String getEmail() {
29         return email;
30     }
31
32     public void setEmail(String email) {
33         this.email = email;
34     }
35
36     public Date getDob() {
37         return dob;
38     }
39
40     public void setDob(Date dob) {
41         this.dob = dob;
42     }
43
44     @Override
45     public String toString() {
46         return "Student{" +
47                 "stuid=" + stuid +
48                 ", name='" + name + '\'' +
49                 ", email='" + email + '\'' +
50                 ", dob=" + dob +
51                 '}';
52     }
53 }
第三步:创建StudentMapper接口
package com.nf;

import java.sql.SQLException;

public interface StudentDao {
    //方法
    public Student findStudentByid(int stuid) ;
}
第四步:创建StudentMapperImpl实现类
package com.nf;

import java.sql.*;

public class StudentDaoImpl implements StudentDao {

    @Override
    public Student findStudentByid(int stuid) throws  SQLException {
        Student student = null;
        Connection connection;

        //获取连接
    String jdbcurl = "jdbc:mysql://localhost:3306/student2?characterEncoding=utf8&useSSL=false&serverTimezone=UTC&rewriteBatchedStatements=true";
    connection =  DriverManager.getConnection(jdbcurl,"root","123456");

        try {
        //加载驱动
        Class.forName("com.mysql.cj.jdbc.Driver");
    } catch (ClassNotFoundException e) {
        e.printStackTrace();
    }
    //获取PreparedStatement
    PreparedStatement  pst = connection.prepareStatement("select * from students where stuid=?");
            pst.setInt(1,stuid);
    //查询获取结果
    ResultSet rs = pst.executeQuery();
    // 处理结果集
            if(rs.next()){
        student = new Student();
        student.setStuid(rs.getInt("stuid"));
        student.setName(rs.getString("name"));
        student.setEmail(rs.getString("email"));
        student.setDob(rs.getDate("dob"));
    }
            rs.close();
            pst.close();
            connection.close();
        return student;
}
获取数据:
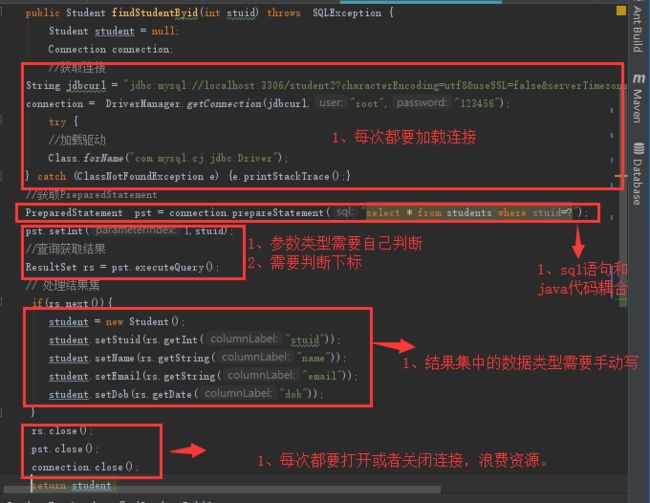
JDBC缺点分析:
上述的每个方法中有大量的重复代码:创建一个连接,创建一个 Statement 对象,设置输入参数,关闭资源(如 connection,statement,resultSet)。
三、MyBatis
我们现在使用MyBatis现实上面的代码:
3.1 添加依赖(pom.xml)
12 org.mybatis 3mybatis 43.5.2 5
3.2 全局配置文件(config.xml )
1 2 3 "http://mybatis.org/dtd/mybatis-3-config.dtd"> 4 56 7 default="mycom"> 8 9 2110 11 2012 13 14 1915 16 17 18 22 2423
3.3配置文件 StudentMapper.xml ( StudentMapper.xml )
第一步: 在 SQL Mapper 映射配置文件中配置 SQL 语句,假定为 StudentMapper.xml
查询操作:
//StudentMapper.xml <!-- mapper:根标签,namespace:命名空间,随便写,一般保证命名空间唯一 -->
<!-- statement,内容:sql语句。id:要与接口方法名相同,在同一个命名空间下保持唯一 resultType:parameter:需要返回的类型;sql语句查询结果集的封装类型,tb_user即为数据库中的表 --> //查询
3.4 测试类
 1 public class Test2 {
 2     public static void main(String[] args) throws SQLException {
 3         SqlSessionFactory factory = null;
 4         try {
 5             //指定全局配置的文件xml再读取配置文件
 6            //(这里可以比喻成一个建筑图 工程师要建房子首先要先看图纸,我们现在把config.xml看做是一张图纸)
 7             InputStream inputStream= Resources.getResourceAsStream("config.xml");
 8             // 构建sqlSessionFactory(创建一个工厂)
 9             SqlSessionFactoryBuilder builder = new SqlSessionFactoryBuilder();
10             factory = builder.build(inputStream);
11             System.out.println("1.配置的config.xml"+inputStream);
12             System.out.println("2.创建出一个工厂"+factory);
13         } catch (IOException e) {
14             e.printStackTrace();
15         }
16         // 获取sqlSession(打开工厂)
17         SqlSession sqlSession = factory.openSession();
18         System.out.println("3.session"+sqlSession);
19         //StudentMapper层(将东西放进工厂生产)
20         StudentDao studentDao = sqlSession.getMapper(StudentDao.class);
21         System.out.println("4.获得实现类的实例:"+studentDao);
22         Student student = studentDao.findStudentByid(1);
23         System.out.println(student);
24
25         sqlSession.close();
26     }
27 }
删除操作:
第一步:接口写入一个方法(findStudenrdelete()):
package com.nf;

import java.sql.SQLException;
import java.util.List;

public interface StudentDao {
//    查询
    public Student findStudentByid(int stuid) throws SQLException;
//    删除
    public boolean findStudentdelete(int stuid);
第二步: 配置文件 StudentMapper.xml
1 2 3 4 56 7 8 13 14 //查询 15 19 20 //删除 id:与接口的方法名要一致 Student的实体类 219 10 11 12 22 DELETE FROM students WHERE stuid=#{Id} 23
24
第三步:测试类(Testdelete.java)
 1 package com.nf;
 2
 3 import org.apache.ibatis.session.SqlSession;
 4 import org.apache.ibatis.session.SqlSessionFactory;
 5 import org.apache.ibatis.io.Resources;
 6 import org.apache.ibatis.session.SqlSessionFactoryBuilder;
 7
 8 import java.io.IOException;
 9 import java.io.InputStream;
10
11
12 //删除
13 public class Test4 {
14     public static void main(String[] args) {
15         SqlSessionFactory factory = null;
16         try {
17             InputStream inputStream = Resources.getResourceAsStream("config.xml");
18             SqlSessionFactoryBuilder builder = new SqlSessionFactoryBuilder();
19             factory = builder.build(inputStream);
20         } catch (IOException e) {
21             e.printStackTrace();
22         }
23         SqlSession sqlSession = factory.openSession();
24         StudentDao studentDao = sqlSession.getMapper(StudentDao.class);
25
26         boolean ok = studentDao.findStudentdelete(1);//点接口方法名
27         if(ok){
28             System.out.println("删除成功");
29         }else{
30             System.out.println("删除失败");
31         }
32         sqlSession.commit();
33     }
34 }
添加操作:
第一步:接口写入一个方法(findStudenrdelete()):
package com.nf;

import java.sql.SQLException;
import java.util.List;

public interface StudentDao {
//    查询
    public Student findStudentByid(int stuid) throws SQLException;
//    删除
    public boolean findStudentdelete(int stuid);
//    添加
    public boolean findStudentInsert(Student student);

}
第二步:第二步: 配置文件 StudentMapper.xml
1 2 3 4 56 7 8 13 14 15 19 20 219 10 11 12 22 delete from students where stuid=#{Id} 23 24 //添加 2526 INSERT INTO students(name,email,dob) value(#{name},#{email},#{dob}) 27 28
第三步:测试类(TestInsert.java)
 1 package com.nf;
 2
 3 import org.apache.ibatis.io.Resources;
 4 import org.apache.ibatis.session.SqlSession;
 5 import org.apache.ibatis.session.SqlSessionFactory;
 6 import org.apache.ibatis.session.SqlSessionFactoryBuilder;
 7
 8 import java.io.IOException;
 9 import java.io.InputStream;
10 import java.sql.Date;
11 import java.sql.SQLException;
12 import java.text.ParseException;
13 import java.text.SimpleDateFormat;
14
15 //添加
16 public class Test3 {
17     public static void main(String[] args) throws SQLException {
18         SqlSessionFactory factory = null;
19         try {
20             InputStream inputStream = Resources.getResourceAsStream("config.xml");
21             SqlSessionFactoryBuilder builder = new SqlSessionFactoryBuilder();
22             factory = builder.build(inputStream);
23             System.out.println("配置xml"+inputStream);
24             System.out.println("创建出一个工厂"+factory);
25         } catch (IOException e) {
26             e.printStackTrace();
27         }
28         SqlSession sqlSession = factory.openSession();
29         StudentDao studentDao = sqlSession.getMapper(StudentDao.class);
30         Student student = new Student();
31         //student.setStuid(4);
32         student.setName("小华");
33         student.setEmail("[email protected]");
34 //        日期转类型
35         SimpleDateFormat simpleDateFormat = new SimpleDateFormat("yyyy-MM-dd");
36         java.util.Date  date = null;
37         try {
38             date= simpleDateFormat.parse("2055-6-2");
39         } catch (ParseException e) {
40             e.printStackTrace();
41         }
42         //new java.sql.Date(date.getTime());
43         student.setDob( new java.sql.Date(date.getTime()));
44         //不严谨
45         //student.setDob(Date.valueOf("2055-6-2"));
46         boolean ok =studentDao.findStudentInsert(student);
47         if(ok){
48             System.out.println("添加成功");
49         }else{
50             System.out.println("添加失败");
51         }
52         studentDao.findStudentInsert(student);
53
54         sqlSession.commit();
55         System.out.println(student.getStuid());
56         sqlSession.close();
57     }
58 }


