Squid是什么?
Squid是Linux系统中最常用的一款开源的代理服务软件,用于实现HTTP和FTP以及DNS查询,SSL等应用的缓存代理。属于应用层的代理服务软件,squid主要提供缓存加速和应用层过滤控制的功能。
官方站点:http://www.squid-cache.org
squid可构建的代理服务:传统代理、透明代理、反向代理
代理的工作机制
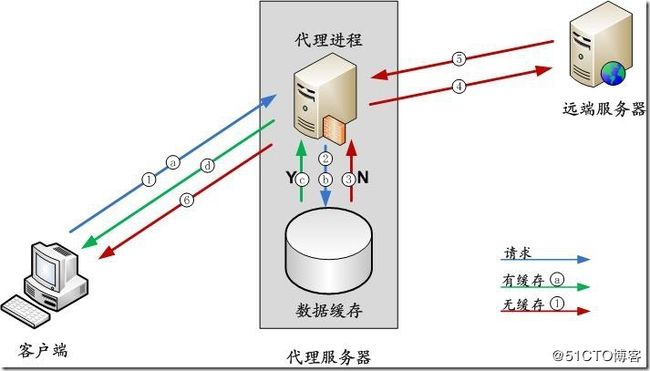
客户端通过代理来请求web页面时,指定的代理服务器首先检查自己的高速缓存,是否有客户端请求的页面
有 则直接从缓存中读取页面反馈给客户端
没有 缓存服务器向web服务端发送访问请求,将结果缓存到本地并返回给客户端,缓存对象主要是文字,图像等静态的元素
当客户机在不同的时候访问同一WEB元素,不同的客户机访问相同的WEB元素时,可以直接从代理服务器的缓存中获得结果
使用squid代理服务器有以下几点好处:
减少向web端的重复访问请求,从而减轻web服务端压力
隐藏客户端的IP地址
加快客户端访问速度
充当web端“经纪人”角色,可以针对(访问目标,客户机地址,时间段)进行过滤控制
squid代理服务器的缓存机制图解:
代理的基本类型
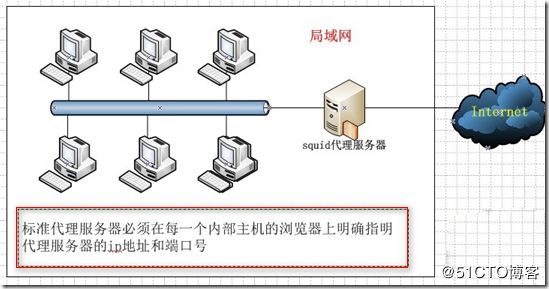
标准的传统代理缓冲服务器
一个标准的代理缓冲服务被用于缓存静态的网页(例如:html文件和图片文件等)到本地网络上的一台主机上(即代理服务器)。当被缓存的页面被第二次访问的时候,浏览器将直接从本地代理服务器那里获取请求数据而不再向原web站点请求数据。这样就节省了宝贵的网络带宽,而且提高了访问速度。但是,要想实现这种方式,必须在每一个内部主机的浏览器上明确指明代理服务器的IP地址和端口号。客户端上网时,每次都把请求送给代理服务器处理,代理服务器根据请求确定是否连接到远程web服务器获取数据。如果在本地缓冲区有目标文件,则直接将文件传给用户即可。如果没有的话则先取回文件,先在本地保存一份缓冲,然后将文件发给客户端浏览器。
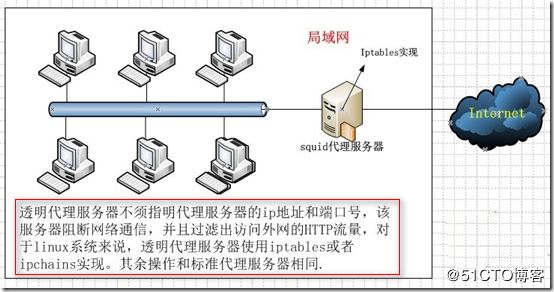
透明代理缓冲服务器
透明代理缓冲服务和标准代理服务器的功能完全相同。但是,代理操作对客户端的浏览器是透明的(即不需指明代理服务器的IP和端口)。透明代理服务器阻断网络通信,并且过滤出访问外部的HTTP(80端口)流量。如果客户端的请求在本地有缓冲则将缓冲的数据直接发给用户,如果在本地没有缓冲则向远程web服务器发出请求,其余操作和标准的代理服务器完全相同。对于Linux操作系统来说,透明代理使用Iptables或者Ipchains实现。因为不需要对浏览器作任何设置,所以,透明代理对于ISP(Internet服务器提供商)特别有用。
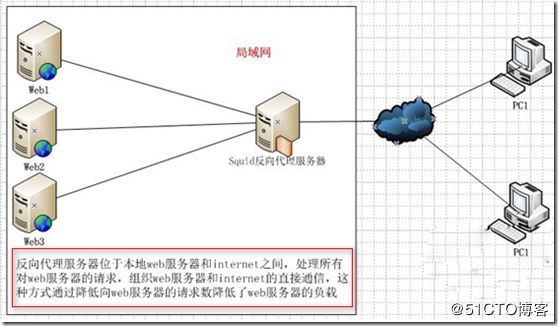
反向代理缓冲服务器
反向代理是和前两种代理完全不同的一种代理服务。使用它可以降低原始WEB服务器的负载。反向代理服务器承担了对原始WEB服务器的静态页面的请求,防止原始服务器过载。它位于本地WEB服务器和Internet之间,处理所有对WEB服务器的请求,组织了WEB服务器和Internet的直接通信。如果互联网用户请求的页面在代理服务器上有缓冲的话,代理服务器直接将缓冲内容发送给用户。如果没有缓冲则先向WEB服务器发出请求,取回数据,本地缓存后再发送给用户。这种方式通过降低了向WEB服务器的请求数从而降低了WEB服务器的负载
百度网盘免费提供软件包
squid-3.4.6.tar.gz: https://pan.baidu.com/s/114jVkk-fo9P_KwkdKH3xUg
部署传统代理缓存服务器
实验环境介绍:
服务器主机 IP地址 安装软件包 操作系统
squid代理 192.168.30.55 squid-3.4.6.tar.gz CentOS7
web服务端 192.168.30.10 yum安装httpd CentOS7
client客户端 192.168.30.20 IE浏览器用于测试 Windows7
在代理服务器上安装配置squid
将事先准备的软件包进行解压,并yum安装编译环境gcc, gcc-c++ ,make
[root@localhost ~]# tar xvf squid-3.4.6.tar.gz
[root@localhost ~]# yum -y install gcc gcc-c++ make
进行编译安装
[root@localhost ~]# cd squid-3.4.6/
[root@localhost squid-3.4.6]# ./configure --prefix=/usr/local/squid \#安装目录--sysconfdir=/etc \ #单独将配置文件修改到其他目录
--enable-arp-acl \ #在规则中设置直接通过客户端MAC进行管理,防止客户端使用IP欺骗
--enable-linux-netfilter \ #使用内核过滤
--enable-linux-tproxy \
#支持透明模式--enable-async-io=100 \ #异步I/O,提升存储性能,相当于 --enable-pthreads --enable-storeio=ufs,aufs --with-pthreads --with-aufs-thread=值
--enable-err-language="Simplify_Chinese" \
#错误信息的显示语言--enable-underscore \
#允许URL中有下划线--enable-poll \ #使用poll() 模式,提升性能
--enable-gnuregex
#使用GNU正则表达式
make &&make install
安装完成后,创建链接文件,创建运行用户和组
[root@localhost squid-3.4.6]# ln -s /usr/local/squid/sbin/* /usr/local/sbin/
[root@localhost squid-3.4.6]# useradd -M -s /sbin/nologin squid
[root@localhost squid-3.4.6]# chown -R squid.squid /usr/local/squid/var/
Squid的基本配置
squid服务的配置文件位于/etc/squid.conf,更详细的配置项可以参考/etc/squid.conf.documented文件
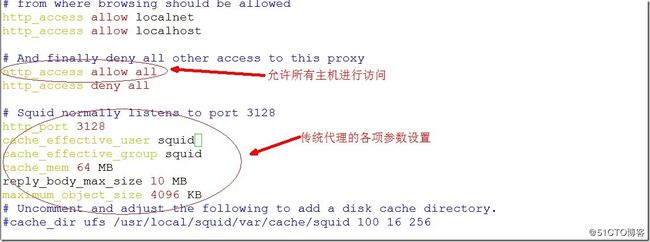
配置squid实现传统代理服务时,需要添加http_access allow all访问策略,以便允许任意客户机使用代理服务。除此之外,为限制下载文件的大小,还需要设置reply_body_max_size 项,其他各种参数均可保持默认
[root@localhost squid-3.4.6]# vim /etc/squid.conf
# from where browsing should be allowed
http_access allow localnet
http_access allow localhost# And finally deny all other access to this proxy
http_access allow all #允许任意主机使用代理服务器(注意:需要放在http_access deny all前面)
http_access deny all# Squid normally listens to port 3128
http_port 3128 #指定代理服务监听的地址和端口(默认端口 3128)
cache_effective_user squid #指定squid程序用户,用来设置初始化,运行时的缓存帐号
cache_effective_group squid #默认为cache_effective_user指定帐号的基本组
cache_mem 64 MB #指定缓存功能所使用的内存空间大小 注意格式,要有空格
reply_body_max_size 10 MB #允许用户下载的最大文件大小(10MB),默认设置0,表示不进行限制
maximum_object_size 4096 KB #允许保存到缓存空间的最大对象大小,超过大小限制的文件将不被缓存,而是直接转发给客户端
squid的运行控制
检查配置文件的语法是否正确
[root@localhost squid-3.4.6]# squid -k parse
启动,停止squid
[root@localhost squid-3.4.6]# squid -z #-z选项用来初始化缓存目录
[root@localhost squid-3.4.6]# 2018/09/23 13:07:19 kid1| Set Current Directory to /usr/local/squid/var/cache/squid
2018/09/23 13:07:19 kid1| Creating missing swap directories
2018/09/23 13:07:19 kid1| No cache_dir stores are configured.[root@localhost squid-3.4.6]# squid #启动squid服务
确认squid服务处于正常监听状态
[root@localhost squid-3.4.6]# netstat -antp | grep squid
tcp6 0 0 :::3128 :::* LISTEN 85094/(squid-1)
编写squid服务脚本,
为了使squid服务的启动,停止,重载等操作更加方便,可以编写一个squid服务脚本,并使用chkconfig和service工具来进行管理
[root@localhost squid-3.4.6]# vim /etc/init.d/squid
#!/bin/bash
#chkconfig:2345 80 35
PID="/usr/local/squid/var/run/squid.pid"
CMD="/usr/local/squid/sbin/squid"
CONF="/etc/squid.conf"
case "$1" in
start)
netstat -antp | grep squid &>/dev/null
if [ $? -eq 0 ]
then
echo "squid is running"
else
$CMD
echo "启动 squid服务"
fi
;;
stop)
$CMD -k kill &>/dev/null
rm -rf $PID
echo "停止 squid服务 "
;;
restart)
-----$0 stop &>/dev/null
echo "停止 squid服务"
$0 start &>/dev/null
echo "启动 squid服务"
;;
status)
[ -f $PID ] &>/dev/null
if [ $? -eq 0 ]
then
netstat -antp | grep squid
else
echo "squid is not running"
fi
;;
reload)
$CMD -k recongure &>/dev/null
;;
check)
$CMD -k parse
;;
*)
echo "用法: $0 start|stop|restart|status|reload|check"
;;
esac
[root@localhost ~]# chmod 755 /etc/init.d/squid #赋予服务脚本执行权限
[root@localhost ~]# chkconfig --add squid #添加为系统服务
[root@localhost ~]# chkconfig squid on #添加为开启自启项
在防火墙上添加允许策略
[root@localhost ~]# iptables -F #清空之前的规则
[root@localhost ~]# setenforce 0 #关闭selinux功能
[root@localhost ~]# iptables -I INPUT -p tcp --dport 3128 -j ACCEPT #允许3128端口的访问请求通过
重启squid服务
[root@localhost ~]# service squid restart
停止 squid服务
启动 squid服务
[root@localhost ~]# service squid status
tcp6 0 0 :::3128 :::* LISTEN 85436/(squid-1)
web服务端配置
关闭防火墙功能,关闭selinux,使用yum安装httpd服务,并启动服务
[root@localhost ~]# systemctl stop firewalld.service
[root@localhost ~]# setenforce 0
[root@localhost ~]# yum -y install httpd[root@localhost ~]# systemctl start httpd.service
[root@localhost ~]# netstat -antp | grep 80
tcp6 0 0 :::80 :::* LISTEN 48833/httpd
client客户端在浏览器上设置代理进行验证实验结果
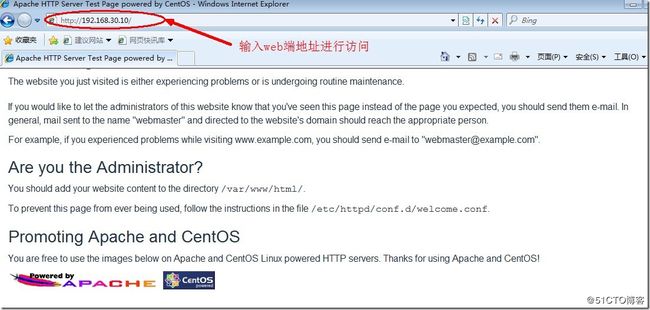
client配置代理之前访问web端,并查看web服务端的访问日志
[root@localhost ~]# head /var/log/httpd/access_log
192.168.30.20 - - [23/Sep/2018:13:44:08 +0800] "GET / HTTP/1.1" 403 4897 "-" "Mozilla/4.0 (compatible; MSIE 8.0; Windows NT 6.1; WOW64; Trident/4.0; SLCC2; .NET CLR 2.0.50727; .NET CLR 3.5.30729; .NET CLR 3.0.30729; Media Center PC 6.0; .NET4.0C; .NET4.0E)"
192.168.30.20 - - [23/Sep/2018:13:44:08 +0800] "GET /noindex/css/bootstrap.min.css HTTP/1.1" 200 19341 "http://192.168.30.10/" "Mozilla/4.0 (compatible; MSIE 8.0; Windows NT 6.1; WOW64; Trident/4.0; SLCC2; .NET CLR 2.0.50727; .NET CLR 3.5.30729; .NET CLR 3.0.30729; Media Center PC 6.0; .NET4.0C; .NET4.0E)"
192.168.30.20 - - [23/Sep/2018:13:44:08 +0800] "GET /noindex/css/open-sans.css HTTP/1.1" 200 5081 "http://192.168.30.10/" "Mozilla/4.0 (compatible; MSIE 8.0; Windows NT 6.1; WOW64; Trident/4.0; SLCC2; .NET CLR 2.0.50727; .NET CLR 3.5.30729; .NET CLR 3.0.30729; Media Center PC 6.0; .NET4.0C; .NET4.0E)"在日志记录中可以看到是client客户端192.168.30.20直接访问web服务器
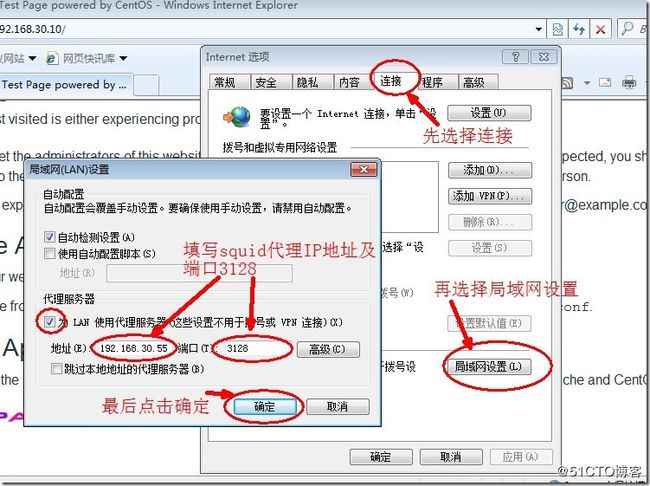
在IE浏览器中设 置代理选项:选择“工具”----》“Internet选项”,弹出“Internet选项”对话框,在该对话框中进行设置
再次刷新页面
查看squid访问日志的新增记录
在squid代理服务器中,通过跟踪squid服务的访问日志文件,应该能够发现客户端192.168.30.20访问web服务器192.168.30.10的记录
[root@localhost ~]# tail -f /usr/local/squid/var/logs/access.log #实时追踪squid代理访问日志记录
1537682774.118 2 192.168.30.20 TCP_MISS/404 524 GET http://192.168.30.10/noindex/css/fonts/LightItalic/OpenSans-LightItalic.eot? - HIER_DIRECT/192.168.30.10 text/html
1537682774.118 3 192.168.30.20 TCP_MISS/404 512 GET http://192.168.30.10/noindex/css/fonts/Light/OpenSans-Light.eot? - HIER_DIRECT/192.168.30.10 text/html
1537682774.122 5 192.168.30.20 TCP_MISS/404 516 GET http://192.168.30.10/noindex/css/fonts/Regular/OpenSans-Regular.eot? - HIER_DIRECT/192.168.30.10 text/html
查看web访问日志的新增记录
在被访问的web服务器中,通过跟踪httpd服务的访问日志文件,应该能够发现来自squid代理服务器192.168.30.55的访问记录。这说明当客户机使用代理以后,web服务器并不知道客户端的真实IP地址,因为实际上是由squid代理服务器在替它访问。
[root@localhost ~]# tail -f /var/log/httpd/access_log #实时追踪httpd服务的访问日志记录
192.168.30.55 - - [23/Sep/2018:14:06:14 +0800] "GET /noindex/css/fonts/LightItalic/OpenSans-LightItalic.eot? HTTP/1.1" 404 252 "http://192.168.30.10/" "Mozilla/4.0 (compatible; MSIE 8.0; Windows NT 6.1; WOW64; Trident/4.0; SLCC2; .NET CLR 2.0.50727; .NET CLR 3.5.30729; .NET CLR 3.0.30729; Media Center PC 6.0; .NET4.0C; .NET4.0E)"
192.168.30.55 - - [23/Sep/2018:14:06:14 +0800] "GET /noindex/css/fonts/Light/OpenSans-Light.eot? HTTP/1.1" 404 240 "http://192.168.30.10/" "Mozilla/4.0 (compatible; MSIE 8.0; Windows NT 6.1; WOW64; Trident/4.0; SLCC2; .NET CLR 2.0.50727; .NET CLR 3.5.30729; .NET CLR 3.0.30729; Media Center PC 6.0; .NET4.0C; .NET4.0E)"
192.168.30.55 - - [23/Sep/2018:14:06:14 +0800] "GET /noindex/css/fonts/Regular/OpenSans-Regular.eot? HTTP/1.1" 404 244 "http://192.168.30.10/" "Mozilla/4.0 (compatible; MSIE 8.0; Windows NT 6.1; WOW64; Trident/4.0; SLCC2; .NET CLR 2.0.50727; .NET CLR 3.5.30729; .NET CLR 3.0.30729; Media Center PC 6.0; .NET4.0C; .NET4.0E)"
当客户机再次访问同一web页面时,squid访问日志中会增加新的记录,但web访问日志中的记录不会有变化(除非页面变更或执行强制刷新等操作)。这说明当客户机重复访问同一静态页面时,实际上页面是由代理服务器通过缓存提供的。
配置透明代理服务并作为内网客户端的网关服务器
透明代理服务器的功能与传统代理是一致的,其透明功能是结合默认路由和防火墙的重定向策略实现的;
更适用于为局域网主机服务,而不适合为Internet中的客户端提供服务
透明代理实验部署
服务器主机 IP地址 安装软件包 操作系统
squid代理 ens33:192.168.30.1 squid-3.4.6.tar.gz CentOS7
ens36:12.0.0.1
web服务端 12.0.0.12 yum安装httpd CentOS7
client客户端 192.168.30.20 IE浏览器用于测试 Windows7
以刚才实验为基础进行改动
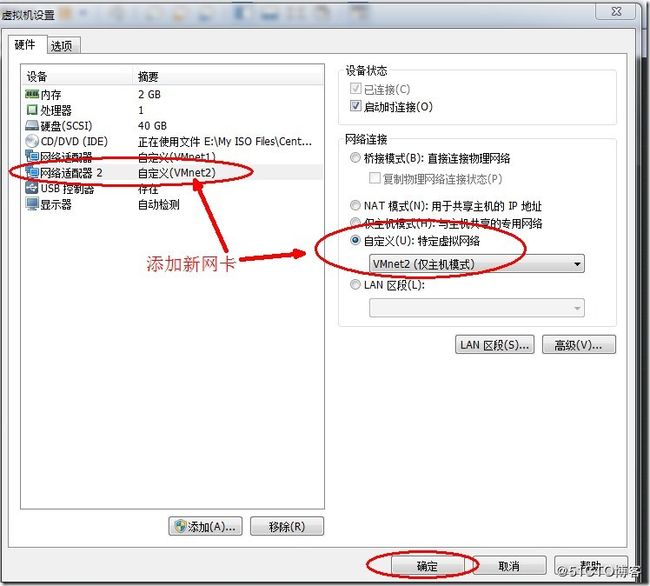
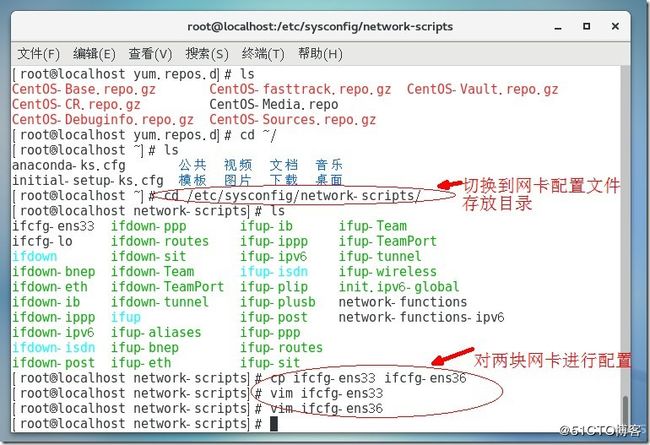
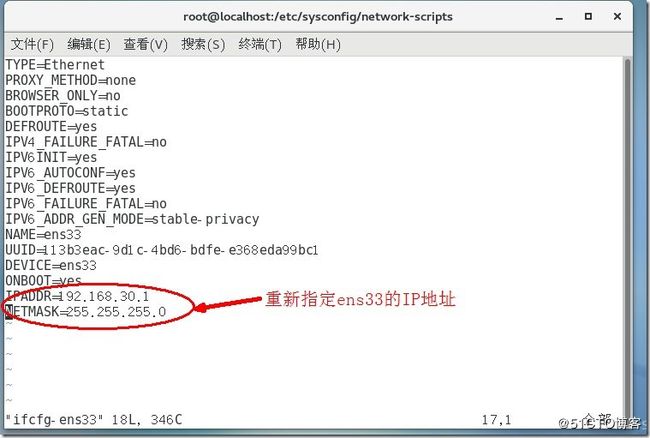
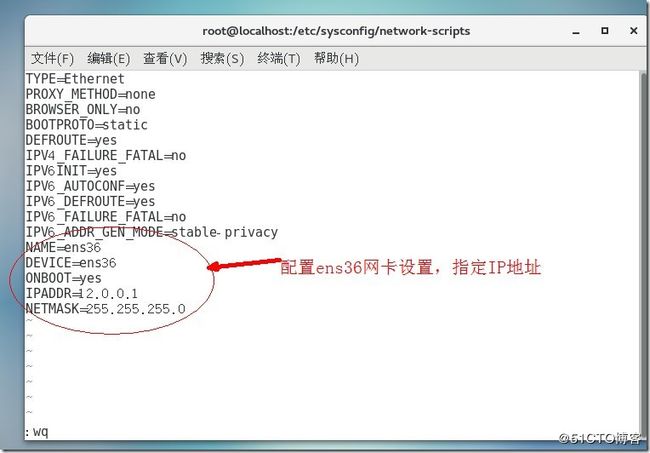
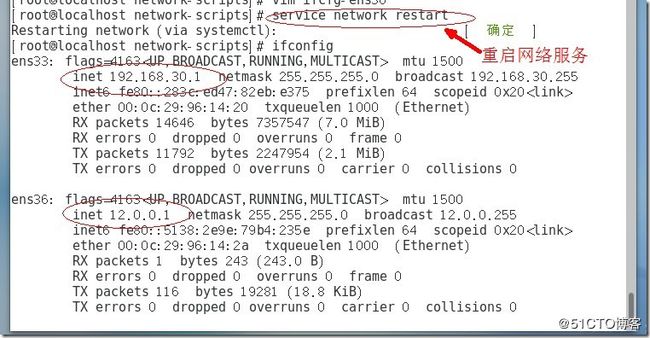
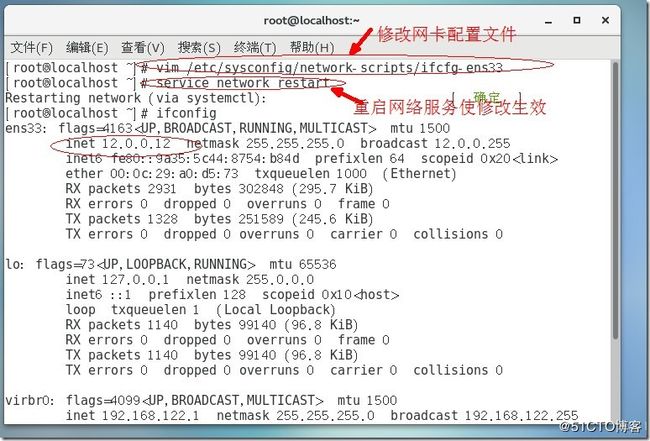
squid服务端再添加一块网卡,配置双网卡: ens33:192.168.30.1;ens36:12.0.0.1
开启路由转发功能
[root@localhost ~]# echo 1 >/proc/sys/net/ipv4/ip_forward
配置squid支持透明代理
squid服务默认配置并不支持透明代理,因此需要调整相关设置。只要将http_port配置行进行修改即可
[root@localhost ~]# vim /etc/squid.conf
http_access allow localnet
http_access allow localhost# And finally deny all other access to this proxy
http_access allow all
http_access deny all# Squid normally listens to port 3128
http_port 192.168.30.1:3128 transparent #在内网卡上提供squid代理服务
cache_effective_user squid
cache_effective_group squid
cache_mem 64 MB
reply_body_max_size 10 MB
maximum_object_size 4096 KB[root@localhost ~]# service squid restart
停止 squid服务
启动 squid服务
设置iptables的重定向(REDIRECT)策略,及本机端口重定向,将访问网站协议http,https的外发数据包交给本机的Squid服务(3128)端口
REDIRECT 重定向 ,在防火墙主机内部转发数据包(只能在nat表的PREROUTING或OUTPUT链及其他调用链中使用)结合 “--to-ports 端口号” 映射目标端口
[root@localhost ~]# iptables -F
[root@localhost ~]# iptables -t nat -F
[root@localhost ~]# iptables -I INPUT -p tcp --dport 3128 -j ACCEPT
[root@localhost ~]# iptables -t nat -I PREROUTING -i ens33 -s 192.168.30.0/24 -p tcp --dport 80 -j REDIRECT --to 3128
[root@localhost ~]# iptables -t nat -I PREROUTING -i ens33 -s 192.168.30.0/24 -p tcp --dport 443 -j REDIRECT --to 3128
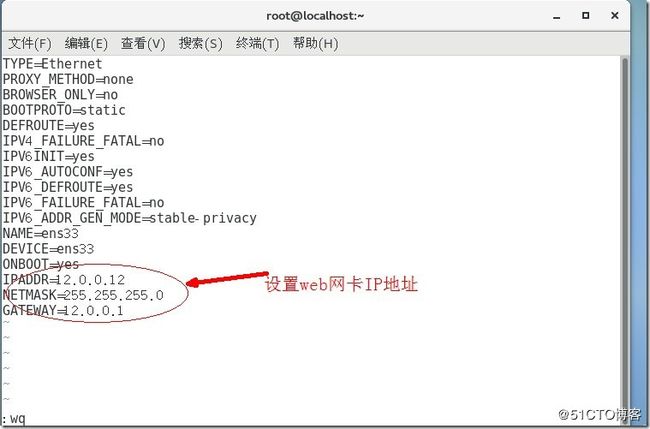
web服务端重新设置IP地址为12.0.0.12
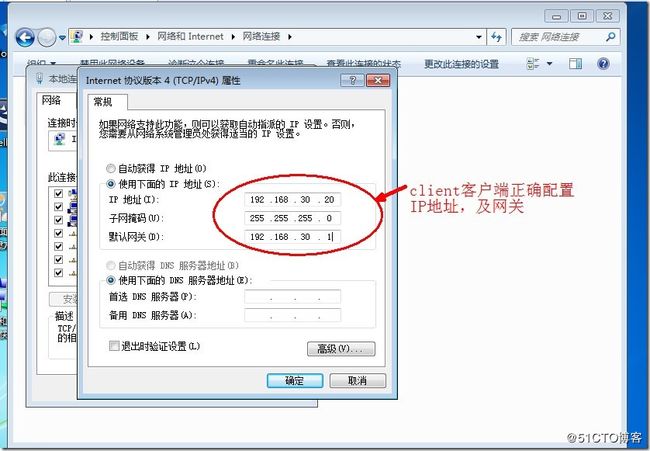
client客户端正确配置IP地址和网关,
验证透明代理的使用,
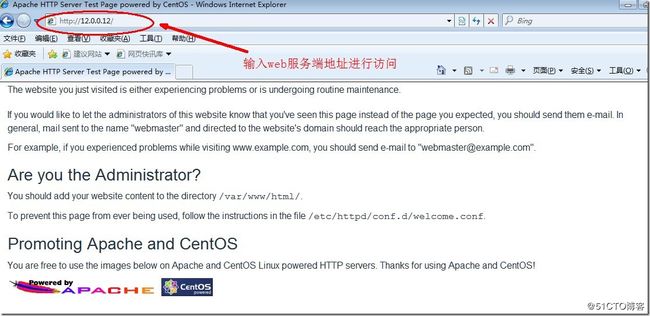
在IE浏览器上去掉刚才设置的squid代理功能,输入web地址12.0.0.12进行访问
查看squid访问日志的新增记录,可以发现客户端192.168.30.20访问web服务器12.0.0.12的记录
[root@localhost ~]# tail -f /usr/local/squid/var/logs/access.log
1537689177.708 4 192.168.30.20 TCP_MISS/404 512 GET http://12.0.0.12/noindex/css/fonts/Light/OpenSans-Light.eot? - ORIGINAL_DST/12.0.0.12 text/html
1537689177.719 8 192.168.30.20 TCP_MISS_ABORTED/404 524 GET http://12.0.0.12/noindex/css/fonts/LightItalic/OpenSans-LightItalic.eot? - ORIGINAL_DST/12.0.0.12 text/html
1537689177.720 9 192.168.30.20 TCP_MISS/404 510 GET http://12.0.0.12/noindex/css/fonts/Bold/OpenSans-Bold.eot? - ORIGINAL_DST/12.0.0.12 text/html
查看web访问日志的新增记录,应该能够发现来自squid代理服务器12.0.0.1的访问记录
[root@localhost ~]# tail -f /var/log/httpd/access_log
12.0.0.1 - - [23/Sep/2018:15:52:57 +0800] "GET /noindex/css/fonts/LightItalic/OpenSans-LightItalic.eot? HTTP/1.1" 404 252 "http://12.0.0.12/" "Mozilla/4.0 (compatible; MSIE 8.0; Windows NT 6.1; WOW64; Trident/4.0; SLCC2; .NET CLR 2.0.50727; .NET CLR 3.5.30729; .NET CLR 3.0.30729; Media Center PC 6.0; .NET4.0C; .NET4.0E)"
12.0.0.1 - - [23/Sep/2018:15:52:57 +0800] "GET /noindex/css/fonts/Bold/OpenSans-Bold.eot? HTTP/1.1" 404 238 "http://12.0.0.12/" "Mozilla/4.0 (compatible; MSIE 8.0; Windows NT 6.1; WOW64; Trident/4.0; SLCC2; .NET CLR 2.0.50727; .NET CLR 3.5.30729; .NET CLR 3.0.30729; Media Center PC 6.0; .NET4.0C; .NET4.0E)"
反向代理部署
通过squid反向代理可以加速网站的访问速度,可将不同的URL请求分发到后台不同的web服务器上,同时客户端只能看到反向代理服务器的地址,加强了网站访问的安全
实验环境介绍
服务器主机 IP地址 安装软件包 操作系统
squid代理 192.168.30.1 squid-3.4.6.tar.gz CentOS7
服务端web1 192.168.30.10 yum安装httpd CentOS7
服务端web2 192.168.30.15 系统默认自带httpd CentOS6.5
client客户端 192.168.30.20 IE浏览器用于测试 Windows7
以刚才实验为基础,首先将web1服务端网卡设置为192.168.30.10,再开启一台主机作为web2,两台都安装并开启httpd服务,
web1服务端设置
关闭防火墙功能,关闭selinux,使用yum安装httpd服务,并启动服务
[root@localhost ~]# systemctl stop firewalld.service
[root@localhost ~]# setenforce 0
[root@localhost ~]# yum -y install httpd[root@localhost ~]# systemctl start httpd.service
[root@localhost ~]# netstat -antp | grep 80
tcp6 0 0 :::80 :::* LISTEN 48833/httpd
编辑web1的首页文档(与web2页面不同,方便进行测试)
[root@localhost ~]# echo "
this is web1
" >/var/www/html/index.html
web2服务端设置
关闭防火墙功能,关闭selinux,CentOS6.5默认安装httpd服务,只需启动服务即可
[root@localhost ~]# service iptables stop
iptables:将链设置为政策 ACCEPT:filter [确定]
iptables:清除防火墙规则: [确定]
iptables:正在卸载模块: [确定]
[root@localhost ~]# setenforce 0
[root@localhost ~]# service httpd start
正在启动 httpd:httpd: Could not reliably determine the server's fully qualified domain name, using localhost.localdomain for ServerName
[确定]
[root@localhost ~]# netstat -antp | grep 80
tcp 0 0 :::80 :::* LISTEN 32365/httpd
编辑web2的首页文档
[root@localhost ~]# echo "
this is web2
" >/var/www/html/index.html
squid代理服务端配置
添加反向代理支持参数
accel :使用加速模式
[root@localhost ~]# vim /etc/squid.conf
http_port 192.168.30.1:80 accel vhost vport
cache_peer 192.168.30.15 parent 80 0 no-query originserver round-robin max_conn=30 weight=1 name=web1
cache_peer 192.168.168.10 parent 80 0 no-query originserver round-robin max_conn=30 weight=1 name=web2
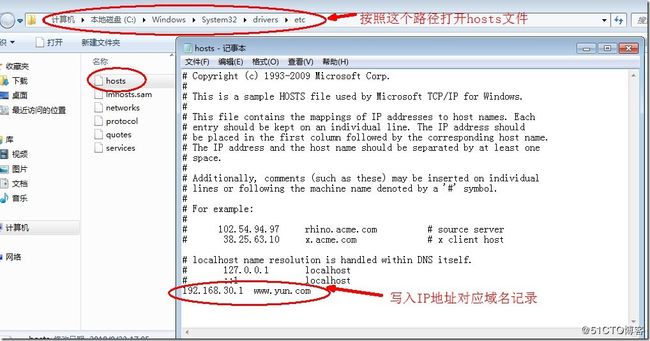
cache_peer_domain web1 web2 www.yun.com
重启squid服务,并关闭防火墙,selinux功能
[root@localhost ~]# service squid restart
停止 squid服务
启动 squid服务[root@localhost ~]# systemctl stop firewalld.service
[root@localhost ~]# setenforce 0
