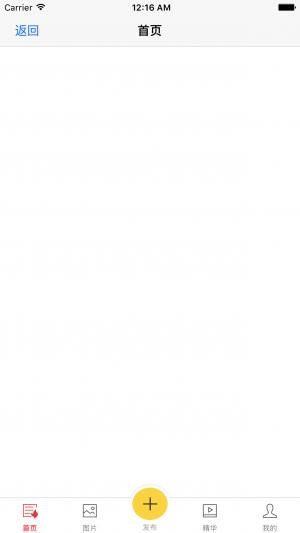
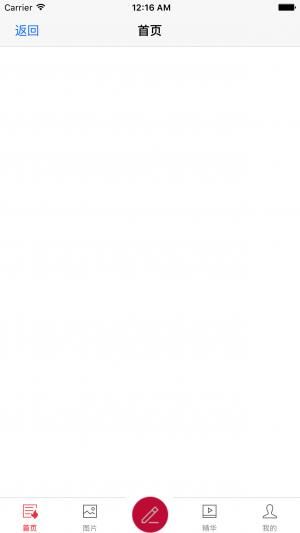
常见的三种自定义tabBar
效果图
Demo 下载地址: ZYCustomTabBar 觉得有用的话, 请给一个star
demo里面有三种自定义方式
实现思路
- UITabBarItem可以看做是一种特殊的button, 可以创建自定义的button
- 创建自定义的ZYTabBarViewController继承UITabBarController
- 创建一个继承自UITabBar的实体类ZYTabbar
- 通过按钮的点击事件,设置代理
- typeOne: 实现中间只有图片的tabBar
#pragma mark - custom method
// 初始化所有的子控制器
- (void)setupAllChildViewControllers {
    // 1.ONE
    UIViewController *one = [[UIViewController alloc] init];
    one.view.backgroundColor = [UIColor whiteColor];
    [self addChildViewController:one  title:@"首页" imageName:@"tabbar_news" selectedImageName:@"tabbar_news_hl"];

    // 2.TWO
    UIViewController *two = [[UIViewController alloc] init];
    two.view.backgroundColor = [UIColor magentaColor];
    [self addChildViewController:two title:@"图片" imageName:@"tabbar_picture" selectedImageName:@"tabbar_picture_hl"];


    if (self.tabBarType == typeOne) {
        // 2.publishButton
        UIViewController *publish = [[UIViewController alloc] init];
        publish.view.backgroundColor = [UIColor blueColor];
        two.view.backgroundColor = [UIColor magentaColor];
        [self addChildViewController:publish title:@"publish" imageName:@"tabbar_write" selectedImageName:@"tabbar_write"];
    }

    // 3.THREE
    UIViewController *three = [[UIViewController alloc] init];
    three.view.backgroundColor = [UIColor cyanColor];
    [self addChildViewController:three title:@"精华" imageName:@"tabbar_video" selectedImageName:@"tabbar_video_hl"];

    // 4.FOUR
    UIViewController *four = [[UIViewController alloc] init];
    four.view.backgroundColor = [UIColor yellowColor];
    [self addChildViewController:four title:@"我的" imageName:@"tabbar_setting" selectedImageName:@"tabbar_setting_hl"];
}
/**
 *  初始化一个子控制器
 *
 *  @param childVc           需要初始化的子控制器
 *  @param title             标题
 *  @param imageName         图标
 *  @param selectedImageName 选中的图标
 */
- (void)addChildViewController:(UIViewController *)childVc title:(NSString *)title imageName:(NSString *)imageName selectedImageName:(NSString *)selectedImageName {
    // 1.设置控制器的属性
    childVc.title = title;
    // 设置图标
    childVc.tabBarItem.image = [[UIImage imageNamed:imageName] imageWithRenderingMode:UIImageRenderingModeAlwaysOriginal];
    // 设置选中的图标
    childVc.tabBarItem.selectedImage = [[UIImage imageNamed:selectedImageName] imageWithRenderingMode:UIImageRenderingModeAlwaysOriginal];
    [childVc.tabBarItem setTitleTextAttributes:@{NSForegroundColorAttributeName:[UIColor redColor],NSFontAttributeName:[UIFont systemFontOfSize:13.f]} forState:UIControlStateSelected];

    //方式一 (self.tabBarType == typeOne) 只有图片没有文字tabbar
    if ([title isEqualToString:@"publish"]) {
        //tabBar图片居中显示,不显示文字
        childVc.title = @"";
        childVc.tabBarItem.imageInsets = UIEdgeInsetsMake(5, 0, -5, 0);
    }
    // 2.包装一个导航控制器
    ZYNavigationVc *nav = [[ZYNavigationVc alloc] initWithRootViewController:childVc];
    [self addChildViewController:nav];
}
Demo里面的三种方式是采用枚举来区分的
#import
typedef NS_ENUM(NSInteger, TabBarType) {
    typeOne = 0,
    typeTwo = 1,
    typeThree = 2
};
@interface ZYTabBarViewController : UITabBarController
@property (nonatomic, assign) TabBarType tabBarType;
@end
typeOne 需要添加的代码
if (self.tabBarType == typeOne) { UIViewController *publish = [[UIViewController alloc] init]; publish.view.backgroundColor = [UIColor blueColor]; two.view.backgroundColor = [UIColor magentaColor]; [self addChildViewController:publish title:@"publish" imageName:@"tabbar_write" selectedImageName:@"tabbar_write"]; }
//方式一 (self.tabBarType == typeOne) 只有图片没有文字tabbar if ([title isEqualToString:@"publish"]) { //tabBar图片居中显示,不显示文字 childVc.title = @""; childVc.tabBarItem.imageInsets = UIEdgeInsetsMake(5, 0, -5, 0); }
typeOne实现思路:
这是一种投机取巧的方式, 主要是把title设置为@"", 在设置图片的偏移
typeTwo实现思路:
通过自定义UITabBar
.m文件核心代码:
- (void)layoutSubviews {
    [super layoutSubviews];
    //按钮的尺寸
    CGFloat buttonW = self.frame.size.width/5.0;
    CGFloat buttonH = self.frame.size.height;

    self.publishButton.center = CGPointMake(self.frame.size.width * 0.5, buttonH * 0.5);
    //中间凸起tabBar
    if (_isCircle) {
        self.publishButton.center = CGPointMake(self.frame.size.width * 0.5, self.frame.size.height/2.0 - 20);
        self.label.center = CGPointMake(self.publishButton.center.x, CGRectGetMaxY(self.publishButton.frame)+10);
    }
    //按钮索引
    NSInteger tabbarIndex = 0;
    for (UIView * subview in self.subviews) {
        if ([subview isKindOfClass:NSClassFromString(@"UITabBarButton")]) {
            subview.frame = CGRectMake(tabbarIndex * buttonW, 0, buttonW, buttonH);
            tabbarIndex ++;
            //把中间的按钮位置预留出来
            if (tabbarIndex == 2) {
                tabbarIndex ++;
            }
        }
    }
}
- (void)publishClick {
    if ([self.ZYDelegate respondsToSelector:@selector(tabBarDidClickPlusButton)]) {
        [self.ZYDelegate tabBarDidClickPlusButton];
    }
}
在自定义的ZYTabBarViewController利用kvc替换系统的tabBar, 这里的self.tabBarType == typeTwo 就是表示第二种自定义tabBar
 ZYTabbar * tabbar = [[ZYTabbar alloc] init];
    tabbar.ZYDelegate = self;
    self.delegate = self;
    //注意:因为是系统的tabBar是readonly的,所以用KVC方法替换
    if (self.tabBarType == typeTwo) {
        [self setValue:tabbar forKey:@"tabBar"];
    }else if (self.tabBarType == typeThree) {
        tabbar.isCircle = YES;
        [self setValue:tabbar forKey:@"tabBar"];
    }
    [self setupAllChildViewControllers];
typeThree实现思路:
和typeTwo基本一致, 就是把自定义button的背景图片以及位置移动一下.并设置label的位置
代码如下:
#pragma mark -- setter
- (void)setIsCircle:(BOOL)isCircle {
    _isCircle = isCircle;
    if (isCircle) {
        [self.publishButton setBackgroundImage:[UIImage imageNamed:@"post_normal"] forState:UIControlStateNormal];
        [self.publishButton setBackgroundImage:[UIImage imageNamed:@"post_normal"] forState:UIControlStateHighlighted];
        self.publishButton.center = CGPointMake(self.frame.size.width * 0.5, self.frame.size.height/2.0 - 20);
        self.label.center = CGPointMake(self.publishButton.center.x, CGRectGetMaxY(self.publishButton.frame)+10);
        [self addSubview:self.label];
    }
}
这里在ZYTabbar声明一个isCircle主要是为了区分方式二和方式三, 并实现isCircle的setter方法, 来修改button的背景图片, 由于layoutSubviews这个方法是在isCircle的setter方法之后调用的, 所以我们还需要在layoutSubviews这个方法内部修改button, label的位置
- (void)layoutSubviews {
    [super layoutSubviews];
    //按钮的尺寸
    CGFloat buttonW = self.frame.size.width/5.0;
    CGFloat buttonH = self.frame.size.height;

    self.publishButton.center = CGPointMake(self.frame.size.width * 0.5, buttonH * 0.5);
    //中间凸起tabBar
    if (_isCircle) {
        self.publishButton.center = CGPointMake(self.frame.size.width * 0.5, self.frame.size.height/2.0 - 20);
        self.label.center = CGPointMake(self.publishButton.center.x, CGRectGetMaxY(self.publishButton.frame)+10);
    }
    //按钮索引
    NSInteger tabbarIndex = 0;
    for (UIView * subview in self.subviews) {
        if ([subview isKindOfClass:NSClassFromString(@"UITabBarButton")]) {
            subview.frame = CGRectMake(tabbarIndex * buttonW, 0, buttonW, buttonH);
            tabbarIndex ++;
            //把中间的按钮位置预留出来
            if (tabbarIndex == 2) {
                tabbarIndex ++;
            }
        }
    }
}
到这里差不多demo里面的三种自定义tabBar已经说完了.
最后说一下点击tabBar的动画效果, 代码如下:
- (void)tabBar:(UITabBar *)tabBar didSelectItem:(UITabBarItem *)item {
    NSMutableArray * tabbarArr = [NSMutableArray array];
    NSInteger index = [self.tabBar.items indexOfObject:item];

    for (UIView *subview in tabBar.subviews) {
        if ([subview isKindOfClass:NSClassFromString(@"UITabBarButton")]) {
            [tabbarArr addObject:subview];
        }
    }

    UIView * tabbarBtn = tabbarArr[index];
    for (UIView * imgV in tabbarBtn.subviews) {
        if ([imgV isKindOfClass:NSClassFromString(@"UITabBarSwappableImageView")]) {

            CABasicAnimation*pulse = [CABasicAnimation animationWithKeyPath:@"transform.scale"];
            pulse.timingFunction= [CAMediaTimingFunction functionWithName:kCAMediaTimingFunctionEaseInEaseOut];
            pulse.duration = 0.2;
            pulse.repeatCount= 1;
            pulse.autoreverses= YES;
            pulse.fromValue= [NSNumber numberWithFloat:0.7];
            pulse.toValue= [NSNumber numberWithFloat:1.3];
            [imgV.layer
             addAnimation:pulse forKey:nil];
        }
    }
}
这里主要是实现UITabBarDelegate的代理方法来实现的, 需要注意的一点就是我们不需要再声明 self.tabBar.delegate = self, 因为我已经实现了UITabBarController的代理, 具体的原因我也不是很清楚, 想了解更多的话, 还是去找度娘

