HAProxy+Varnish动静分离WordPress配置详解 version2.0
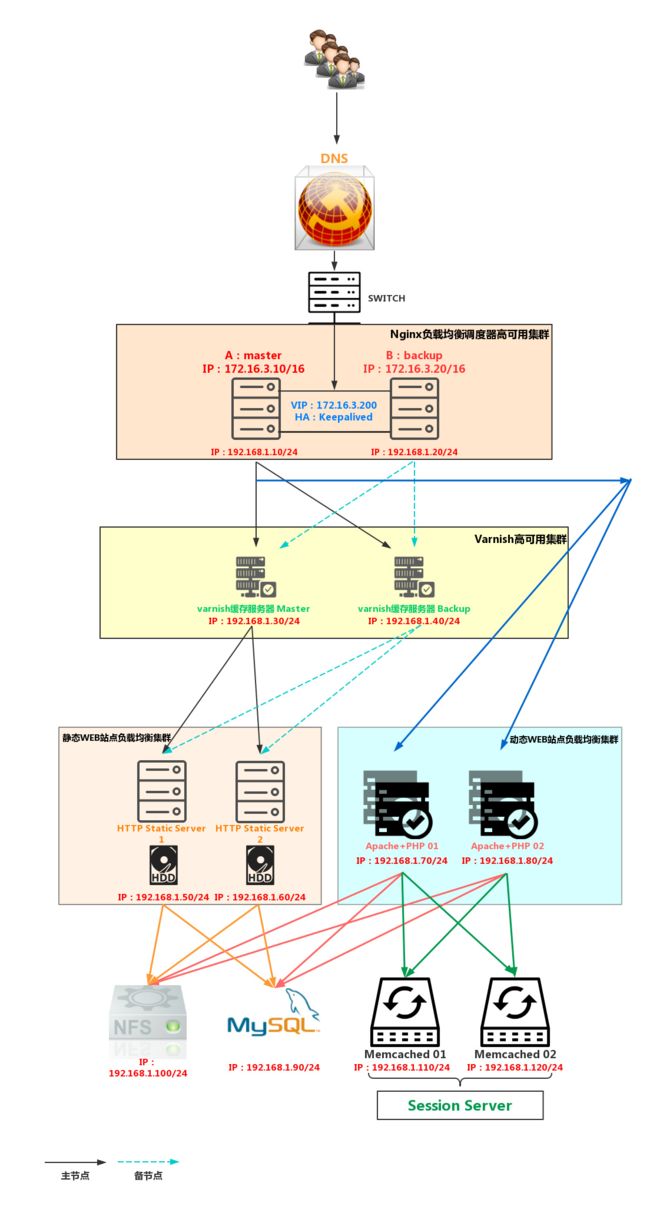
本次的实验拓扑图如下
此次的实验目标
(1) 动静分离部署wordpress,动静都要能实现负载均衡,要注意会话的问题
(2) 在haproxy和后端主机之间添加varnish进行缓存
    只缓存静态,对于动态直接调度至后端主机
(3) haproxy的设定要求:
    (a) stats page,要求仅能通过本地访问使用管理接口;
    (b) 动静分离
    (c) 分别考虑不同的服务器组的调度算法
(4) haproxy高可用(Keepalived)
实验之前所需做的准备
IP地址划分
'调度器:'
    Master:172.16.1.10/16       内网:192.168.1.10/24
    Backup:172.16.1.20/16       内网:192.168.1.20/24
    VIP:172.16.1.200/16 www.maxie.com
'varnish:'
    Master:192.168.1.30/24
    Backup:192.168.1.40/24
'静态WEB:'
    A:192.168.1.50/24
    B:192.168.1.60/24
'动态AP站点:'
    A:192.168.1.70/24
    B:192.168.1.80/24
'MySQL:'
    192.168.1.90/24
'NFS:'
    192.168.1.100/24
初始化脚本编写
#!/bin/bash
#
#hostname
hname=$1
hostnamectl set-hostname ${hname}
#yum software
ver=$2
if [ "$ver" == haproxy ];then
    iptables -F
    setenforce 0
    yum install -y -q ntp
    ntpdate 172.16.0.1
    yum install -y -q nginx keepalived haproxy
    [ $? -eq 0 ]  && echo "yum success" || echo "failed"
elif [ "$ver" == http ];then
    yum install -y httpd
    yum install -y -q nfs-utils
    iptables -F
    setenforce 0
    scp root@192.168.1.10:/etc/hosts /etc/
    echo "$hname Static Server" > /var/www/html/index.html
    mkdir -pv /var/www/html/{wordpress,discuzx}
    mount -t nfs 192.168.1.100:/data/my_wordpress /var/www/html/wordpress
    mount -t nfs 192.168.1.100:/data/my_discuzx /var/www/html/discuzx
    systemctl start httpd
elif [ "$ver" == ap ];then
    yum install -y -q nfs-utils
    yum install -y -q httpd php php-mysql php-mbstring php-mcrypt
    iptables -F
    setenforce 0
    scp root@192.168.1.10:/etc/hosts /etc/
    mkdir -pv /var/www/html/{wordpress,discuzx}
    mount -t nfs 192.168.1.100:/data/my_wordpress /var/www/html/wordpress
    mount -t nfs 192.168.1.100:/data/my_discuzx /var/www/html/discuzx
    cat > /var/www/html/index.php<
EOF
    systemctl start httpd
elif [ "$ver" == nfs ];then
    iptables -F
    setenforce 0
    yum install -y -q nfs-utils rpcbind
    scp root@192.168.1.10:/etc/hosts /etc/
    cat > /etc/exports<
检测网络是否通畅
$ ping 172.16.0.1
$ ping 192.168.1.1
配置后端的动静节点以及 NFS、MySQL节点
配置NFS以及MySQL
配置MySQL
$ yum install -y mariadb-server
$ vim /etc/my.cnf.d/server.conf
[server]
skip_name_resolve=ON
innodb_file_per_table=ON
log-bin=mysql_bin
$ systemctl start mariadb.service
$ mysql
> CREATE DATABASE wordpress_db;
> GRANT ALL PRIVILEGES ON wordpress_db.* TO 'wordpress'@'192.168.1.50' IDENTIFIED BY 'root@123';
> GRANT ALL PRIVILEGES ON wordpress_db.* TO 'wordpress'@'192.168.1.60' IDENTIFIED BY 'root@123';
> GRANT ALL PRIVILEGES ON wordpress_db.* TO 'wordpress'@'192.168.1.70' IDENTIFIED BY 'root@123';
> GRANT ALL PRIVILEGES ON wordpress_db.* TO 'wordpress'@'192.168.1.80' IDENTIFIED BY 'root@123';
> GRANT ALL PRIVILEGES ON wordpress_db.* TO 'wordpress'@'192.168.1.100' IDENTIFIED BY 'root@123';
> FLUSH PRIVILEGES;
> exit;
- 配置NFS
# 执行初始化脚本
$ bash -x init.sh nfs-server nfs
# 查看NFS是否运行并监听在2049端口上
$ ss -tnl | grep 2049
配置动静节点
# 只需检测httpd服务是否正常运行、可访问即可
$ ss -tnl
$ curl http://192.168.1.50/index.html
$ curl http://192.168.1.60/index.html
$ curl http://192.168.1.70/index.php
$ curl http://192.168.1.80/index.php
配置调度器 HAProxy + KeepAlived
配置HAProxy
# 执行初始化脚本
$ bash -x init.sh master haproxy
$ cd /etc/haproxy
$ vim haproxy.cfg
#---------------------------------------------------------------------
# main frontend which proxys to the backends
#---------------------------------------------------------------------
frontend main
# 监听在80端口
bind *:80
# 增加自定义头部
rspadd X-Via:\ HAProxy-1
# 删除头部
rspidel Server.*
# ACL规则
acl static path_end -i .html .css .js
acl static path_end -i .jpg .jpeg .gif .png
acl static path_beg -i /images /static
# 如果满足定义的static ACL规则,则调度至此后端
use_backend websrvs if static
# 默认后端
default_backend appsrvs
#---------------------------------------------------------------------
# Admin Stats
#---------------------------------------------------------------------
# 管理页面配置
listen status
# 管理页面监听端口
bind *:9909
# ACL规则
acl auth_admin src 172.16.250.15 172.16.1.11
# 开启状态页
stats enable
# 状态页URI
stats uri /myha?stats
# 状态页提示信息
stats realm HAProxy\ Admin\ Area
# 认证用户:密码
stats auth root:root@123
# 如果满足 auth_admin条件则允许访问状态页
stats admin if auth_admin
#---------------------------------------------------------------------
# WEB static backend
#---------------------------------------------------------------------
# 后端静态(varnish) Websrvs
backend websrvs
# 添加头部,日志中可以使用
option forwardfor header X-Client
# 负载均衡调度算法为 URI
balance uri
# 后端服务器,健康检查、权重、自定义cookie
server web1 192.168.1.30:80 check weight 1 cookie web1
server web2 192.168.1.40:80 check weight 1 cookie web2
# 一致性HASH
hash-type consistent
#---------------------------------------------------------------------
# ap backend
#---------------------------------------------------------------------
# 后端动态节点 appsrvs
backend appsrvs
option forwardfor header X-Client
balance uri
#balance roundrobin
server app1 192.168.1.70:80 cookie app1 check weight 1
server app2 192.168.1.80:80 cookie app2 check weight 1
hash-type consistent
$ systemctl start haproxy
$ ss -tnl | grep 80
配置keepalived
$ cd /etc/keepalived
$ vim keepalived.conf
# MASTER节点
! Configuration File for keepalived
global_defs {
notification_email {
root@localhost
}
notification_email_from KA@localhost
smtp_server 127.0.0.1
smtp_connect_timeout 30
router_id vs1
vrrp_mcast_group4 224.16.3.100
}
vrrp_instance VI_1 {
state MASTER
interface eno16777736
virtual_router_id 51
priority 100
advert_int 2
authentication {
auth_type PASS
auth_pass maxie95
}
virtual_ipaddress {
172.16.1.200/16 dev eno16777736 label eno16777736:0
}
notify_master "/etc/keepalived/notify.sh master"
notify_backup "/etc/keepalived/notify.sh backup"
notify_fault "/etc/keepalived/notify.sh fault"
}
# BACKUP节点
! Configuration File for keepalived
global_defs {
notification_email {
root@localhost
}
notification_email_from KA@localhost
smtp_server 127.0.0.1
smtp_connect_timeout 30
router_id vs2
vrrp_mcast_group4 224.16.3.100
}
vrrp_instance VI_1 {
state BACKUP
interface eno16777736
virtual_router_id 51
priority 95
advert_int 2
authentication {
auth_type PASS
auth_pass maxie95
}
virtual_ipaddress {
172.16.1.200/16 dev eno16777736 label eno16777736:0
}
notify_master "/etc/keepalived/notify.sh master"
notify_backup "/etc/keepalived/notify.sh backup"
notify_fault "/etc/keepalived/notify.sh fault"
}
# notify.sh脚本
$ vim notify.sh
#!/bin/bash
#
contact="root@localhost"
notify() {
local mailsubject="$(hostname) to be $1, VIP is folating"
local mailbody="$(date + '$F $T'): vrrp transition, $(hostname) changed to be $1"
echo "$mailbody" | mail -s "$mailsubject" $contact
}
case $1 in
master)
systemctl start nginx
notify master
;;
backup)
systemctl start nginx
notify backup
;;
fault)
notify fault
;;
*)
echo "Usage: $(basename $0) {master|backup|fault}"
exit 1
;;
esac
$ systemctl start keepalived
# 查看vip是否在MASTER节点上
$ ifconfig
配置varnish
安装
$ yum install varnish
配置varnish.params
$ cd /etc/varnish
$ vim varnish.params
# 修改监听端口为 80
VARNISH_LISTEN_PORT=80
# 管理IP地址以及端口
VARNISH_ADMIN_LISTEN_ADDRESS=127.0.0.1
VARNISH_ADMIN_LISTEN_PORT=6082
# 共享密钥文件
VARNISH_SECRET_FILE=/etc/varnish/secret
# 缓存类型,可以是磁盘,也可以是内存。这里为内存
VARNISH_STORAGE="malloc,512M"
# 运行varnish的用户以及组
VARNISH_USER=varnish
VARNISH_GROUP=varnish
# 其他自定义设置
DAEMON_OPTS="-p thread_pool_min=50 -p thread_pool_max=2000 -p thread_pool_timeout=300"
配置default.vcl
$ vim default.vcl
# new 4.0 format.
vcl 4.0;
# 导入负载均衡模块
import directors;
# Default backend definition. Set this to point to your content server.
backend default {
.host = "127.0.0.1";
.port = "8080";
}
# 配置后端主机
backend web1 {
.host = "192.168.1.50";
.port = "80";
# 配置健康状态检查
.probe = {
# 检查状态检查的URL
.url = "/index.html";
# 一共检查的次数
.window= 8;
# 如果大于4次则为健康
.threshold = 4;
# 每3秒检查一次
.interval = 3s;
# 超时时间
.timeout = 10s;
}
}
# 配置后端主机
backend web2 {
.host = "192.168.1.60";
.port = "80";
.probe = {
.url = "/index.html";
.window= 8;
.threshold = 4;
.interval = 3s;
.timeout = 10s;
}
}
# 初始化负载均衡
sub vcl_init {
# 定义负载均衡组的名字以及调度算法
new websrv = directors.round_robin();
websrv.add_backend(web1);
websrv.add_backend(web2);
}
# 定义裁剪缓存的提示信息
sub vcl_purge {
return (synth(200,"Pruge Fishished"));
}
# 定义裁剪的ACL
acl purges {
"172.16.1.11";
"172.16.250.15";
"127.0.0.0"/8;
}
# 定义接收段
sub vcl_recv {
# 如果请求方法是PURGE,也就是裁剪缓存
if (req.method == "PURGE") {
# 如果客户端IP不在我们之前定义的ACL for purges中,提示如下信息
if (client.ip !~ purges) {
return(synth(403,"Purging not allowed for" + client.ip));
}
# 反之,执行裁剪缓存
return(purge);
}
# 如果请求的URL中包括以下信息,则调度至我们的后端主机
if (req.url ~ "(?i)\.(html|css|js|jpg|jpeg|png|gif)$") {
set req.backend_hint = websrv.backend();
}
# 自定义头部
if (req.restarts == 0) {
if (req.http.X-Forwarded-For) {
set req.http.X-Forwarded-For = req.http.X-Forwarded-For + "," + client.ip;
} else {
set req.http.X-Forwarded-For = client.ip;
}
}
}
sub vcl_backend_response {
# 清除响应头部
unset beresp.http.X-Powered-By;
# 如果向后端请求URL中包含以下字段,则清除cookie
if (bereq.url ~ "\.(css|js|png|gif|jp(e?)g|swf|ico|txt|eot|svg|woff)") {
unset beresp.http.cookie;
set beresp.http.cache-control = "public, max-age=3600";
}
# 如果相应的状态码不是200或者404,则不缓存
if ( beresp.status != 200 && beresp.status != 404 ) {
set beresp.uncacheable = true;
set beresp.ttl = 120s;
return (deliver);
}
# 设置默认ttl缓存为 1小时
set beresp.ttl = 1h;
# 意思在30s 内复制旧的请求结果给客户端
set beresp.grace = 30s;
return (deliver);
}
sub vcl_deliver {
# 如果命中了则返回自定义头部,未命中则返回另一个自定义头部
if (obj.hits>0) {
set resp.http.X-Cache = "Hit Via " + server.ip;
} else {
set resp.http.X-Cache = "Miss from " + server.ip;
}
}
传送配置文件至另一台varnish
$ scp -r /etc/varnish root@192.168.1.40:/etc
$ systemctl start varnish
$ ss -tnl | grep 80
配置varnish
客户端配置hosts文件
$ sudo vim /etc/hosts
172.16.1.200 www.maxie.com
打开浏览器验证
- 验证主页

- 验证WordPress
- 验证是否可以会话保持
- 验证是否可以上传图片
 Paste_Image.png
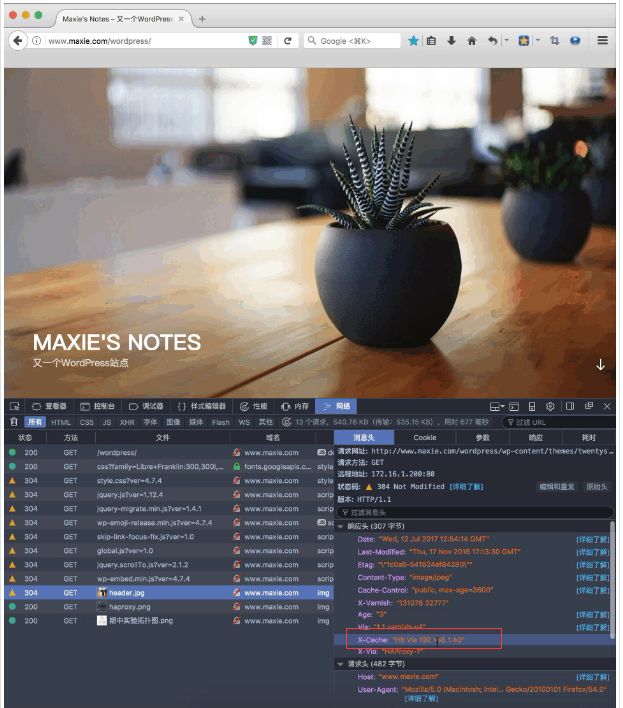
- 验证静态资源是否命中缓存
配置完毕
至此已经全部配置完毕了,如果想使用nginx作为调度器,只需将haproxy服务停掉即可
- nginx配置文件
upstream varnishsrv {
server 192.168.1.30:80;
server 192.168.1.40:80;
}
upstream appsrv {
ip_hash;
server 192.168.1.70:8080;
server 192.168.1.80:8080;
}
server {
listen 80 default_server;
listen [::]:80 default_server;
server_name _;
root /usr/share/nginx/html;
index index.php;
# Load configuration files for the default server block.
include /etc/nginx/default.d/*.conf;
location / {
proxy_pass http://varnishsrv/;
}
location /wordpress {
proxy_pass http://varnishsrv;
}
location ~* /.*\.php$ {
index index.php;
proxy_pass http://appsrv;
}
error_page 404 /404.html;
location = /40x.html {
}
error_page 500 502 503 504 /50x.html;
location = /50x.html {
}
}
不过,我这里只实现了调度,并没有实现缓存静态资源。
- 也可以将AP替换成AT,也就是Apache+Tomcat,而且可以通过memcached实现session server。不过这个实现,我们下次在实现吧
本文来源:Maxie’s Notes