前言
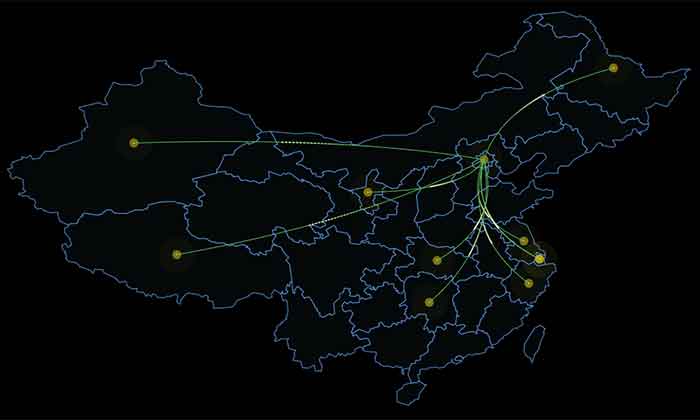
最近在做自己维护的一个可视化工具的时候,在添加基于echart的雷达图的时候,按照echart官网案例写完发现在自己项目中无法正常运行,排查了一番发现是我项目中echart的版本太低。找到问题原因之后就升级echart,但是升级echart之后发现原本正常运行的echart地图组件又无法使用,百度了一番发现echart在最新的版本中地图数据进行了切换,原先的数据由于不符合规范被砍掉,导致2.0以前的echart地图都无法正常使用了。既然出现这样的情况,那就没办法了,项目中使用的echart地图有三种类型,迁徙图、标记图和热力图。思来想去,echart最终还是要升级,所以就决定自己开发项目中需要的基于canvas的迁徙图,标记图和热力图。这篇稳重主要就阐述canvas如何实现类似于echart中的迁徙图。
原理说明
1、轨迹开始位置和结束位置之间的轨迹通过二次贝塞尔曲线quadraticCurveTo来实现,其中绘制贝塞尔曲线的控制点需要根据开始位置和结束位置来确定;
2、轨迹上运行的标记通过二次贝塞尔曲线反推获取贝塞尔曲线不同位置的x,y坐标,然后通过不断设置轨迹上点位置来实现轨迹上点;
3、轨迹上点移动和开始和结束位置动画通过requestAnimationFrame来实现,切换重回canvas的时候需要调用cancelAnimationFrame来实现。
演示示例实例效果图如下:
轨迹绘制方法
 1 function drawTravel (start,end) {
 2   var middleX = 0;
 3   var middleY = 0;
 4   var gnt1 = ctx.createLinearGradient(start.pos[0],start.pos[1],end.pos[0],end.pos[1]);
 5   gnt1.addColorStop(0,start.color);
 6   gnt1.addColorStop(1,end.color);
 7   if (start.pos[0] > end.pos[0] && start.pos[1] > end.pos[1]) {
 8      middleX = (start.pos[0] + end.pos[0]) / 2 * rate;
 9      middleY = (start.pos[1] + end.pos[1]) / 2 * (2 - rate);
10   }
11   if (start.pos[0] > end.pos[0] && start.pos[1] < end.pos[1]) {
12      middleX = (start.pos[0] + end.pos[0]) / 2 * rate;
13      middleY = (start.pos[1] + end.pos[1]) / 2 * rate;
14   }
15   if (start.pos[0] < end.pos[0] && start.pos[1] > end.pos[1]) {
16      middleX = (start.pos[0] + end.pos[0]) / 2 * (2 - rate);
17      middleY = (start.pos[1] + end.pos[1]) / 2 * (2 - rate);
18   }
19   if (start.pos[0] < end.pos[0] && start.pos[1] < end.pos[1]) {
20      middleX = (start.pos[0] + end.pos[0]) / 2 * (2 - rate);
21      middleY = (start.pos[1] + end.pos[1]) / 2 * rate;
22   }
23   ctx.strokeStyle = gnt1;
24   ctx.beginPath();
25   ctx.moveTo(start.pos[0],start.pos[1]);
26   ctx.quadraticCurveTo(middleX,middleY,end.pos[0],end.pos[1]);
27   ctx.stroke();
28   // 获取贝塞尔曲线上的点
29   for (var i = 0; i < dotNumber; i++) {
30     var _t = (t - animationDotSpeed * i * 2) >= 0 ? (t - animationDotSpeed * i * 2) : 1 + (t - animationDotSpeed * i * 2);
31     var x = Math.pow(1-_t, 2) * start.pos[0] + 2 * _t * (1-_t) * middleX + Math.pow(_t, 2) * end.pos[0];
32     var y = Math.pow(1-_t, 2) * start.pos[0] + 2 * _t * (1-_t) * middleY + Math.pow(_t, 2) * end.pos[1];
33     ctx.fillStyle = 'rgba(' + dotColor.split('(')[1].split(')')[0] + ',' + (1 - 1 / dotNumber * i) + ')'
34     ctx.beginPath();
35     ctx.arc(x,y,dotRadius,0,2*Math.PI);
36     ctx.fill();
37     ctx.closePath()
38   }
39 }
开始位置和结束位置标记绘制方法
 1 function drawCoordinate (coordinate) {
 2   ctx.fillStyle = centerColor;
 3   ctx.beginPath();
 4   ctx.arc(coordinate.pos[0], coordinate.pos[1], radiusCenter,0,2*Math.PI);
 5   ctx.closePath();
 6   ctx.fill()
 7   ctx.fillStyle = ringColor.split(',').slice(0,3).join(',') + ',0.5)';
 8   ctx.beginPath();
 9   ctx.arc(coordinate.pos[0], coordinate.pos[1], radiusCenter + 5,0,2*Math.PI);
10   ctx.closePath();
11   ctx.fill()
12   if (radiusRing >= radiusRingMax) {
13       radiusRing = radiusRingMin;
14   }
15   ctx.fillStyle = ringColor;
16   ctx.beginPath();
17   ctx.arc(coordinate.pos[0], coordinate.pos[1], radiusRing,0,2*Math.PI);
18   ctx.closePath();
19   ctx.fill()
20   radiusRing += animationSpeed;
21   ringColor = ringColor.split(',').slice(0,3).join(',') + ',' + (0.5 - (radiusRing - radiusRingMin) * 0.02) + ')';
22 }
执行canvas绘制方法
 1 function draw () {
 2   cancelAnimationFrame(requestAnimationFrameName);
 3   ctx.clearRect(0,0,width,height)
 4   array.forEach(function (item, index) {
 5     drawCoordinate(item);
 6     if (index > 0) {
 7         drawTravel(array[0],item)
 8     }
 9   })
10   if (t >= 1) {
11       t = 0;
12   }
13   t += animationDotSpeed;
14   requestAnimationFrameName = requestAnimationFrame(draw)
15 }
实例预览地址:canvas实现平面地图迁徙图
希望上述说明能够帮助到您。
