一、前言
Retrofit是一个非常优秀、非常流行的简化HTTP请求的库,有个小的不足是下载文件时,没有提供显示文件下载进度的回调,这在下载文件时无疑会影响用户体验,本文基于Retrofit+Okio+RxBus实现了带下载进度的文件下载功能。
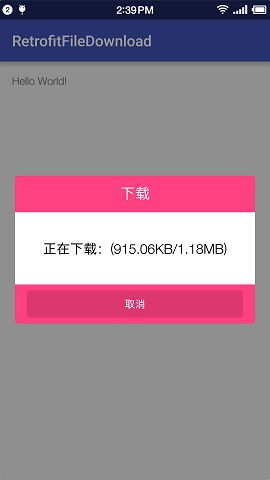
二、效果
三、实现过程
3.1 下载文件的代码
接下来我们从代码入手,分析如何使用及其实现原理。假如现在要下载 http://hengdawb-app.oss-cn-hangzhou.aliyuncs.com/app-debug.apk 对应的APK文件,对应代码如下:
        String baseUrl = "http://hengdawb-app.oss-cn-hangzhou.aliyuncs.com/";
        String fileName = "app-debug.apk";
        String fileStoreDir = Environment.getExternalStorageDirectory().getAbsolutePath() + File.separator + "M_DEFAULT_DIR";
        String fileStoreName = fileName;
        showLoadingDialog();
        FileApi.getInstance(baseUrl).loadFileByName(fileName, new FileCallback(fileStoreDir, fileStoreName) {
                    @Override
                    public void onSuccess(File file) {
                        super.onSuccess(file);
                        hDialogBuilder.dismiss();
                    }

                    @Override
                    public void progress(long progress, long total) {
                        updateProgress(progress, total);
                    }

                    @Override
                    public void onFailure(Call call, Throwable t) {
                        hDialogBuilder.dismiss();
                        call.cancel();
                    }

                });
- baseUrl:是网络请求基地址,必须以 / 结束;
- fileName:是文件名,与baseUrl组成完整的下载地址;
- fileStoreDir:是文件下载后在本地的存储目录;
- fileStoreName:是文件在本地的存储名称。
3.2 FileCallback
下载文件的代码非常简单,从上面的代码中可以看到一个叫FileCallback的类,其中有三个方法需要我们自己实现或重写,分别是onSuccess(),onFailure(),progress(),progress()方法有两个参数,progress和total,分别表示文件已下载的大小和总大小,我们只需要将这两个参数不断更新到UI上即可。FileCallback的代码如下:
package com.hengda.tailyou.retrofitfiledownload.fileload;

import java.io.File;
import java.io.FileOutputStream;
import java.io.IOException;
import java.io.InputStream;

import okhttp3.ResponseBody;
import retrofit2.Call;
import retrofit2.Callback;
import retrofit2.Response;
import rx.android.schedulers.AndroidSchedulers;
import rx.functions.Action1;
import rx.schedulers.Schedulers;
import rx.subscriptions.CompositeSubscription;

/**
 * 作者:Tailyou (祝文飞)
 * 时间:2016/4/5 08:52
 * 邮箱:[email protected]
 * 描述:Retrofit 文件下载回调
 */
public abstract class FileCallback implements Callback {

    /**
     * 订阅下载进度
     */
    private CompositeSubscription rxSubscriptions = new CompositeSubscription();
    /**
     * 目标文件存储的文件夹路径
     */
    private String destFileDir;
    /**
     * 目标文件存储的文件名
     */
    private String destFileName;

    public FileCallback(String destFileDir, String destFileName) {
        this.destFileDir = destFileDir;
        this.destFileName = destFileName;
        subscribeLoadProgress();
    }

    public void onSuccess(File file) {
        unsubscribe();
    }

    public abstract void progress(long progress, long total);

    @Override
    public void onResponse(Call call, Response response) {
        try {
            saveFile(response);
        } catch (IOException e) {
            e.printStackTrace();
        }
    }

    /**
     * 保存
     *
     * @param response
     * @return
     * @throws IOException
     */
    public File saveFile(Response response) throws IOException {
        InputStream is = null;
        byte[] buf = new byte[2048];
        int len;
        FileOutputStream fos = null;
        try {
            is = response.body().byteStream();
            File dir = new File(destFileDir);
            if (!dir.exists()) {
                dir.mkdirs();
            }
            File file = new File(dir, destFileName);
            fos = new FileOutputStream(file);
            while ((len = is.read(buf)) != -1) {
                fos.write(buf, 0, len);
            }
            fos.flush();
            onSuccess(file);
            return file;
        } finally {
            try {
                if (is != null) is.close();
            } catch (IOException e) {
            }
            try {
                if (fos != null) fos.close();
            } catch (IOException e) {
            }
        }
    }

    /**
     * 订阅文件下载进度
     */
    private void subscribeLoadProgress() {
        rxSubscriptions.add(RxBus.getDefault()
                .toObservable(FileLoadEvent.class)
                .onBackpressureBuffer()
                .subscribeOn(Schedulers.io())
                .observeOn(AndroidSchedulers.mainThread())
                .subscribe(new Action1() {
                    @Override
                    public void call(FileLoadEvent fileLoadEvent) {
                        progress(fileLoadEvent.getProgress(), fileLoadEvent.getTotal());
                    }
                }));
    }

    /**
     * 取消订阅,防止内存泄漏
     */
    private void unsubscribe() {
        if (!rxSubscriptions.isUnsubscribed()) {
            rxSubscriptions.unsubscribe();
        }
    }

}
代码比较多,跟下载进度相关的其实非常少,可以看到咱们实现的progress()方法在是在RxBus收到FileLoadEvent后才调用的,熟悉RxBus的人肯定可以想到,下载进度的实时更新是通过以下几步实现的:
- 1)RxBus发送FileLoadEvent对象;
- 2)FileLoadEvent中包含当前下载进度和文件总大小;
- 3)FileCallback订阅RxBus发送的FileLoadEvent;
- 4)根据接收到的FileLoadEvent更新下载Dialog的UI。
3.3 何时何处发送的FileLoadEvent?
使用Retrofit进行网络操作时,通常都与OKHttpClient结合使用;我们可以用OKHttpClient来设置连接超时,请求超时,网络拦截器等。这里我们也需要使用自己的OKHttpClient,在网络拦截器中使用我们自定义的ResponseBody。代码如下:
    private FileApi(String baseUrl) {
        retrofit = new Retrofit.Builder()
                .client(initOkHttpClient())
                .baseUrl(baseUrl)
                .build();
        fileService = retrofit.create(FileService.class);
    }
    /**
     * 初始化OkHttpClient
     *
     * @return
     */
    private OkHttpClient initOkHttpClient() {
        OkHttpClient.Builder builder = new OkHttpClient.Builder();
        builder.connectTimeout(DEFAULT_TIMEOUT, TimeUnit.SECONDS);
        builder.networkInterceptors().add(new Interceptor() {
            @Override
            public Response intercept(Chain chain) throws IOException {
                Response originalResponse = chain.proceed(chain.request());
                return originalResponse
                        .newBuilder()
                        .body(new FileResponseBody(originalResponse))
                        .build();
            }
        });
        return builder.build();
    }
/**
 * 作者:Tailyou (祝文飞)
 * 时间:2016/5/30 16:19
 * 邮箱:[email protected]
 * 描述:
 */
public class FileResponseBody extends ResponseBody {

    Response originalResponse;

    public FileResponseBody(Response originalResponse) {
        this.originalResponse = originalResponse;
    }

    @Override
    public MediaType contentType() {
        return originalResponse.body().contentType();
    }

    @Override
    public long contentLength() {
        return originalResponse.body().contentLength();
    }

    @Override
    public BufferedSource source() {
        return Okio.buffer(new ForwardingSource(originalResponse.body().source()) {
            long bytesReaded = 0;

            @Override
            public long read(Buffer sink, long byteCount) throws IOException {
                long bytesRead = super.read(sink, byteCount);
                bytesReaded += bytesRead == -1 ? 0 : bytesRead;
                RxBus.getDefault().post(new FileLoadEvent(contentLength(), bytesReaded));
                return bytesRead;
            }
        });
    }

}
FileResponseBody重写了source()方法,在Okio.buffer中处理下载进度相关的逻辑,也是在这个时候发送的FileLoadEvent的,到这里整个过程就差不多全了。
总结
其实整个过程并不复杂,总结起来就一下几点:
- 1)使用自定义的OKHttpClient,在自定义的FileResponseBody中发送文件下载进度;
- 2)在FileCallback中订阅FileLoadEvent;
- 3)根据FileLoadEvent中的参数,调用progress(),刷新下载UI。
