我的电脑系统是win10,内存8g如下
一开始是装的Ubuntu18.04.2LTS, gitlab-ce_12.1.3-ce.0_amd64.deb,每次能够安装成功,但是修改完ip后,运行gitlab-ctl reconfigure,就会卡死在systemctl restart gitlab-runsvdir;试了很多遍都不行,我怀疑是内存小于等于8G的问题,所以最后只能选择装Ubuntu16.04, gitlab-ce_12.0.4-ce.0_amd64.deb
GitLab 官方安装步骤地址:https://about.gitlab.com/install/
GitLab 版本选择地址:https://packages.gitlab.com/gitlab/gitlab-ce
1.首先安装依赖:
sudo apt-get update
sudo apt-get install curl openssh-server ca-certificates postfix
2.官方建议安装方法:(这个方法下载会很慢,一般很难下载成功,所以不建议使用)
curl https://packages.gitlab.com/install/repositories/gitlab/gitlab-ee/script.deb.sh | sudo bash

sudo EXTERNAL_URL="https://gitlab.example.com" apt-get install gitlab-ee
EXTERNAL_URL的地址改成本机的服务器地址,例如http://192.168.22.222:1000
3.其它安装GitLab的方法
方法1:

利用清华大学的镜像按装,速度会很快(https://mirror.tuna.tsinghua.edu.cn/help/gitlab-ce/)

信任 GitLab 的 GPG 公钥
curl https://packages.gitlab.com/gpg.key 2> /dev/null | sudo apt-key add - &>/dev/null
修改配置文件
sudo vi /etc/apt/sources.list.d/gitlab-ce.list
添加清华镜像
deb https://mirrors.tuna.tsinghua.edu.cn/gitlab-ce/ubuntu xenial main
安装 gitlab-ce
sudo apt-get update

sudo apt-get install gitlab-ce=12.0.4-ce.0
方法2:提前下载下来安装包,然后利用ssh上传到服务器上(下载地址:https://packages.gitlab.com/gitlab/gitlab-ce)

在安装包所在的目录执行下列命令,注意:把下面的gitlab版本换成你们自己的
sudo apt-get update

sudo dpkg –i gitlab-ce_12.0.4-ce.0_amd64.deb
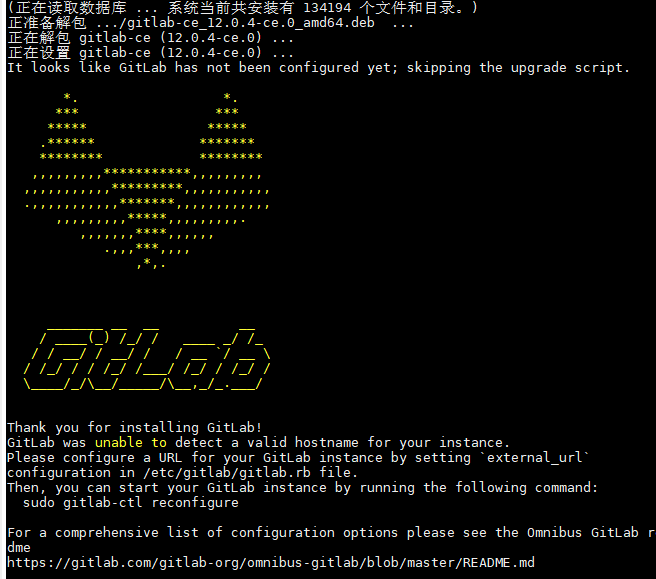
gitlab安装成功界面如下:
4.配置gitlab
执行如下命令,把文件中的external_url = 'http://git.example.com' 修改为自己的域名地址,例如:http://192.168.22.222:1000,然后保存,退出vi编辑器。
sudo vi /etc/gitlab/gitlab.rb
5.gitlab配置重新生成,运行如下命令:
sudo gitlab-ctl reconfigure
运行成功如下:
6.重启GitLab
sudo gitlab-ctl restart
7.打开在浏览器打开上面设置的external_url ,就会出现GitLab服务页面,第一次让我们设置root用户的登录密码,设置好root的登录密码,就可以用root账号登录,进行操作了。
8.汉化GitLab ,
注意:先停止gitlab,再进行汉化,停止GitLab服务命令
sudo gitlab-ctl stop
下载汉化包:https://gitlab.com/xhang/gitlab/,可以在这里直接下载安装包,然后通过ssh服务上传到Ubuntu,也可以利用下面命令直接下载
sudo wget -cO gitlab-12.0_zh.tar.gz https://gitlab.com/xhang/gitlab/repository/archive.tar.gz?ref=12-0-stable-zh
解压下载的包
sudo unzip gitlab-12-0-stable-zh.zip
查看汉化版本
cat gitlab-12-0-stable-zh/VERSION
![]()
备份gitlab
sudo cp -r /opt/gitlab/embedded/service/gitlab-rails/ /opt/gitlab/embedded/service/gitlab-rails-bak/
汉化
sudo cp -rf gitlab-12-0-stable-zh/* /opt/gitlab/embedded/service/gitlab-rails/
会报上面的错,没有关系。
最后重启配置和服务
sudo gitlab-ctl reconfigure
sudo gitlab-ctl restart
重启成功,然后访问地址,会报502错误,不用担心,请耐心等待几分钟以后,再访问就一切正常了。


