一、阿里云服务器购买
选择快捷方式购买(无需自定义)。
二、阿里云服务器连接
- 重置密码
- 安全组设置
- ssh [email protected]
三、项目部署
Nginx和uWSGI都是Web服务器,Nginx负责静态内容,uWSGI负责Python这样的动态内容,二者配合共同提供Web服务以实现提高效率和负载均衡等目的。
- 基本流程
- 基本环境(虚拟环境、数据库)
- 将项目拷贝到线上服务器
- 安装项目依赖
- 通过python manager ruserver -r -d -h '0.0.0.0' 保证项目能正常启动并访问

- 安装Nginx
- 配置Nginx
- 测试Nginx能正常使用
- Nginx对应到项目的静态目录static中

- uwsgi.ini文件的编写
- 通过uwsgi --ini uwsgi.ini启动项目,保证项目能启动并访问

- Nginx对应uwsgi
ps -ef | grep uwsgi 查看进程
pkill -9 uwsgi 杀死服务对应的进程
四、服务器基本配置
- 虚拟环境安装
# 第一步: 安装
$ pip install virtualenv
$ pip install virtualenvwrapper

# 第二步: 查看安装目录
$ type virtualenvwrapper.sh

# 第三步: 配置
$ vi ~/.bashrc
    export WORKON_HOME=~/.virtualenvs
    source /usr/local/bin/virtualenvwrapper.sh

# 第四步: 创建目录
$ mkdir ~/.virtualenvs

# 第五步: 刷新环境
$ source ~/.bashrc

# 第六步: 创建虚拟环境
$ mkvirtualenv python3 -p /usr/bin/python3.5

# 第七步: 检查是否成功(是否python3.5版本)
$ python

# 备注: ubuntu中Python2的环境默认都是全的,但是Python3的集成不够完整,有部分包是欠缺的
$ apt update
$ apt install python3-dev
- 数据库安装
# 更新
$ apt update

# 安装
$ apt install mysql-server

# 设置开机自启动
$ systemctl enable mysql.service

# 查看状态
$ systemctl status mysql.service

# 连接测试
$ mysql -uroot -p
五、Nginx简介
Nginx是一个非常轻量级的HTTP服务器, 是一个高性能的HTTP和反向代理服务器,同时也是一个IMAP/POP3/SMTP 代理服务器。
作为web服务器: 相比于Apache,Nginx使用资源更少,支持更多并发连接,体现更高的效率,能够支持高达5W个并发连接的响应;
作为负载均衡服务器: Nginx既可以在内部直接支持Redis和PHP,也可以支持作为HTTP代理服务器对外进行服务,Nginx使用C编写的,不论是系统资源开销还是CPU使用效率都处理的非常好;
中文文档资料: http://www.nginx.cn/doc/index.html
官方文档: http://nginx.org
- 安装nginx
# 安装
## key验证
$ wget http://nginx.org/keys/nginx_signing.key
$ sudo apt-key add nginx_signing.key

## 添加到 /etc/apt/sources.list 文件中
deb http://nginx.org/packages/ubuntu/ xenial nginx
deb-src http://nginx.org/packages/ubuntu/ xenial nginx

## 更新源
$ apt update

## 安装
$ apt install nginx

# 设置开机自启动
$ systemctl enable nginx.service

# 重启nginx
$ systemctl restart nginx.service

# 查看状态
$ systemctl status nginx.service

# 检查是否安装成功
浏览器中输入服务器IP地址,可以看到`Welcome to nginx!`说明安装成功!
卸载: apt remove nginx
杀死进程: pkill -9 nginx
- nginx指定配置文件启动
# 不运行,仅测试配置文件
$ nginx -t configPath

# 从指定路径加载配置文件
$ nginx -c configPath

# 测试执行配置文件
$ nginx -t -c configPath
- nginx配置文件结构
main    # 全局设置
events{     # 工作模式,连接配置
    ....
}
http{       # http的配置
    ...
    upstream xxx{...}   # 负载均衡配置
    server{             # 主机设置
        ...
        location xxx{   # URL匹配
            ...
        }
    }
}
ubuntu中默认配置文件: /etc/nginx/nginx.conf
- 2048游戏 测试配置
# 说明: 2048目录中2048.html、bind_polyfill.js、style.css

# 第一步,将2048目录拷贝到 /var/www/game/ 中
# 上传目录 [前提有对应的目录]
$ scp -r 2048html/ [email protected]:/var/www/game/


# 第二步/etc/nginx/mynginx.conf配置
user www-data;
worker_processes auto;
pid /run/nginx.pid;

events {
    worker_connections 768;
    # multi_accept on;
}

http {

    ##
    # Basic Settings
    ##

    sendfile on;
    tcp_nopush on;
    tcp_nodelay on;
    keepalive_timeout 65;
    types_hash_max_size 2048;
    # server_tokens off;

    # server_names_hash_bucket_size 64;
    # server_name_in_redirect off;

    include /etc/nginx/mime.types;
    default_type application/octet-stream;

    ##
    # SSL Settings
    ##

    ssl_protocols TLSv1 TLSv1.1 TLSv1.2; # Dropping SSLv3, ref: POODLE
    ssl_prefer_server_ciphers on;

    ##
    # Logging Settings
    ##

    access_log /var/log/nginx/access.log;
    error_log /var/log/nginx/error.log;

    ##
    # Gzip Settings
    ##

    gzip on;
    gzip_disable "msie6";

    # gzip_vary on;
    # gzip_proxied any;
    # gzip_comp_level 6;
    # gzip_buffers 16 8k;
    # gzip_http_version 1.1;
    # gzip_types text/plain text/css application/json application/javascript text/xml application/xml application/xml+rss text/javascript;

    ##
    # Virtual Host Configs
    ##

    #设定虚拟主机配置
    server {
        #监听80端口
        listen 80;
        listen [::]:80 ipv6only=on default_server;

        #服务器IP
        server_name 112.74.55.3;

        #默认请求
        location /2048 {
            #别名
            alias /var/www/game/2048/;
        }
    }


    #include /etc/nginx/conf.d/*.conf;
    #include /etc/nginx/sites-enabled/*;
}

# 第三步,指定配置文件启动
nginx -t -c mynginx.conf

# 第四步,浏览器中访问
http://112.74.55.3/2048/2048.html
注意: 此处配置确保nginx能正常运行并访问!
六、Django项目基本配置
- 项目基本配置
- 关闭调试模式 settings.py
    DEBUG = False

- 开启访问权限 settings.py
    ALLOWED_HOSTS = ['*']

- 数据库配置 settings.py
  mysql配置,配置服务器对应数据库。要注意先创建创建对应的数据库;

- 上传项目
    $ scp -r axf [email protected]:/var/www

- 安装依赖
    # 切换到项目目录中
    $ pip install -r requirements.txt

- 执行迁移操作,生成对应的表单
  $ python manage.py migrate

- 启动项目
    $ python manage.py runserver 0.0.0.0:8000

- 浏览器(此时静态文件是访问不了的)
    112.74.55.3:8000/axf/
确保项目是能够正常启动的,后续再对接nginx!
- 项目静态文件配置(对接nginx)
- myniginx.conf配置(对应项目static的目录位置)
    #静态文件配置
    location /static {
        #别名
        alias /var/www/Python1807AXF/static/;
    }

- 关闭nginx
    pkill -9 nginx

- 对应配置文件启动
    nginx -c mynginx.conf

- 浏览器访问静态文件(确保能够访问项目的静态文件)
    http://112.74.55.3/static/base/css/reset.css
七、配置pycharm(项目同步)
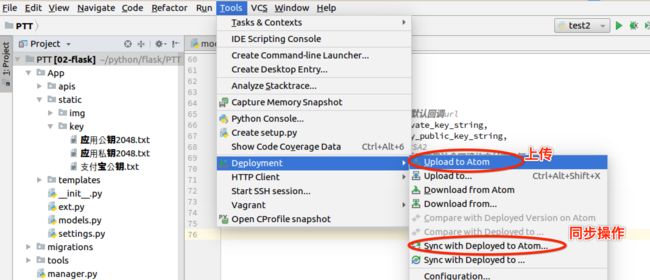
将开发环境和项目同步到服务器上,在pycharm中集成了项目部署相关的工具。
- 配置服务器信息
Toos > Deployment > configuration > +(添加) > 选择STPF

Connection中的配置:
    STPF host: 服务器IP
    Port: 端口号(默认就22)
    User name: 服务器用户名
    Password: 服务器密码

Mappings中的配置:
    Local path: 本地项目路径
    Deloyment path on server 'xxx': /var/www (需要自己手动添加)
-
相关操作
八、uWSGI
web服务器,支持多线程。在生产环境中使用WSGI作为python web的服务器。Python Web服务器网关接口,是Python应用程序或框架和Web服务器之间的一种接口,被广泛接受。
uWSGI旨在为部署分布式集群的网络应用开发一套完整的解决方案。
uWSGI是一个web服务器,实现了WSGI协议,uwsgi协议,http协议等。
- uWSGI基本使用
- 安装(安装在虚拟环境中!!!)
    $ pip install uwsgi

- 项目目录中 添加 uwsgi.ini文件
    # 即是在axf目录中添加
    touch uwsgi.ini

- 配置uwsgi.ini文件(测试: 直接使用uwsgi,而不对接nginx)
    # uwsgi基本使用没问题,再对接上nginx,即打开socket,关闭http
    [uwsgi]
    # 使用nginx连接时 使用
    #socket=0.0.0.0:8000
    # 直接作为web服务器使用
    http=0.0.0.0:8010
    # 配置工程目录
    chdir=/var/www/axf/Python1807AXF
    # 配置项目的wsgi目录。相对于工程目录
    wsgi-file=Python1807AXF/wsgi.py

    #配置进程,线程信息
    processes=1
    threads=1
    enable-threads=True
    master=True
    pidfile=uwsgi.pid
    daemonize=uwsgi.log

- 使用
    # 启动
    $ uwsgi --ini uwsgi.ini
    # 停止
    $ uwsgi --stop uwsgi.ini

# 访问测试(确保uswgi能够启动项目)
    http://112.74.55.3:8010/axf/
查看进程: ps -ef | grep uwsgi
关闭对应服务: pkill -9 uwsgi
九、uWSGI与Nginx对接
Nginx和uWSGI都是Web服务器,Nginx负责静态内容,uWSGI负责Python这样的动态内容,二者配合共同提供Web服务以实现提高效率和负载均衡等目的。
- uwsgi对接nginx
- uwsig.ini文件
    [uwsgi]
    # 使用nginx连接时 使用
    socket=0.0.0.0:8000
    # 直接作为web服务器使用
    #http=127.0.0.1:8010
    # 配置工程目录
    chdir=/var/www/axf/PythonAXF
    # 配置项目的wsgi目录。相对于工程目录
    wsgi-file=PythonAXF/wsgi.py

    #配置进程,线程信息
    processes=1
    threads=1
    enable-threads=True
    master=True
    pidfile=uwsgi.pid
    daemonize=uwsgi.log

- mynginx.conf配置文件
    #默认请求
    location / {
        #导入了uwsgi的配置
        include /etc/nginx/uwsgi_params;
        #设定了uwsig服务器位置
        uwsgi_pass 127.0.0.1:8000;
    }
    location /2048 {
        #别名
        alias /var/www/game/2048/;
    }
    #静态文件
    location /static{
        alias /var/www/axf/Python1807AXF/static/;
    }

- 浏览器访问
    http://112.74.55.3/axf/
十、Nginx与runserver对接
通过runserver启动项目,有对应的调试信息,方便调试。但有些需要部署到外网才能进行操作的(如:支付宝、微信),重要的是通过Nginx反向代理,就可以屏蔽掉端口号。
# Nginx配置
location / {
    # 方向代理转发地址
    proxy_pass http://127.0.0.1:8000
}

# 启动Nginx之后,用runserver启动项目!
十一、Nginx与gunicorn对接
# 安装gunicorn
$ pip install gunicorn

# 启动Django项目 (指定uwsgi文件, AXF/uwsgi.py)
$ gunicorn AXF.uwsgi

# Nginx配置和上述配置一样
十二、负载均衡
一台Nginx服务器可以处理5W的并发数量,但假如有10W,20W并发如何解决?负载均衡。
负载均衡模块,通过一个调度算法来实现客户IP到后台服务器的负载平衡。
# 负载均衡模块
upstream atom_server{
    ip_hash;
    server 10.112.13.45:8000;
    server 12.33.243.2:8000;
    server 183.21.78.89:8000 down;
    server 19.2.34.27:8000 weight=3;
    server 17.12.12.89:8000 backup;
    fair;
}

location / {
    proxy_pass http://atom_server;
}

# weight 负载权重
# down 当前server不参数负载均衡
# backup 当其他机器全挂了或满负荷时使用此服务
# ip_hash 按每个请求的hash结果分配
# fair 按后台响应时间分(第三方)
十三、其他
- Linux中文件传输
# 上传目录
scp -r ./atom  用户名@IP:/home/

# 上传文件
scp ./atom  用户名@IP:/home/
- uwsgi错误1
启动uwsgi时,错误: 提示没有 'uwsgi_params'

#默认请求
    location / {
        #导入了uwsgi的配置
        include /etc/nginx/uwsgi_params;
        #设定了uwsig服务器位置
        uwsgi_pass 127.0.0.1:8000;
    }
    location /2048 {
        #别名
        alias /var/www/game/2048/;
    }
    location /static{
        alias /var/www/axf/Python1807AXF/static/;
    }
比较常见的是uwsgi_params缺少问,这可以直接指定包含路径!
- uwsgi错误2
问题描述:
    uwsgi --ini uwsgi.ini 启动项目
    但浏览器访问时,显示服务器内部错误

问题分析:
    查看运行日志: uwsgi.log
    Traceback (most recent call last):
    File "Python1807AXF/wsgi.py", line 12, in
    from django.core.wsgi import get_wsgi_application
ImportError: No module named django.core.wsgi
unable to load app 0 (mountpoint='') (callable not found or import error)

    项目运行环境是在虚拟环境中,而uwsgi并没安装到虚拟环境导致的!
    通过whereis uwsgi可以查看到!

解决:
    方式一: 卸载掉uwsgi,在虚拟环境中重新安装uwsgi即可
    方式二: 虚拟环境安装uwsgi,并直接使用虚拟环境中的uwsgi启动uwsgi.ini文件
该问题是最最常见,最最容易出问题的!!!
