虚拟主机
有三种实现方案:
基于ip:为每个虚拟主机准备至少一个ip地址
基于port:为每个虚拟主机使用至少一个独立的port
基于FQDN:为每个虚拟主机使用至少一个FQDN
注意:一般虚拟机不要与main主机混用;因此,要使用虚拟主机,一般先禁用main主机
禁用方法:注释中心主机的DocumentRoot指令即可
说明:当有虚拟主机的时候,默认站点是虚拟主机的第一个站点
基于FQDN的方式是根据http报文首部来确定客户端访问的是哪个站点
虚拟主机的配置方法:
ServerName FQDN 当基于RQSN的时候这一项才起作用
DocumentRoot “/path"
建议:上述配置存放在独立的配置文件中
其它可用指令:
ServerAlias:虚拟主机的别名;可多次使用
ErrorLog: 错误日志
CustomLog:访问日志
如下实验每次修改完httpd配置文件之后都需要service httpd reload重新加载文件
centos6:
一、基于IP的虚拟主机示例
前提是准备多个ip,并且每个ip对应一个站点,方便测试
ip addr add 192.168.119.10/24 dev eth0
ip addr add 192.168.119.20/24 dev eth0
ip addr add 192.168.119.30/24 dev eth0
mkdir /app/site1 /app/site2 /app/site3
echo /app/site1/index.html > /app/site1/index.html
echo /app/site2/index.html > /app/site2/index.html
echo /app/site3/index.html > /app/site3/index.html
vim /etc/httpd/conf.d/test.conf
DocumentRoot "/app/site1"
DocumentRoot "/app/site2"
DocumentRoot "/app/site3"
测试: curl http://192.168.119.10
curl http://192.168.119.20
curl http://192.168.119.30
但是使用ip访问不现实,所以在客户端模拟出dns,然后使用域名来访问
vim /etc/hosts 添加三行
192.168.119.10 www.a.com
192.168.119.20 www.b.com
192.168.119.30 www.c.com
测试:
curl http://www.a.com
curl http://www.b.com
curl http://www.c.com
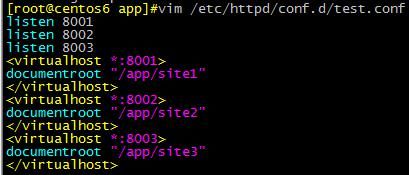
二、基于端口的虚拟主机(可和基于IP的虚拟主机混和使用)
vim /etc/httpd/conf.d/test.conf
listen 8001
listen 8002
listen 8003
DocumentRoot "/app/site1"
DocumentRoot "/app/site2"
DocumentRoot "/app/site3"
测试:
curl http://192.168.119.129:8001
curl http://192.168.119.129:8002
curl http://192.168.119.129:8003
同样可以模拟dns使用域名访问而不需要输入ip
vim /etc/hosts
192.168.119.129 www.a.com www.b.com www.c.com
测试:
curl http://www.a.com:8001
curl http://www.b.com:8002
curl http://www.c.com:8003
三、基于FQDN的虚拟主机:
准备条件:在客户端模拟三个站点的解析
vim /etc/hosts
192.168.119.129 www.a.com www.b.com www.c.com
服务器端配置:
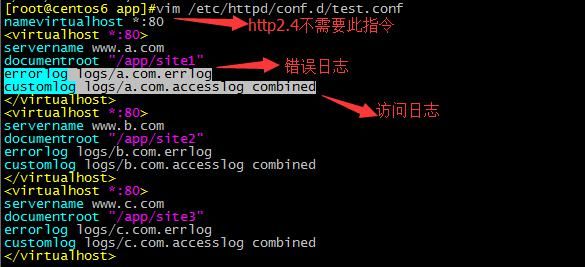
vim /etc/httpd/conf.d/test.conf
NameVirtualHost *:80 httpd2.4不需要此指令
ServerName www.a.com
DocumentRoot "/app/site1"
errorlog logs/a.com.errlog 错误日志
customlog logs/a.com.accesslog combined 访问日志
ServerName www.b.net
DocumentRoot "/app/site2"
errorlog logs/b.com.errlog 错误日志
customlog logs/b.com.accesslog combined 访问日志
ServerName www.c.org
DocumentRoot "/app/site3"
errorlog logs/c.com.errlog 错误日志
customlog logs/c.com.accesslog combined 访问日志
测试:
curl http://www.a.com
curl http://www.b.com
curl http://www.c.com
curl http://192.168.119.129/
默认站点是第一个站点
![]()
centos7:
与centos6大致一样,只是必须对目录显示授权,而且不需要NameVirutalHost指令。
比如实现基于FQDN的虚拟主机,配置文件代码如下:
cat /etc/httpd/conf.d/test.conf
ServerName www.a.net
DocumentRoot "/app/site1"
Require all granted 对目录显示授权
ServerName www.b.net
DocumentRoot "/app/site2"
Require all granted
ServerName www.c.net
DocumentRoot "/app/site3"
Require all granted
以上就是虚拟主机的实验过程,如有疑问,欢迎留言


