互联网时代,各个公司的应用都会用到消息推送这一功能,今天我就来说一下有关消息推送的应用。
消息推送分为本地推送和远端推送,本地推送是需要你自己去控制的,比如说每天什么定时推送消息。远程推送是服务端进行控制。比如说公告,im消息推送等等。我们来看一组推送的原理
provider server 是你公司的服务器
Apple推送通知服务(APNs)
devices 用户的设备
myApp 您的应用(在用户的设备上运行)。
如果你需要发送一条推送给用户,你需要从你的服务器构建一条推送服务,然后通过苹果的apns,找到用户的token 设备唯一id,然后苹果根据token发送给对应的用户。
关于如何启动推送和创建推送证书我在这里就不多讲了。主要说一下自定义的消息推送。
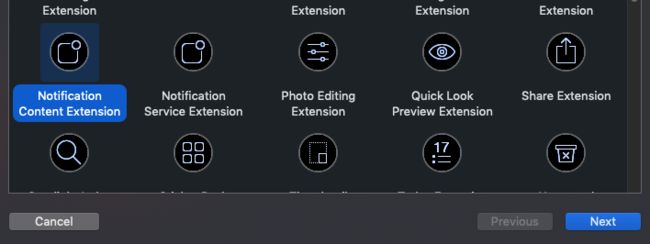
找到file-> new target ->
找到notification centent extension 点击下一步就好了。
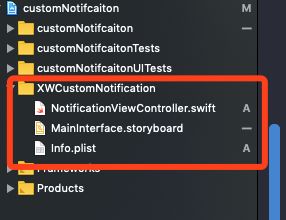
来看一下目录结构
我们需要自定义的东西就是在NotificationViewController这个文件中。自动绑定了一个storyboard。需要在storyboard中进行界面绘制。这里看你需求是什么,想画什么就画什么。
来看一下自定义的代码:UNNotificationContentExtension这个协议代理里面有几个方法
// This will be called to send the notification to be displayed by
    // the extension. If the extension is being displayed and more related
    // notifications arrive (eg. more messages for the same conversation)
    // the same method will be called for each new notification.
    public func didReceive(_ notification: UNNotification)

// If implemented, the method will be called when the user taps on one
    // of the notification actions. The completion handler can be called
    // after handling the action to dismiss the notification and forward the
    // action to the app if necessary.
    optional public func didReceive(_ response: UNNotificationResponse, completionHandler completion: @escaping (UNNotificationContentExtensionResponseOption) -> Void)
还有其他一些属性和播放的方法,这些请读者自行阅读。
didReceive这个方法当你收到推送消息的时候会触发,在这里主要做一下界面值的填充。我这里是这样写的
self.label?.text = notification.request.content.body
       self.titleLabel.text = notification.request.content.title
       self.playButton .setImage(UIImage.init(named: "icon_hang_up"), for: .normal)
       self.acceptButton.setImage(UIImage.init(named: "icon_answer"), for: .normal)
didReceive(_ response: UNNotificationResponse, completionHandler completion: @escaping (UNNotificationContentExtensionResponseOption) -> Void)这个方法主要是点击事件的回调。如果你自定义了按钮,哪里会在这里就行事件的逻辑编写。
func didReceive(_ response: UNNotificationResponse, completionHandler completion: @escaping (UNNotificationContentExtensionResponseOption) -> Void) {
        if response.actionIdentifier == "aceept_action" {
            print("取消按钮")
        } else if response.actionIdentifier == "decline_action" {
            print("接受按钮")
        }
    }
最后就是消息的触发了。我这里是写的本地消息,服务端逻辑也是一样的。只要返回的格式是按照苹果的要求,以json返回的就行。
推送服务器数据格式
json 格式:
{
   “aps” : {
      “alert” : {
         “title” : “Game Request”,
         “subtitle” : “Five Card Draw”
         “body” : “Bob wants to play poker”,
      },
      “category” : “GAME_INVITATION”
   },
   “gameID” : “12345678”
}
本地触发:
构建一个消息内容
let content = UNMutableNotificationContent()
        content.title = "爸爸给你来电话啦"
        content.body = "今天吃什么呢?"
// 这里的内容是你可以自行扩展的
        content.userInfo = ["MEETING_ID" : "meetingID",
                            "USER_ID" : "userID" ]
设置提示声音
// 设置声音
// 这里有两种方法。使用系统默认的和自定义的声音文件,我这里采用的自定义声音文件
        let sound = UNNotificationSound.init(named: UNNotificationSoundName.init("video_alert.caf"))
        content.sound = sound

// 这句代码很重要,是关联自定义的类别,在info.plist文件中的配置一致
 content.categoryIdentifier = "customNotification"
设置触发时间
这里有两种方式:UNCalendarNotificationTrigger和UNTimeIntervalNotificationTrigger,如果我们设置的是每天、每周的周几就采用第一种,如果是其他的比如10秒后触发,就采用第二种,其实还有一种基于位置的触发,这里我就不写了,看文档很清楚
// 我这里设置的10后触发通知
let trigger = UNTimeIntervalNotificationTrigger.init(timeInterval: 10, repeats: false)
注册通知请求
// 注册通知请求
  let uuidString = UUID().uuidString
  let request = UNNotificationRequest(identifier: uuidString, content: content, trigger: trigger)
注册可操作的通知类型
 // 注册可操作的通知类型
 这里注册的事件标志符必须和上面接受事件里面的一样,根据标志符进行事件判断用的
        let acceptAction = UNNotificationAction(identifier: "aceept_action", title: "接受", options: UNNotificationActionOptions.init(rawValue: 0))
        let declineAction = UNNotificationAction.init(identifier: "decline_action", title: "拒绝", options: UNNotificationActionOptions.init(rawValue: 0))
        let notificationCenter = UNUserNotificationCenter.current()
检测通知权限是否开启
// 请求授权
        notificationCenter.requestAuthorization(options: [.alert,.sound,.badge]) { (granted, error) in
            if error == nil {
                print("授权成功")
            }
        }
关联自定义通知类别
let meetingInviteCategory = UNNotificationCategory(identifier: "customNotification", actions: [acceptAction,declineAction], intentIdentifiers: [], hiddenPreviewsBodyPlaceholder: "", options: .customDismissAction)
            notificationCenter.setNotificationCategories([meetingInviteCategory])
发送自定义通知
 // 发送
        notificationCenter.add(request) { (error) in
            if error == nil {
                print("消息发送成功")
            } else {
                print("消息发送失败")
            }
        }
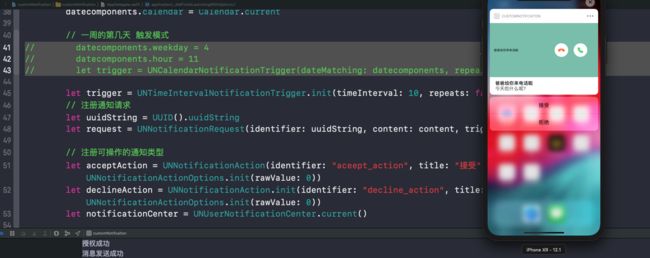
最后看一下效果吧!
到此本教程结束啦。谢谢你耐心读完! demo地址


