linux笔记:ubuntu16.04中Anaconda下安装Pytorch(基于conda或pip)
目录
一、基于conda安装
1.修改conda镜像源
2.conda安装Pytorch下载过慢解决办法
3.安装Pytorch
二、基于pip文件安装
1. 配置镜像源
2. 下载.whl安装文件
3. 安装pytorch
4、测试
一、基于conda安装
我们在Ubuntu下用pip或者conda安装软件包都容易龟速最终导致失败,但是嗑盐的我们耽误不起时间,所以要找一个最好最快的安装的方式,以下我介绍基于conda和pip的两种安装方式,先保证电脑里已经安装好了Anaconda。
1.修改conda镜像源
在一个Anconda环境中创建一个pytorch环境,用于在里面安装所需要的包,
zhangkf@Ubuntu2:~$ conda create -n pytorch python=3.6
有不理解的可以参考我之前的文档:https://blog.csdn.net/abc13526222160/article/details/84624334
在终端中运行以下命令修改镜像源,可以明显加速安装,使用清华conda镜像
zhangkf@Ubuntu2:~$ conda config --prepend channels https://mirrors.tuna.tsinghua.edu.cn/anaconda/pkgs/free/注意:更新2019-07-06,由于清华源已经封闭,可以使用国科大。
- https://mirrors.ustc.edu.cn/anaconda/pkgs/main/
- https://mirrors.ustc.edu.cn/anaconda/pkgs/free/
要查看镜像源是否安装成功的话,建议终端中运行以下命令:
zhangkf@Ubuntu2:~$ conda config --set show_channel_urls yes会生成一个~/.condarc文件,运行cat命令查看文件内容
(pytorch) zhangkf@Ubuntu2:~$ cat ~/.condarc
#会显示如下:
channels:
  - https://mirrors.tuna.tsinghua.edu.cn/anaconda/pkgs/free/
  - https://mirrors.tuna.tsinghua.edu.cn/anaconda/cloud/pytorch/
  - https://mirrors.tuna.tsinghua.edu.cn/anaconda/cloud/conda-forge/
  - https://mirrors.tuna.tsinghua.edu.cn/anaconda/cloud/msys2/
  - https://mirrors.tuna.tsinghua.edu.cn/anaconda/pkgs/main/
  - defaults
show_channel_urls: true
report_errors: true
这样每次用conda安装时,在package右边都会显示安装源的地址,那么我们对于安装的时间能有一个大致的估计.
修改后,用conda安装镜像源中任何库都能明显加速,在我的电脑上安装速度级可以达到MB/s
2.conda安装Pytorch下载过慢解决办法
当使用conda安装的时候,可能会遇到下载过慢的问题,下载的时候可能会遇到无尽的等待。这里推荐用清华源替代默认conda源的方法,可以解决下载过慢的问题。
- 添加清华源
conda config --add channels https://mirrors.tuna.tsinghua.edu.cn/anaconda/pkgs/free/
conda config --add channels https://mirrors.tuna.tsinghua.edu.cn/anaconda/pkgs/main/
conda config --set show_channel_urls yes- 另外为了保险起见,建议同时添加第三方conda源:
conda config --add channels https://mirrors.tuna.tsinghua.edu.cn/anaconda/cloud/conda-forge/
conda config --add channels https://mirrors.tuna.tsinghua.edu.cn/anaconda/cloud/msys2/
conda config --add channels https://mirrors.tuna.tsinghua.edu.cn/anaconda/cloud/bioconda/
conda config --add channels https://mirrors.tuna.tsinghua.edu.cn/anaconda/cloud/menpo/
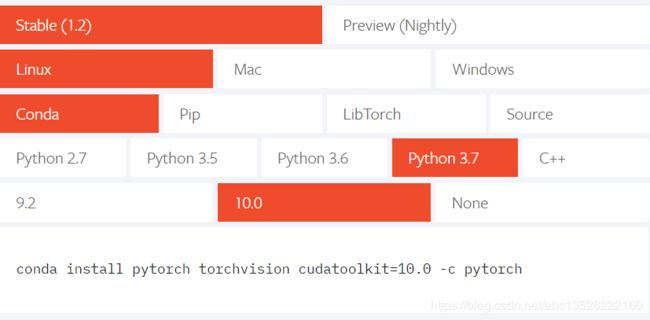
conda config --add channels https://mirrors.tuna.tsinghua.edu.cn/anaconda/cloud/pytorch/- 根据Python和CUDA选择对应的版本,然后官方给出提示可通过运行:
-
但是这里一定要注意,去掉-c pytorch,安装的时候才会默认从清华源下载相应的包,因此这里用命令行
conda install pytorch torchvision cudatoolkit=10.03.安装Pytorch
我安装的方法是conda+python3.6+cuda8.0,所以安装命令如下:(根据https://pytorch.org/选择适合自己的)
zhangkf@Ubuntu2:~$ conda install pytorch torchvision cuda80 -c pytorch二、基于pip文件安装
有时候基于conda安装pytorch,下载速度会非常的慢,这个时候可以考虑用这个方法,也是很简单的。首先创建一个环境:
zhangkf@Ubuntu2:~$ conda create -n pytorch python=3.6
创建完毕进入环境中:
zhangkf@Ubuntu2:~$ conda activate pytorch1. 配置镜像源
请参考博文Ubuntu16.10下配置pip国内镜像源加速安装. 这一步是为加速安装torch vision进行的.
2. 下载.whl安装文件
可以按pytorch安装指南的网址https://pytorch.org/get-started/previous-versions/,选择适合自己的版本。我选择的是下面
3. 安装pytorch
把下载好的文件传输到服务器中,进入刚刚创建好环境,用pip install .whl文件即可
(pytorch) zhangkf@Ubuntu2:~$ pip install torch-0.3.0.post4-cp27-cp27mu-linux_x86_64.whl
(pytorch) zhangkf@Ubuntu2:~$ pip install torch vision
有了镜像加持和.whl文件的本地化,安装很顺利 ,torch vision安装非常迅速
4、测试
在终端中按以下顺序运行命令python:
(pytorch) zhangkf@Ubuntu2:~$ python
Python 3.6.2 |Continuum Analytics, Inc.| (default, Jul 20 2017, 13:51:32)
[GCC 4.4.7 20120313 (Red Hat 4.4.7-1)] on linux
Type "help", "copyright", "credits" or "license" for more information.
>>>
在打开的python命令行中运行
(pytorch) zhangkf@Ubuntu2:~$ python
Python 3.6.2 |Continuum Analytics, Inc.| (default, Jul 20 2017, 13:51:32)
[GCC 4.4.7 20120313 (Red Hat 4.4.7-1)] on linux
Type "help", "copyright", "credits" or "license" for more information.
>>> import torch
>>>
注意:安装过程中如果遇到这样的问题,安装过程中出错: Could not import setuptools ,或者 Failed building wheel for pyyaml,问题简写了,看看有没有这几个关键词。有的话的请参考我的文章:问题会得到解决,安装过程中不报错的话即代表安装成功,然后开始入坑吧.祝你好运。https://blog.csdn.net/abc13526222160/article/details/86435519
部分参考了作者:
- https://blog.csdn.net/yucicheung/article/details/79094657

