springboot多模块项目搭建之基础模块
序言:
之前开发项目的时候,都是在项目中根据逻辑分为dao、service、web层,这些都是在一个项目内部进行分层,所表现的形式就是不同的包。
但是这种方式会带来一些问题:
- 同一个数据表,在不同的项目中或者功能使用。所以每个项目都会配一个mybatis。如果一开始规定这个表不能改什么字段了,那这样做没问题。但事实上,一张表从开始到结束,会经历大风大浪,所以可能在多个项目中改mybatis改到晕眩。。。。。。
- 再举个例子,比如有一个web服务里面包含了多个功能,其中一个功能可能会消耗大量CPU和内存,那这样可能会影响到其他功能的使用。这个时候,如果能把各个功能模块分不出来单独部署,最终通过http或者rpc去调用,相信会提高不少。
其实不管是分包还是分模块,都是为了让我们的代码能够具有重用性,同时也能降低代码之间的依赖(解耦合)。
不知不觉说这么多了,下面就直接手把手教大家如何搭建一个多模块的项目。
我这边用的是idea,eclispe的玩家可以忽略本文,我不是很熟 -。-
一 、创建父工程:
idea 中创建Spring Initializr 工程,依赖包的啥都不要选。创建结束后,删除src、mvn、等,只保留一个pom.xml文件。

二、创建子模块
- 依次点击根项目 选择 new-> Module

- 选择Maven -> Next

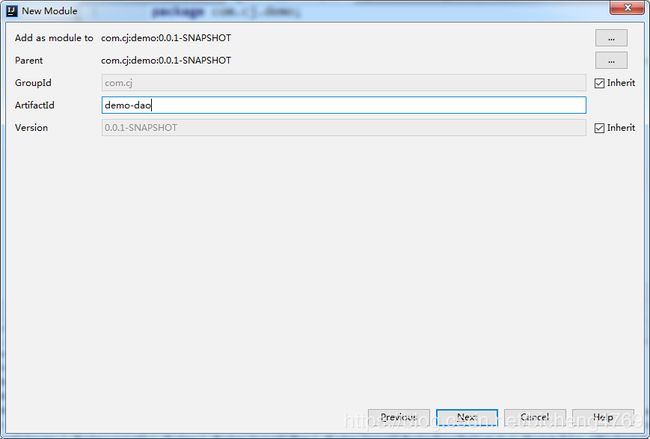
- 填写AiffactId -> Next

- 修改Module name ,中间加个斜杠 -> Finish

- 同理 添加 demo-web,demo-service子模块。最终的项目结构如下:

大家注意下,添加完子模块后,父工程的pom中已经有了modules的信息。
三、设置启动模块
到现在为止,这仅仅是一个maven项目,都没有个启动的入口,我们这里可以利用springboot添加一个入口类。
- 首先在demo-web层的pom.xml中添加springboot的依赖:
            org.springframework.boot
            spring-boot-starter-web
            RELEASE
            compile
然后在 demo-web层创建一个com.cj.demo.web包,在demo下(和web同目录)创一个DemoApplication .java.代码如下所示:
import org.springframework.boot.SpringApplication;
import org.springframework.boot.autoconfigure.SpringBootApplication;

@SpringBootApplication
public class DemoApplication {
    public static void main(String[] args) {
        SpringApplication.run(DemoApplication.class);
    }
}
- 在web下新建一个controller包并创建一个controller,添加test方法测试接口是否可用:
import org.springframework.web.bind.annotation.GetMapping;
import org.springframework.web.bind.annotation.RequestMapping;
import org.springframework.web.bind.annotation.RestController;

@RestController
@RequestMapping("demo")
public class IndexController {

    @GetMapping("test")
    public String test() {
        return "test";
    }
}
可能会出现的问题:
1 错误: 找不到或无法加载主类 com.cj.DemoApplication
启动项中的路径不对,修改一下就好了,如下图进行修改:

四、配置模块间的依赖关系
- 父工程pom文件中都要声明所有的子模块的依赖。
- 子模块之间依赖关系:service 依赖dao层,web依赖service层。
- 父工程pom文件中声明所有子模块依赖:
        0.0.1-SNAPSHOT


                com.cj
                demo-dao
                ${module.version}


                com.cj
                demo-web
                ${module.version}


                com.cj
                demo-service
                ${module.version}
- demo-web添加demo-service依赖
            com.cj
            demo-service
- demo-service 添加demo-dao 依赖
            com.cj
            demo-dao
- 编写demo-service层代码。在demo-service添加com.cj.demo.service包并创建DemoService和DemoServiceImpl,如下所示:
DemoService 类:
package com.cj.demo.service;

public interface DemoService {
    String test();
}
DemoServiceImpl 类:
package com.cj.demo.service;

import org.springframework.stereotype.Service;

@Service
public class DemoServiceImpl implements  DemoService {
    @Override
    public String test() {
        return "hello world";
    }
}
- 在controller中@Autowired 注解注入DemoService,controller代码如下:
import com.cj.demo.service.DemoService;
import org.springframework.beans.factory.annotation.Autowired;
import org.springframework.web.bind.annotation.GetMapping;
import org.springframework.web.bind.annotation.RequestMapping;
import org.springframework.web.bind.annotation.RestController;

@RestController
@RequestMapping("demo")
public class IndexController {
    @Autowired
    private DemoService demoService;

    @GetMapping("test")
    public String test() {
        return demoService.test();
    }
}
可能会遇到的问题:
- 发生如下的报错:

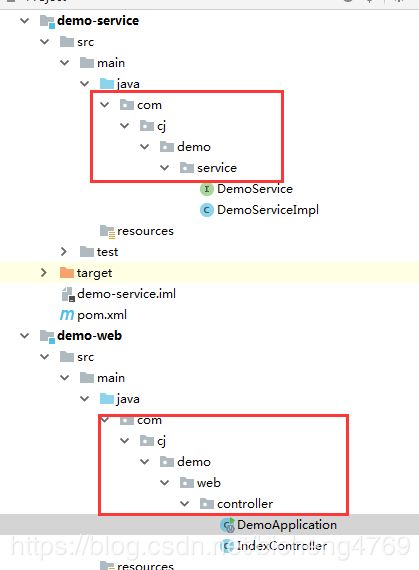
这个原因是找不到DemoService类,也就是我们的注解没有作用。为什么会找不到呢?SpringBoot 在启动的时候默认会在启动类所在的包的路径进行扫描,然后将扫描的类自动注入。
出现这个问题的原因可能是你启动项所在的包和扫描不到的那个类所在的包不是同一个包(或者包涵关系),我看下我的项目,如下图:

启动项所在包 com.cj.demo.web.controller
DemoService com.cj.demo.service.
这两个路径没有包含关系,所以找不到类。
解决方法:
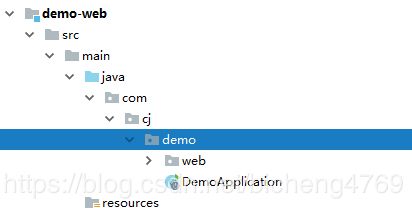
- 将启动项移动到和web同一层的路径,如下图:

现在的路径是com.cj.demo 扫描就会从这个路径开始 com.cj.demo.service同样会扫描到。
2. 启动项加入注解强制扫描:
@SpringBootApplication(scanBasePackages = "com.cj.demo")
public class DemoApplication {
    public static void main(String[] args) {
        SpringApplication.run(DemoApplication.class);
    }
}
五、总结
到这里springboot 多模块项目已经搭建了一大半了,最后还有个最重要的Data这一层的处理,我们下一篇博客在给大家介绍,后续的话,我这边应该还会写一篇关于多模块打包的文章,包括jar和war包。有兴趣的同学可以点个关注,谢谢大家。
最后附上demo 的下载地址:demo


