Spring源代码之bean的基本解析
先看这样一段儿代码:
spring bean xml配置
<beans xmlns:xsi="http://www.w3.org/2001/XMLSchema-instance"
       xmlns="http://www.springframework.org/schema/beans"
       xsi:schemaLocation="http://www.springframework.org/schema/beans
     http://www.springframework.org/schema/beans/spring-beans-4.0.xsd">

    <bean id="myTestBean" class="org.springframework.myTests.MyTestBean">
    bean>
beans>
定义一个测试bean:
public class MyTestBean {

    private String myBean = "hello bean";

    public String getMyBean() {
        return myBean;
    }

    public MyTestBean setMyBean(String myBean) {
        this.myBean = myBean;
        return this;
    }

}
获得这个bean,并执行
public class ContextBeanTest {

    /**
     * 用XmlBeanFactory这个方式获得bean,现在已经不用这个方式了
     */
    @Test
    public void test() {
        XmlBeanFactory xmlBeanFactory = new XmlBeanFactory(new ClassPathResource("spring-base.xml"));
        MyTestBean myTestBean = (MyTestBean) xmlBeanFactory.getBean("myTestBean");
        System.out.println(myTestBean.getMyBean());
    }
}
打印结果很明显.就是:hello bean.
DefaultListableBeanFactory
类似于上面直接使用XmlBeanFactory的方式其实已经过时了,目前大家都用ApplicationContext,那么ApplicationContext和XmlBeanFactory有什么关系?简单来说,可以理解为ApplicationContext是在XmlBeanFactory基础上的扩展,前者拥有后者的全部功能,而且在其基础上做了封装.在ApplicationContext初始化的过程中,它是获得了BeanFactory的示例,并享受其功能的,在那里,XmlBeanFactory会获得新生~
研究spring,最好的办法就是clone源代码,自己跟着示例来看一下.到spring官网,clone下代码,eclipse和IDEA都有相应的.md格式的安装指南或运行脚本,除了耗时一点外,没别的难处,我把我的spring源代码放到了我的github上,会一直更新源代码的中文注释,感兴趣的可以去看看spring源代码中文注释
这里的代码在spring.beans的jar包,或者spring-beans这个工程内.
可以看一下XmlBeanFactory这个类:
public class XmlBeanFactory extends DefaultListableBeanFactory继承自DefaultListableBeanFactory
@SuppressWarnings("serial")
public class DefaultListableBeanFactory extends AbstractAutowireCapableBeanFactory
        implements ConfigurableListableBeanFactory, BeanDefinitionRegistry, Serializable {
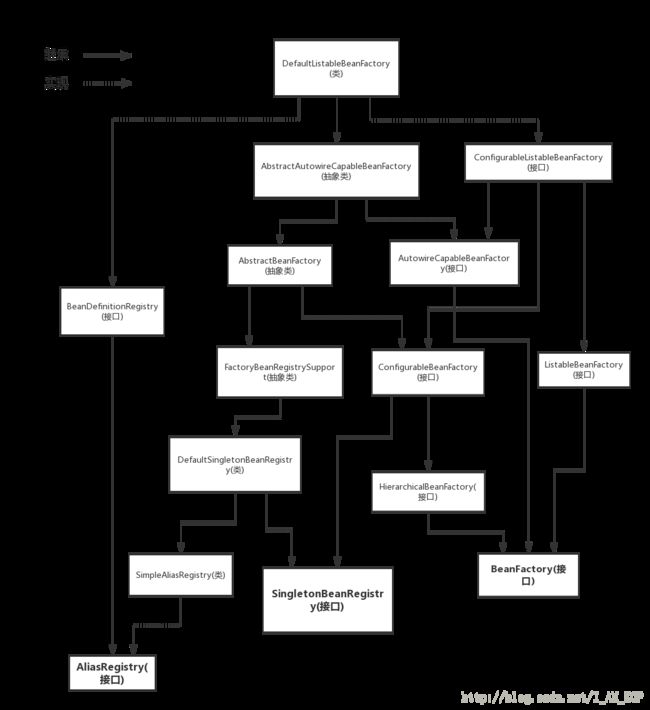
这个类是是整个bean加载的核心部分,是spring注册及加载的默认实现,他的子类,XmlBeanFactory和他不同的地方在于,XmlBeanFactory使用了自定义的XML读取器XmlBeanDefinitionReader,当前类继承了AbstractAutowireCapableBeanFactory,并且实现了ConfigurableListableBeanFactory等.
下面给出一个相关的UML类图:

这个图基本从XmlBeanFactory继承了DefaultListableBeanFactory开始,把这块儿的脉络画了出来,过程很痛苦,结果很好,下面介绍图中各个类的作用:
- AliasRegistry 定义对alias的操作
- SimpleAliasRegistry 实现了AliasRegistry ,map来存储
- SingletonBeanRegistry 单例的注册和获取
- BeanFactory 定义和获取bean,核心接口
- DefaultSingletonBeanRegistry SingletonBeanRegistry的默认实现
- BeanDefinitionRegistry BeanDefinition的增删盖茶
- FactoryBeanRegistrySupport 在DefaultSingletonBeanRegistry的基础上,扩展了一些功能,比如对FactoryBean的处理
- ConfigurableBeanFactory 提供配置factory的方法
- ListableBeanFactory 根据各种条件获取bean的清单
- AbstractBeanFactory 由图中可知,综合了FactoryBeanRegistrySupport和ConfigurableBeanFactory
- ConfigurableListableBeanFactory beanFactory配置清单,指定忽略类型和接口
XmlBeanDefinitionReader
xmlBeanFactory对DefaultListableBeanFactory进行了扩展,作用主要是从xml中读取bean的定义.和父类主要的不同,在于XmlBeanDefinitionReader.
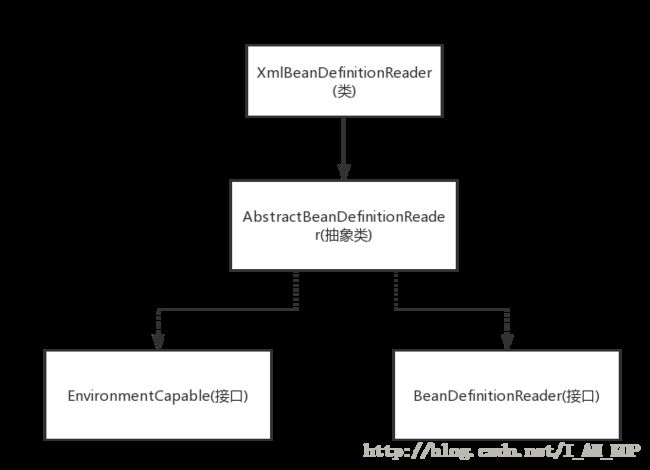
private final XmlBeanDefinitionReader reader = new XmlBeanDefinitionReader(this);xmlBeanFactory的属性reader用的是XmlBeanDefinitionReader.下面看这个类,首先,UML图:

相关类的介绍:
- AbstractBeanDefinitionReader 实现EnvironmentCapable和BeanDefinitionReader
- EnvironmentCapable 定义获取相关环境
- BeanDefinitionReader 定义资源文件,读取或转换BeanDefinition
XmlBeanFactory的核心实现
说这个之前,对上述两个类:DefaultListableBeanFactory和XmlBeanDefinitionReader做了一个概括的分析,下面,从细节处来看XmlBeanFactory.
在我们的测试类:javaXmlBeanFactory xmlBeanFactory = new XmlBeanFactory(new ClassPathResource("spring-base.xml"));代码中XmlBeanFactory(new ClassPathResource(“spring-base.xml”)),构造方法的调用看下面:
public XmlBeanFactory(Resource resource) throws BeansException {
        this(resource, null);
    }
//最终调用这个
public XmlBeanFactory(Resource resource, BeanFactory parentBeanFactory) throws BeansException {
        super(parentBeanFactory);
        this.reader.loadBeanDefinitions(resource);
    }
this.reader.loadBeanDefinitions(resource);这个才是资源加载的真正实现!点进去:
    /**
     * 进来第一步,将resource封装成EncodedResource类型
     */
public int loadBeanDefinitions(Resource resource) throws BeanDefinitionStoreException {
        return loadBeanDefinitions(new EncodedResource(resource));
    }
继续点进去:
public int loadBeanDefinitions(EncodedResource encodedResource) throws BeanDefinitionStoreException {
        Assert.notNull(encodedResource, "EncodedResource must not be null");
        if (logger.isInfoEnabled()) {
            logger.info("Loading XML bean definitions from " + encodedResource.getResource());
        }
        //resourcesCurrentlyBeingLoaded的初始化是new NamedThreadLocal<>("XML bean definition resources currently being loaded");
        //通过ThreadLocal来存储属性的值
        Set currentResources = this.resourcesCurrentlyBeingLoaded.get();
        if (currentResources == null) {
            currentResources = new HashSet<>(4);
            this.resourcesCurrentlyBeingLoaded.set(currentResources);
        }
        if (!currentResources.add(encodedResource)) {
            throw new BeanDefinitionStoreException(
                    "Detected cyclic loading of " + encodedResource + " - check your import definitions!");
        }
        try {
            //获取Resource对象,并获取流
            InputStream inputStream = encodedResource.getResource().getInputStream();
            try {
                InputSource inputSource = new InputSource(inputStream);
                if (encodedResource.getEncoding() != null) {
                    inputSource.setEncoding(encodedResource.getEncoding());
                }
                //真正的核心代码
                return doLoadBeanDefinitions(inputSource, encodedResource.getResource());
            }
            finally {
                inputStream.close();
            }
        }
        catch (IOException ex) {
            throw new BeanDefinitionStoreException(
                    "IOException parsing XML document from " + encodedResource.getResource(), ex);
        }
        finally {
            currentResources.remove(encodedResource);
            if (currentResources.isEmpty()) {
                this.resourcesCurrentlyBeingLoaded.remove();
            }
        }
    }
进去核心方法”doLoadBeanDefinitions”:
    /**
     * 排除一堆catch,其实代码没有几句
     */
    protected int doLoadBeanDefinitions(InputSource inputSource, Resource resource)
            throws BeanDefinitionStoreException {
        try {
        //方法一,验证xml的验证模式,加载xml获取对相应的Document
            Document doc = doLoadDocument(inputSource, resource);
        ////根据返回的DOC,注册bean
            return registerBeanDefinitions(doc, resource);
        }

    protected Document doLoadDocument(InputSource inputSource, Resource resource) throws Exception {
    //验证xml的验证模式,加载xml获取对相应的Document
        return this.documentLoader.loadDocument(inputSource, getEntityResolver(),
        this.errorHandler,getValidationModeForResource(resource), isNamespaceAware());
    }
上面主要做了:
- 获取xml的验证模式
- 获得xml对象的Document
- 根据返回的doc对象,注册bean
这些基本就是spring容器基础部分的实现,当然,第三部应该是最核心的部分,前两部只是他的基础工作,方法传进去了一个doc,一个资源,doLoadDocument又获得了验证模式,那么,接下来的工作,就是加载bean了,这应该是一个很复杂的过程,至于文档的验证模式,主要有DTD,XSD两种,有兴趣可以研究一下
下面进registerBeanDefinitions(doc, resource);
public int  registerBeanDefinitions(Document doc, Resource resource) throws BeanDefinitionStoreException {
        //实例化BeanDefinitionDocumentReader,用了DefaultBeanDefinitionDocumentReader
        BeanDefinitionDocumentReader documentReader = createBeanDefinitionDocumentReader();
        //当前bean定义的个数
        int countBefore = getRegistry().getBeanDefinitionCount();
        //加载及注册bean
        documentReader.registerBeanDefinitions(doc, createReaderContext(resource));
        //仅返回本次的加载bean个数
        return getRegistry().getBeanDefinitionCount() - countBefore;
    }
注释中说了实例化BeanDefinitionDocumentReader,用了DefaultBeanDefinitionDocumentReader,那下面进入他的egisterBeanDefinitions(doc, createReaderContext(resource))方法:
    public void registerBeanDefinitions(Document doc, XmlReaderContext readerContext) {
        this.readerContext = readerContext;
        logger.debug("Loading bean definitions");
        //获取文件的root
        Element root = doc.getDocumentElement();
        //将root节点,传入下面方法
        doRegisterBeanDefinitions(root);
    }
protected void doRegisterBeanDefinitions(Element root) {
// Any nested elements will cause recursion in this method. In
// order to propagate and preserve default-* attributes correctly,
// keep track of the current (parent) delegate, which may be null. Create
// the new (child) delegate with a reference to the parent for fallback purposes,
// then ultimately reset this.delegate back to its original (parent) reference.
// this behavior emulates a stack of delegates without actually necessitating one.
//delegate属性赋值给一变量parent,初始化parent为new BeanDefinitionParserDelegate(readerContext);
BeanDefinitionParserDelegate parent = this.delegate;
this.delegate = createDelegate(getReaderContext(), root, parent);
//判断节点的名称空间是否是http://www.springframework.org/schema/beans,如果是,进入
if (this.delegate.isDefaultNamespace(root)) {
//准备处理profile属性,这个属性不常用
String profileSpec = root.getAttribute(PROFILE_ATTRIBUTE);
if (StringUtils.hasText(profileSpec)) {
String[] specifiedProfiles = StringUtils.tokenizeToStringArray(
profileSpec, BeanDefinitionParserDelegate.MULTI_VALUE_ATTRIBUTE_DELIMITERS);
if (!getReaderContext().getEnvironment().acceptsProfiles(specifiedProfiles)) {
if (logger.isInfoEnabled()) {
logger.info("Skipped XML bean definition file due to specified profiles [" + profileSpec +
"] not matching: " + getReaderContext().getResource());
}
return;
}
}
}
//protected的空方法,叫给子类定制一些自己的实现
preProcessXml(root);
//继续点进去
parseBeanDefinitions(root, this.delegate);
//protected的空方法,叫给子类定制一些自己的实现
postProcessXml(root);
this.delegate = parent;
}这个类里面,很多方法都是protected,从这可以看出spring这块的面向继承的思想.其中,
protected void parseBeanDefinitions(Element root, BeanDefinitionParserDelegate delegate) {
        if (delegate.isDefaultNamespace(root)) {
            //获得beans节点的子节点
            NodeList nl = root.getChildNodes();
            for (int i = 0; i < nl.getLength(); i++) {
                Node node = nl.item(i);
                //如果子节点的element
                if (node instanceof Element) {
                    Element ele = (Element) node;
                    if (delegate.isDefaultNamespace(ele)) {
                        //bean的解析
                        parseDefaultElement(ele, delegate);
                    }
                    else {
                        //bean的解析
                        delegate.parseCustomElement(ele);
                    }
                }
            }
        }
        else {
            delegate.parseCustomElement(root);
        }
    }
如果是默认的命名空间,则调用上面的bean解析,如果不是,调用下面的bean解析,默认的话,spring会正常的去解析,如果不是默认的,那么应该是一个稍显复杂的过程,需要重写一些类,或者实现一些接口,从这开始,其实就进入了spring对默认的标签的一些解析,非默认的暂时不想去看,下一篇,会写到spring的默认标签解析,然后就是bean的加载,存储,获取等,最后就是ApplicationContext的一些实现,这个主线才算略显完整一些.