SpringBoot结合swagger自动生成API文档
Web开发常采用前后端分离的方式。前后端通过API进行交互,在Swagger UI中,前后端人员能够直观预览并且测试API,方便前后端人员同步开发。
在SpringBoot中集成swagger,步骤如下:
1.将下面的依赖添加到Maven项目的pom.xml文件中。springfox-swagger2组件帮助我们自动生成描述API的json文件,而springfox-swagger-ui组件就是将这个json文件解析出来,用一种更友好的方式呈现出来。
            io.springfox
            springfox-swagger2
            2.8.0


            io.springfox
            springfox-swagger-ui
            2.8.0
2.添加Swaager的配置类
package com.example.demo.config;

import io.swagger.annotations.ApiOperation;
import org.springframework.context.annotation.Bean;
import org.springframework.context.annotation.Configuration;
import springfox.documentation.builders.RequestHandlerSelectors;
import springfox.documentation.spi.DocumentationType;
import springfox.documentation.spring.web.plugins.Docket;
import springfox.documentation.swagger2.annotations.EnableSwagger2;

@EnableSwagger2
@Configuration
public class SwaggerConfig {
    @Bean
    public Docket swaggerSpringMvcPlugin() {
        return new Docket(DocumentationType.SWAGGER_2).select().apis(RequestHandlerSelectors.withMethodAnnotation(ApiOperation.class)).build();
    }

}
3.在需要暴露的API上添加需要在Swagger UI页面上显示的应用相关的介绍信息。举个例子吧~
在Controller类上添加@API注解,说明该类的作用;该类下包含增删改查五个方法,给大家一个全面的示范,至于service、dao层的实现,留给大家自己发挥吧~主要是在方法上添加@ApiOperation,@ApiImplicitParam注解,作用是对方法以及参数的说明。
package com.example.demo.controller;

import com.example.demo.service.AreaService;
import io.swagger.annotations.Api;
import io.swagger.annotations.ApiImplicitParam;
import io.swagger.annotations.ApiOperation;
import org.springframework.beans.factory.annotation.Autowired;
import org.springframework.web.bind.annotation.*;
import com.example.demo.entity.Area;
import java.util.*;

@Api(description = "AreaController相关的api")
@RestController
@RequestMapping("/superadmin")
public class AreaController {
    @Autowired
    private AreaService areaService;
    @ApiOperation(value="查询区域信息" ,notes = "查询数据库中所有区域信息")
    @RequestMapping(value="/listarea" , method = RequestMethod.GET)
    private Map listArea(){
        Map modelMap = new HashMap() ;
        List list = areaService.getAreaList();
        modelMap.put("areaList" , list);
        return modelMap;
    }

        @ApiOperation(value="根据id查询区域信息" ,notes = "查询数据库中某个区域信息")
        @ApiImplicitParam(name="areaId",value="区域ID",paramType="query",required = true,dataType = "int")
        @RequestMapping(value="/getareabyid" ,method = RequestMethod.GET)
        private Map getAreaById(@RequestParam("areaId") Integer areaId){
            Map modelMap = new HashMap() ;
            Area area = areaService.getAreaById(areaId);
        modelMap.put("areaList" , area);
        return modelMap;
    }
    @ApiOperation(value="添加区域信息",notes="根据Area对象添加区域信息")
    @ApiImplicitParam(name="area",value="区域信息",required=true,dataType="Area")
    @RequestMapping(value="/addarea" ,method = RequestMethod.POST)
    private Map addArea(@RequestBody Area area){
        Map modelMap = new HashMap() ;
        modelMap.put("success" ,areaService.addArea(area));
        return modelMap;
    }
    @ApiOperation(value="修改区域信息",notes="根据Area对象修改区域信息")
    @ApiImplicitParam(name="area",value="区域信息",required=true,dataType="Area")
    @RequestMapping(value="/modifyarea" ,method = RequestMethod.POST)
    private Map modifyArea(@RequestBody Area area){
        Map modelMap = new HashMap() ;
        modelMap.put("success" ,areaService.modifyArea(area));
        return modelMap;
    }
    @ApiOperation(value="删除区域信息",notes="根据区域ID删除区域信息")
    @ApiImplicitParam(name="areaId",value="区域ID",required=true,dataType="int")
    @RequestMapping(value="/removearea" ,method = RequestMethod.GET)
    private Map removeArea(@RequestParam("areaId") Integer areaId){
        Map modelMap = new HashMap() ;
        modelMap.put("success",areaService.deleteArea(areaId));
        return modelMap;
    }
}
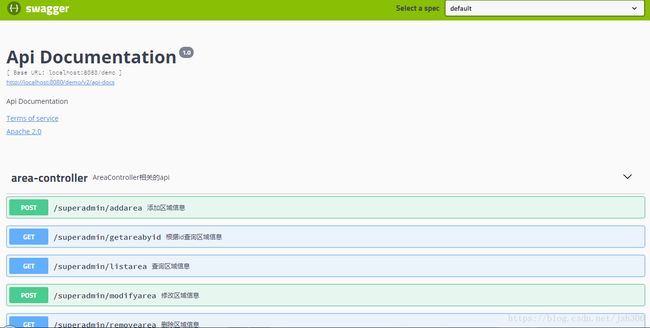
4.启动SpringBoot项目,访问http://localhost:8080/demo/swagger-ui.html页面,注意了,我这里是因为在application.properties配置了项目路径server.servlet.context-path=/demo,所以才在上面的url加上/demo,一般若无特殊的配置,直接访问http://localhost:8080/swagger-ui.html即可。
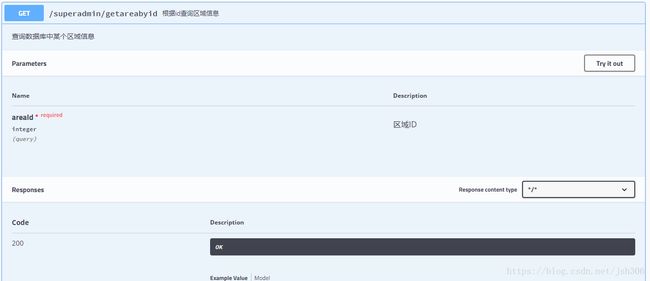
Swagger UI界面绝对有颜有值!画面小清新,而且API非常直观。点击页面上的url,可查看API文档api-docs,不仅如此,咱们是可以测试接口的哟~简单测个 根据id查询区域信息 的接口吧,点击将其展开。
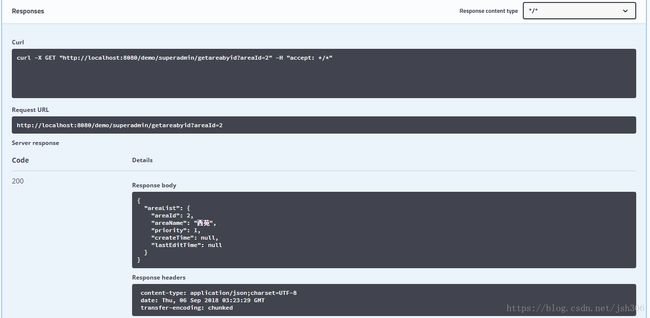
点击 Try it out ,咱们得输个int类型的区域ID做参数,输入完后点击execute后就可以看到结果啦!
迟到两年的swagger,算是正式认识了。
日ji


