BERT之提取特征向量 及 bert-as-server的使用
本文内容列表
- 一、 提取句向量
- 1、句向量简介
- 1-1传统句向量
- 1-2 BERT句向量
- 2、 extract_features.py源码分析
- 2-1 参数
- 2-2 main()函数
- 3、如何得到句向量呢?
- 二、Bert-as-server
- 1、 安装
- 2、开启服务
- 3、使用客户端获取句子编码向量
- 参考资料
版权声明:本文为博主原创文章,转载请注明出处:https://blog.csdn.net/ling620/article/details/94738471
前一篇文章 BERT介绍及中文文本相似度任务实践 简单介绍了使用BERT进行中文文本相似度计算的方法,这篇文章着重对特征提取方法进行讲述。
一、 提取句向量
1、句向量简介
1-1传统句向量
更多采用word embedding的方式取加权平均,该方法的一大弊端,就是无法理解上下文的语义,同一个词在不同的语境意思可能不一样,但是却会被表示成同样的word embedding, BERT生成句向量的优点在于可理解句意,并且排除了词向量加权引起的误差。
1-2 BERT句向量
BERT包括两个版本,12层transformer和24层的transformer,官方提供了12层的中文模型。
每一层transformer的输出值,理论上来说都可以作为句向量,但是到底该取哪一层呢,根据hanxiao(肖涵)大神的实验数据,最佳结果是取倒数第二层,最后一层的值太接近于目标,前面几层的值可能语义还未充分的学习到。
2、 extract_features.py源码分析
该文件使用预训练的模型文件,对测试样例进行句向量提取。不包含训练过程,只是执行BERT的前向过程,使用固定的参数对输入样例进行转换。
那么,从main函数开始吧!
2-1 参数
文件的一开始,是文件的参数,如下所示:
if __name__ == "__main__":
    flags.mark_flag_as_required("input_file")
    flags.mark_flag_as_required("vocab_file")
    flags.mark_flag_as_required("bert_config_file")
    flags.mark_flag_as_required("init_checkpoint")
    flags.mark_flag_as_required("output_file")
    tf.app.run()
这几个参数比较好理解,如何不明白,可参考BERT介绍及中文文本相似度任务实践文章中run_classifier.py文件中的参数,意义相同。
我们可以直接使用官网提供的中文预训练模型chinese_L-12_H-768_A-12。
除了必填的这几个参数外,其他参数我们可以从文件的最开始位置查看,部分如下:
flags = tf.flags

FLAGS = flags.FLAGS

flags.DEFINE_string("input_file", None, "")

flags.DEFINE_string("output_file", './out.txt', "")

flags.DEFINE_string("layers", "-1,-2,-3,-4", "")

flags.DEFINE_string(
    "bert_config_file", None,
    "The config json file corresponding to the pre-trained BERT model. "
    "This specifies the model architecture.")

flags.DEFINE_integer(
    "max_seq_length", 128,
    "The maximum total input sequence length after WordPiece tokenization. "
    "Sequences longer than this will be truncated, and sequences shorter "
    "than this will be padded.")

flags.DEFINE_string(
    "init_checkpoint", None,
    "Initial checkpoint (usually from a pre-trained BERT model).")
其中,layers表示取模型第几层的输出值作为词向量, 默认值是[-1, -2, -3, -4]即表示倒数第一层、倒数第二层、倒数第三层和倒数第四层。我们可以指定想要的层数,在这里我们可以只取倒数第二层的输出作为词向量,即设为[-2]。
max_seq_length:表示是输入序列经过tokenize之后的长度,大于这个长度的部分,会被截取掉,小于这个长度的序列,会在其后进行填充。
2-2 main()函数
说完了文件运行所需要的参数,那就从main函数开始吧。
examples = read_examples(FLAGS.input_file)

features = convert_examples_to_features(
    examples=examples, seq_length=FLAGS.max_seq_length, tokenizer=tokenizer)
上面两行代码实现了 读入输入文件,并对其进行预处理,对输入文本处理为 网络输入所需的格式。
其中,convert_examples_to_features函数最终将输入文本封装为InputFeatures对象并添加到list中返回。如下所示:
def convert_examples_to_features(examples, seq_length, tokenizer):
    """Loads a data file into a list of `InputBatch`s."""
    features = []
    # 此处是将输入补零到最大序列长度
    # Zero-pad up to the sequence length.
    while len(input_ids) < seq_length:
        input_ids.append(0)
        input_mask.append(0)
        input_type_ids.append(0)
    ......
        features.append(
            InputFeatures(
                unique_id=example.unique_id,
                tokens=tokens,
                input_ids=input_ids,
                input_mask=input_mask,
                input_type_ids=input_type_ids))
    return features
其中,里面有一步是将输入向量补零到最大长度。
下面的代码实现加载预训练模型的接口。
    model_fn = model_fn_builder(
        bert_config=bert_config,
        init_checkpoint=FLAGS.init_checkpoint,
        layer_indexes=layer_indexes,
        use_tpu=FLAGS.use_tpu,
        use_one_hot_embeddings=FLAGS.use_one_hot_embeddings)

    # If TPU is not available, this will fall back to normal Estimator on CPU
    # or GPU.
    estimator = tf.contrib.tpu.TPUEstimator(
        use_tpu=FLAGS.use_tpu,
        model_fn=model_fn,
        config=run_config,
        predict_batch_size=FLAGS.batch_size)

    input_fn = input_fn_builder(
        features=features, seq_length=FLAGS.max_seq_length)
具体加载模型参数的代码位于input_fn_builder函数中的model_fn函数中,如下所示:
def model_fn_builder(bert_config, init_checkpoint, layer_indexes, use_tpu,
                     use_one_hot_embeddings):
    """Returns `model_fn` closure for TPUEstimator."""

    def model_fn(features, labels, mode, params):  # pylint: disable=unused-argument
        """The `model_fn` for TPUEstimator."""
        # 创建Bert模型
        model = modeling.BertModel(
            config=bert_config,
            is_training=False,
            input_ids=input_ids,
            input_mask=input_mask,
            token_type_ids=input_type_ids,
            use_one_hot_embeddings=use_one_hot_embeddings)

        if mode != tf.estimator.ModeKeys.PREDICT:
            raise ValueError("Only PREDICT modes are supported: %s" % (mode))

        # 获取模型中所有的训练参数
        tvars = tf.trainable_variables()
        scaffold_fn = None
        # 加载Bert模型
        (assignment_map,
         initialized_variable_names) = modeling.get_assignment_map_from_checkpoint(
             tvars, init_checkpoint)
        。。。。。。
        。。。。。。
        all_layers = model.get_all_encoder_layers() # 所有层

        predictions = {
            "unique_id": unique_ids,
        }
		# 循环读取layer_indexes中所要返回的哪一层输出,如只有一个数如[-2]则只倒数第二层
        for (i, layer_index) in enumerate(layer_indexes):
            predictions["layer_output_%d" % i] = all_layers[layer_index]

        output_spec = tf.contrib.tpu.TPUEstimatorSpec(
            mode=mode, predictions=predictions, scaffold_fn=scaffold_fn)
        return output_spec

    return model_fn
再后面的代码就是将得到的结果保存到输出文件中去的过程。
其中,注意一个操作,如下面代码所示:
for (i, token) in enumerate(feature.tokens):
    all_layers = []
    for (j, layer_index) in enumerate(layer_indexes):
        layer_output = result["layer_output_%d" % j]
        layers = collections.OrderedDict()
        layers["index"] = layer_index
        layers["values"] = [
            round(float(x), 6) for x in layer_output[i:(i + 1)].flat
        ]
        all_layers.append(layers)
上面这部分代码的意思是只取出输入 经过tokenize之后的长度 的向量。
即如果max_seq_lenght设为128, 如果输入的句子为我爱你,则经过tokenize之后的输入tokens=[["CLS"], '我', '爱','你',["SEP"]],实际有效长度为5,而其余128-5位均填充0。
上面代码就是只取出有效长度的向量。
layer_output的维度是(128, 768), layers["values"]的维度是是(5,768)
3、如何得到句向量呢?
由上面的流程可知,若输入语句为我爱你, 则得到的输出向量维度是(5,768),那句向量的维度应该是(738,)才对,一种比较常用的方法就是对该句话中 所有字向量取均值,即得到该句的句向量。
二、Bert-as-server
这是啥?
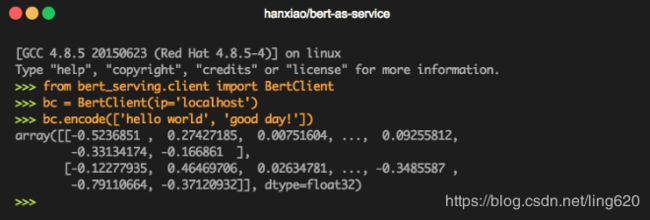
bert-as-service能让你简单通过两行代码,即可使用预训练好的模型生成句向量和 ELMo 风格的词向量:
bert-as-server的作者是肖涵博士。
你可以将 bert-as-service 作为公共基础设施的一部分,部署在一台 GPU 服务器上,使用多台机器从远程同时连接实时获取向量,当做特征信息输入到下游模型。
git源码地址: bert-as-server
具体的使用方法,可直接取git上查找,说的也比较仔细;另外,也有许多博客进行了讲解,都比较仔细。
1、 安装
使用pip进行安装,命令如下:
pip install bert-serving-server  # server
pip install bert-serving-client  # client, independent of `bert-serving-server`
要求Python >= 3.5, Tensorflow >= 1.10
2、开启服务
打开服务命令:
bert-serving-start -model_dir /tmp/english_L-12_H-768_A-12/ -num_worker=4
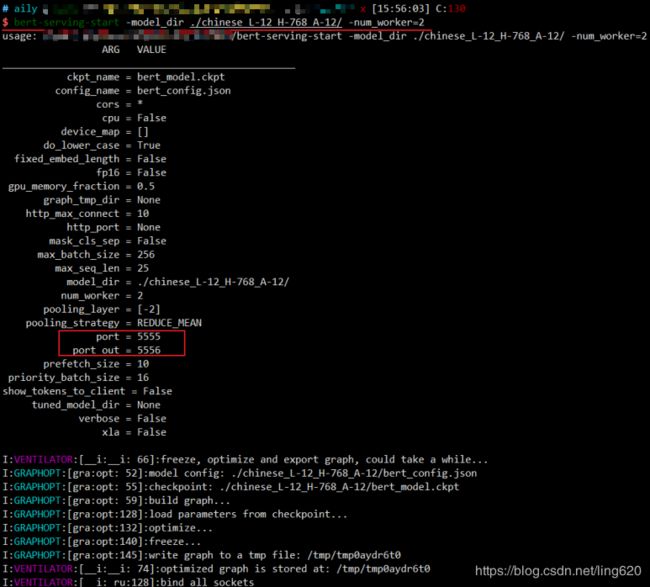
如下图所示,开启成功后显示如下:

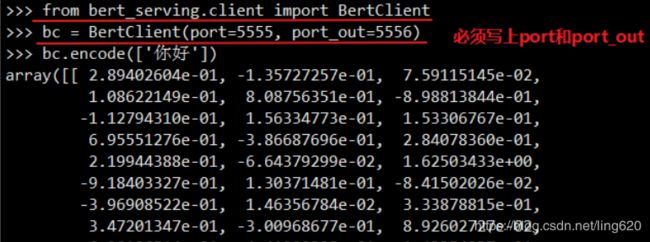
咳咳,注意一下红框标识位置,后面会用到。
3、使用客户端获取句子编码向量
BERT 的另一个特性是可以获取一对句子的向量,句子之间使用|||作为分隔
使用方法
bc.encode(['你好吗|||今天天气不错'])
当然,更希望一次测试多个句子,如下:
bc.encode(['你好吗', '今天天气不错', '谢谢啊'])
参考资料
下面这两篇博客,自认为分析的比较好
- BERT简单使用:简化了官网文档中的代码,很清晰
- 使用BERT生成句向量:作者基于Google开源的BERT代码进行了进一步的简化,方便生成句向量与做文本分类

