Xcode7.3,swift2.2
Storyboard凭借其方便直观等优点,已经越来越多用于项目开发中.这里我来介绍一下刚学到的一个技巧.
1.问题来源
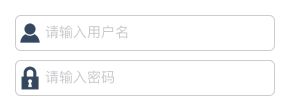
当UI设计师设计的界面中有这样的控件,你会怎么做.
1.使用代码
在不允许使用storyboard或xib时,只能用代码,在run时才能看到效果
2.使用storyboard,拖控件,设置圆角,边框
仍旧需要使用代码来实现,在run时才能看到效果.而且拖一个控件只是为了设置其边框、圆角,会增加代码量,不简洁.
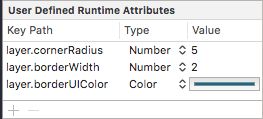
3.使用Runtime Attributes
不用拖控件写代码设置,但是KeyPath中设置属性没有提示,对于习惯于提示的我,总是先在代码中写好,再复制到KeyPath中,且run时才能看到效果
layer.borderColor是CGColor类型,如果直接设置颜色,是没有效果的,需要在CALayer中扩展一个自定义属性
extension CALayer {
    public var borderUIColor:UIColor? {
        set(newValue) {
            self.borderColor = newValue?.CGColor
        }
        get {
            return UIColor(CGColor: self.borderColor!)
        }
    }
}
使用自定义属性borderUIColor设置边框颜色
5.使用
IBDesignable和
IBInspectable动态改变.
2.使用IBDesignable和IBInspectable动态改变
1.创建类
创建一个类MMButton,继承于UIButton
在class前加关键字,@IBDesignable
@IBDesignable
class MMButton: UIButton {
}
增加自定义属性,并且在属性前加关键字@ IBInspectable,重写didSet方法
@IBDesignable
class MMButton: UIButton {
    //圆角
    @IBInspectable var cornerRadius:CGFloat = 0.0 {
        didSet {
            self.layer.cornerRadius = cornerRadius
        }
    }
    //边框宽度
    @IBInspectable var borderWidth:CGFloat = 0.0 {
        didSet {
            self.layer.borderWidth = borderWidth
        }
    }
    //边框颜色
    @IBInspectable var borderColor:UIColor = UIColor() {
        didSet {
            self.layer.borderColor = borderColor.CGColor
        }
    }
}
2.创建控件
向storyboard/xib中的view上拖一个UIButton控件,并修改class为刚才新建的类MMButton
现在可以在Attributes Inspector中看到MMButton中设置的属性
这时改变属性值,就可以实时看到UI效果
3.OC用法
1..h文件声明
在.h文件中声明属性,在属性中加关键字IBInspectable
#import
@interface MMButton : UIButton
@property (nonatomic, assign) IBInspectable CGFloat connerRadius;
@property (nonatomic, assign) IBInspectable CGFloat borderWidth;
@property (nonatomic, assign) IBInspectable UIColor *borderColor;
@end
2..m文件实现,重写set方法
在.m文件中,添加关键字IB_DESIGNABLE
#import "MMButton.h"
IB_DESIGNABLE
@implementation MMButton
- (void)setConnerRadius:(CGFloat)connerRadius {
    _connerRadius = connerRadius;
    self.layer.cornerRadius = _connerRadius;
    self.layer.masksToBounds = YES;
}
- (void)setBorderWidth:(CGFloat)borderWidth {
    _borderWidth = borderWidth;
    self.layer.borderWidth = _borderWidth;
}
- (void)setBorderColor:(UIColor *)borderColor {
    _borderColor = borderColor;
    self.layer.borderColor = _borderColor.CGColor;
}
@end
4.为项目设计属于自己的"UIKit"库
1.常用控件
UIView, UILabel, UIButton, UIImageView: layer.cornerRadius, layer.borderColor, layer.borderWidth
UILabel: UIEdgeInsets
UITextField: leftView, rightView
2.UIView/UIButton/UIImageView
这三个控件可以设置常用的属性,
self.layer.cornerRadius
self.layer.borderColor
self.layer.borderWidth
3.UILabel
self.layer.cornerRadius
self.layer.borderColor
self.layer.borderWidth
除了以上三个常用属性,还可以添加边距
@IBInspectable var insetTop:CGFloat = 0 {
        didSet {
        }
    }
    @IBInspectable var insetLeft:CGFloat = 0 {
        didSet {
        }
    }
    @IBInspectable var insetBottom:CGFloat = 0 {
        didSet {
        }
    }
    @IBInspectable var insetRight:CGFloat = 0 {
        didSet {
        }
    }
    override func drawTextInRect(rect: CGRect) {
        super.drawTextInRect(UIEdgeInsetsInsetRect(rect, UIEdgeInsetsMake(insetTop, insetLeft, insetBottom, insetRight)))
    }
4.UITextField
设置textField.leftView和textField.rightView
@IBDesignable
class MMTextField: UITextField {
    //************* leftView *************
    @IBInspectable var leftImage:UIImage = UIImage() {
        didSet {
            self.leftViewMode = .Always
            let imageView = UIImageView(image: leftImage)
            imageView.clipsToBounds = true
            imageView.contentMode = .ScaleAspectFit
            //为了看一下leftView的大小(rect),实际使用时不用设置
            imageView.backgroundColor = UIColor.redColor()
            self.leftView = imageView
        }
    }
    @IBInspectable var leftViewWidth:CGFloat = 0 {
        didSet {
            self.leftView?.frame = CGRectMake(0, 0, leftViewWidth, leftViewHeight)
        }
    }
    @IBInspectable var leftViewHeight:CGFloat = 0 {
        didSet {
            self.leftView?.frame = CGRectMake(0, 0, leftViewWidth, leftViewHeight)
        }
    }
    //************* rightView ************
    @IBInspectable var rightImage:UIImage = UIImage() {
        didSet {
            self.rightViewMode = .Always
            self.rightView?.clipsToBounds = true
            let imageView = UIImageView(image: rightImage)
            imageView.contentMode = .ScaleAspectFit
            self.rightView?.backgroundColor = UIColor.greenColor()
            self.rightView = imageView
        }
    }
    @IBInspectable var rightViewWidth:CGFloat = 0 {
        didSet {
            self.rightView?.frame = CGRectMake(0, 0, rightViewWidth, rightViewHeight)
        }
    }
    @IBInspectable var rightViewHeight:CGFloat = 0 {
        didSet {
            self.rightView?.frame = CGRectMake(0, 0, rightViewWidth, rightViewHeight)
        }
    }
    //************* textRect *************
    override func textRectForBounds(bounds: CGRect) -> CGRect {
        var rect = bounds
        rect.origin.x += leftViewWidth
        rect.size.width -= (leftViewWidth+rightViewWidth)
        return rect
    }
    override func editingRectForBounds(bounds: CGRect) -> CGRect {
        var rect = bounds
        rect.origin.x += leftViewWidth
        rect.size.width -= (leftViewWidth+rightViewWidth)
        return rect
    }
}
leftView和
rightView的背景色是为了演示视图大小(rect),实际使用时,去掉颜色
可以方便设置这种登录界面
5.注意点
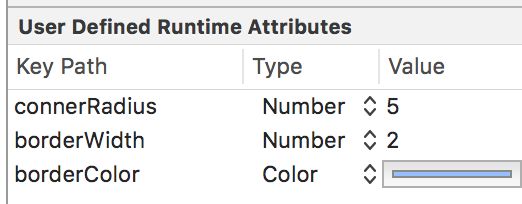
修改属性之后,可以看到在 User Defined Runtime Attributes 中会自动添加属性
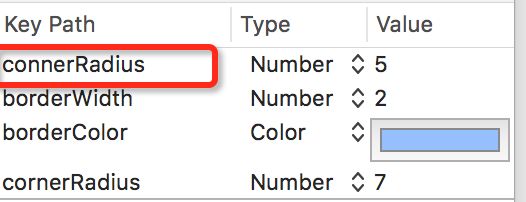
由于英语不好,拼错了单词cornerRadius,出于程序员的强迫症,必须把他改过来.改完后,再设置属性,发现原来的属性仍旧存在.需要把原来的属性删掉


