python接口测试框架的实现
本文总结分享介绍接口测试框架开发,环境使用python3+requests+unittest+ddt测试框架及ddt数据驱动,采用Excel管理测试用例等集成测试数据功能,以及使用HTMLTestRunner来生成测试报告,目前有开源的poman、Jmeter等接口测试工具,为什么还要开发接口测试框架呢?因接口测试工具也有存在几点不足。
- 测试数据不可控制。比如接口返回数据不可控,就无法自动断言接口返回的数据,不能断定是接口程序引起,还是测试数据变化引起的错误,所以需要做一些初始化测试数据。接口工具没有具备初始化测试数据功能,无法做到真正的接口测试自动化。
- 无法测试加密接口。实际项目中,多数接口不是可以随便调用,一般情况无法摸拟和生成加密算法。如时间戳和MDB加密算法,一般接口工具无法摸拟。
- 扩展能力不足。开源的接口测试工具无法实现扩展功能。比如,我们想生成不同格式的测试报告,想将测试报告发送到指定邮箱,又想让接口测试集成到CI中,做持续集成定时任务。
一、项目结构
1.新建一个工程(一定要创建工程),工程名称自己定义,如:api_xxx
2.在工程的跟目录新建一个脚本:run_main.py,用来执行全部用例
3.在工程下创建以下几个pakage包:
–cases:这个包放test开头的测试用例,也可以放一些封装接口的方法,如:loginblog(如果封装的接口比较多,也可以单独放一个包)
–common:这个包放一些公共的方法,如:读取excel文件方法,读取mysql、oracle,logger.py这个是封装日志的输入,HTMLTestRunner发送报告
–config:cfg.ini这里是配置文件,如邮箱的一些参数:收件人,发件人,密码
等,readConfig.py用于读取配置文件
–logs:这里存放日志信息
–reports:这里存放测试报告
–img:存放图片路径

二、run_main
第一步:用discover方法加载所有的测试用例
1.cur_path这个参数是读取当前这个脚本的真实路径,也就是run_main.py的真实路径
2.caseName="case"这个case是存放测试用例的文件夹,如果没有的话,自动创建。如果想运行其它文件夹的用例,就改下caseName这个参数值
3.rule="test*.py"这个是匹配用例脚本名称的规则,默认匹配test开头的所有用例
coding=utf-8
import unittest
import time
from common import HTMLTestRunner
from email.mime.text import MIMEText
from email.mime.multipart import MIMEMultipart
import smtplib
import os
from config import readConfig
‘’’
下面三行代码python2报告出现乱码时候可以加上####
import sys
reload(sys)
sys.setdefaultencoding(‘utf8’)
‘’’
这个是优化版执行所有用例并发送报告,分四个步骤
第一步加载用例
第二步执行用例
第三步获取最新测试报告
第四步发送邮箱 (这一步不想执行的话,可以注释掉最后面那个函数就行)
当前脚本所在文件真实路径
cur_path = os.path.dirname(os.path.realpath(file))
def add_case(caseName=“cases”, rule=“test*.py”):
‘’‘第一步:加载所有的测试用例’’’
case_path = os.path.join(cur_path, caseName) # 用例文件夹
# 如果不存在这个case文件夹,就自动创建一个
if not os.path.exists(case_path): os.mkdir(case_path)
print(“test case path:%s”%case_path)
# 定义discover方法的参数
discover = unittest.defaultTestLoader.discover(case_path,
pattern=rule,
top_level_dir=None)
print(discover)
return discover
def run_case(all_case, reportsName=“reports”):
‘’‘第二步:执行所有的用例, 并把结果写入HTML测试报告’’’
now = time.strftime("%Y_%m_%d_%H_%M_%S")
reports_path = os.path.join(cur_path, reportsName) # 用例文件夹
# 如果不存在这个report文件夹,就自动创建一个
if not os.path.exists(reports_path):os.mkdir(reports_path)
reports_abspath = os.path.join(reports_path, “result.html”)
print(“reports path:%s”%reports_abspath)
fp = open(reports_abspath, “wb”)
runner = HTMLTestRunner.HTMLTestRunner(stream=fp,
verbosity=2,
title=u’自动化测试报告,测试结果如下:’,
description=u’用例执行情况:’)
# 调用add_case函数返回值
runner.run(all_case)
fp.close()
def get_reports_file(reports_path):
‘’‘第三步:获取最新的测试报告’’’
lists = os.listdir(reports_path)
lists.sort(key=lambda fn: os.path.getmtime(os.path.join(reports_path, fn)))
print(u’最新测试生成的报告: '+lists[-1])
# 找到最新生成的报告文件
reports_file = os.path.join(reports_path, lists[-1])
return reports_file
def send_mail(sender, psw, receiver, smtp_server, reports_file, port):
‘’‘第四步:发送最新的测试报告内容’’’
with open(reports_file, “rb”) as f:
mail_body = f.read()
# 定义邮件内容
msg = MIMEMultipart()
body = MIMEText(mail_body, _subtype=‘html’, _charset=‘utf-8’)
msg[‘Subject’] = u"自动化测试报告"
msg[“from”] = sender
if isinstance(receiver, str):
msg[“to”] = receiver
if isinstance(receiver, list):
msg[“to”] = “,”.join(receiver)
msg.attach(body)
# 添加附件
att = MIMEText(open(reports_file, “rb”).read(), “base64”, “utf-8”)
att[“Content-Type”] = “application/octet-stream”
att[“Content-Disposition”] = ‘attachment; filename= “reports.html”’
msg.attach(att)
try:
smtp = smtplib.SMTP()
smtp.connect(smtp_server) # 连服务器
smtp.login(sender, psw)
except:
smtp = smtplib.SMTP_SSL(smtp_server, port) # QQ
smtp.login(sender, psw) # 登录
smtp.sendmail(sender, receiver, msg.as_string())
smtp.quit()
print(‘test reports email has send out !’)
if name == “main”:
all_case = add_case() # 1 加载用例
run_case(all_case) # 2执行用例
# # 获取最新的测试报告文件
reports_path = os.path.join(cur_path, “reports”) # 用例文件夹
reports_file = get_reports_file(reports_path) # 3获取最新的测试报告
# #邮箱配置
sender=readConfig.sender
psw=readConfig.psw
smtp_server=readConfig.smtp_server
receiver=readConfig.receiver
port=readConfig.port
send_mail(sender, psw, receiver, smtp_server, reports_file, port)
三、config配置
cfg.ini的代码:
[email]
sender=你的邮箱账号
psw=授权码
smtp_server=smtp.qq.com
receiver=你的邮箱账号
port=465
不同的邮箱服务器也会不一样的,这边使用的是qq的smtp,需要自己在邮箱里开启smtp并获取授权码,不会开启smtp的,可以参考下面的链接
https://service.mail.qq.com/cgi-bin/help?id=28&no=1001256&subtype=1
readConfig.py的代码:
#coding:utf-8
import os
import configparser #使用配置文件生效
cur_path = os.path.dirname(os.path.realpath(file))
configPath=os.path.join(cur_path,“cfg.ini”)
conf=configparser.ConfigParser()
conf.read(configPath,encoding=“utf-8”)
smtp_server=conf.get(‘email’,‘smtp_server’)
sender=conf.get(‘email’,‘sender’)
psw=conf.get(‘email’,‘psw’)
receiver=conf.get(“email”,“receiver”)
port=conf.get(“email”,‘port’)

四logger日志的配置
import logging, time
import os
#log_path是存放日志的路径
cur_path = os.path.dirname(os.path.realpath(file))
log_path = os.path.join(os.path.dirname(cur_path), ‘logs’)
#如果不存在这个logs文件夹,就自动创建一个
if not os.path.exists(log_path):os.mkdir(log_path)
class Log():
def init(self):
# 文件的命名
self.logname = os.path.join(log_path, ‘%s.log’%time.strftime(’%Y_%m_%d’))
self.logger = logging.getLogger()
self.logger.setLevel(logging.DEBUG)
# 日志输出格式
self.formatter = logging.Formatter(’[%(asctime)s] - %(filename)s] - %(levelname)s: %(message)s’)
def __console(self, level, message):
# 创建一个FileHandler,用于写到本地
fh = logging.FileHandler(self.logname, ‘a’) # 追加模式 这个是python2的
# fh = logging.FileHandler(self.logname, ‘a’, encoding=‘utf-8’) # 这个是python3的
fh.setLevel(logging.DEBUG)
fh.setFormatter(self.formatter)
self.logger.addHandler(fh)
# 创建一个StreamHandler,用于输出到控制台
ch = logging.StreamHandler()
ch.setLevel(logging.DEBUG)
ch.setFormatter(self.formatter)
self.logger.addHandler(ch)
if level == ‘info’:
self.logger.info(message)
elif level == ‘debug’:
self.logger.debug(message)
elif level == ‘warning’:
self.logger.warning(message)
elif level == ‘error’:
self.logger.error(message)
# 这两行代码是为了避免日志输出重复问题
self.logger.removeHandler(ch)
self.logger.removeHandler(fh)
# 关闭打开的文件
fh.close()
def debug(self, message):
self.__console(‘debug’, message)
def info(self, message):
self.__console(‘info’, message)
def warning(self, message):
self.__console(‘warning’, message)
def error(self, message):
self.__console(‘error’, message)
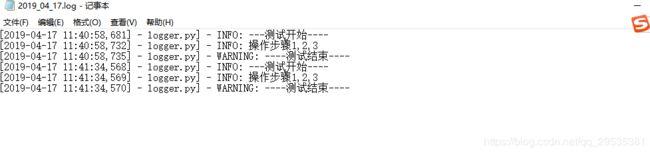
if name == “main”:
log = Log()
log.info("—测试开始----")
log.info(“操作步骤1,2,3”)
log.warning("----测试结束----")
五cases编写
1.常用的接口封装 如登录界面
import requests
import re
url = “http://221.228.101.103:8282/gyoms/back”
url2=“http://221.228.101.103:8282/gyoms/login”
s = requests.session()
def login(s, user, psw):
t1 = s.get(url)
h2={
“Connection”: “keep-alive”,
“Content-Length”: “39”,
“User-Agent”: “Mozilla/5.0 (Windows NT 10.0; Win64; x64) AppleWebKit/537.36 (KHTML, like Gecko) Chrome/73.0.3683.86 Safari/537.36”,
“Referer”:‘http://221.228.101.103:8282/gyoms/back’,
“Accept-Encoding”:“gzip, deflate”,
“Cookie”: “JSESSIONID=6C863CB8646D438B7002487DA2033516”
}
body={
“username”:user,
“password”:psw
}
t2=s.post(url2,headers=h2,data=body)
url3="http://221.228.101.103:8282/gyoms/back/main "
c=requests.cookies.RequestsCookieJar()
c.set(“menusf”,“ok”)
c.set(“JSESSIONID”,“6C863CB8646D438B7002487DA2033516”)
c.set(“rememberMe”,“sQVIuLzVOVvXEscsJrC3Ba31E/SSxVa6fx5sbTiPxw/OXMMCCqZ+ivGYcIA82P6CxDAaBqoVcKsZ3cWBYcGUDt3S+sIooaYHuS/Q9eFo4Ra00BmK3hWTNa9Vmh2CDgmALHeHK/l7JmX1mw5gXN2iKZRkOMFul90j+jVmr9uB2e45I/BwizFesCuJeUfCSLlW2f2wJOb9cefUpcrf1hPySDgAk6vIL8K9aDveB/r2onk7spKtcwYKm6NgsWG0xDvECli2NCnj8WcOJ1jKt2LYRxG8c97BDFg5tUG/5WCAXl0e9xDtIDkSo/2gwXpg15V3UWlzXK/dBHoACl1wwTQJ0LAskZWqv0dr5JiHaWw0OAstVJo3DnixOYGkK3eSZVk/72tMwwsgiYtkFRjCw/MJnU2l2rCpLOU2O4D7D4PVSJvjYzaAm/QcOG//srjVulvDVGO19w/Y5lTitfVfRRVxZWQSJfXELSSWiyn+I0bnRBEruPF10Tm5MG+nQXQ1vVf1/yRJHIRUYjfEHa++ULsVWg==”)
s.cookies.update©
t3=s.get(url3)
if “Lily全渠道订单管理系统” in t3.text:
print(“Lily全渠道订单管理系统!”)
else:
print(“登录失败,检查账号密码!”)
return t3.text
def is_login_sucess(t):
result = False # 立 flag
if “Lily全渠道订单管理系统” in t:
result = True
return result
if name == “main”:
r = login(s,“账户名”,“密码”)
print®
res = is_login_sucess®
print(res)
2.test用例的编写
import unittest
import requests
from common.read_excel import ExcelUtil
import os
import json
from api_lily.lily_login import login,is_login_sucess
class TestLogin(unittest.TestCase):
def setUp(self):
pass
self.s = requests.session()
def tearDown(self):
self.s.cookies.clear() # 清空cookies
def test_login_01(self):
‘’‘登录数据: test test ‘’’
t = login(self.s, user=“test”, psw=“test”)
res = is_login_sucess(t)
print(res) # 获取实际结果 True False
self.assertEqual(res, True)
if name == ‘main’:
unittest.main()
6.logger的日志查看
7.测试报告的输出
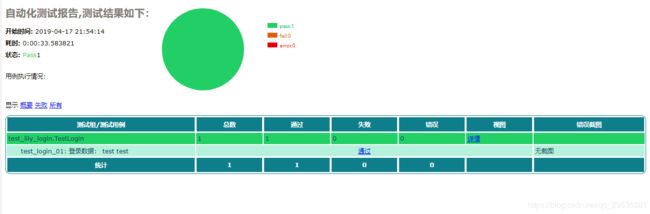
8.邮箱收到测试报告

qq邮箱这边显示有点问题,用企业邮箱不会出现这个情况