巧用Unity 2D功能:只需六步开发简单的2D UFO游戏
无论我们现在可以选择多少种类繁多的,拥有逼真画面感的游戏,2D游戏始终会在玩家们的心中占据一席之地,而对于想迈入开发者行列的同学们来说,先尝试做一款2D游戏无疑是合适的起点。Unity中的2D功能让开发此类游戏更加的便捷,这篇教程将教大家使用Unity 2D功能制作一个非常简单的UFO游戏,整个过程只需要6个步骤,适合Unity初学者以及对Unity的2D功能不甚熟悉的开发者们,希望Unity能让你初尝游戏开发的乐趣,为以后的开发之路奠定基础,你准备好完成这款简单的2D游戏了吗?
第一步 新建项目设置场景
首先下载项目所需的资源,或者在Asset Store中下载Unity官方的2D UFO Tutorial。

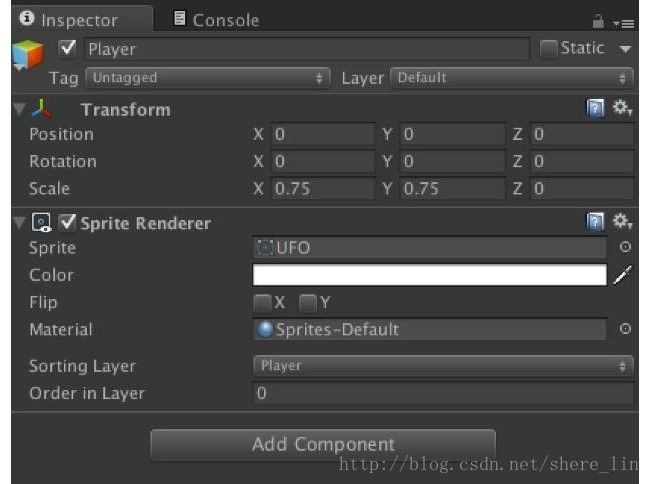
新建2D项目,在Assets文件夹下新建三个文件夹:Prefabs、Scripts、Scenes。将下载的资源导入项目,会看到Sprites文件夹。将Sprites文件夹下的Background和UFO图片拖拽至层级视图(Hierarchy),将UFO重命名为Player。如下:

依次点击菜单项Edit > Project Settings > Tags and Layers,新建三个Sorting Layer分别命名为Background、Pickups和Players,然后设置各Sprite的Sorting Layer。

将Player的Scale设为(0.75, 0.75, 0),如下:
将Main Camera的Size设为16.5,背景颜色设为RGB(32, 32, 32),如下:

将场景保存到新建的Scenes文件夹下,任意命名即可,本例中命名为Main。
第二步 添加控制主角的脚本
首先为Player游戏对象添加Rigibody 2D组件。然后新建脚本CompletePlayerController
用于控制Player对象,脚本代码如下:
using UnityEngine;
using System.Collections;
//Adding this allows us to access members of the UI namespace including Text.
using UnityEngine.UI;
public class CompletePlayerController : MonoBehaviour {
public float speed; //Floating point variable to store the player’s movement speed.
public Text countText; //Store a reference to the UI Text component which will display the number of pickups collected.
public Text winText; //Store a reference to the UI Text component which will display the ‘You win’ message.
private Rigidbody2D rb2d; //Store a reference to the Rigidbody2D component required to use 2D Physics.
private int count; //Integer to store the number of pickups collected so far.
// Use this for initialization
void Start()
{
rb2d = GetComponent ();
   count = 0;

   //Initialze winText to a blank string since we haven't won yet at beginning.                 winText.text = "";
    //Call our SetCountText function which will update the text with the current value for count.                 SetCountText ();         }
{
//Store the current horizontal input in the float moveHorizontal. float moveHorizontal = Input.GetAxis (“Horizontal”);
//Store the current vertical input in the float moveVertical. float moveVertical = Input.GetAxis (“Vertical”);
//Use the two store floats to create a new Vector2 variable movement.
Vector2 movement = new Vector2 (moveHorizontal, moveVertical);
rb2d.AddForce (movement * speed);
}
//OnTriggerEnter2D is called whenever this object overlaps with a trigger collider. void OnTriggerEnter2D(Collider2D other)
{
//Check the provided Collider2D parameter other to see if it is tagged “PickUp”, if it is…
if (other.gameObject.CompareTag (“PickUp”))
{
//… then set the other object we just collided with to inactive. other.gameObject.SetActive(false);
//Add one to the current value of our count variable.
//Update the currently displayed count by calling the SetCountText function. SetCountText ();
}
}
//This function updates the text displaying the number of objects we’ve collected and displays our victory message if we’ve collected all of them. void SetCountText() {
countText.text = “Count: ” + count.ToString ();
if (count >= 12)
}
}
依次点击Edit > Project Settings > Input设置控制键,如下:

将Player对象的Rigibody 2D组件的Gravity Scale属性设为0以防止Player向下坠落,并将PlayerController脚本的Speed属性设为10。
第三步 添加碰撞
为Player添加Circle Collider 2D组件并将Radius属性设为2.15,如下:

接下来为背景添加碰撞体,让玩家不要跑出墙壁。为背景边框添加4个Box Collider 2D组件,各组件属性设置如下:

第四步 让摄像机跟随主角
新建脚本CompleteCameraController绑定到Main Camera上,用于控制相机跟随主角移动。脚本代码如下:
using UnityEngine;
using System.Collections;
public class CompleteCameraController : MonoBehaviour {
//Public variable to store a reference to the player game object
private Vector3 offset;
void Start ()
//Calculate and store the offset value by getting the distance between the player’s position and camera’s position.
offset = transform.position - player.transform.position;
// LateUpdate is called after Update each frame
void LateUpdate ()
// Set the position of the camera’s transform to be the same as the player’s, but offset by the calculated offset distance.
transform.position = player.transform.position + offset;
}
}
将Player游戏对象赋给CameraController脚本的player字段。
第五步 设置宝石
将Sprites文件夹下的Pickup图片拖拽至层级视图,将其Sorting Layer设为Pickup并添加Circle Collider 2D组件。然后新建脚本CompleteRotator用于旋转宝石,脚本代码如下:
using UnityEngine;
using System.Collections;
//Update is called every frame
{
//Rotate thet transform of the game object this is attached to by 45 degrees, taking into account the time elapsed since last frame.
transform.Rotate (new Vector3 (0, 0, 45) * Time.deltaTime);
}
}
将该游戏对象拖拽至项目视图(Project)的Prefabs文件夹下存为预设体,在层级视图复制出11个宝石对象。然后在层级视图新建GameObject命名为Pickups,并将这12个对象均拖至Pickups下,分别设置合适的位置,如下图:

将Pickup预设体的Tag设为PickUp,并将所有Pickup对象的Circle Collider 2D组件的isTrigger属性勾选上:

第六步 添加UI
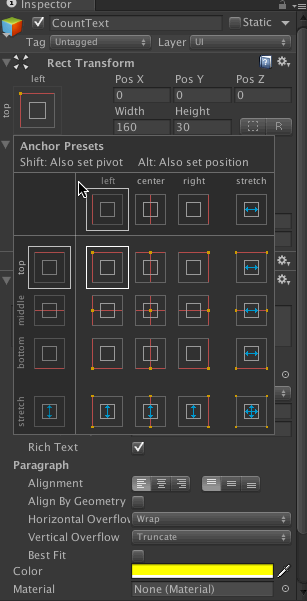
右键点击层级视图,在弹出菜单中选择UI > Text新建文本,层级视图中除了Text外还会添加Canvas和EventSystem组件。将新建的Text命名为CountText,在检视面板中打开Rect Transform的锚点设置面板后按下Shift+Alt/Option键点选左上角,让Text自动吸附到界面左上角并选择合适的文本颜色,如下图:
再次新建Text命名为WinText,将字体大小设为24,对齐位置设为中间并选择合适的颜色,如下图:

最后,将刚才新建的两个Text分别赋给PlayerController脚本的CountText及WinText字段,如下图:

到此就大功告成了,最后运行效果如下:

同学们如果想掌握更多Unity 2D开发的知识与技巧,通过更系统的学习变身Unity技术达人,创造出梦想中的游戏,请关注“技术闪耀未来-Unity全球技术校园行”。
“技术闪耀未来-Unity全球技术校园行”- Unity Plus加强版开学季专属优惠(9月1日-9月30日):
1, 特惠价格139元/月订阅价
2, 免费获得Unity认证开发者课程(访问权截止到12月31日)
3, 免费获得1款资源工具包:VR、2D、艺术设计和移动平台(4选1)
点击此链接,完成订阅购买:https://store.unity.com/cn/offer/unity-essentials-education-packs?login=1