spring security------过滤器源码解析(二)
我们上篇已经解析过了前三个过滤器的源码,这篇将会去解析之前剩下的几个类
- BasicAuthenticationFilter
- RequestCacheAwareFilter
- SecurityContextHolderAwareRequestFilter
- AnonymousAuthenticationFilter
废话不多说,直接进入主题吧
BasicAuthenticationFilter类
其实这个是基于Basic验证方式,而什么是basic认证呢?
Basic 认证是HTTP 中非常简单的认证方式,因为简单,所以不是很安全,不过仍然非常常用。
当一个客户端向一个需要认证的HTTP服务器进行数据请求时,如果之前没有认证过,HTTP服务器会返回401状态码,要求客户端输入用户名和密码。用户输入用户名和密码后,用户名和密码会经过BASE64加密附加到请求信息中再次请求HTTP服务器,HTTP服务器会根据请求头携带的认证信息,决定是否认证成功及做出相应的响应。
这个BasicAuthenticationFilter类其实是针对于basic的,因为security是支持这个basic认证的。而我们平常开发中很少用到这个认证方式。所以这个源码就直接绕过去。
RequestCacheAwareFilter 类
这个类的作用主要是用于用户登录成功后,重新恢复因为登录被打断的请求 ,
被打算的请求:简单点说就是出现了AuthenticationException、AccessDeniedException两类异常
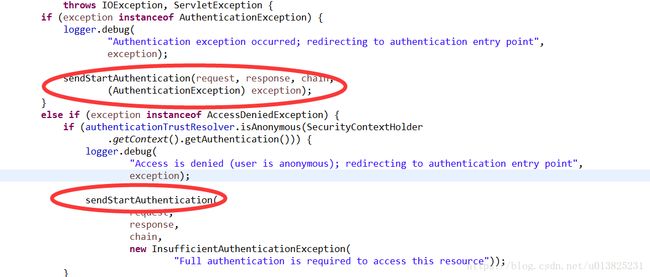
当我们用security的时候,你会发现我们在第一次登录的时候,你访问一个需要登录的接口的时候,他会自动帮你转到登录页面,然后你登录成功后,他会帮你重新在转回来,其实这个转来转去就是通过这个类来保存之前访问的url。因为我们知道在我们未登录的时候,也就是contextholder里面没有数据的时候是会抛出异常的,所以在我们抛出异常的过程中,我们会将他跳转到登录页面,而之前的url会被保存,所以我们需要去异常类里面查看他是如何进行数据的保存的。我们直接通过这个异常类来看吧ExceptionTranslationFilter这个方法
    protected void sendStartAuthentication(HttpServletRequest request,
            HttpServletResponse response, FilterChain chain,
            AuthenticationException reason) throws ServletException, IOException {
        // SEC-112: Clear the SecurityContextHolder's Authentication, as the
        // existing Authentication is no longer considered valid
        SecurityContextHolder.getContext().setAuthentication(null);
        //这边将我们的request进行保存
        requestCache.saveRequest(request, response);
        logger.debug("Calling Authentication entry point.");
        authenticationEntryPoint.commence(request, response, reason);
    }
而这个方法的执行时在这上面判断的

可以看到当出现了异常的时候就会去调用这个方法进行保存这个request,具体的保存方法requestCache.saveRequest(request, response);的实现如下
public void saveRequest(HttpServletRequest request, HttpServletResponse response) {
         //由于构造HttpSessionRequestCache的bean时,没有设置justUseSavedRequestOnGet属性,所以该属性为默认值false。
    if (!justUseSavedRequestOnGet || "GET".equals(request.getMethod())) {
        //构造DefaultSavedRequest,并且设置到session中
            DefaultSavedRequest savedRequest = new DefaultSavedRequest(request,
                    portResolver);
            if (createSessionAllowed || request.getSession(false) != null) {
                // Store the HTTP request itself. Used by
                // AbstractAuthenticationProcessingFilter
                // for redirection after successful authentication (SEC-29)
                request.getSession().setAttribute(SAVED_REQUEST, savedRequest);
                logger.debug("DefaultSavedRequest added to Session: " + savedRequest);
            }
        }
        else {
            logger.debug("Request not saved as configured RequestMatcher did not match");
        }
    }
既然有保存,那么就一定有恢复,他是在哪恢复的呢,其实这个就是在我们这边的过滤器的dofilter中
//根据当前session取出DefaultSavedRequest,如果有被打断的请求,就把当前请求与被打断请求做匹配。如果匹配成功,对当前请求封装,再传递到下一个过滤器
public void doFilter(ServletRequest request, ServletResponse response,
            FilterChain chain) throws IOException, ServletException {

        HttpServletRequest wrappedSavedRequest = requestCache.getMatchingRequest(
                (HttpServletRequest) request, (HttpServletResponse) response);
        chain.doFilter(wrappedSavedRequest == null ? request : wrappedSavedRequest,
                response);
    }
然后继续回到我们保存cach的类中HttpSessionRequestCache中
    public HttpServletRequest getMatchingRequest(HttpServletRequest request,
            HttpServletResponse response) {
        DefaultSavedRequest saved = (DefaultSavedRequest) getRequest(request, response);

         //如果没有被打断请求,直接返回null,不做处理
    if (saved == null) {
        return null;
    }
    //如果当前请求与被打断请求不匹配,直接返回null,不做处理
    if (!saved.doesRequestMatch(request, portResolver)) {
        logger.debug("saved request doesn't match");
        return null;
    }
    //清除被打断请求
    removeRequest(request, response);
    //重新包装当前请求为被打断请求的各项信息
    return new SavedRequestAwareWrapper(saved, request);
    }
SecurityContextHolderAwareRequestFilter 类
SecurityContextHolderAwareRequestWrapper类对request包装的目的主要是实现servlet api的一些接口方法isUserInRole、getRemoteUser。 这个过滤器看起来很简单。目的仅仅是实现java ee中servlet api一些接口方法。 一些应用中直接使用getRemoteUser方法、isUserInRole方法,在使用spring security时其实就是通过这个过滤器来实现的。
看他源码的dofiler就能看出一点猫腻
public void doFilter(ServletRequest req, ServletResponse res, FilterChain chain)
            throws IOException, ServletException {
            //将HttpServletRequest和HttpServletResponse重新封装了一下
        chain.doFilter(requestFactory.create((HttpServletRequest) req,
                (HttpServletResponse) res), res);
    }
至于下面怎么包装的,大家可以自己抽空去看下。
AnonymousAuthenticationFilter 类
AnonymousAuthenticationFilter过滤器是在UsernamePasswordAuthenticationFilter、BasicAuthenticationFilter、RememberMeAuthenticationFilter这些过滤器后面的,所以如果这三个过滤器都没有认证成功,则为当前的SecurityContext中添加一个经过匿名认证的token,但是通过servlet的getRemoteUser等方法是获取不到登录账号的。因为SecurityContextHolderAwareRequestFilter过滤器在AnonymousAuthenticationFilter前面。这个过滤器主要是针对于匿名的。
我们还是看他的dofilter方法
public void doFilter(ServletRequest req, ServletResponse res, FilterChain chain)
            throws IOException, ServletException {
            //首先会去判断这个context是否为空,为空的话就会去createAuthentication这个方法,不为空直接放行
        if (SecurityContextHolder.getContext().getAuthentication() == null) {
            SecurityContextHolder.getContext().setAuthentication(
                    createAuthentication((HttpServletRequest) req));

            if (logger.isDebugEnabled()) {
                logger.debug("Populated SecurityContextHolder with anonymous token: '"
                        + SecurityContextHolder.getContext().getAuthentication() + "'");
            }
        }
        else {
            if (logger.isDebugEnabled()) {
                logger.debug("SecurityContextHolder not populated with anonymous token, as it already contained: '"
                        + SecurityContextHolder.getContext().getAuthentication() + "'");
            }
        }
        chain.doFilter(req, res);
    }
上面提到createAuthentication方法,我们直接看这个 方法做了什么事情
protected Authentication createAuthentication(HttpServletRequest request) {
//创建一个AnonymousAuthenticationToken,注意这里的key、userAttribute是通过解析标签注入的
        AnonymousAuthenticationToken auth = new AnonymousAuthenticationToken(key,
                principal, authorities);
        auth.setDetails(authenticationDetailsSource.buildDetails(request));

        return auth;
    }
看到这个AnonymousAuthenticationToken 类是不是很熟悉啊,是不是和我们上节说的UsernamePasswordAuthenticationFilter很相像啊,其实他们都是Authentication的实现类,Authentication则是被SecurityContextHolder(SecurityContext)持有的。
而我们xml配置的匿名的时候是这样配置的
<anonymous granted-authority="ROLE_ANONYMOUS" enabled="true" username="test"/> 这里username属性容易混淆,username默认为anonymousUser,实际上是注入到UserAttribute的password变量中的。
granted-authority属性注入到UserAttribute的authorities授权列表