开源EDR(OSSEC)基础篇- 02 -部署环境与安装方式
前言
上一篇介绍了OSSEC设计的定位以及产品输出的能力,在对OSSEC安全功能有个大体印象的前提下,我们接着开始实践OSSEC的安装和部署,本篇重点的重点是帮助初次接触或者对OSSEC不熟悉的同学,无痛安装,并能够用最短的时间在所服务的企业内部真正的使用起来。
1. 环境准备
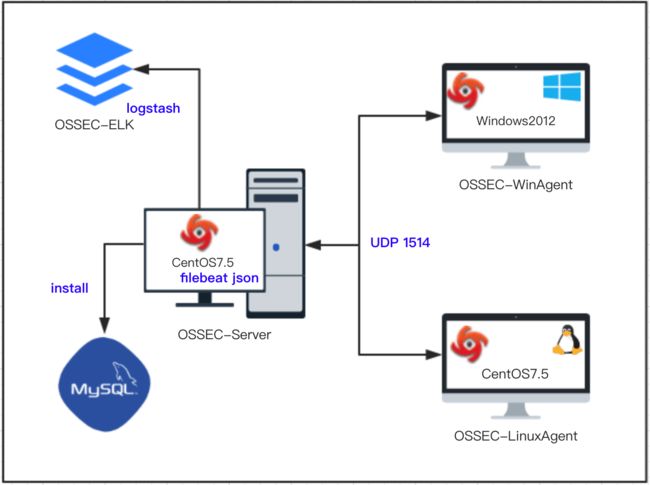
1.1 拓扑图
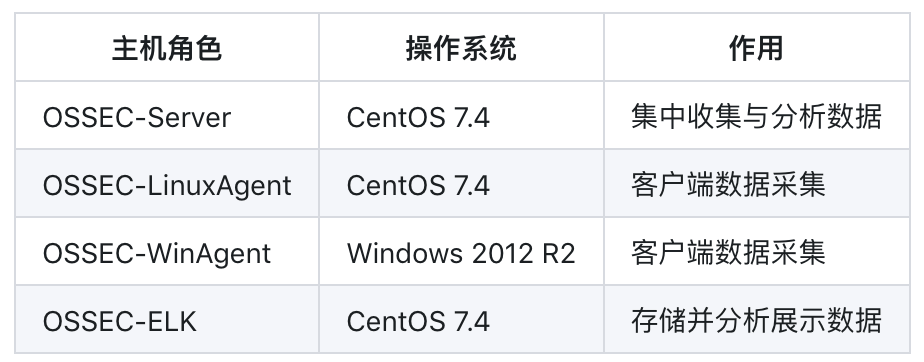
1.2 部署清单
1.3 工作流
- OSSEC-Server 部署Server端程序
- OSSEC-LinuxAgent和OSSEC-WinAgent分别部署Agent端程序
- OSSEC-Server 防火墙开启开启UDP(1514),接收Agent上报数据
- OSSEC-Server 编译支持MySQL日志存储
- OSSEC-Server 开启日志输出JSON,安装ELK组件filebeat
- OSSEC-ELK 配置logstash服务接收filebeat来源日志,并存入ElasticSearch
备注:
OSSEC-ELK 默认已经安装有logstash、elasticsearch、Kibana
文档使用的ELK stack组件版本:
- Elasticserarch elasticsearch-6.0.0.tar.gz
- Logstash logstash-6.0.0.tar.gz
- Kibana kibana-6.0.0-linux-x86_64.tar.gz
- Filebeat filebeat-6.5.4-linux-x86_64.tar.gz
1.4 OSSEC-Server 安装
Step 1
初始化环境安装,分别安装编译库,以及数据库支持库
# yum -y install make gcc
# yum -y install mysql-devel postgresql-devel
# yum -y install sqlite-devel
Step 2
下载OSSEC安装包,并进行解压,进入安装目录
# wget https://github.com/ossec/ossec-hids/archive/3.1.0.tar.gz
# mv 3.1.0.tar.gz ossec-hids-3.1.0.tar.gz
# tar xf ossec-hids-3.1.0.tar.gz
# cd ossec-hids-3.1.0
Step 3
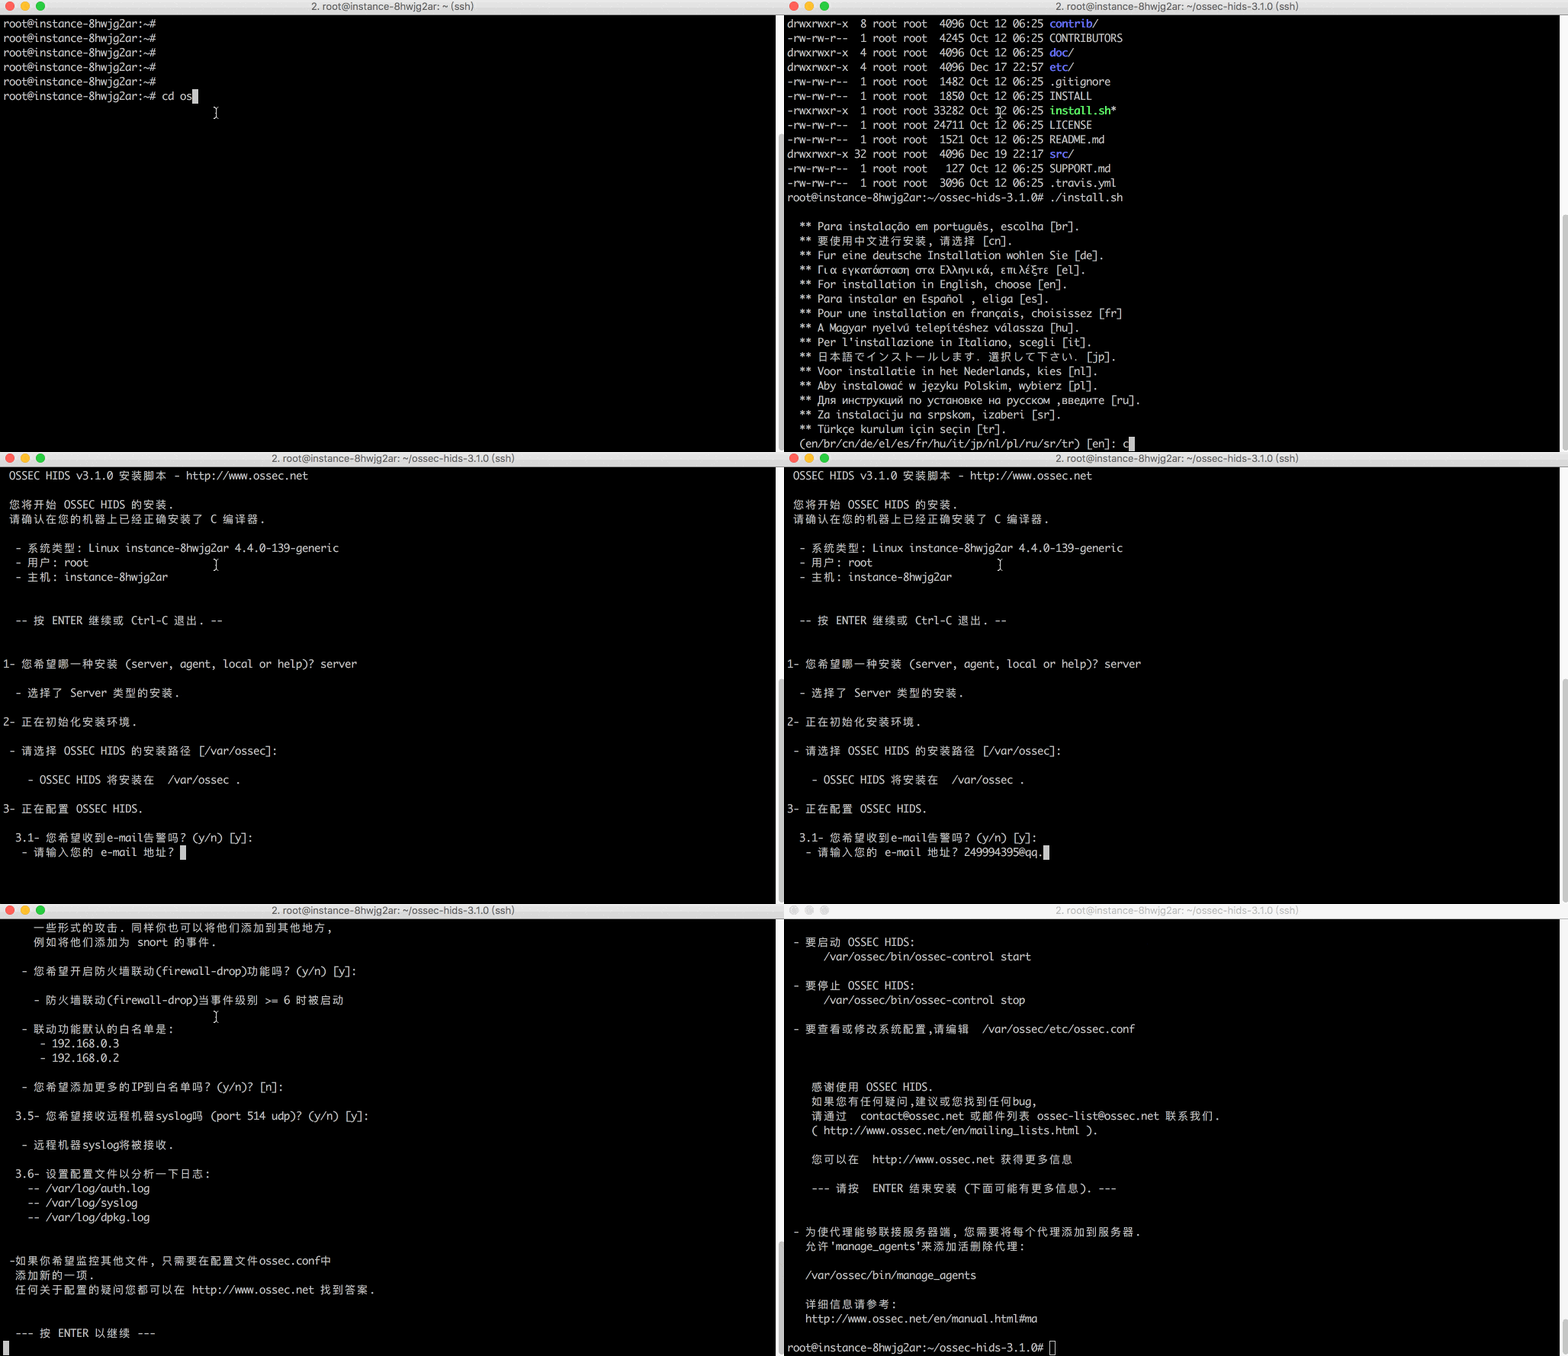
运行配置安装选项脚本
root@instance-8hwjg2ar:~/ossec-hids-3.1.0# ./install.sh

...此处省略...

 您将开始 OSSEC HIDS 的安装.
 请确认在您的机器上已经正确安装了 C 编译器.

  - 系统类型: Linux instance-8hwjg2ar 4.4.0-139-generic
  - 用户: root
  - 主机: instance-8hwjg2ar


  -- 按 ENTER 继续或 Ctrl-C 退出. --


1- 您希望哪一种安装 (server, agent, local or help)? server

  - 选择了 Server 类型的安装.

2- 正在初始化安装环境.

 - 请选择 OSSEC HIDS 的安装路径 [/var/ossec]:

    - OSSEC HIDS 将安装在  /var/ossec .

3- 正在配置 OSSEC HIDS.

  3.1- 您希望收到e-mail告警吗? (y/n) [y]:
   - 请输入您的 e-mail 地址? [email protected]

   - 我们找到您的 SMTP 服务器为: mx2.qq.com.
   - 您希望使用它吗? (y/n) [y]: y

   --- 使用 SMTP 服务器:  mx2.qq.com.

  3.2- 您希望运行系统完整性检测模块吗? (y/n) [y]: y

   - 系统完整性检测模块将被部署.

  3.3- 您希望运行 rootkit检测吗? (y/n) [y]: y

   - rootkit检测将被部署.

  3.4- 关联响应允许您在分析已接收事件的基础上执行一个
       已定义的命令.
       例如,你可以阻止某个IP地址的访问或禁止某个用户的访问权限.
       更多的信息,您可以访问:
       http://www.ossec.net/en/manual.html#active-response
   - 您希望开启联动(active response)功能吗? (y/n) [y]: y


     - 关联响应已开启

   - 默认情况下, 我们开启了主机拒绝和防火墙拒绝两种响应.
     第一种情况将添加一个主机到 /etc/hosts.deny.
     第二种情况将在iptables(linux)或ipfilter(Solaris,
     FreeBSD 或 NetBSD)中拒绝该主机的访问.
   - 该功能可以用以阻止 SSHD 暴力攻击, 端口扫描和其他
     一些形式的攻击. 同样你也可以将他们添加到其他地方,
     例如将他们添加为 snort 的事件.

   - 您希望开启防火墙联动(firewall-drop)功能吗? (y/n) [y]: n

     - 防火墙联动(firewall-drop)当事件级别 >= 6 时被启动

   - 联动功能默认的白名单是:
      - 192.168.0.3
      - 192.168.0.2

   - 您希望添加更多的IP到白名单吗? (y/n)? [n]:

  3.5- 您希望接收远程机器syslog吗 (port 514 udp)? (y/n) [y]: y

   - 远程机器syslog将被接收.

  3.6- 设置配置文件以分析一下日志:
    -- /var/log/auth.log
    -- /var/log/syslog
    -- /var/log/dpkg.log


 -如果你希望监控其他文件, 只需要在配置文件ossec.conf中
  添加新的一项.
  任何关于配置的疑问您都可以在 http://www.ossec.net 找到答案.


  --- 按 ENTER 以继续 ---
选项说明
server - 安装服务器端
/var/ossec - 选择安装目录,默认选项
y - 是否启用邮件告警,默认启用
y - 是否启用系统完整性检测模块Syscheck功能,默认启用
y - 是否启用后门检测模块Rootcheck功能,默认启用
y - 是否启用主动响应模块active-response功能,默认启用
n - 是否启用防火墙联动功能,默认启用,此处为关闭
n - 是否添加联动功能白名单,默认启用,此处为关闭
y - 是否接受远程主机发送的syslog日志,默认启用
备注
配置完安装脚本之后,按回车键就开始进行编译安装,如果需要改变OSSEC的配置,可以等安装完成后,编辑ossec.conf配置文件进行修改,并重启ossec进程使其生效
安装演示
1.5 OSSEC-LinuxAgent 安装
Step 1
初始化环境安装,安装编译库
# yum -y install make gccStep 2
下载OSSEC安装包,并进行解压,进入安装目录
# wget https://github.com/ossec/ossec-hids/archive/3.1.0.tar.gz
# mv 3.1.0.tar.gz ossec-hids-3.1.0.tar.gz
# tar xf ossec-hids-3.1.0.tar.gz
# cd ossec-hids-3.1.0
Step 3
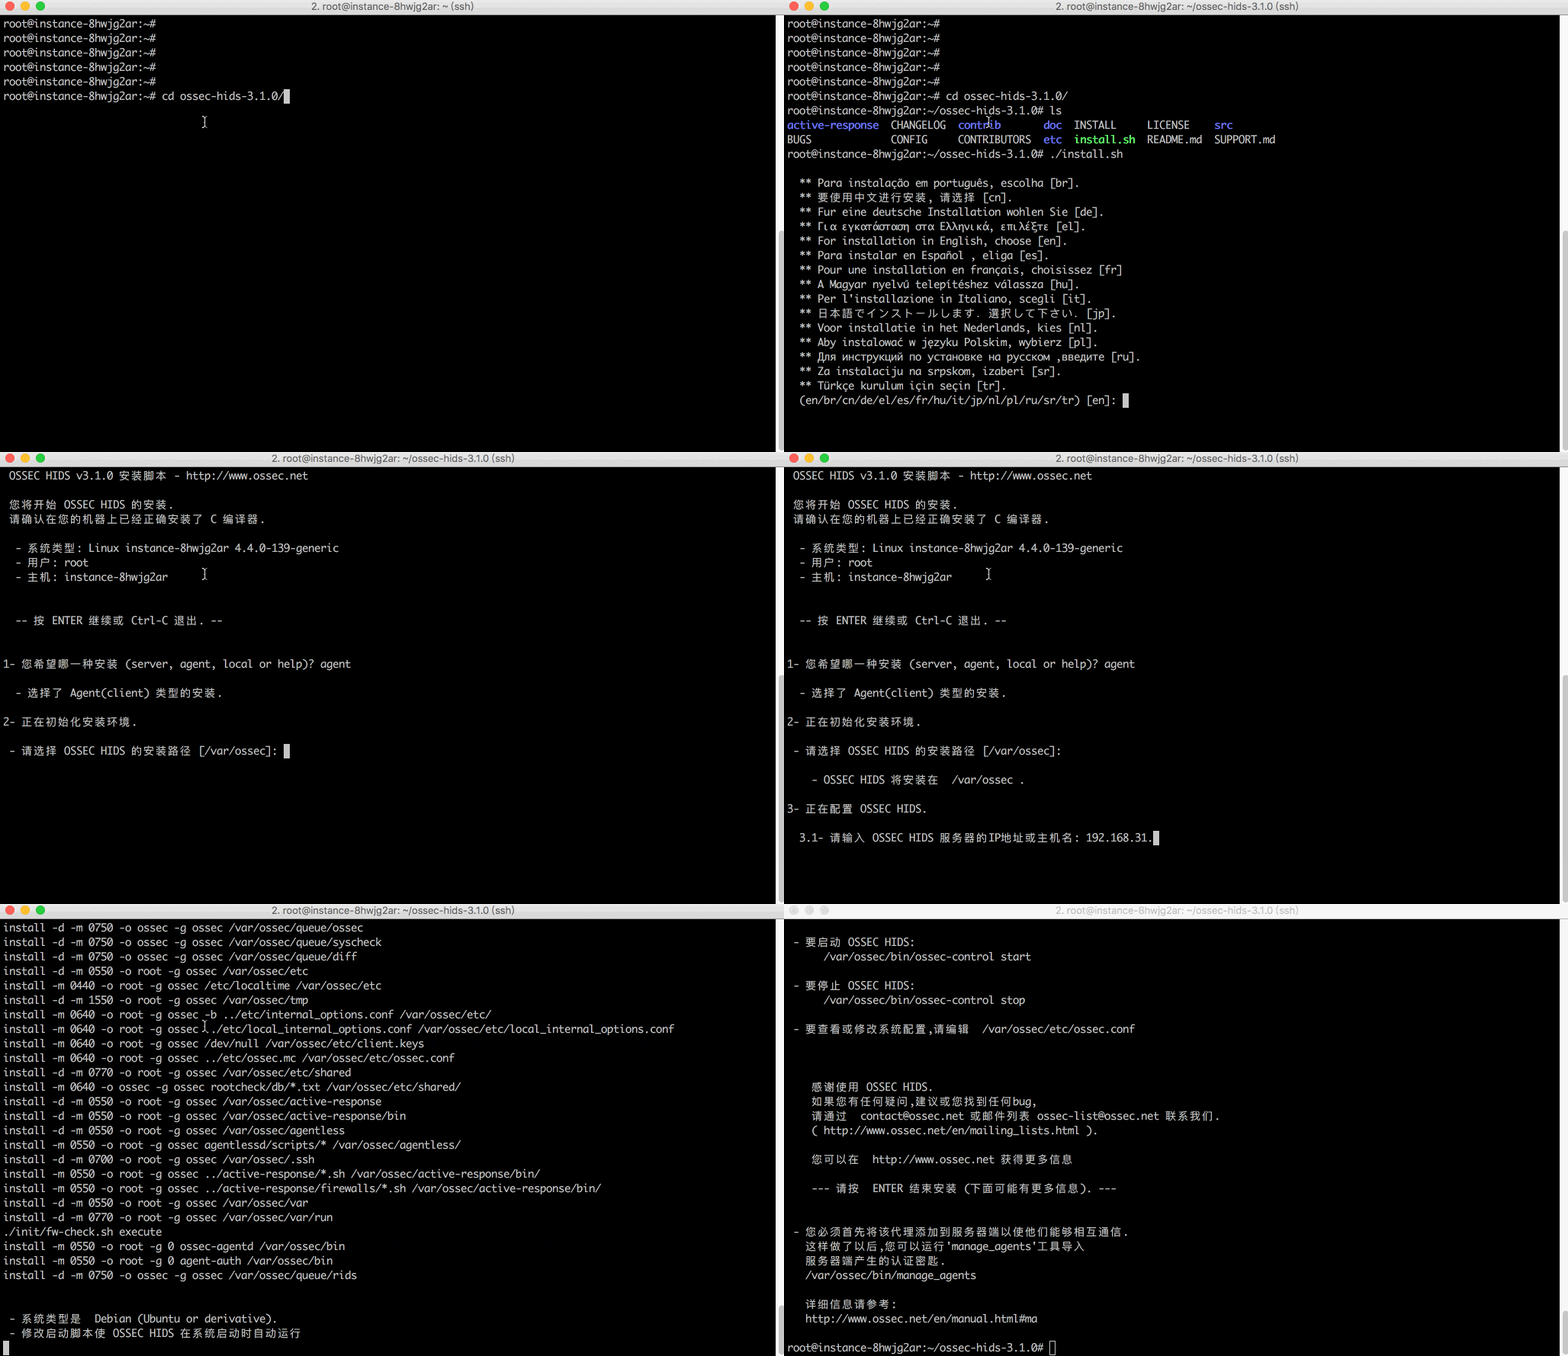
运行配置安装选项脚本
root@instance-8hwjg2ar:~/ossec-hids-3.1.0# ./install.sh

...此处省略...

 OSSEC HIDS v3.1.0 安装脚本 - http://www.ossec.net

 您将开始 OSSEC HIDS 的安装.
 请确认在您的机器上已经正确安装了 C 编译器.

  - 系统类型: Linux instance-8hwjg2ar 4.4.0-139-generic
  - 用户: root
  - 主机: instance-8hwjg2ar


  -- 按 ENTER 继续或 Ctrl-C 退出. --


1- 您希望哪一种安装 (server, agent, local or help)? agent

  - 选择了 Agent(client) 类型的安装.

2- 正在初始化安装环境.

 - 请选择 OSSEC HIDS 的安装路径 [/var/ossec]:

    - OSSEC HIDS 将安装在  /var/ossec .

3- 正在配置 OSSEC HIDS.

  3.1- 请输入 OSSEC HIDS 服务器的IP地址或主机名: 192.168.31.178

   - 添加服务器IP  192.168.31.178

  3.2- 您希望运行系统完整性检测模块吗? (y/n) [y]:

   - 系统完整性检测模块将被部署.

  3.3- 您希望运行 rootkit检测吗? (y/n) [y]:

   - rootkit检测将被部署.

  3.4 - 您希望开启联动(active response)功能吗? (y/n) [y]:


  3.5- 设置配置文件以分析一下日志:
    -- /var/log/auth.log
    -- /var/log/syslog
    -- /var/log/dpkg.log


 -如果你希望监控其他文件, 只需要在配置文件ossec.conf中
  添加新的一项.
  任何关于配置的疑问您都可以在 http://www.ossec.net 找到答案.


  --- 按 ENTER 以继续 ---
选项说明
agent - 安装客户端
/var/ossec - 选择安装目录,默认选项
192.168.31.178 - 输入服务器端IP地址
y - 是否启用系统完整性检测模块Syscheck功能,默认启用
y - 是否启用后门检测模块Rootcheck功能,默认启用
y - 是否启用主动响应模块active-response功能,默认启用
安装演示
1.6 OSSEC-WinAgent 安装
Step 1
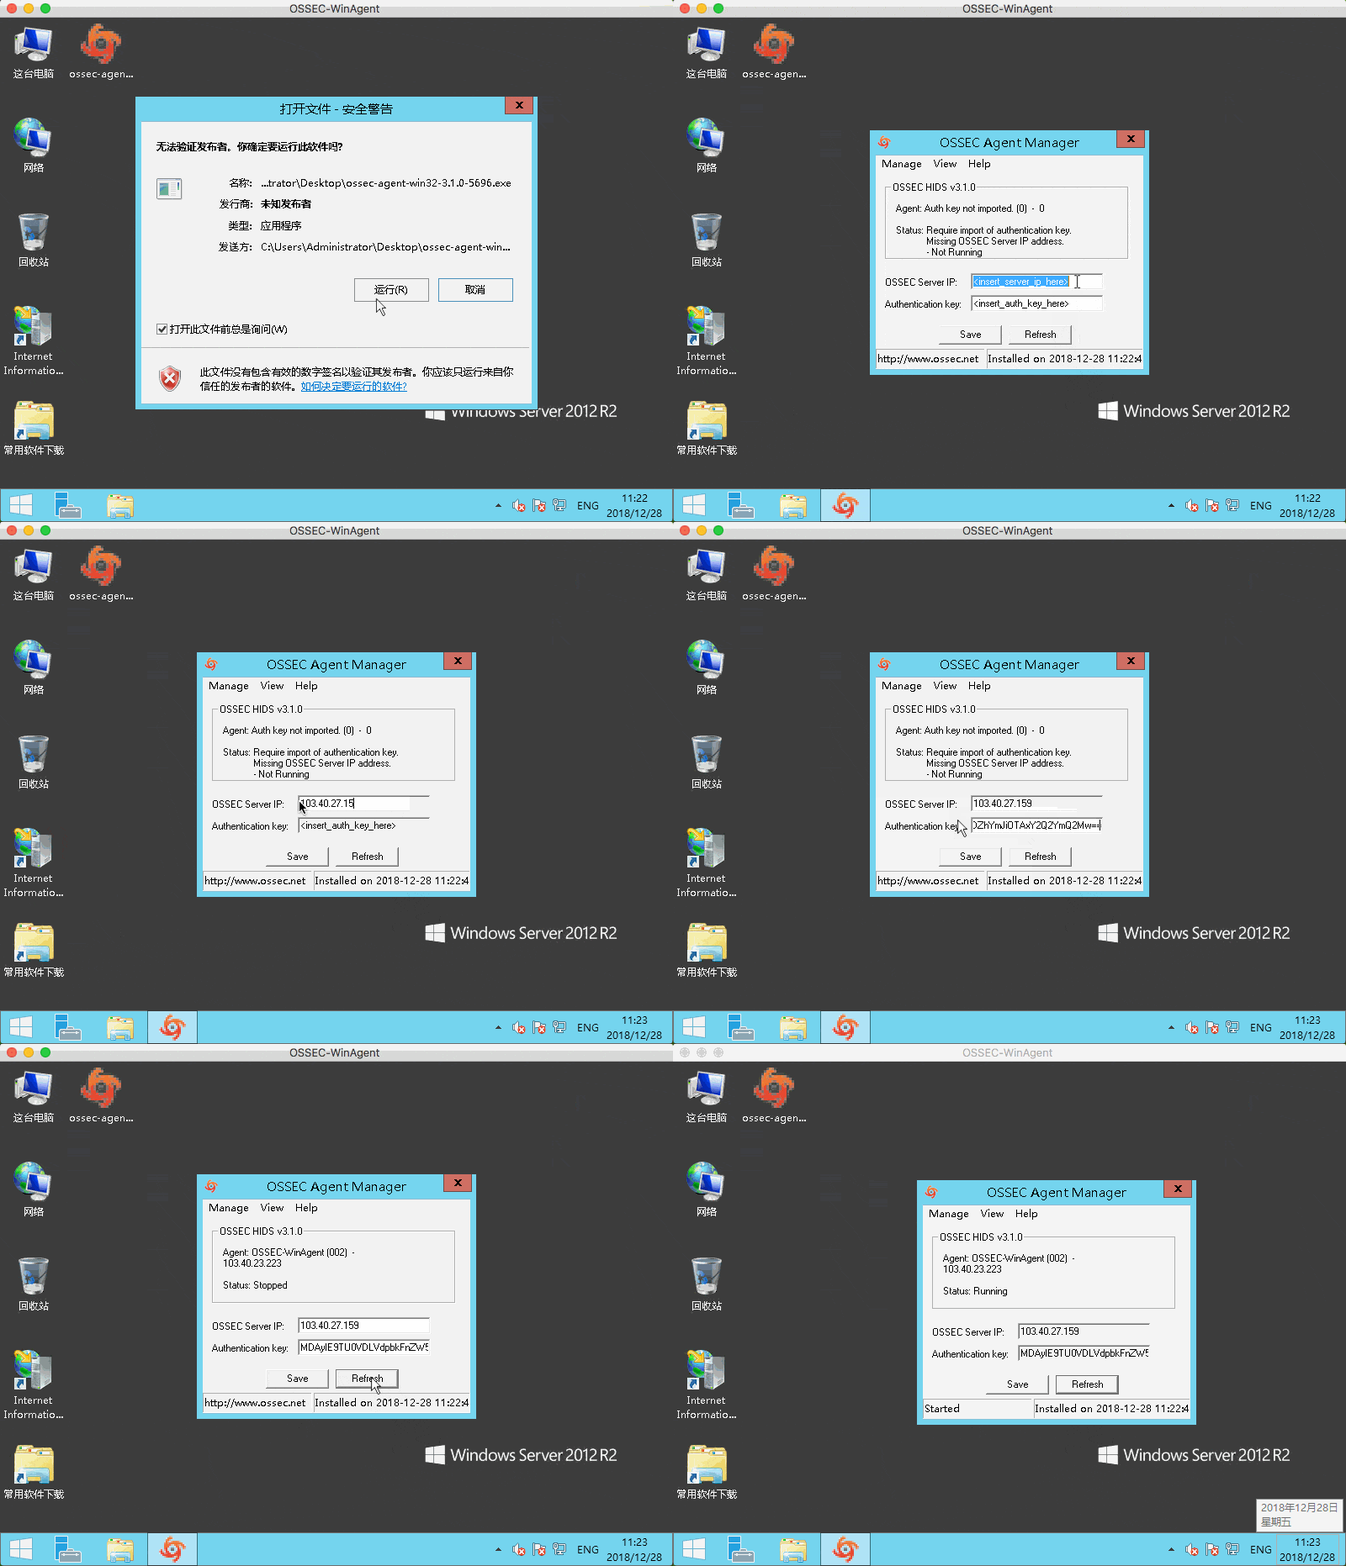
下载并运行Agent安装程序
https://updates.atomicorp.com/channels/atomic/windows/ossec-agent-win32-3.1.0-5696.exe
Step 2
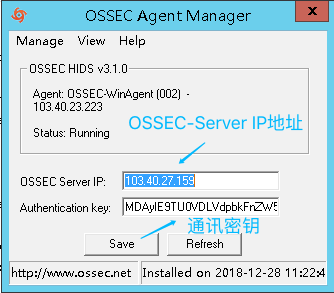
输入OSSEC-Server IP地址和通信密钥
安装演示
备注:
生成密钥,参考 1.7相关内容
1.7 OSSEC Server与Agent通信
OSSEC Server和Agent之间建立通信需要通过认证,在Server端为Agent生成通讯密钥并导入Agent后才能完成信任关系,以及Server端需要开放UDP 1514通讯端口,接收Agent上报的信息
Step 1
Agent配置指向Server IP
[root@agent ~]# cat /var/ossec/etc/ossec.conf


    10.40.27.159


  ...
Step 2
Server为Agent生成通信密钥
[root@server ~]# /var/ossec/bin/manage_agents


****************************************
* OSSEC HIDS v3.1.0 Agent manager.     *
* The following options are available: *
****************************************
   (A)dd an agent (A).
   (E)xtract key for an agent (E).
   (L)ist already added agents (L).
   (R)emove an agent (R).
   (Q)uit.
Choose your action: A,E,L,R or Q: A

- Adding a new agent (use '\q' to return to the main menu).
  Please provide the following:
   * A name for the new agent: agent01
   * The IP Address of the new agent: 10.40.27.121
   * An ID for the new agent[001]:
Agent information:
   ID:001
   Name:agent01
   IP Address:10.40.27.121

Confirm adding it?(y/n): y
Agent added.


****************************************
* OSSEC HIDS v3.1.0 Agent manager.     *
* The following options are available: *
****************************************
   (A)dd an agent (A).
   (E)xtract key for an agent (E).
   (L)ist already added agents (L).
   (R)emove an agent (R).
   (Q)uit.
Choose your action: A,E,L,R or Q: E

Available agents:
   ID: 001, Name: agent01, IP: 10.40.27.121
Provide the ID of the agent to extract the key (or '\q' to quit): 001

Agent key information for '001' is:
MDAxIGFnZW50MDEgMTAuNDAuMjcuMTIxIDMyMTk4MDAwOGI4ZWJkYmZlMTIyNDA3ZGYzZTA4MGI5MDAzMmUzNTVmNGVhODQ5NjE4ZDU0NWFjNzNhMmM4MTE=

** Press ENTER to return to the main menu.
选项说明
A - 新增Agent
agent01 - 设置Agent名称
10.40.27.121 - 输入Agent IP地址
y - 是否确认新增Agent
E - 为Agent生成通讯Key
001 - 输入新增Agent的ID,显示Key值
Step 3
拷贝Server生成的通信密钥,并导入Agent
[root@agent ~]# /var/ossec/bin/manage_agents


****************************************
* OSSEC HIDS v3.1.0 Agent manager.     *
* The following options are available: *
****************************************
   (I)mport key from the server (I).
   (Q)uit.
Choose your action: I or Q: I

* Provide the Key generated by the server.
* The best approach is to cut and paste it.
*** OBS: Do not include spaces or new lines.

Paste it here (or '\q' to quit): MDAxIGFnZW50MDEgMTAuNDAuMjcuMTIxIDMyMTk4MDAwOGI4ZWJkYmZlMTIyNDA3ZGYzZTA4MGI5MDAzMmUzNTVmNGVhODQ5NjE4ZDU0NWFjNzNhMmM4MTE=

Agent information:
   ID:001
   Name:agent01
   IP Address:10.40.27.121

Confirm adding it?(y/n): y
Added.
** Press ENTER to return to the main menu.
选项说明
I - 新增Agent
MDAxIGFnZW50MDEgM=... - 输入通信key
y - 输入Agent IP地址
Step 4
Server主机防火墙开放UDP(1514)服务端口
[root@server ~]# firewall-cmd --add-port=1514/udp --permanent
success
[root@server ~]# firewall-cmd --reload
success
Server上检查Agent是否可以通信
[root@server ~]# /var/ossec/bin/list_agents -c
agent01-10.40.27.121 is active.
备注:
可以通过 /var/ossec/bin/list_agents -h 查询更多Agent的状态信息
1.8 OSSEC-Server MySQL存储事件
OSSEC-Server编译支持的数据库有三种,它们分别是MySQL、Postgresql、SQLite,可以选择把日志告警等信息存储到这些数据库中,使用标准SQL语法进行便捷的查询和调用
Step 1
安装MySQL、启动MySQL并设置开机自启动
[root@server ~]# wget http://repo.mysql.com/mysql-community-release-el7-5.noarch.rpm
[root@server ~]# rpm -ivh mysql-community-release-el7-5.noarch.rpm
[root@server ~]# yum -y install mysql-server
[root@server ~]# systemctl start mysqld
[root@server ~]# systemctl enable mysqld
Step 2
MySQL初始化安全设置、更改root密码
[root@server ~]# /usr/bin/mysql_secure_installationStep 3
建立 ossec 数据库、配置权限用户为 ossec ,密码为 password
[root@server ~]# mysql -u root -p

mysql> create database ossec;
mysql> grant INSERT,SELECT,UPDATE,CREATE,DELETE,EXECUTE on ossec.* to ossec@localhost;
mysql> set password for ossec@localhost=PASSWORD('password');
mysql> flush privileges;
Step 4
导入OSSEC数据库表结构 schema 文件保存在源码目录
ossec-hids-3.1.0/src/os_dbd/mysql.schema
[root@server ~]# cd /root/ossec-hids-3.1.0/src/os_dbd
[root@server os_dbd]# ll
总用量 124
... 此处省略..
-rw-rw-r-- 1 root root  3040 10月 12 06:25 mysql.schema
-rw-rw-r-- 1 root root  3005 10月 12 06:25 postgresql.schema

[root@server os_dbd]# mysql -u root -p ossec < mysql.schema
Step 5
编译支持MySQL存储,并激活
[root@server ~]# cd /root/ossec-hids-3.1.0/src
[root@server src]# make TARGET=server DATABASE=mysql install
[root@server src]# make clean
[root@server src]# cd ..
[root@server ossec-hids-3.1.0]# DATABASE=mysql ./install.sh
[root@server ossec-hids-3.1.0]# /var/ossec/bin/ossec-control enable database
Step 6
最后主配置文件 ossec.conf 增加MySQL数据库配置,直接复制整段到配置文件最后
        127.0.0.1
        ossec
        password
        ossec
        mysql
Step 7
保存配置,并重启OSSEC进程
[root@server ~]# service ossec restart数据常用查询
Case 1 查询最近发生的10条告警
mysql> SELECT id,server_id,rule_id,level,timestamp,location_id,src_ip,dst_ip,src_port,dst_port,alertid,user FROM alert limit 10;
+----+-----------+---------+-------+------------+-------------+----------------+--------+----------+----------+-------------------+--------+
| id | server_id | rule_id | level | timestamp  | location_id | src_ip         | dst_ip | src_port | dst_port | alertid           | user   |
+----+-----------+---------+-------+------------+-------------+----------------+--------+----------+----------+-------------------+--------+
|  1 |         1 |    5716 |     5 | 1545571731 |           1 | 182.100.67.15  | (null) |        0 |        0 | 1545571730.513468 | root   |
|  2 |         1 |    5716 |     5 | 1545571736 |           1 | 182.100.67.15  | (null) |        0 |        0 | 1545571732.513773 | root   |
|  3 |         1 |     502 |     3 | 1545571736 |           2 | (null)         | (null) |        0 |        0 | 1545571733.514078 | (null) |
|  4 |         1 |    5716 |     5 | 1545571736 |           1 | 182.100.67.15  | (null) |        0 |        0 | 1545571734.514235 | root   |
|  5 |         1 |    5716 |     5 | 1545571741 |           1 | 182.100.67.15  | (null) |        0 |        0 | 1545571736.514540 | root   |
|  6 |         1 |    5716 |     5 | 1545571741 |           1 | 182.100.67.15  | (null) |        0 |        0 | 1545571738.514845 | root   |
|  7 |         1 |    2502 |    10 | 1545571741 |           1 | 182.100.67.15  | (null) |        0 |        0 | 1545571738.515150 | root   |
|  8 |         1 |    5503 |     5 | 1545571741 |           1 | 182.100.67.15  | (null) |        0 |        0 | 1545571738.515533 | root   |
|  9 |         1 |    5716 |     5 | 1545571741 |           1 | 182.100.67.15  | (null) |        0 |        0 | 1545571740.515882 | root   |
| 10 |         1 |    5710 |     5 | 1545572031 |           1 | 24.192.159.138 | (null) |        0 |        0 | 1545572031.516188 | (null) |
+----+-----------+---------+-------+------------+-------------+----------------+--------+----------+----------+-------------------+--------+
10 rows in set (0.00 sec)
Case 2 查询规则ID 1002 关联的事件分类
mysql> SELECT rule_id, cat_name from category, signature_category_mapping WHERE rule_id = 1002 AND signature_category_mapping.cat_id = category.cat_id;
+---------+----------+
| rule_id | cat_name |
+---------+----------+
|    1002 | syslog   |
|    1002 | errors   |
+---------+----------+
2 rows in set (0.00 sec)
1.9 OSSEC-Server ELK日志存储
OSSEC产生的告警日志,虽然可以保存到MySQL等数据库中,但日志数量一旦线性增长,结构化数据库就不满足大量日志存储的需求了,这时就需要ELK技术栈出场了,主流的方式是使用filebeat实时读取OSSEC输出的json数据,通过logstash输入到ElasticSearch,并通过Kibana查询、聚合等数据处理操作
Step 1
OSSEC-Server上JSON数据配置输出
yes
重启OSSEC进程,生成 alerts.json
[root@server ~]# cd /var/ossec/logs/alerts
[root@server alerts]#ll
总用量 128
drwxr-x--- 3 ossec ossec   4096 12月 21 21:17 2018
-rw-r----- 2 ossec ossec    236 12月 25 16:10 alerts.json
-rw-r----- 2 ossec ossec 116628 12月 25 16:10 alerts.log
Step 2
OSSEC-Server上安装filebeat
[root@server ~]# wget https://artifacts.elastic.co/downloads/beats/filebeat/filebeat-6.5.4-linux-x86_64.tar.gz
[root@server ~]# cp filebeat-6.5.4-linux-x86_64.tar.gz /opt
[root@server ~]# cd /opt
[root@server opt]# tar xf filebeat-6.5.4-linux-x86_64.tar.gz
[root@server opt]#mv filebeat-6.5.4-linux-x86_64 filebeat
[root@server opt]#cd filebeat
[root@server filebeat]# ls
data  fields.yml  filebeat  filebeat.reference.yml  filebeat.yml  kibana  LICENSE.txt  module  modules.d  NOTICE.txt  README.md
filebeat读取 alerts.json ,发送到logstash
[root@server filebeat]# vim filebeat.yml

filebeat.inputs:

- type: log

paths:
    - /var/ossec/logs/alerts/alerts.json # 读取告警json文件
  json.keys_under_root: true
  json.overwrite_keys: true

fields:
  log_type: osseclogs

output.logstash:
  hosts: ["103.40.26.189:5044"] # 指定logstash服务器
Step 3
OSSEC-ELK上配置logstash接收,并存入ES
[root@ELK logstash]# cat logstash_ossec.conf
input {
  beats {
    id => "ossec_test"
    port => 5044
    type => "ossec"
  }
}

filter {
  if([fields][log_type] == "osseclogs") {
    mutate {
      replace => {
        "[type]" => "osseclogs"
      }
    }
  }
}

output {

  if([type] == "osseclogs") {
    elasticsearch {
      index => "ossec-%{+YYYY.MM.dd}"
    }
  }
}
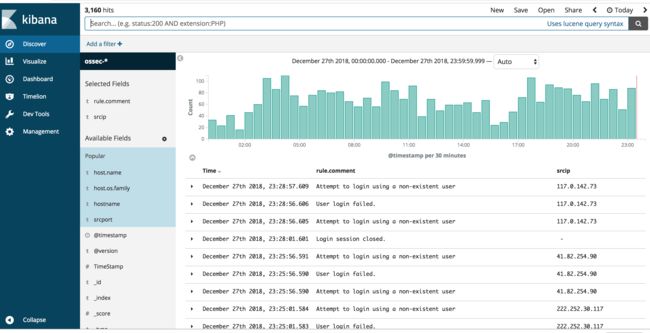
Step 4 通过Kibana查询OSSEC日志
1.10 OSSEC 源码安装卸载
OSSEC版本的升级或与OSSEC增强套件(Wazuh)之间的切换,需要进行手工卸载OSSEC操作
Step 1
停止OSSEC进程
# service ossec stopStep 2
删除初始化配置文件
# rm -rf /etc/ossec-init.confStep 3
删除安装根目录以及自启动脚本
# rm -rf /var/ossec && rm /etc/init.d/*ossec*总结
通过上面的内容,我们了解了OSSEC部署结构、安装方法、以及如何对安全日志进行存储(MySQL、ELK),由于在实际环境中,不可能一台一台的手动安装Agent,在高级篇我们将介绍使用自动化工具实现批量安装、更新、卸载agent,以适应各种生产环境。
下一篇,我们开始系统的介绍OSSEC配置文件的每个功能点,对OSSEC的配置选项有个整体的了解。
