TensorFlow学习(四):梯度带(GradientTape),优化器(Optimizer)和损失函数(losses)
更新时间:
- 2017.5.9 简化了很多不需要的内容,关注重点。
- 2019.4.17 更新到tensorflow 2.x,添加自动求导和新版本的optimizer
因为tensorflow 2.x相对于tensorflow 1.x的变动,API变更和思路也变化了,这节重点介绍的为梯度带(GradientTape)和优化器(Optimizer)
因为大多数机器学习任务就是最小化损失,在损失定义的情况下,后面的工作就交给优化器啦。因为深度学习常见的是对于梯度的优化,也就是说,优化器最后其实就是各种对于梯度下降算法的优化。
一.梯度带tf.GradientTape
梯度带是新版本tensorflow非常常用的一个特性了,因为一旦涉及到计算梯度的问题就离不开这个新的API,下面通过几个例子来介绍一下这个API。首先说明,下面的几个例子比较偏底层一点,需要非常少量和简单的一元和多元微分的知识。
例一:一元和二元求导
import tensorflow as tf

def gradient_test():
    #-------------------一元梯度案例---------------------------
    print("一元梯度")
    x=tf.constant(value=3.0)
    with tf.GradientTape(persistent=True,watch_accessed_variables=True) as tape:
        tape.watch(x)
        y1=2*x
        y2=x*x+2
        y3=x*x+2*x
    #一阶导数
    dy1_dx=tape.gradient(target=y1,sources=x)
    dy2_dx = tape.gradient(target=y2, sources=x)
    dy3_dx = tape.gradient(target=y3, sources=x)
    print("dy1_dx:",dy1_dx)
    print("dy2_dx:", dy2_dx)
    print("dy3_dx:", dy3_dx)


    # # -------------------二元梯度案例---------------------------
    print("二元梯度")
    x = tf.constant(value=3.0)
    y = tf.constant(value=2.0)
    with tf.GradientTape(persistent=True,watch_accessed_variables=True) as tape:
        tape.watch([x,y])
        z1=x*x*y+x*y
    # 一阶导数
    dz1_dx=tape.gradient(target=z1,sources=x)
    dz1_dy = tape.gradient(target=z1, sources=y)
    dz1_d=tape.gradient(target=z1,sources=[x,y])
    print("dz1_dx:", dz1_dx)
    print("dz1_dy:", dz1_dy)
    print("dz1_d:",dz1_d)
    print("type of dz1_d:",type(dz1_d))


if __name__=="__main__":
    gradient_test()
结果:
一元梯度
dy1_dx: tf.Tensor(2.0, shape=(), dtype=float32)
dy2_dx: tf.Tensor(6.0, shape=(), dtype=float32)
dy3_dx: tf.Tensor(8.0, shape=(), dtype=float32)
二元梯度
dz1_dx: tf.Tensor(14.0, shape=(), dtype=float32)
dz1_dy: tf.Tensor(12.0, shape=(), dtype=float32)
dz1_d: [, ]
type of dz1_d:
根据这个例子说一下tf.GradientTape这个类的常见的属性和函数,更多的可以去官方文档来看。
__init__(persistent=False,watch_accessed_variables=True)
作用:创建一个新的GradientTape
参数:
- persistent: 布尔值,用来指定新创建的gradient tape是否是可持续性的。默认是False,意味着只能够调用一次
gradient()函数。 - watch_accessed_variables: 布尔值,表明这个gradien tap是不是会自动追踪任何能被训练(trainable)的变量。默认是True。要是为False的话,意味着你需要手动去指定你想追踪的那些变量。
比如在上面的例子里面,新创建的gradient tape设定persistent为True,便可以在这个上面反复调用gradient()函数。
watch(tensor)
作用:确保某个tensor被tape追踪
参数:
- tensor: 一个Tensor或者一个Tensor列表
gradient(target,sources,output_gradients=None,unconnected_gradients=tf.UnconnectedGradients.NONE)
作用:根据tape上面的上下文来计算某个或者某些tensor的梯度
参数:
- target: 被微分的Tensor或者Tensor列表,你可以理解为经过某个函数之后的值
- sources: Tensors 或者Variables列表(当然可以只有一个值). 你可以理解为函数的某个变量
- output_gradients: a list of gradients, one for each element of target. Defaults to None.
- unconnected_gradients: a value which can either hold ‘none’ or ‘zero’ and alters the value which will be returned if the target and sources are unconnected. The possible values and effects are detailed in ‘UnconnectedGradients’ and it defaults to ‘none’.
返回:
一个列表表示各个变量的梯度值,和source中的变量列表一一对应,表明这个变量的梯度。
上面的例子中的梯度计算部分可以更直观的理解这个函数的用法。
二.优化器
优化器也是大家非常熟悉的东西了,tensorflow 2.x也会把优化器移动到了tf.keras.optimizers,其他的用法还是和之前一样,这里就不啰嗦了。同时这里推荐一个博客,总结了这些优化器的原理以及性能,写的挺好的:An overview of gradient descent optimazation algorithms
注意,这里所有的优化器里面一般会有几个更新梯度的常用函数:
apply_gradients(grads_and_vars,name=None)
作用:把计算出来的梯度更新到变量上面去。
参数:
- grads_and_vars: (gradient, variable) 对的列表.
- name: 操作名
Returns:
An Operation that applies the specified gradients. If global_step was not None, that operation also increments global_step.
三.损失函数
损失函数可以根据自己的需要自己写,也可以使用tensorflow中封装的一些损失函数,比如均方误差啊等等。损失函数也不用我啰嗦了,需要使用tensorflow中自带的那些损失函数,在tf.keras.losses里面找就行.
四.线性回归例子
有了上面两个的基础,下面就用一个线性回归的简单综合例子来把优化器和梯度带结合起来。
要是有不知道线性回归的理论知识的,请到
http://blog.csdn.net/xierhacker/article/details/53257748
http://blog.csdn.net/xierhacker/article/details/53261008
熟悉的直接跳过。
直接上代码:
import tensorflow as tf
import numpy as np
import matplotlib.pyplot as plt
TRAIN_STEPS=20
# Prepare train data
train_X = np.linspace(-1, 1, 100)
train_Y = 2 * train_X + np.random.randn(*train_X.shape) * 0.33 + 10
print(train_X.shape)
w=tf.Variable(initial_value=1.0)
b=tf.Variable(initial_value=1.0)
optimizer=tf.keras.optimizers.SGD(0.1)
mse=tf.keras.losses.MeanSquaredError()
for i in range(TRAIN_STEPS):
print("epoch:",i)
print("w:", w.numpy())
print("b:", b.numpy())
#计算和更新梯度
with tf.GradientTape() as tape:
logit = w * train_X + b
loss=mse(train_Y,logit)
gradients=tape.gradient(target=loss,sources=[w,b]) #计算梯度
#print("gradients:",gradients)
#print("zip:\n",list(zip(gradients,[w,b])))
optimizer.apply_gradients(zip(gradients,[w,b])) #更新梯度
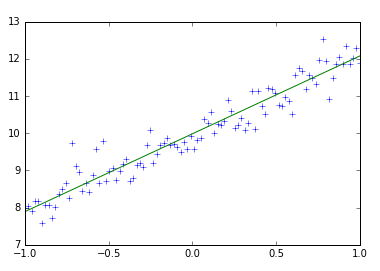
#draw
plt.plot(train_X,train_Y,"+")
plt.plot(train_X,w * train_X + b)
plt.show()
结果:
epoch: 0
w: 1.0
b: 1.0
epoch: 1
w: 1.062283
b: 2.799747
epoch: 2
w: 1.12033
b: 4.2395444
epoch: 3
w: 1.1744289
b: 5.391382
epoch: 4
w: 1.2248484
b: 6.3128524
epoch: 5
w: 1.2718387
b: 7.050029
epoch: 6
w: 1.3156329
b: 7.6397696
epoch: 7
w: 1.3564487
b: 8.111563
epoch: 8
w: 1.3944883
b: 8.4889965
epoch: 9
w: 1.4299408
b: 8.790944
epoch: 10
w: 1.462982
b: 9.032502
这里你可以使用更多的优化器来试一下各个优化器的性能和调参情况