Spring Boot、Cloud学习
md feign 如果名字是一样的,config没法根据具体的client来配置了。这个坑 很深。
再比如 feign 上传文件 到微服务 得加feign-form jar,而且还不支持body传其它参数,只支持path 或者 param。
再比如 feign调用的时候,刚上线的微服务总是找不到,需要改eruaka发现配置。
一堆堆的啊
-
eclipse安装lombok
https://blog.csdn.net/ypf8312/article/details/80340604
https://blog.csdn.net/dorothy1224/article/details/79280591/ -
Spring Cloud分布式事务终极解决方案探讨
https://segmentfault.com/a/1190000012762869 -
Java Metrics系统性能监控工具
https://www.jianshu.com/p/e5bba03fd64f -
Spring Boot 内嵌容器Undertow参数设置
https://www.cnblogs.com/duanxz/p/9337022.html
Boot注解及配置
初始化项目
- @SpringBootApplication
等价于三个注解的总和:
@Configuration
@EnableAutoConfiguration
@ComponentScan
https://blog.csdn.net/claram/article/details/75125749 - @RestController
- @RequestMapping(value = {"/hello","/hi"},method = RequestMethod.GET)
- @RunWith(SpringRunner.class)
@SpringBootTest(webEnvironment = SpringBootTest.WebEnvironment.RANDOM_PORT)
@LocalServerPort   private int port;
@Autowired  private TestRestTemplate template;
@Before
@Test
assertThat(response.getBody(), equalTo("Greetings from Spring Boot!"));
配置文件详解
- application.properties / application.yml
配置文件赋值随机数
 number:  ${random.int}
 uuid : ${random.uuid}
 max: ${random.int(10)}
 value: ${random.value}
- @Value("${name}") private String name; >>通过配置获取属性>>appliction.yml:
server:
  port: 8080
  context-path: /springboot

girl:
  name: B
  age: 18
  content: content:${name},age:${age}
-
@ConfigurationProperties(prefix=“girl”)
@Component 可加可不加,spring-boot-configuration-processor依赖可加可不加
public class GirlProperties
将配置属性注入java bean(属性+getter+setter),获取此处前一配置文件里girt: 的属性;
在应用类或者application类,加EnableConfigurationProperties注解
@RestController
@EnableConfigurationProperties({ConfigBean.class})
public class LucyController -
自定义配置文件注入javabean,需要三个注解
@Configuration
@PropertySource(value = “classpath:test.properties”)
@ConfigurationProperties(prefix = “com.forezp”)
public class User -
多环境配置文件
格式为application-{profile}.properties,其中{profile}对应你的环境标识application-test.properties:测试环境
application-dev.properties:开发环境
application-prod.properties:生产环境
application.yml添加:
 spring:
  profiles:
    active: dev
其中application-dev.yml:
 server:
  port: 8082
Boot+JdbcTemplates
- 在pom文件引入spring-boot-starter-jdbc的依赖;
引入mysql-connector-java依赖;
引入druid依赖;
配置application.properties:
spring.datasource.driver-class-name=com.mysql.jdbc.Driver
spring.datasource.url=jdbc:mysql://localhost:3306/test
spring.datasource.username=root
spring.datasource.password=123456
- dao层实现
@Repository
public class AccountDaoImpl implements IAccountDAO
@Autowired
private JdbcTemplate jdbcTemplate;
jdbcTemplate.update("insert into account(name, money) values(?, ?)",
              account.getName(),account.getMoney());
 List list = jdbcTemplate.query("select * from account where id = ?", new Object[]{id}, new BeanPropertyRowMapper(Account.class));
Boot+JPA
JPA全称Java Persistence API.JPA通过JDK 5.0注解或XML描述对象-关系表的映射关系,并将运行期的实体对象持久化到数据库中
JPA 的目标之一是制定一个可以由很多供应商实现的API,并且开发人员可以编码来实现该API
JPA是需要Provider来实现其功能的,Hibernate就是JPA Provider中很强的一个,应该说无人能出其右。从功能上来说,JPA就是Hibernate功能的一个子集
- 添加spring-boot-starter-data-jpa、mysql-connector-java、druid依赖
application.yml配置:
spring:
  datasource:
    driver-class-name: com.mysql.jdbc.Driver
    url: jdbc:mysql://localhost:3306/test?useUnicode=true&characterEncoding=utf8&characterSetResults=utf8
    username: root
    password: 123456

  jpa:
    hibernate:
      ddl-auto: update  # 第一次简表create  后面用update
    show-sql: true
如果通过jpa在数据库中建表,将jpa.hibernate,ddl-auto改为create,建完表之后,要改为update,要不然每次重启工程会删除表并新建
- @Entity 表明是一个映射的实体类, @Id表明id, @GeneratedValue 字段自动生成
@Entity
public class Account {
    @Id
    @GeneratedValue
    private int id ;
- Dao层
数据访问层,通过编写一个继承自 JpaRepository 的接口就能完成数据访问,其中包含了几本的单表查询的方法,非常的方便。值得注意的是,这个Account 对象名,而不是具体的表名,另外Interger是主键的类型,一般为Integer或者Long
public interface AccountDao  extends JpaRepository {
}
- service调用JPA默认方法
List    accountDao.findAll()
Account   accountDao.findOne(id)
String
 Account account = new Account();
        account.setMoney(money);
        account.setName(name);
        account.setId(id);
        Account account1 = accountDao.saveAndFlush(account);

        return account1.toString();
使用baseRepository.save()发现无论怎么同步锁都会出现数据误差,后来换成saveAndFlush方法 结果对了,以此推断save方法具有延迟性,在高并发下建议用saveAndFlush
Boot+MyBatis接口
- 引入mybatis-spring-boot-starter、mysql-connector-java、druid依赖
spring.datasource.url=jdbc:mysql://localhost:3306/test
spring.datasource.username=root
spring.datasource.password=123456
spring.datasource.driver-class-name=com.mysql.jdbc.Driver
- Dao层
@Mapper
public interface AccountMapper {

    @Insert("insert into account(name, money) values(#{name}, #{money})")
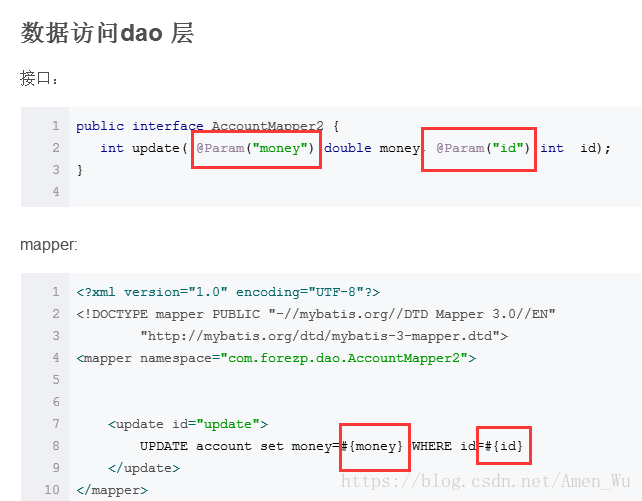
    int add(@Param("name") String name, @Param("money") double money);

    @Update("update account set name = #{name}, money = #{money} where id = #{id}")
    int update(@Param("name") String name, @Param("money") double money, @Param("id") int  id);

    @Delete("delete from account where id = #{id}")
    int delete(int id);

    @Select("select id, name as name, money as money from account where id = #{id}")
    Account findAccount(@Param("id") int id);
Boot+MyBatis.xml并声明式事务
- 引入mybatis-spring-boot-starter、mysql-connector-java、druid依赖
spring.datasource.url=jdbc:mysql://localhost:3306/test
spring.datasource.username=root
spring.datasource.password=123456
spring.datasource.driver-class-name=com.mysql.jdbc.Driver
mybatis.mapper-locations=classpath*:mybatis/*Mapper.xml
mybatis.type-aliases-package=com.forezp.entity
 @Transactional
    public void transfer() throws RuntimeException{
Boot+MongoDB
- 引入spring-boot-starter-data-mongodb依赖
 如果mongodb端口是默认端口,并且没有设置密码,可不配置,sprinboot会开启默认的。
spring.data.mongodb.uri=mongodb://localhost:27017/springboot-db

mongodb设置了密码,这样配置:
spring.data.mongodb.uri=mongodb://name:pass@localhost:27017/dbname
- mongo实体类
 import org.springframework.data.annotation.Id;
public class Customer {
    @Id
    public String id;
- dao层
 public interface CustomerRepository extends MongoRepository {

    public Customer findByFirstName(String firstName);
    public List findByLastName(String lastName);
写一个接口,继承MongoRepository,这个接口有了几本的CURD的功能。如果你想自定义一些查询,比如根据firstName来查询,获取根据lastName来查询,只需要定义一个方法即可。注意firstName严格按照存入的mongodb的字段对应。在典型的java的应用程序,写这样一个接口的方法,需要自己实现,但是在springboot中,你只需要按照格式写一个接口名和对应的参数就可以了,因为springboot已经帮你实现了
Boot+Redis
- 引入spring-boot-starter-data-redis依赖,配置数据源:
spring.redis.host=localhost
spring.redis.port=6379
#spring.redis.password=
spring.redis.database=1
spring.redis.pool.max-active=8
spring.redis.pool.max-wait=-1
spring.redis.pool.max-idle=500
spring.redis.pool.min-idle=0
spring.redis.timeout=0
- dao层
 @Repository
public class RedisDao {

    @Autowired
    private StringRedisTemplate template;

    public  void setKey(String key,String value){
        ValueOperations ops = template.opsForValue();
        ops.set(key,value,1, TimeUnit.MINUTES);//1分钟过期
    }
spring Restdocs创建API文档
https://blog.csdn.net/forezp/article/details/71023510
- 引入spring-boot-starter-web、spring-boot-starter-test、spring-restdocs-mockmvc依赖
- 通过@SpringBootApplication,开启springboot
- 创建一个controller,GetMapping,PostMapping
- restdocs是通过单元测试生存snippets文件,然后snippets根据插件生成htm文档的
@RunWith(SpringRunner.class)
@WebMvcTest(HomeController.class)
@AutoConfigureRestDocs(outputDir = “target/snippets”) 开启了生成snippets文件,并指定了存放位置
public class WebLayerTest {

    @Autowired
    private MockMvc mockMvc;

    @Test
    public void shouldReturnDefaultMessage() throws Exception {
        this.mockMvc.perform(get("/")).andDo(print()).andExpect(status().isOk())
                .andExpect(content().string(containsString("Hello World")))
                .andDo(document("home"));
    }
}
- 启动单元测试,测试通过,你会发现在target文件下生成了一个snippets文件夹
- snippets是Asciidoctor格式的文件,包括request和reponse,另外其他两种httpie和curl两种流行的命令行的http请求模式。
到目前为止,只生成了Snippets文件,需要用Snippets文件生成文档 - 创建一个新文件src/main/asciidoc/index.adoc
http://docs.spring.io/spring-restdocs/docs/current/reference/html5/ - asciidoctor-maven-plugin插件
    org.asciidoctor
    asciidoctor-maven-plugin


            generate-docs
            prepare-package

                process-asciidoc


                index.adoc
                html

                    ${project.build.directory}/snippets
Boot+swagger2,Restful API
https://blog.csdn.net/forezp/article/details/71023536
在线文档的查阅,在线文档的测试。另外swagger很容易构建restful风格的api,简单优雅帅气
- 引入springfox-swagger2、springfox-swagger-ui依赖
            io.springfox
            springfox-swagger2
            2.6.1


            io.springfox
            springfox-swagger-ui
            2.6.1
- 配置类
@Configuration   //@Configuration注解,表明它是一个配置类
@EnableSwagger2   //@EnableSwagger2开启swagger2
public class Swagger2 {

    @Bean
    public Docket createRestApi() {
        return new Docket(DocumentationType.SWAGGER_2)
                .apiInfo(apiInfo())
                .select()   //apis()指定扫描的包会生成文档
           .apis(RequestHandlerSelectors.basePackage("com.forezp.controller"))
                .paths(PathSelectors.any())
                .build();
    }
    private ApiInfo apiInfo() {    //apiINfo()配置一些基本的信息
        return new ApiInfoBuilder()
                .title("springboot利用swagger构建api文档")
                .description("简单优雅的restfun风格,http://blog.csdn.net/forezp")
                .termsOfServiceUrl("http://blog.csdn.net/forezp")
                .version("1.0")
                .build();
    }
}
- 生产文档注解。swagger通过注解表明该接口会生成文档,包括接口名、请求方法、参数、返回信息的等等
    @Api:修饰整个类,描述Controller的作用
    @ApiOperation:描述一个类的一个方法,或者说一个接口
    @ApiParam:单个参数描述
    @ApiModel:用对象来接收参数
    @ApiProperty:用对象接收参数时,描述对象的一个字段
    @ApiResponse:HTTP响应其中1个描述
    @ApiResponses:HTTP响应整体描述
    @ApiIgnore:使用该注解忽略这个API
    @ApiError :发生错误返回的信息
    @ApiParamImplicitL:一个请求参数
    @ApiParamsImplicit 多个请求参数
如果请求参数在url上,@ApiImplicitParam 上加paramType = “path”
Boot+Redis实现消息队列
- 加入spring-boot-starter-data-redis依赖:
            org.springframework.boot
            spring-boot-starter-data-redis
- 创建一个消息接收者
一.CountDownLatch用法
http://www.importnew.com/21889.html
public class Receiver {
    private static final Logger LOGGER = LoggerFactory.getLogger(Receiver.class);

    private CountDownLatch latch;

    @Autowired
    public Receiver(CountDownLatch latch) {
        this.latch = latch;
    }

    public void receiveMessage(String message) {
        LOGGER.info("Received <" + message + ">");
        latch.countDown();
    }
}
- 注入消息接收者
 @Bean
    Receiver receiver(CountDownLatch latch) {
        return new Receiver(latch);
    }

    @Bean
    CountDownLatch latch() {
        return new CountDownLatch(1);
    }

    @Bean
    StringRedisTemplate template(RedisConnectionFactory connectionFactory) {
        return new StringRedisTemplate(connectionFactory);
    }
- 注入消息监听容器
在spring data redis中,利用redis发送一条消息和接受一条消息,需要三样东西:
一个连接工厂
一个消息监听容器
Redis template
@Bean
    RedisMessageListenerContainer container(RedisConnectionFactory connectionFactory,MessageListenerAdapter listenerAdapter) {
        RedisMessageListenerContainer container = new RedisMessageListenerContainer();
        container.setConnectionFactory(connectionFactory);
        container.addMessageListener(listenerAdapter, new PatternTopic("chat"));

        return container;
    }

    @Bean
    MessageListenerAdapter listenerAdapter(Receiver receiver) {
        return new MessageListenerAdapter(receiver, "receiveMessage");
    }
关于RedisTemplate和StringRedisTemplate
https://blog.csdn.net/notsaltedfish/article/details/75948281
- springboot入口方法
public static void main(String[] args) throws Exception{
        ApplicationContext ctx =  SpringApplication.run(SpringbootRedisApplication.class, args);

        StringRedisTemplate template = ctx.getBean(StringRedisTemplate.class);
        CountDownLatch latch = ctx.getBean(CountDownLatch.class);

        LOGGER.info("Sending message...");
        template.convertAndSend("chat", "Hello from Redis!");

        latch.await();

        System.exit(0);
    }
Boot+RabbitMQ
- 引入spring-boot-starter-amqp依赖
            org.springframework.boot
            spring-boot-starter-amqp
- 消息接收者
 @Component
public class Receiver {

    private CountDownLatch latch = new CountDownLatch(1);

    public void receiveMessage(String message) {
        System.out.println("Received <" + message + ">");
        latch.countDown();
    }

    public CountDownLatch getLatch() {
        return latch;
    }

}
-
创建消息监听,并发送一条消息
RabbitTemplate提供了发送消息和接收消息的所有方法需要一个消息监听容器
声明一个quene,一个exchange,并且绑定它们
一个组件去发送消息
https://blog.csdn.net/forezp/article/details/71023692
restTemplate消费服务
@Bean
    public RestTemplate restTemplate(RestTemplateBuilder builder) {
        return builder.build();
    }

    @Bean
    public CommandLineRunner run(RestTemplate restTemplate) throws Exception {
        return args -> {
            String quote = restTemplate.getForObject(
                    "http://gturnquist-quoters.cfapps.io/api/random", String.class);
            log.info(quote.toString());
        };
    }
Boot上传文件
https://blog.csdn.net/forezp/article/details/71023752
- Boot文件上传与下载
https://www.cnblogs.com/studyDetail/p/7003253.html
Boot+Scheduled定时任务
-
在方法上加@Scheduled注解,表明该方法是一个调度任务。
@Scheduled(fixedRate = 5000) :上一次开始执行时间点之后5秒再执行
@Scheduled(fixedDelay = 5000) :上一次执行完毕时间点之后5秒再执行
@Scheduled(initialDelay=1000, fixedRate=5000) :第一次延迟1秒后执行,之后按fixedRate的规则每5秒执行一次
@Scheduled(cron=” /5 “) :通过cron表达式定义规则,什么是cro表达式,自行搜索引擎。
Boot+表单校验
https://blog.csdn.net/forezp/article/details/71023817
Boot表单请求
@ModelAttribute
https://blog.csdn.net/lovesomnus/article/details/78873089
Boot多Moudle项目
https://blog.csdn.net/forezp/article/details/71024153
- @Import注解,spring4.3开始允许加载第三方class,或者普通class,声明为一个bean
https://blog.csdn.net/heyutao007/article/details/74994161
Boot RestTemplate发异步请求
https://blog.csdn.net/forezp/article/details/71024169
@JsonIgnoreProperties(ignoreUnknown=true) 忽略json对实体中字段缺失的情况
@Async 异步java请求
@EnableAsync
- Jackson 解析json数据之忽略解析字段注解@JsonIgnoreProperties
https://blog.csdn.net/ngl272/article/details/70217104
Boot+Docker容器
通过dockerfile和maven-docker插件,构建docker镜像
https://blog.csdn.net/forezp/article/details/71024219
Cloud注解及配置
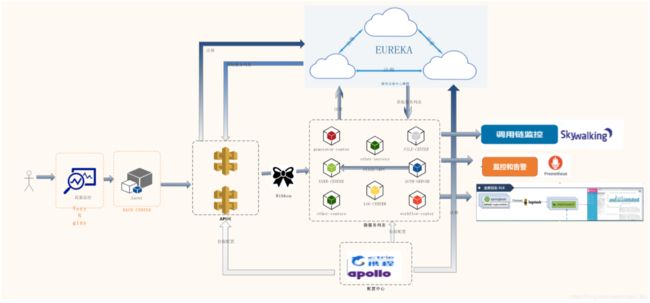
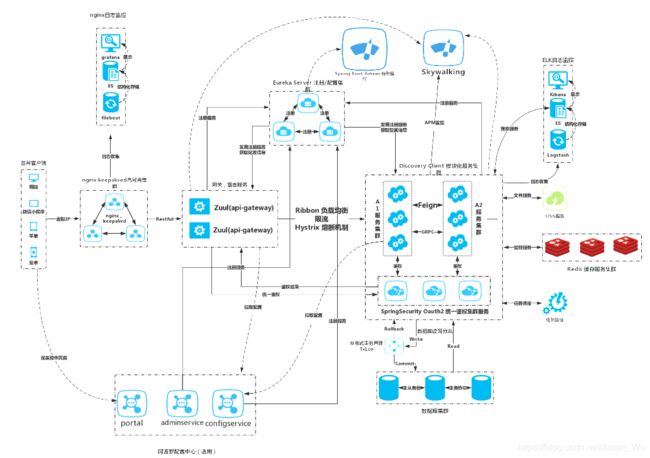
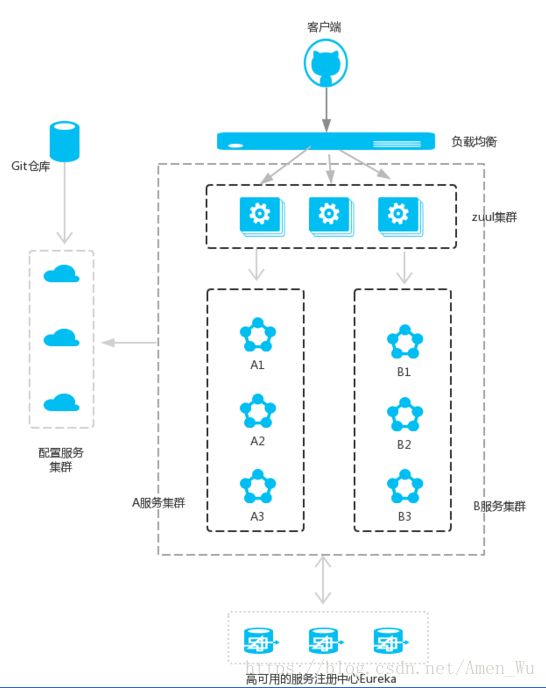
在微服务架构中,需要几个基础的服务治理组件,包括服务注册与发现、服务消费、负载均衡、断路器、智能路由、配置管理等
Eureka:服务注册与发现
Eureka Server
- 引入spring-boot-starter-parent、spring-cloud-starter-eureka-server、spring-boot-starter-test、spring-cloud-dependencies依赖,引入spring-boot-maven-plugin插件
- 启动一个服务注册中心,只需要一个注解
@EnableEurekaServer
@SpringBootApplication - eureka是一个高可用的组件,它没有后端缓存,每一个实例注册之后需要向注册中心发送心跳(因此可以在内存中完成),在默认情况下erureka server也是一个eureka client ,必须要指定一个 server。可以通过端口访问server页面。
- server配置文件(applicaiton.yml):
 server:
  port: 8761

eureka:
  instance:
    hostname: localhost
  client:
    registerWithEureka: false  //1.
    fetchRegistry: false   //2. 通过这俩配置表明是server
    serviceUrl:
      defaultZone: http://${eureka.instance.hostname}:${server.port}/eureka/
Eureka Client
- 引入spring-boot-starter-parent、spring-cloud-starter-eureka、spring-boot-starter-web、spring-boot-starter-test、spring-cloud-dependencies依赖,引入spring-boot-maven-plugin插件
- 通过@EnableEurekaClient表明
@SpringBootApplication
@EnableEurekaClient
@RestController - 还需要在配置文件中注明自己的服务注册中心的地址(application.yml)
 eureka:
  client:
    serviceUrl:
      defaultZone: http://localhost:8761/eureka/
server:
  port: 8762
spring:
  application:
    name: service-hi   //需要指明spring.application.name,这个很重要,
    //这在以后的服务与服务之间相互调用一般都是根据这个name
Rest+Ribbon:服务消费者
- 在微服务架构中,业务都会被拆分成一个独立的服务,服务与服务的通讯是基于http restful的。
- Spring cloud有两种服务调用方式,一种是ribbon+restTemplate,另一种是feign。
- ribbon是一个负载均衡客户端,可以很好的控制htt和tcp的一些行为。Feign默认集成了ribbon。
- ribbon 已经默认实现了这些配置bean:
    IClientConfig ribbonClientConfig: DefaultClientConfigImpl

    IRule ribbonRule: ZoneAvoidanceRule

    IPing ribbonPing: NoOpPing

    ServerList ribbonServerList: ConfigurationBasedServerList

    ServerListFilter ribbonServerListFilter: ZonePreferenceServerListFilter

    ILoadBalancer ribbonLoadBalancer: ZoneAwareLoadBalancer
- @EnableDiscoveryClient向服务中心注册
- 通过@LoadBalanced注解表明这个restRemplate开启负载均衡的功能
Feign:服务消费者
- 引入spring-cloud-starter-feign、spring-cloud-starter-eureka、spring-boot-starter-web依赖
- 启动类@EnableFeignClients注解开启Feign的功能
@SpringBootApplication
@EnableDiscoveryClient
@EnableFeignClients - 定义一个feign接口,通过@ FeignClient(“服务名”),来指定调用哪个服务
 @FeignClient(value = "service-hi")
public interface SchedualServiceHi {
    @RequestMapping(value = "/hi",method = RequestMethod.GET)
    String sayHiFromClientOne(@RequestParam(value = "name") String name);
}
- controller层暴露一个请求,并调用、消费上述feign接口
@RestController
public class HiController {

    @Autowired
    SchedualServiceHi schedualServiceHi;
    @RequestMapping(value = "/hi",method = RequestMethod.GET)
    public String sayHi(@RequestParam String name){
        return schedualServiceHi.sayHiFromClientOne(name);
        //消费已定义的接口,调用远端服务
    }
}
Hystrix:断路器-熔断机制
- 较底层的服务如果出现故障,会导致连锁故障。当对特定的服务的调用的不可用达到一个阀值(Hystric 是5秒20次) 断路器将会被打开。
- 断路打开后,可用避免连锁故障,fallback方法可以直接返回一个固定值
- 引入spring-cloud-starter-hystrix依赖
- 启动类加入@EnableHystrix注解开启Hystrix
 @SpringBootApplication
@EnableDiscoveryClient
@EnableHystrix
public class ServiceRibbonApplication {

    public static void main(String[] args) {
        SpringApplication.run(ServiceRibbonApplication.class, args);
    }

    @Bean    //向IOC提交自己实例化的对象,注解在提供bean的方法上
    @LoadBalanced
    RestTemplate restTemplate() {
        return new RestTemplate();
    }

}
RestTemplate+Ribbon使用断路器hystrix
- 在hiService方法上加上@HystrixCommand注解。该注解对该方法创建了熔断器的功能,并指定了fallbackMethod熔断方法,熔断方法直接给定一个返回值
 @Service
public class HelloService {

    @Autowired    //在使用的地方注入bean
    RestTemplate restTemplate;

    @HystrixCommand(fallbackMethod = "hiError")  //fallbackMethod调用hiError()
    public String hiService(String name) {
        return restTemplate.getForObject("http://SERVICE-HI/hi?name="+name,String.class);
    }

    public String hiError(String name) {  // hiError()
        return "hi,"+name+",sorry,error!";
    }
}
工程不可用的时候,service-ribbon调用API接口时,会执行快速失败,直接返回一组字符串,而不是等待响应超时,这很好的控制了容器的线程阻塞
Feign中使用断路器Hystrix
- Feign是自带断路器的,在D版本的Spring Cloud中,它没有默认打开。配置文件配置打开:
feign.hystrix.enabled=true
- 只需要在FeignClient的SchedualServiceHi接口的注解中加上fallback的指定类
 @FeignClient(value = "service-hi",fallback = SchedualServiceHiHystric.class)
 //feign接口fallback=指定类
public interface SchedualServiceHi {
    @RequestMapping(value = "/hi",method = RequestMethod.GET)
    String sayHiFromClientOne(@RequestParam(value = "name") String name);
}
- SchedualServiceHiHystric需要实现SchedualServiceHi 接口,并注入到Ioc容器中
 @Component
public class SchedualServiceHiHystric implements SchedualServiceHi {
    @Override
    public String sayHiFromClientOne(String name) {
        return "sorry "+name;
    }
}
Hystrix Dashboard (断路器:Hystrix 仪表盘)
- 引入spring-cloud-starter-hystrix-dashboard、spring-boot-starter-actuator依赖
- 启动类中加入@EnableHystrixDashboard注解,开启hystrixDashboard:
@SpringBootApplication
@EnableDiscoveryClient
@EnableHystrix
@EnableHystrixDashboard
Zuul:路由网关
新建zuul工程
- 引入parent依赖:spring-boot-starter-parent
- 引入:spring-cloud-starter-eureka、spring-cloud-starter-zuul、spring-boot-starter-web、spring-boot-starter-test
- 在启动类加上注解@EnableZuulProxy,开启zuul的功能:
@EnableZuulProxy
@EnableEurekaClient
@SpringBootApplication - application.yml配置:
 eureka:
  client:
    serviceUrl:
      defaultZone: http://localhost:8761/eureka/
server:
  port: 8769
spring:
  application:
    name: service-zuul
zuul:
  routes:
    api-a:
      path: /api-a/**
      serviceId: service-ribbon
    api-b:
      path: /api-b/**
      serviceId: service-feign
zuul不仅只是路由,并且还能过滤,做一些安全验证
@Component
public class MyFilter extends ZuulFilter{

    private static Logger log = LoggerFactory.getLogger(MyFilter.class);
    @Override
    public String filterType() {
        return "pre";  //返回一个字符串代表过滤器的类型,
                       //在zuul中定义了四种不同生命周期的过滤器类型
           //pre:路由之前  routing:路由之时  post: 路由之后  error:发送错误调用
    }

    @Override
    public int filterOrder() {
        return 0;   //filterOrder:过滤的顺序
    }

    @Override
    public boolean shouldFilter() {
        return true;
        //shouldFilter:这里可以写逻辑判断,是否要过滤,本文true,永远过滤
    }

    @Override
    public Object run() {
    //run:过滤器的具体逻辑。可用很复杂,包括查sql,nosql去判断该请求到底有没有权限访问
        RequestContext ctx = RequestContext.getCurrentContext();
        HttpServletRequest request = ctx.getRequest();
        log.info(String.format("%s >>> %s", request.getMethod(), request.getRequestURL().toString()));
        Object accessToken = request.getParameter("token");
        if(accessToken == null) {
            log.warn("token is empty");
            ctx.setSendZuulResponse(false);
            ctx.setResponseStatusCode(401);
            try {
                ctx.getResponse().getWriter().write("token is empty");
            }catch (Exception e){}

            return null;
        }
        log.info("ok");
        return null;
    }
}
Spring Cloud Config:分布式配置中心
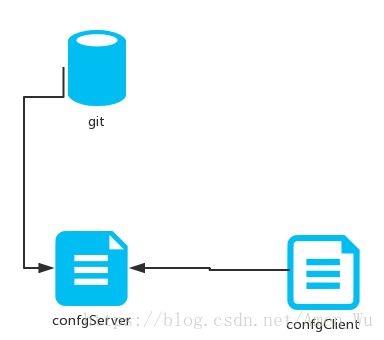
支持配置服务放在配置服务的内存中(即本地),也支持放在远程Git仓库中。在spring cloud config 组件中,分两个角色,一是config server,二是config client
构建config server
- 引入spring-boot-starter-parent的boot-parent依赖
- 引入spring-cloud-config-server、spring-boot-starter-test、spring-cloud-starter-eureka依赖
- 启动类加上@EnableConfigServer注解开启配置服务器的功能
@SpringBootApplication
@EnableConfigServer - application.properties配置:
spring.application.name=config-server
server.port=8888

spring.cloud.config.server.git.uri=https://github.com/forezp/SpringcloudConfig/               //git仓库地址
spring.cloud.config.server.git.searchPaths=respo  //仓库路径
spring.cloud.config.label=master         //仓库分支
spring.cloud.config.server.git.username=your username   //仓库用户名,公开仓库不需要
spring.cloud.config.server.git.password=your password   //仓库密码,公开仓库不需要
- 远程仓库https://github.com/forezp/SpringcloudConfig/ 中有个文件config-client-dev.properties文件中有一个属性。启动程序:访问http://localhost:8888/foo/dev 。可以看到配置信息
- http请求地址和资源文件映射如下:
    /{application}/{profile}[/{label}]
    /{application}-{profile}.yml
    /{label}/{application}-{profile}.yml
    /{application}-{profile}.properties
    /{label}/{application}-{profile}.properties
构建config client
- 引入spring-boot-starter-parent的boot-parent依赖
- 引入spring-cloud-starter-config、spring-boot-starter-web、spring-boot-starter-test依赖
- 配置文件bootstrap.properties:
spring.application.name=config-client
spring.cloud.config.label=master  //远程仓库分支
spring.cloud.config.profile=dev  //dev开发,test测试,pro正式
spring.cloud.config.uri= http://localhost:8888/  //配置服务中心网址
server.port=8881
- controller中可以这样写,返回配置信息:
  @Value("${foo}")
    String foo;
    @RequestMapping(value = "/hi")
    public String hi(){
        return foo;
    }
config server的高可用
创建eureka server工程,作为配置中心的注册中心
- 引入spring-cloud-starter-eureka-server、spring-boot-starter-web、spring-boot-starter-test依赖
- application.yml配置:
server:
  port: 8889   //指定服务端口为8889

eureka:           //加上作为服务注册中心的基本配置
  instance:
    hostname: localhost
  client:
    registerWithEureka: false
    fetchRegistry: false
    serviceUrl:
      defaultZone: http://${eureka.instance.hostname}:${server.port}/eureka/
- 启动类加入注解:
@EnableEurekaServer
@SpringBootApplication
改造config-server
- 加入EurekaClient的依赖spring-cloud-starter-eureka
(spring-cloud-config-server、spring-boot-starter-test、spring-cloud-starter-eureka) - application.yml配置:
spring.application.name=config-server
server.port=8888

spring.cloud.config.server.git.uri=https://github.com/forezp/SpringcloudConfig/
spring.cloud.config.server.git.searchPaths=respo
spring.cloud.config.label=master
spring.cloud.config.server.git.username= your username
spring.cloud.config.server.git.password= your password
eureka.client.serviceUrl.defaultZone=http://localhost:8889/eureka/
   //指定服务地址。其他配置与单机版配置中心相同
- 启动类加入@EnableEureka的注解
改造config-client
- 将其注册微到服务注册中心,作为Eureka客户端。加入依赖spring-cloud-starter-eureka
(spring-cloud-starter-config、spring-boot-starter-web、spring-cloud-starter-eureka、spring-boot-starter-test) - 配置文件bootstrap.properties,注意是bootstrap,加入服务注册地址:
spring.application.name=config-client
spring.cloud.config.label=master spring.cloud.config.profile=dev
//spring.cloud.config.uri= http://localhost:8888/eureka.client.serviceUrl.defaultZone=http://localhost:8889/eureka/ //服务注册地址
spring.cloud.config.discovery.enabled=true //从配置中心读取文件
spring.cloud.config.discovery.serviceId=config-server server.port=8881 //配置中心serverid,服务名
//在读取配置文件不再写ip地址,而是服务名,这时如果配置服务部署多份,通过负载均衡,从而高可用
Spring Cloud Bus:消息总线
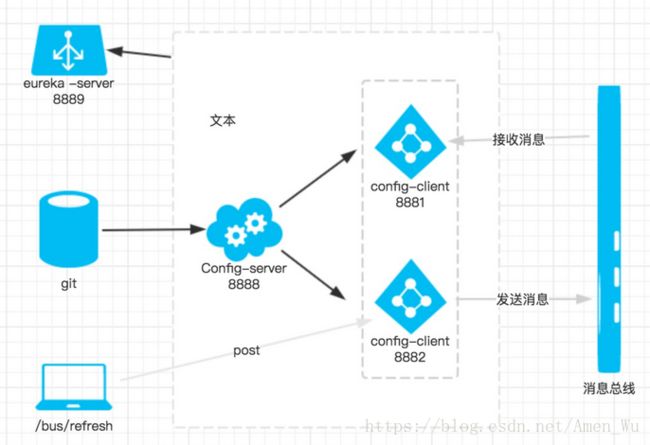
- 将分布式的节点用轻量的消息代理连接起来。它可以用于广播配置文件的更改或者服务之间的通讯,也可以用于监控。
- 本文要讲述的是用Spring Cloud Bus实现通知微服务架构的配置文件的更改
- 安装RabbitMQ,引入spring-cloud-starter-bus-amqp依赖
改造config-client
- 加入spring-cloud-starter-bus-amqp依赖(安装RabbitMQ)
(spring-retry、spring-cloud-starter-config、spring-boot-starter-web、spring-boot-starter-aop、spring-cloud-starter-eureka、spring-boot-starter-test、spring-cloud-starter-bus-amqp、spring-boot-starter-actuator) - application.properties配置RabbitMQ信息:
 spring.rabbitmq.host=localhost   //地址
spring.rabbitmq.port=5672        //端口
// spring.rabbitmq.username=        //用户名
// spring.rabbitmq.password=       //密码
- 如果是传统的做法,需要重启服务,才能达到配置文件的更新。此时,我们只需要发送post请求:http://localhost:8881/bus/refresh,你会发现config-client会重新读取配置文件
- /bus/refresh接口可以指定服务,即使用”destination”参数,比如 “/bus/refresh?destination=customers:**” 即刷新服务名为customers的所有服务,不管ip
Spring Cloud Sleuth:服务链路追踪
- Spring Cloud Sleuth集成了zipkin组件。在分布式系统中提供追踪解决方案,并且兼容支持了 zipkin
- 微服务架构上通过业务来划分服务的,通过REST调用,对外暴露的一个接口,可能需要很多个服务协同才能完成这个接口功能,如果链路上任何一个服务出现问题或者网络超时,都会形成导致接口调用失败。随着业务的不断扩张,服务之间互相调用会越来越复杂
(略)
高可用服务注册中心
- 将Eureka Server集群化。Eureka通过运行多个实例,使其更具有高可用性。事实上,这是它默认的熟性,你需要做的就是给对等的实例一个合法的关联serviceurl
改造eureka-server
- eureka-server工程中resources文件夹下,创建配置文件application-peer1.yml:
 server:
  port: 8761

spring:
  profiles: peer1
eureka:
  instance:
    hostname: peer1
  client:
    serviceUrl:
      defaultZone: http://peer2:8769/eureka/
- 创建另外一个配置文件application-peer2.yml:
 server:
  port: 8769

spring:
  profiles: peer2
eureka:
  instance:
    hostname: peer2
  client:
    serviceUrl:
      defaultZone: http://peer1:8761/eureka/
- 按照官方文档的指示,需要改变etc/hosts,linux系统通过vim /etc/hosts ,加上:
127.0.0.1 peer1
127.0.0.1 peer2
windows电脑,在c:/windows/systems/drivers/etc/hosts 修改
- 改造下service-hi:
 eureka:
  client:
    serviceUrl:
      defaultZone: http://peer1:8761/eureka/
server:
  port: 8762
spring:
  application:
    name: service-hi
启动eureka-server
java -jar eureka-server-0.0.1-SNAPSHOT.jar - -spring.profiles.active=peer1
java -jar eureka-server-0.0.1-SNAPSHOT.jar - -spring.profiles.active=peer2
- 需要手动改host是不是不符合Spring Cloud 的高上大?
eureka.instance.preferIpAddress=true是通过设置ip让eureka让其他服务注册它。也许能通过去改变去通过改变host的方式。 - Eureka-eserver peer1 8761,Eureka-eserver peer2 8769相互感应,当有服务注册时,两个Eureka-eserver是对等的,它们都存有相同的信息,这就是通过服务器的冗余来增加可靠性,当有一台服务器宕机了,服务并不会终止,因为另一台服务存有相同的数据。
Docker:部署cloud项目
https://blog.csdn.net/forezp/article/details/70198649
Docker通常用于如下场景:
web应用的自动化打包和发布;
自动化测试和持续集成、发布;
在服务型环境中部署和调整数据库或其他的后台应用;
从头编译或者扩展现有的OpenShift或Cloud Foundry平台来搭建自己的PaaS环境。
采用maven的方式去构建项目,并采用docker-maven-plugin去构建docker镜像
                org.springframework.boot
                spring-boot-maven-plugin


                com.spotify
                docker-maven-plugin
                0.4.3

                    ${docker.image.prefix}/${project.artifactId}
                    src/main/docker


                            /
                            ${project.build.directory}
                            ${project.build.finalName}.jar
Spotify 的 docker-maven-plugin 插件是用maven插件方式构建docker镜像的。
imageName指定了镜像的名字,本例为 forep/eureka-server
dockerDirectory指定 Dockerfile 的位置
resources是指那些需要和 Dockerfile 放在一起,在构建镜像时使用的文件,一般应用 jar 包需要纳入。
- 增加配置:
server:
  port: 8761
eureka:
  instance:
    prefer-ip-address: true
  client:
    registerWithEureka: false
    fetchRegistry: false
- 编写dokcerfile文件:
 FROM frolvlad/alpine-oraclejdk8:slim
VOLUME /tmp
ADD eureka-server-0.0.1-SNAPSHOT.jar app.jar
// RUN bash -c 'touch /app.jar'
ENTRYPOINT ["java","-Djava.security.egd=file:/dev/./urandom","-jar","/app.jar"]
EXPOSE 8761
Hystrix Dashboard:断路器监控
在微服务架构中为例保证程序的可用性,防止程序出错导致网络阻塞,出现了断路器模型。断路器的状况反应了一个程序的可用性和健壮性,它是一个重要指标。Hystrix Dashboard是作为断路器状态的一个组件,提供了数据监控和友好的图形化界面
- 在service-hi中引入依赖:spring-boot-starter-actuator、spring-cloud-starter-hystrix-dashboard、spring-cloud-starter-hystrix。这三个依赖是必须的,缺一不可
- 加上@EnableHystrix注解开启断路器,这个是必须的,并且需要在程序中声明断路点HystrixCommand;加上@EnableHystrixDashboard注解,开启HystrixDashboard
@SpringBootApplication
@EnableEurekaClient
@RestController
@EnableHystrix   //必须的
@EnableHystrixDashboard  //开启HystrixDashboard
public class ServiceHiApplication {

    public static void main(String[] args) {
        SpringApplication.run(ServiceHiApplication.class, args);
    }

    @Value("${server.port}")
    String port;
    @RequestMapping("/hi")
    @HystrixCommand(fallbackMethod = "hiError")
    //声明断路点HystrixCommand
    public String home(@RequestParam String name) {
        return "hi "+name+",i am from port:" +port;
    }

    public String hiError(String name) {
        return "hi,"+name+",sorry,error!";
    }
}
- Hystrix Dashboard图形展示:打开http://localhost:8762/hystrix.stream,可以看到一些具体的数据
- 打开locahost:8762/hystrix,可以看到界面
Hystrix Turbine:断路器聚合监控
- 看单个的Hystrix Dashboard的数据并没有什么多大的价值,要想看这个系统的Hystrix Dashboard数据就需要用到Hystrix Turbine 。因为我们需要多个服务的Dashboard,所以需要再建一个服务,取名为service-lucy
- 创建service-turbine:spring-cloud-starter-turbine、spring-cloud-netflix-turbine、spring-boot-starter-actuator、spring-boot-starter-test
- 启动类注解@EnableTurbine,开启turbine,@EnableTurbine注解包含了@EnableDiscoveryClient注解,即开启了注册服务
@SpringBootApplication
@EnableTurbine
- application.yml配置:
 spring:
  application.name: service-turbine
server:
  port: 8769
security.basic.enabled: false
turbine:
  aggregator:
    clusterConfig: default   # 指定聚合哪些集群,多个使用","分割,默认为default。可使用http://.../turbine.stream?cluster={clusterConfig之一}访问
  appConfig: service-hi,service-lucy  ### 配置Eureka中的serviceId列表,表明监控哪些服务
  clusterNameExpression: new String("default")
  # 1. clusterNameExpression指定集群名称,默认表达式appName;此时:turbine.aggregator.clusterConfig需要配置想要监控的应用名称
  # 2. 当clusterNameExpression: default时,turbine.aggregator.clusterConfig可以不写,因为默认就是default
  # 3. 当clusterNameExpression: metadata['cluster']时,假设想要监控的应用配置了eureka.instance.metadata-map.cluster: ABC,则需要配置,同时turbine.aggregator.clusterConfig: ABC
eureka:
  client:
    serviceUrl:
      defaultZone: http://localhost:8761/eureka/
