CentOS7下利用rsyslog+loganalyzer配置日志服务器及Linux和windows客户端配置
随着机房内的服务器和网络设备增加,日志管理和查询就成了让系统管理员头疼的事。
系统管理员遇到的常见问题如下:
1、日常维护过程中不可能登录到每一台服务器和设备上去查看日志;
2、网络设备上的存储空间有限,不可能存储日期太长的日志,而系统出现问题又有可能是很久以前发生的某些操作造成的;
3、在某些非法入侵的情况下,入侵者一般都会清除本地日志,清除入侵痕迹;
4、zabbix等监控系统无法代替日志管理,无法监控如系统登录、计划任务执行等项目。
基于上述原因,在当前的网络环境中搭建一台用于日志集中管理的Rsyslog日志服务器就显得十分有必要了。
Rsyslog服务的优点如下:
1、Rsyslog服务器可以大多数的网络设备支持,在网络设备的系统设备选项中大多都有远程日志服务的配置选项。只需要填写上IP地址和端口(大多数设备已经默认是514了),然后确定就可以了;
2、Linux服务器只需要在本地的Rsyslog服务配置中加入简单的一行就可以将日志发送到日志服务器,布署和配置起来十分简单;
3、通过软件(如evtsys)也可以支持Windows服务器,布署和配置也不是很难,但是有些软件是要收费的;
4、搭配前端的loganalyzer等软件,可以轻松实现图形化管理和查询日志。
二、系统环境及软件版本:
Rsyslog_server: CentOS7.2
Rsyslog_server IP:192.168.253.160
Rsyslog_client: CentOS7.2 + Windows7
所用软件:
Rsyslog Version: rsyslog-7.4.7-12.el7.x86_64
LogAnalyzer Version: loganalyzer-3.6.5.tar.gz
MySQL Version:MySQL5.7
Httpd Version:httpd-2.4.6-40.el7.centos.x86_64
PHP Version:php-5.4.16-36.el7_1.x86_64
三、环境准备:
3.1 关闭防火墙:
# systemctl stop firewalld
3.2 将SELINUX设置为disabled
# setenforce 0
# sed -i 's#SELINUX=enforcing#SELINUX=disabled#g' /etc/selinux/config
四、配置LAMP环境:
4.1 安装MySQL,由于CentOS7默认会安装Mariadb,因此使用MySQL官方提供快速的安装方法,地址:http://dev.mysql.com/doc/mysql-yum-repo-quick-guide/en/
# mkdir /home/rsyslog_server/tools -p #创建下载文件存放目录
# cd /home/rsyslog_server/tools
# yum install wget -y
# wget http://dev.mysql.com/get/mysql57-community-release-el7-8.noarch.rpm
# rpm -Uvh mysql57-community-release-el7-8.noarch.rpm #安装MySQL官方yum仓库
# yum install mysql-community-server -y #安装MySQL
# systemctl start mysqld.service
# systemctl status mysqld.service
# grep 'temporary password' /var/log/mysqld.log #查看初始密码
# mysql -u root -p
>ALTER USER 'root'@'localhost' IDENTIFIED BY 'MyNewPass4!'; #更改密码,密码需要符合以下规则:至少一个大写字母,一个小写字母,一个数字,一个特殊字符,而且密码长度需要超过8位
4.2 安装Apache及PHP
# yum install httpd -y
# yum install php php-gd php-xml php-mysql -y
4.3 启动服务并加入开机自启动:
# systemctl start httpd.service
# systemctl enable httpd.service
# systemctl start mysqld.service
# systemctl enable mysqld.service
4.4 测试PHP环境
# vi index.php
在浏览器中输入http://192.168.253.160/index.php,若显示以下内容,则配置成功。
五、检查并安装服务端软件
5.1 检查是否安装了rsyslog软件
# rpm -qa rsyslog #CentOS7默认会安装rsyslog
5.2 安装rsyslog 连接MySQL数据库的模块
# yum install rsyslog-mysql -y #rsyslog使用此模块将数据传入MySQL数据库,必须安装
六、配置服务器端
6.1 导入rsyslog-mysql 数据库文件
# cd /usr/share/doc/rsyslog-7.4.7/ # mysql -uroot -p6.2 登录数据库查看:
mysql> show databases;
mysql> show tables;
导入数据库操作创建了Syslog 库并在该库中创建了两张空表SystemEvents 和SystemEventsProperties。
6.3 在MySQL下创建rsyslog用户并授权:
mysql> grant all on Syslog.* to rsyslog@'localhost' identified by 'MyNewPass4!'; mysql> flush privileges; mysql> exit6.4 配置服务端支持rsyslog-mysql 模块,并开启UDP服务端口获取网内其他LINUX系统日志;
老版本rsyslog的配置# vi /etc/rsyslog.conf #按如下进行更改 #### MODULES #### $Modload ommysql *.* :ommysql:localhost,Syslog,rsyslog,MyNewPass4! #localhost 表示本地主机,Syslog 为数据库名,rsyslog 为数据库的用户,MyNewPass4!为该用户密码。 $ModLoad immark # immark是模块名,支持日志标记 $ModLoad imudp #imupd是模块名,支持udp协议 $UDPServerRun 514 #允许514端口接收使用UDP和TCP协议转发过来的日志 #### RULES #### #在RULES下注释掉*.info;mail.none;authpriv.none;cron.none改为 *.info;mail.none;authpriv.none;cron.none # :ommysql:localhost,Syslog,rsyslog,MyNewPass4! #*.info;mail.none;authpriv.none;cron.none /var/log/messages *.info;mail.none;authpriv.none;cron.none :ommysql:localhost,Syslog,rsyslog,MyNewPass4!新版本rsyslog的配置# rsyslog configuration file # For more information see /usr/share/doc/rsyslog-*/rsyslog_conf.html # If you experience problems, see http://www.rsyslog.com/doc/troubleshoot.html #### MODULES #### # The imjournal module bellow is now used as a message source instead of imuxsock. $ModLoad imuxsock # provides support for local system logging (e.g. via logger command) $ModLoad imjournal # provides access to the systemd journal #$ModLoad imklog # reads kernel messages (the same are read from journald) $ModLoad immark # provides --MARK-- message capability # Provides UDP syslog reception $ModLoad imudp $UDPServerRun 514 # Provides TCP syslog reception #$ModLoad imtcp #$InputTCPServerRun 514 $ModLoad ommysql *.* :ommysql:localhost,Syslog,rsyslog,MyNewPass4! #Standard Redhat syslog settings *.info;mail.none;authpriv.none;cron.none /var/log/messages authpriv.* /var/log/secure mail.* -/var/log/maillog cron.* /var/log/cron *.emerg * uucp,news.crit /var/log/spooler local7.* /var/log/boot.log $template tpl,"insert into SystemEvents (Message, Facility, FromHost, Priority, DeviceReportedTime, ReceivedAt, InfoUnitID, SysLogTag) values ('%msg%', %syslogfacility%, '%FROMHOST-IP%', %syslogpriority%, '%timereported:::date-mysql%', '%timegenerated:::date-mysql%', %iut%, '%syslogtag%')",SQL #### GLOBAL DIRECTIVES #### # Where to place auxiliary files $WorkDirectory /var/lib/rsyslog # Use default timestamp format $ActionFileDefaultTemplate RSYSLOG_TraditionalFileFormat # File syncing capability is disabled by default. This feature is usually not required, # not useful and an extreme performance hit #$ActionFileEnableSync on # Include all config files in /etc/rsyslog.d/ $IncludeConfig /etc/rsyslog.d/*.conf # Turn off message reception via local log socket; # local messages are retrieved through imjournal now. $OmitLocalLogging on # File to store the position in the journal $IMJournalStateFile imjournal.state #### RULES #### # Log all kernel messages to the console. # Logging much else clutters up the screen. #kern.* /dev/console # Log anything (except mail) of level info or higher. # Don't log private authentication messages! #*.info;mail.none;authpriv.none;cron.none /var/log/messages *.info;mail.none;authpriv.none;cron.none :ommysql:localhost,Syslog,rsyslog,MyNewPass4! # The authpriv file has restricted access. authpriv.* /var/log/secure # Log all the mail messages in one place. mail.* -/var/log/maillog # Log cron stuff cron.* /var/log/cron # Everybody gets emergency messages *.emerg :omusrmsg:* # Save news errors of level crit and higher in a special file. uucp,news.crit /var/log/spooler # Save boot messages also to boot.log local7.* /var/log/boot.log # ### begin forwarding rule ### # The statement between the begin ... end define a SINGLE forwarding # rule. They belong together, do NOT split them. If you create multiple # forwarding rules, duplicate the whole block! # Remote Logging (we use TCP for reliable delivery) # # An on-disk queue is created for this action. If the remote host is # down, messages are spooled to disk and sent when it is up again. #$ActionQueueFileName fwdRule1 # unique name prefix for spool files #$ActionQueueMaxDiskSpace 1g # 1gb space limit (use as much as possible) #$ActionQueueSaveOnShutdown on # save messages to disk on shutdown #$ActionQueueType LinkedList # run asynchronously #$ActionResumeRetryCount -1 # infinite retries if host is down # remote host is: name/ip:port, e.g. 192.168.0.1:514, port optional #*.* @@remote-host:514 # ### end of the forwarding rule ###6.5 重启rsyslog服务
# systemctl restart rsyslog.service七、配置客户端
7.1 检查客户端有没有安装rsyslog
# rpm -qa rsyslog7.2 配置rsyslog客户端发送本地日志到服务端
# vi /etc/rsyslog.conf *.* @192.168.253.160:514 #在文件结尾处增加此内容7.3 重启rsyslog服务
# systemctl restart rsyslog.service7.4 编辑/etc/bashrc,将客户端执行的所有命令写入系统日志/var/log/messages中
# vi /etc/bashrc export PROMPT_COMMAND='{ msg=$(history 1 | { read x y; echo $y; });logger "[euid=$(whoami)]":$(who am i):[`pwd`]"$msg"; }' #在结尾处加上此内容设置使其生效
# source /etc/bashrc八、测试rsyslog_server可否正常接收rsyslog_client的日志
[root@syslog log]# mysql -uroot -p Enter password: Welcome to the MySQL monitor. Commands end with ; or \g. Your MySQL connection id is 207 Server version: 5.7.17 MySQL Community Server (GPL) Copyright (c) 2000, 2016, Oracle and/or its affiliates. All rights reserved. Oracle is a registered trademark of Oracle Corporation and/or its affiliates. Other names may be trademarks of their respective owners. Type 'help;' or '\h' for help. Type '\c' to clear the current input statement. mysql> show databases; +--------------------+ | Database | +--------------------+ | information_schema | | Syslog | | mysql | | performance_schema | +--------------------+ 4 rows in set (0.00 sec) mysql> use Syslog; Reading table information for completion of table and column names You can turn off this feature to get a quicker startup with -A Database changed mysql> show tables; +------------------------+ | Tables_in_Syslog | +------------------------+ | SystemEvents | | SystemEventsProperties | | logcon_charts | | logcon_config | | logcon_dbmappings | | logcon_fields | | logcon_groupmembers | | logcon_groups | | logcon_savedreports | | logcon_searches | | logcon_sources | | logcon_users | | logcon_views | +------------------------+ 13 rows in set (0.00 sec) mysql> select count(*) from SystemEvents; +----------+ | count(*) | +----------+ | 75 | #####这里不为零 说明mysql已经和rsyslog连接正常并接受到数据 +----------+ 1 row in set (0.00 sec) mysql>
九、安装LogAnalyzer
# cd /home/rsyslog_server/tools/ # wget http://download.adiscon.com/loganalyzer/loganalyzer-3.6.5.tar.gz # tar zxf loganalyzer-3.6.5.tar.gz # cd loganalyzer-3.6.5 # mkdir -p /var/www/html/loganalyzer # cp -rf src/* /var/www/html/loganalyzer/#cp -rf contrib/* /var/www/html/loganalyzer十、在浏览器中进行安装LogAnalyzer
10.1 打开浏览器,输入http://192.168.253.160/loganalyzer
提示无配置文件,点击here按钮生成;
10.2 点击next进行系统环境测试:
此处提示没有config.php文件,使用contrib中的configure.sh脚本可生成;
# cd contrib/ # cp configure.sh /var/www/html/loganalyzer/ # cd /var/www/html/loganalyzer/ # sh configure.sh此部分操作在/var/www/html/loganalyzer/目录下创建config.php文件并配置权限为666,也可以使用mkdir及chmod命令执行。
10.3 继续下一步,填写数据库信息
点击next生成数据库中的表;
10.4 设置管理员
10.5 创建第一个系统日志source
10.6 完成
Rsyslog + LogAnalyzer 日志服务器部署完毕,可根据需要进行设置。
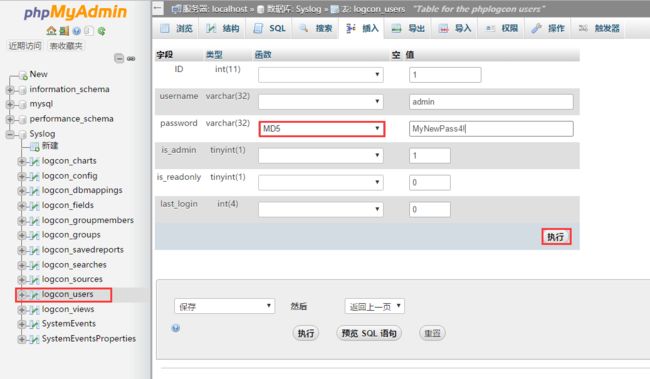
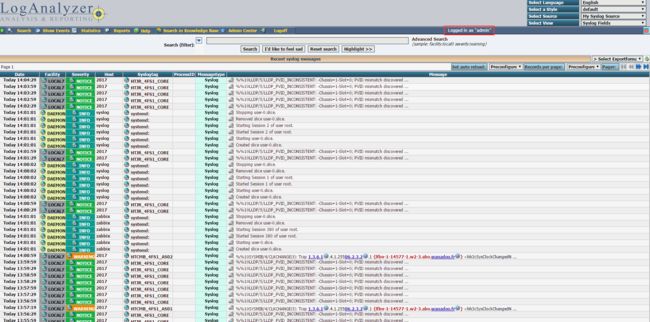
最后的问题帐号登出后 再登陆loganalyzer的web页面老是提示帐号密码错误使用phpmyadmin在Syslog数据库里更改密码加密方式为MD5点击执行 再次登陆后正常
CentOS 6.5下利用Rsyslog+LogAnalyzer+MySQL部署日志服务器可以参考下面的博客
http://www.cnblogs.com/mchina/p/linux-centos-rsyslog-loganalyzer-mysql-log-server.html

