FastDFS集群环境搭建(一)单机FastDFS配置
文章目录
- 安装libfastcommon
- 安装FastDFS
- 配置FastDFS
- 配置tracker.conf(跟踪服务配置文件)
- 配置storage.conf(存储配置文件)
- 配置client.conf(客户端配置文件)
- 配置http.conf
- 启动FastDFS
- 上传文件测试
- 开放端口
- 设置开机自启动
安装libfastcommon
由于FastDFS依赖libfastcommon,所以先需要安装libfastcommon,安装libfastcommon需要源代码本地编译安装。如果系统没有git/gcc/make需要先安装
git clone https://github.com/happyfish100/libfastcommon.git
cd libfastcommon
./make.sh
./make.sh install
在32位系统中,libfastcommon会安装在/usr/lib 中,64位系统则安装在 /usr/lib64 中。依次执行以下命令:(根据自己的操作系统选择路径)
export LD_LIBRARY_PATH=/usr/lib/
sudo ln -s /usr/lib64/libfastcommon.so /usr/local/lib/libfastcommon.so
sudo ln -s /usr/lib64/libfastcommon.so /usr/lib/libfastcommon.so
sudo ln -s /usr/lib64/libfdfsclient.so /usr/local/lib/libfdfsclient.so
sudo ln -s /usr/lib64/libfdfsclient.so /usr/lib/libfdfsclient.so
安装FastDFS
通过git下载最新版本源代码,本地编译安装
sudo git clone https://github.com/happyfish100/fastdfs.git
cd fastdfs
sudo ./make
sudo ./make.sh install
配置FastDFS
进入FastDFS配置文件路径/etc/fdfs,把目录下配置文件
.sample后缀去掉,具体的配置可以参考我的下一篇博文FastDFS集群环境搭建(二)FastDFS配置文件详解
配置tracker.conf(跟踪服务配置文件)
编辑配置文件修改其中的base_path和http.server_port(默认的
port=22122不用修改),其中“base_path”的路径必须保证存在,如果不存在需要手动创建
sudo vi /etc/fdfs/tracker.conf
配置storage.conf(存储配置文件)
编辑配置文件修改如下列出项,其中
store_path0和base_path的路径必须存在,如果不存在需要手动创建,xxx.xxx.xxx.xxx是跟踪服务器IP地址,单机即为本机IP
group_name=group1
store_path0=/home/feige/fastdfs/storage
base_path=/home/feige/fastdfs/storage
tracker_server=xxx.xxx.xxx.xxx:22122
http.server_port=8888
配置client.conf(客户端配置文件)
编辑配置文件修改如下列出项,其中
base_path的路径必须存在,如果不存在需要手动创建,xxx.xxx.xxx.xxx是跟踪服务器IP地址,单机即为本机IP,另外最后一行“#include http.conf”删除一个“#”
# base_path需要和tracker.conf中的base_path保持一致
base_path=/home/weifei/fastdfs/tracker
tracker_server=xxx.xxx.xxx.xxx:22122
http.tracker_server_port=8888
#include http.conf
配置http.conf
从git下载的fastdfs目录的conf目录下拷贝http.conf到/etc/fdfs目录下,修改防盗链图片所在路径(在fastdfs/conf目录下)
http.anti_steal.token_check_fail=/home/feige/fastdfs/fastdfs-5.11/conf/anti-steal.jpg
启动FastDFS
执行如下命令启动跟踪服务器和存储服务器
sudo /usr/bin/fdfs_trackerd /etc/fdfs/tracker.conf
sudo /usr/bin/fdfs_storaged /etc/fdfs/storage.conf
启动完成后通过如下命令查看是否启动成功
sudo netstat -unltp|grep fdfs
sudo tail -100f /home/feige/fastdfs/tracker/logs/trackerd.log
sudo tail -100f /home/feige/fastdfs/storage/logs/storaged.log
上传文件测试
准备一张图片/home/feige/fastdfs/image/desktop.png执行如下命令
sudo fdfs_upload_file /etc/fdfs/client.conf /home/feige/fastdfs/image/desktop.png
上传成功后返回FastDFS存储路径
![]()
还有另一种上传测试方式,如下:
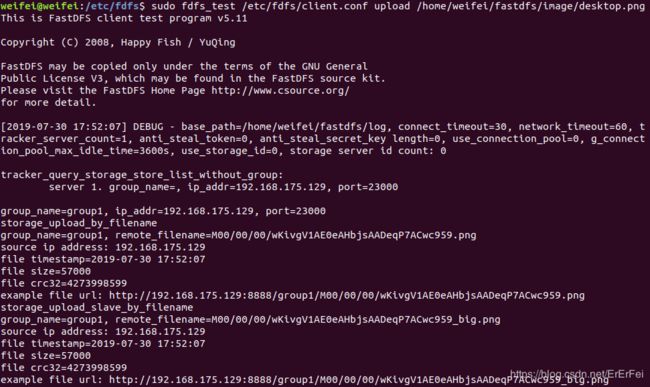
sudo fdfs_test /etc/fdfs/client.conf upload /home/feige/fastdfs/image/desktop.png

注意,上面打印日志最后一行虽然写着可以访问,但是实际上从4.05版本就移除了内置的http支持,
下面这段文字是FastDFS_v5.08\FastDFS\HISTORY 文件 的部分内容。看最后一行:移除内嵌的http支持。
所以要访问文件需要安装Apache或Nginx模块才行。
Version 4.05 2012-12-30
- client/fdfs_upload_file.c can specify storage ip port and store path index
- add connection pool
- client load storage ids config
- common/ini_file_reader.c does NOT call chdir
- keep the mtime of file same
- use g_current_time instead of call time function
- remove embed HTTP support
开放端口
开放22122/23000/8888三个端口(参考我的博文:Ubuntu开放指定端口)
iptables -I INPUT -p tcp --dport 22122 -j ACCEPT
iptables -I INPUT -p tcp --dport 23000 -j ACCEPT
iptables -I INPUT -p tcp --dport 8888 -j ACCEPT
sudo netfilter-persistent save
sudo netfilter-persistent reload
设置开机自启动
如果是Ubuntu 18以上版本参考我的博文:Ubuntu 18.04设置开机自动启动,然后编辑/etc/rc.local增加下面内容
# Start FastDFS tracker server
sudo /usr/bin/fdfs_trackerd /etc/fdfs/tracker.conf
# Start FastDFS storage server
sudo /usr/bin/fdfs_storaged /etc/fdfs/storage.conf