实验环境
最小化安装Centos6.5-x86_64
服务端192.168.2.1 vmnet4
一.简介
Cobbler 可以用来快速建立 Linux 网络安装环境,它已将 Linux 网络安装的技术门槛,从大专以上文化水平,成功降低到初中以下,连补鞋匠都能学会。
网络安装服务器套件 Cobbler(补鞋匠)从前,我们一直在做装机民工这份很有前途的职业。自打若干年前 Red Hat 推出了 Kickstart,此后我们顿觉身价倍增。不再需要刻了光盘一台一台地安装 Linux,只要搞定 PXE、DHCP、TFTP,还有那满屏眼花缭乱不知所云的 Kickstart 脚本,我们就可以像哈里波特一样,轻点魔棒,瞬间安装上百台服务器。这一堆花里胡哨的东西可不是一般人都能整明白的,没有大专以上学历,通不过英语四级,根本别想玩转。总而言之,这是一份多么有前途,多么有技术含量的工作啊。很不幸,Red Hat 最新(Cobbler项目最初在2008年左右发布)发布了网络安装服务器套件 Cobbler(补 鞋匠),它已将 Linux 网络安装的技术门槛,从大专以上文化水平,成功降低到初中以下,连补鞋匠都能学会。对于我们这些在装机领域浸淫多年,经验丰富,老骥伏枥,志在千里的民工兄弟们来说,不啻为一个晴天霹雳。
Cobbler是一个快速网络安装linux的服务,而且在经过调整也可以支持网络安装windows。该工具使用python开发,小巧轻便(才15k行python代码),使用简单的命令即可完成PXE网络安装环境的配置,同时还可以管理DHCP、DNS、以及yum仓库、构造系统ISO镜像。
Cobbler支持命令行管理,web界面管理,还提供了API接口,可以方便二次开发使用。
Cobbler客户端Koan支持虚拟机安装和操作系统重新安装,使重装系统更便捷。
二、cobbler提供的功能
使用 Cobbler,您无需进行人工干预即可安装机器。Cobbler 设置一个 PXE 引导环境(它还可使用 yaboot 支持 PowerPC),并控制与安装相关的所有方面,比如网络引导服务(DHCP 和 TFTP)与存储库镜像。当希望安装一台新机器时,Cobbler 可以:
使用一个以前定义的模板来配置 DHCP 服务(如果启用了管理 DHCP)
将一个存储库(yum 或 rsync)建立镜像或解压缩一个媒介,以注册一个新操作系统
在 DHCP配置文件中为需要安装的机器创建一个条目,并使用您指定的参数(IP 和 MAC 地址)
在TFTFP 服务目录下创建适当的 PXE 文件
重新启动DHCP 服务以反映更改
重新启动机器以开始安装(如果电源管理已启用)
Cobbler 支持众多的发行版:Red Hat、Fedora、CentOS、Debian、Ubuntu 和 SuSE。当添加一个操作系统(通常通过使用 ISO 文件)时,Cobbler 知道如何解压缩合适的文件并调整网络服务,以正确引导机器。
Cobbler 可使用 kickstart 模板。基于 Red Hat 或 Fedora 的系统使用 kickstart 文件来自动化安装流程。通过使用模板,您就会拥有基本的 kickstart 模板,然后定义如何针对一种配置文件或机器配置而替换其中的变量。例如,一个模板可能包含两个变量 $domain和 $machine_name。在 Cobbler 配置中,一个配置文件指定 domain=mydomain.com,并且每台使用该配置文件的机器在machine_name 变量中指定其名称。该配置文件中的所有机器都使用相同的kickstart 安装且针对 domain=mydomain.com 进行配置,但每台机器拥有其自己的机器名称。您仍然可以使用 kickstart 模板在不同的域中安装其他机器并使用不同的机器名称。
为了协助管理系统,Cobbler 可通过 fence scripts 连接到各种电源管理环境。Cobbler 支持 apc_snmp、bladecenter、bullpap、drac、ether_wake、ilo、integrity、ipmilan、ipmitool、lpar、rsa、virsh 和 wti。要重新安装一台机器,可运行 reboot system foo命令,而且 Cobbler 会使用必要的凭据和信息来为您运行恰当的 fence scripts(比如机器插槽数)。
除了这些特性,还可使用一个配置管理系统 (CMS)。您有两种选择:该工具内的一个内部系统,或者集成一个现有的外部 CMS,比如 Chef 或 Puppet。借助内部系统,您可以指定文件模板,这些模板会依据配置参数进行处理(与 kickstart 模板的处理方式一样),然后复制到您指定的位置。如果必须自动将配置文件部署到特定机器,那么此功能很有用。
使用 koan 客户端,Cobbler 可从客户端配置虚拟机并重新安装系统。我不会讨论配置管理和koan 特性,因为它们不属于本文的介绍范畴。但是,它们是值得研究的有用特性
三.安装配置
1.挂载系统光盘
[root@bogon ~]# mount/dev/cdrom /mnt
mount: block device/dev/sr0 is write-protected, mounting read-only
[root@bogon ~]# df -h
Filesystem      Size Used Avail Use% Mounted on
/dev/sda3        18G 754M   16G   5% /
tmpfs           931M     0 931M   0% /dev/shm
/dev/sda1       485M  32M  428M   7% /boot
/dev/sr0        4.2G 4.2G     0 100% /mnt
2.安装wget下载工具
[root@bogon ~]# rpm-ivh /mnt/Packages/wget-1.12-1.8.el6.x86_64.rpm
warning:/mnt/Packages/wget-1.12-1.8.el6.x86_64.rpm: Header V3 RSA/SHA1 Signature, keyID c105b9de: NOKEY
Preparing...               ########################################### [100%]
   1:wget                  ########################################### [100%]
3.下载yum源用配置文件
[root@bogon~]# wget -O /etc/yum.repos.d/CentOS-Base.repo http://mirrors.aliyun.com/repo/Centos-6.repo
[root@bogon ~]# sed -i's/$releasever/6/g' /etc/yum.repos.d/CentOS-Base.repo
[root@bogon ~]# yummakecache    #生成缓存
4.安装服务
[root@bogon ~]# yum -yinstall cobbler cobbler-web dhcp httpd xinetd tftp-server pykickstart rsync
Loaded plugins:fastestmirror
Determining fastestmirrors
 * base: mirrors.aliyun.com
 * extras: mirrors.aliyun.com
 * updates: mirrors.aliyun.com
Setting up InstallProcess
No packagecobbler available.
No packagecobbler-web available.   #可以看到cobbler、cobbler_web没有安装成功,那是因为常规yum源中没有关于cobbler的包,不过不用着急,我们需要在配置一个epel源,就可以了
配置epel源
[root@bogon ~]# yum -yinstall epel*
[root@bogon ~]# yummakecache
安装cobblercobbler-web
[root@bogon ~]# yum -yinstall cobbler cobbler-web
软件包用途
cobbler #cobbler程序包
cobbler-web #cobbler的web服务包
pykickstart #cobbler检查kickstart语法错误
httpd #Apache web服务
tftp #tftp服务
rsync #rsync服务
dhcp #dhcp服务
xinetd #超级守护进程
5.关闭selinux和防火墙
[root@bogon ~]#setenforce 0
[root@bogon ~]# serviceiptables stop
iptables: Settingchains to policy ACCEPT: filter [ OK  ]
iptables: Flushingfirewall rules: [  OK  ]
iptables: Unloadingmodules: [  OK  ]
6.检查配置,需要在cobblerd和httpd启动的情况下检查
[root@bogon ~]# cobblercheck
执行cobblercheck 解决如下问题
The following arepotential configurationitems that you may want to fix:
1 : The 'server' fieldin /etc/cobbler/settingsmust be set to something other than localhost, orkickstarting features willnot work.  Thisshould be a resolvablehostname or IP for the boot server as reachable by all machinesthat will useit.
2 : For PXE to befunctional, the'next_server' field in /etc/cobbler/settings must be set tosomething otherthan 127.0.0.1, and should match the IP of the boot server onthe PXE network.
3 : change 'disable' to'no' in/etc/xinetd.d/tftp
4 : some network boot-loadersare missingfrom /var/lib/cobbler/loaders, you may run 'cobbler get-loaders' todownloadthem, or, if you only want to handle x86/x86_64 netbooting, you mayensure thatyou have installed a *recent* version of the syslinux packageinstalled and canignore this message entirely. Files inthis directory, should you want to support all architectures,should include pxelinux.0, menu.c32, elilo.efi, and yaboot. The 'cobblerget-loaders' commandis the easiest way to resolve these requirements.
5 : change 'disable' to'no' in/etc/xinetd.d/rsync
6 : since iptables maybe running, ensure69, 80/443, and 25151 are unblocked
7 : comment out 'dists'on/etc/debmirror.conf for proper debian support
8 : comment out'arches' on/etc/debmirror.conf for proper debian support
9 : ksvalidator was notfound, installpykickstart
10 : The defaultpassword used by thesample templates for newly installed machines(default_password_crypted in/etc/cobbler/settings) is still set to 'cobbler'and should be changed, try:"openssl passwd -1 -salt 'random-phrase-here''your-password-here'"to generate new one
11 : fencing tools werenot found, and arerequired to use the (optional) power management features.install cman orfence-agents to use them
Restart cobblerd andthen run 'cobblersync' to apply changes.
问题1:修改/etc/cobbler/settings 中的server 参数为192.168.0.150
问题2:修改/etc/cobbler/settings 中的next_server参数为192.168.0.150
问题3:修改/etc/xinet.d/tftp,激活tftp
问题4:执行cobbler get-loaders 来下载最新的boot-loaders文件,或者是安装syslinux,安装完后cp  /usr/share/syslinux中的pxelinux.0,menu.c32等文件至/var/lib/cobbler/loaders目录中。
问题5:修改/etc/xinet.d/rsync,激活rsync
问题6:关闭iptables
问题7:注释掉/etc/debmirror.conf中的dists
问题8:注释掉/etc/debmirror.conf中的arches
问题9:yum install pykickstart
问题10:openssl passwd -1 -salt 'random-phrase-here' '123.com' 修改默认密码,并替换/etc/cobbler/settings中的默认密码文件
[root@bogon ~]# vim/etc/cobbler/settings   #修改default_password_crypted: 注意空格
default_password_crypted:"$1$random-p$NICT70XxnoGyJGW2haesv/"
问题11:安装cam和fance-agents来实现电源管理
yum -y install cmanfence-agents
因为是最小化安装,没有安装vim编辑器
[root@bogon ~]# yum -yinstall vim
解决配置问题
[root@bogon ~]# vim/etc/cobbler/settings
server: 192.168.2.1      #服务端的IP
next_server:192.168.2.1
启用tftp服务
[root@bogon ~]#chkconfig tftp on
下载最新的boot-loaders文件
[root@bogon ~]# cobblerget-loaders
[root@localhost ~]# cp/usr/share/syslinux/{pxelinux.0,menu.c32} /var/lib/cobbler/loaders/
#/var/lib/cobbler/loaders/ 这个目录可以理解为cobbler的工作目录,一些要用到的引导文件或ks都要放到这里,cobbler会自动从这里复制。如:会把pxelinux.0复制到tftp根目录。
开启rsync服务
[root@bogon ~]#chkconfig rsync on
管理debian部署和存储库包
[root@bogon ~]# yum -yinstall debmirror
[root@localhost ~]# vim/etc/debmirror.conf
#@dists="sid";
#@arches="i386";
修改默认密码,并替换
[root@bogon ~]# opensslpasswd -1 -salt 'random-phrase-here' '123.com'
[root@bogon ~]# vim/etc/cobbler/settings
default_password_crypted:"$1$random-p$NICT70XxnoGyJGW2haesv/"
安装软件包,实现电源管理
[root@bogon ~]# yum -yinstall cman fence-agents
7.启动服务
[root@bogon ~]# servicecobblerd restart
[root@bogon ~]#chkconfig cobblerd on
[root@bogon ~]# servicexinetd start
[root@bogon ~]#chkconfig xinetd on
[root@bogon ~]# servicehttpd restart
[root@bogon ~]#chkconfig httpd on
8.配置DHCP
[root@bogon~]# cp -a /usr/share/doc/dhcp-4.1.1/dhcpd.conf.sample /etc/dhcp/dhcpd.conf
cp: overwrite`/etc/dhcp/dhcpd.conf'? y
[root@localhost ~]# vim/etc/dhcp/dhcpd.conf
subnet 192.168.2.0netmask 255.255.255.0 {
  range 192.168.2.10 192.168.2.20;
  option domain-name-servers 202.106.0.20;
  option domain-name "abiao.cn";
  option routers 192.168.2.1;
  option broadcast-address 192.168.2.255;
  default-lease-time 600;
  max-lease-time 7200;
  next-server 192.168.2.1;
  filename "pxelinux.0";
}
配置应用的网络接口,并启动服务
vi /etc/sysconfig/dhcpd
DHCPDARGS=eth1  //DHCPDARGS=eth1               #仅在eth1上提供dhcp服务
[root@localhost ~]#service dhcpd restart
[root@localhost ~]#chkconfig dhcpd on
四、配置cobbler
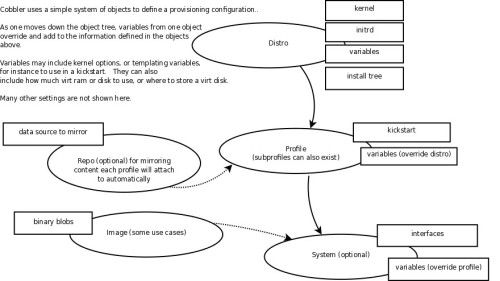
cobbler的各主要组件间的关系如下图所示
cobbler里面有几个概念要了解一下:
distro: 用来标识一个发行版。因为安装不同版本的系统起码要用不同的内核与initrd来启动安装程序。这个就是用来区分它们的。注意distro主要是来标识不同的内核与initrd,与整个光盘的软件没有关系,这些软件是在ks文件里配置的。
profile: 用来区分不同的配置信息, 最主要的就是区分不同的ks文件。如有的ks文件是最小化安装,有的是桌面版安装。
system: 估计是用来以MAC地址来区分不同主机,来完成定制安装的吧。没有尝试过,不敢肯定。
一定要区分一下,cobbler做的只是第一二阶段的引导,在客户机加载完内核与initrd文件以后就与cobbler没有关系了。之后在哪里下载软件还有系统配置和分区就是ks文件的关系了。
1.定义distro
是cobbler变得可用的第一步为定义distro,其可以通过为其指定外部的安装引导内核及ramdisk文件的方式实现。而如果已经有完成的安装树(如os的安装镜像)则推荐使用improt之间导入的方式进行
import 命令来定义发行版,内核和initrd文件
# cobbler import--name=centos6.5-x86-64 --path=/mnt
这部过程会有点长,耐心等待
[root@localhost ~]#cobbler import --name=centos6.5-x86_64 --path=/mnt
task started:2016-08-12_171025_import
task started (id=Mediaimport, time=Fri Aug 12 17:10:25 2016)
Found a candidatesignature: breed=redhat, version=rhel6
Found a matchingsignature: breed=redhat, version=rhel6
Adding distros frompath /var/www/cobbler/ks_mirror/centos6.5-x86_64:
creating new distro:centos6.5-x86_64
trying symlink:/var/www/cobbler/ks_mirror/centos6.5-x86_64 ->/var/www/cobbler/links/centos6.5-x86_64
creating new profile:centos6.5-x86_64
associating repos
checking for rsyncrepo(s)
checking for rhnrepo(s)
checking for yumrepo(s)
starting descent into/var/www/cobbler/ks_mirror/centos6.5-x86_64 for centos6.5-x86_64
processing repo at :/var/www/cobbler/ks_mirror/centos6.5-x86_64
need to proce***epo/comps: /var/www/cobbler/ks_mirror/centos6.5-x86_64
looking for/var/www/cobbler/ks_mirror/centos6.5-x86_64/repodata/*comps*.xml
Keeping repodata as-is:/var/www/cobbler/ks_mirror/centos6.5-x86_64/repodata
*** TASK COMPLETE ***
列出所有的distro
[root@localhost ~]#cobbler distro list
   centos6.5-x86_64
从 http://192.168.2.1/cobbler/ks_mirror/ #查看生成信息
2.生成ks.cfg安装文件
[root@bogon~]# yum -y install system-config-kickstart
[root@bogon~]# system-config-kickstart
http://192.168.2.1/cobbler/ks_mirror/centos6.5-x86_64/
[root@bogon~]# cp -a ks.cfg /var/lib/cobbler/kickstarts
生成ks.cfg在这不做详细,可以查看的我另一篇文章
http://hugyou.blog.51cto.com/11674506/1835027
3.定义profile
cobbler使用profile来为特定的需求类别提供锁需要安装的配置,即在distro的基础上通过提供kiskstart文件来生成一个特定的系统安装配置。
# cobbler profile add--name=centos6.5-x86_64 --distro= centos6.5-x86_64 --kickstart=路径
# cobbler profile add--name=centos6.5-64-x86_64 --distro= centos6.5-x86_64 --kickstart=/var/lib/cobbler/kickstarts/ks.cfg 修改profile方法
#cobblerprofile edit --name=rhel-6.5-x86_64-basic --distro=rhel-6.5-x86_64 --kickstart=新路径
#cobblersync
#ksvalidator /var/lib/cobbler/kickstarts/fenbushi.cfg检查是否有语法错误
会在/var/lib/tftpboot/pxelinux.cfg/default
[root@localhost~]# cobbler profile add --name=centos6.5-64-x86_64 --distro=centos6.5-x86_64--kickstart=/var/lib/cobbler/kickstarts/ks.cfg
 列出当前系统上的profile
[root@localhost~]# cobbler profile list
   centos6.5-64-x86_64
   centos6.5-x86_64
 删除一个profile
[root@localhost~]# cobbler profile remove --name=centos6.5-x86_64
[root@localhost~]# cobbler profile list
  centos6.5-64-x86_64
4.同步数据并重启cobbler服务
[root@localhost~]#  cobbler sync
taskstarted: 2016-08-12_181842_sync
taskstarted (id=Sync, time=Fri Aug 12 18:18:42 2016)
runningpre-sync triggers
cleaningtrees
removing:/var/www/cobbler/p_w_picpaths/centos6.5-x86_64
removing:/var/lib/tftpboot/pxelinux.cfg/default
removing:/var/lib/tftpboot/grub/efidefault
removing:/var/lib/tftpboot/grub/p_w_picpaths
removing:/var/lib/tftpboot/p_w_picpaths/centos6.5-x86_64
removing:/var/lib/tftpboot/s390x/profile_list
copyingbootloaders
copying:/var/lib/cobbler/loaders/pxelinux.0 -> /var/lib/tftpboot/pxelinux.0
copying:/var/lib/cobbler/loaders/menu.c32 -> /var/lib/tftpboot/menu.c32
copying:/var/lib/cobbler/loaders/yaboot -> /var/lib/tftpboot/yaboot
copying:/usr/share/syslinux/memdisk -> /var/lib/tftpboot/memdisk
copying:/var/lib/cobbler/loaders/grub-x86_64.efi -> /var/lib/tftpboot/grub/grub-x86_64.efi
copying:/var/lib/cobbler/loaders/grub-x86.efi -> /var/lib/tftpboot/grub/grub-x86.efi
copyingdistros to tftpboot
copyingfiles for distro: centos6.5-x86_64
tryinghardlink /var/www/cobbler/ks_mirror/centos6.5-x86_64/p_w_picpaths/pxeboot/vmlinuz-> /var/lib/tftpboot/p_w_picpaths/centos6.5-x86_64/vmlinuz
tryinghardlink /var/www/cobbler/ks_mirror/centos6.5-x86_64/p_w_picpaths/pxeboot/initrd.img-> /var/lib/tftpboot/p_w_picpaths/centos6.5-x86_64/initrd.img
copyingp_w_picpaths
generatingPXE configuration files
generatingPXE menu structure
copyingfiles for distro: centos6.5-x86_64
tryinghardlink /var/www/cobbler/ks_mirror/centos6.5-x86_64/p_w_picpaths/pxeboot/vmlinuz-> /var/www/cobbler/p_w_picpaths/centos6.5-x86_64/vmlinuz
tryinghardlink /var/www/cobbler/ks_mirror/centos6.5-x86_64/p_w_picpaths/pxeboot/initrd.img-> /var/www/cobbler/p_w_picpaths/centos6.5-x86_64/initrd.img
Writingtemplate files for centos6.5-x86_64
renderingTFTPD files
generating/etc/xinetd.d/tftp
processingboot_files for distro: centos6.5-x86_64
cleaninglink caches
runningpost-sync triggers
runningpython triggers from /var/lib/cobbler/triggers/sync/post/*
runningpython trigger cobbler.modules.sync_post_restart_services
runningshell triggers from /var/lib/cobbler/triggers/sync/post/*
runningpython triggers from /var/lib/cobbler/triggers/change/*
runningpython trigger cobbler.modules.scm_track
runningshell triggers from /var/lib/cobbler/triggers/change/*
***TASK COMPLETE ***
[root@localhost~]# service cobblerd restart
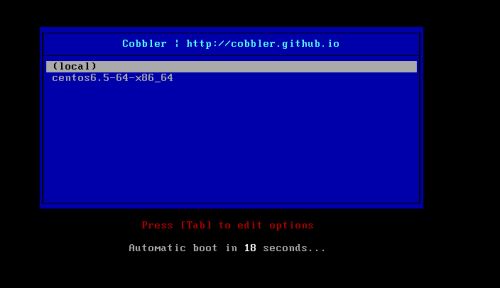
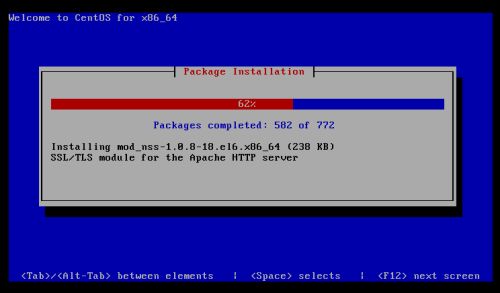
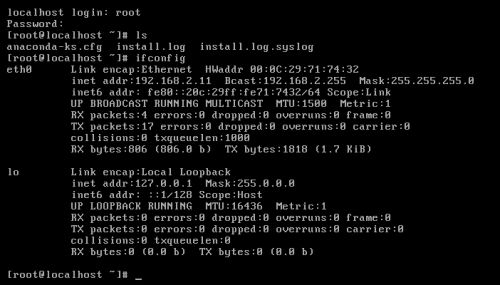
5.测试安装
五.使用cobbler_web
cobbler_web支持多种认证方式,如authn_configfil、authn_ldap或authn_pam等,默认为authn_denyall,即拒绝所有用户登陆。下面说明两种能认证用户登录cobbler_web的方式
1.使用authn_pam模块认证cobbler_web用户
首先修改modules中的[authentication]段中的module参数的值为authn_pam
接着设定系统用户,并为用户设定密码
而后将设定的系统用户添加至cobbler_web的admin组中,修改/etc/cobbler/users.conf文件,将设定的用户添加为admin参数的值即可
2.使用authn_configfile模块认证cobbler_web用户
首先修改modules中的[authentication]段中的module参数的值为authn_configfile
接着创建其认证文件/etc/cobbler/users.digest,并添加所需要的用户即可。需要注意的是,添加第一用户时,需要为htdigest命令使用“-c”选项,后续添加其他用户则不能再使用
本处使用的为authn_pam
[root@localhost~]# vi /etc/cobbler/modules.conf
[authentication]
module= authn_pam
[root@localhost~]# useradd cobblerabiao;echo cobblerabiao:123.com | chpasswd
[root@localhost~]# vi /etc/cobbler/users.conf
[admins]
admin= "cobblerabiao"
[root@localhost~]# service cobblerd restart
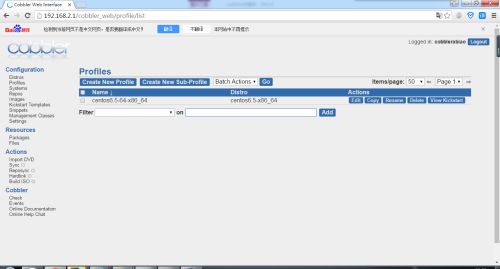
浏览器登录
http://192.168.2.1/cobbler_web
默认口令:cobbler
cobbler目录说明
Cobbler 配置文件存放在/etc/cobbler下
系统镜像数据目录 /var/www/cobbler
导入的系统发行版,repos镜像和ks_mirror文件都放置在/var/www/cobbler目录下。注意:确保/var目录有足够的空间来存储这些文件。
Cobbler数据目录/var/lib/cobbler
此目录存储和Cobbler profiles、systems、distros相关的配置。
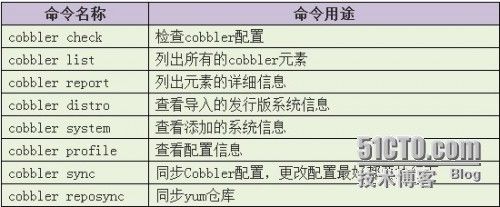
Cobbler的一些命令说明
努力!!!
