Spring Boot Web开发
SpringBoot 系列:
1.Spring Boot 入门
文章目录
- SpringBoot 开发 Web
- Thymeleaf
- SpringMVC 的自动配置
- 国际化
- 错误响应
- Servlet 容器配置
SpringBoot 开发 Web
在 Spring Boot 入门 中,我们知道了:
- 如何根据我们需要的模块创建一个 Spring Boot 应用
- 自动配置的原理
SpringBoot对静态资源的映射规则:
- 以 jar 包的方式引入静态资源,即 pom.xml 配置 webjars 依赖 https://www.webjars.org/,而访问只需要 localhost:8080/webjars/jquery/3.3.1/jquery.js
- “/**” 访问当前项目的任何资源,都去(静态资源的文件夹)找映射,可以从 WebMvcAuotConfiguration 自动配置中找到:
		"classpath:/META-INF/resources/",
		"classpath:/resources/",
		"classpath:/static/",
		"classpath:/public/"
		"/":当前项目的根路径
- 欢迎页:静态资源文件夹下的所有 index.html,被 “/**” 映射
- 欢迎图标:所有 **/favicon.ico 都在静态资源文件夹下找
		//由 ResourceProperties 可以设置和静态资源有关的参数,默认目录、缓存时间等
		@ConfigurationProperties(prefix = "spring.resources", ignoreUnknownFields = false)
		public class ResourceProperties implements ResourceLoaderAware {

		// WebMvcAuotConfiguration 中对静态资源的映射
		@Override
		public void addResourceHandlers(ResourceHandlerRegistry registry) {
			if (!this.resourceProperties.isAddMappings()) {
				logger.debug("Default resource handling disabled");
				return;
			}
			Integer cachePeriod = this.resourceProperties.getCachePeriod();
			if (!registry.hasMappingForPattern("/webjars/**")) {
				customizeResourceHandlerRegistration(
						registry.addResourceHandler("/webjars/**")
								.addResourceLocations(
										"classpath:/META-INF/resources/webjars/")
						.setCachePeriod(cachePeriod));
			}
			String staticPathPattern = this.mvcProperties.getStaticPathPattern();
          	//静态资源文件夹映射
			if (!registry.hasMappingForPattern(staticPathPattern)) {
				customizeResourceHandlerRegistration(
						registry.addResourceHandler(staticPathPattern)
								.addResourceLocations(
										this.resourceProperties.getStaticLocations())
						.setCachePeriod(cachePeriod));
			}
		}
        //配置欢迎页映射
		@Bean
		public WelcomePageHandlerMapping welcomePageHandlerMapping(
				ResourceProperties resourceProperties) {
			return new WelcomePageHandlerMapping(resourceProperties.getWelcomePage(),
					this.mvcProperties.getStaticPathPattern());
		}

       //配置喜欢的图标
		@Configuration
		@ConditionalOnProperty(value = "spring.mvc.favicon.enabled", matchIfMissing = true)
		public static class FaviconConfiguration {
			private final ResourceProperties resourceProperties;
			public FaviconConfiguration(ResourceProperties resourceProperties) {
				this.resourceProperties = resourceProperties;
			}

			@Bean
			public SimpleUrlHandlerMapping faviconHandlerMapping() {
				SimpleUrlHandlerMapping mapping = new SimpleUrlHandlerMapping();
				mapping.setOrder(Ordered.HIGHEST_PRECEDENCE + 1);
              	//所有  **/favicon.ico
				mapping.setUrlMap(Collections.singletonMap("**/favicon.ico",
						faviconRequestHandler()));
				return mapping;
			}

			@Bean
			public ResourceHttpRequestHandler faviconRequestHandler() {
				ResourceHttpRequestHandler requestHandler = new ResourceHttpRequestHandler();
				requestHandler
						.setLocations(this.resourceProperties.getFaviconLocations());
				return requestHandler;
			}
		}
Thymeleaf
模板引擎: html 页面+数据经过模板引擎的处理
 而 SpringBoot 推荐使用的 Thymeleaf 模板引擎:语法简单,功能强大
引入 Thymeleaf
		<properties>
	        <thymeleaf.version>3.0.2.RELEASEthymeleaf.version>
	        <thymeleaf-layout-dialect.version>2.1.1thymeleaf-layout-dialect.version>
	    properties>

		<dependency>
            <groupId>org.springframework.bootgroupId>
            <artifactId>spring-boot-starter-thymeleafartifactId>
        dependency>
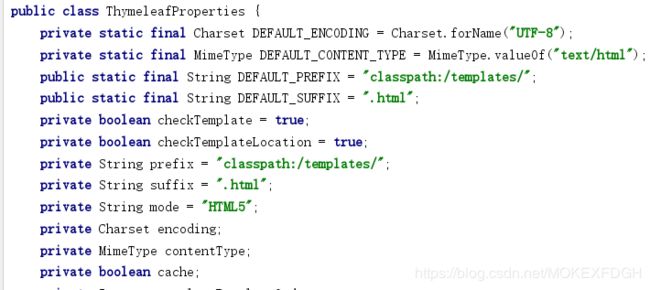
默认的配置: 默认从 classpath:/templates/ 下找相应的 html 页面进行自动渲染
使用:
导入thymeleaf的名称空间
<html lang="en" xmlns:th="http://www.thymeleaf.org">
语法:
例子
contoller:
		@RequestMapping("/test")
	    public String testThymeleaf(Map<String,Object> map){
	        map.put("user","moke");
	        return "test";//test.html
	    }
html:
		<html lang="en" xmlns:th="http://www.thymeleaf.org">
		<head>
		    <meta charset="UTF-8">
		    <title>Testtitle>
		head>
		<body>
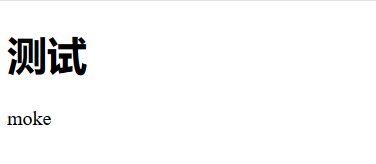
		    <h1>测试 h1>
		    <div th:text="${user}">用户名div>
		body>
		html>
SpringMVC 的自动配置
哪些默认的自动配置?来自官方文档
- Inclusion of
ContentNegotiatingViewResolverandBeanNameViewResolverbeans.- 自动配置了ViewResolver,即视图解析器
- ContentNegotiatingViewResolver:组合所有的视图解析器的,我们可以添加自己的视图解析器
- Support for serving static resources, including support for WebJars (see below).
- 静态资源文件夹路径,webjars
- Static
index.htmlsupport.- 静态首页访问
- Custom
Faviconsupport (see below).- 喜欢的图标 favicon.ico
- Automatic registration of
Converter,GenericConverter,Formatterbeans.- 自动注册了这三个 bean
- Converter:转换器,可用于类型转换
- Formatter: 格式化器,可用于时间格式化,也可以自定义
		@Bean
		@ConditionalOnProperty(prefix = "spring.mvc", name = "date-format")//在文件中配置日期格式化的规则
		public Formatter<Date> dateFormatter() {
			return new DateFormatter(this.mvcProperties.getDateFormat());//日期格式化组件
		}
- Support for
HttpMessageConverters(see below).- HttpMessageConverter:SpringMVC 用来转换 Http 请求和响应的,比如对象转 json;由于也是从容器中获取,所以可以自定义
- Automatic registration of
MessageCodesResolver(see below).- 定义错误代码生成规则
- Automatic use of a
ConfigurableWebBindingInitializerbean (see below).- 初始化 webDataBinder
… 其他自动配置可以参考:org.springframework.boot.autoconfigure.web 下的 xxAutoConfiguration
扩展 SpringMVC(修改默认配置)
既保留了所有的自动配置,也能用我们扩展的配置:
编写一个配置类(@Configuration),是WebMvcConfigurerAdapter类型;不能标注@EnableWebMvc,根据扩展的功能重写相应的方法:
		//使用WebMvcConfigurerAdapter可以来扩展SpringMVC的功能
		@Configuration
		public class MyMvcConfig extends WebMvcConfigurerAdapter {

		    @Override
		    public void addViewControllers(ViewControllerRegistry registry) {
		        //浏览器发送 /test请求来到 test 页面
		        registry.addViewController("/test").setViewName("test");
		    }
		}
原理:
- WebMvcAutoConfiguration是SpringMVC的自动配置类
- 在做其他自动配置时会导入时,@Import(EnableWebMvcConfiguration.class)
- 容器中所有的WebMvcConfigurer都会一起起作用,我们的配置类也会被调用;
替换 SpringMVC 的配置
只需在我们自定义的配置类上,标注 @EnableWebMvc。
@EnableWebMvc 原理:
- 首先看下 WebMvcCofiguration 生效的条件:

- 而 EnableWebMvc 会导入一个 DelegationWebMvcConfiguration 的自动配置,这自动配置就是一个 WebMvcCofiguration :


国际化
步骤:
- 编写国际化配置文件
- 使用ResourceBundleMessageSource管理国际化资源文件
- 在页面使用fmt:message取出国际化内容(jsp方式,thymeleaf 使用 th)
编写国际化配置文件,注意 properties 文件的编码设置:

SpringBoot 通过 MessageSourceAutoConfiguration 自动配置来管理国际化资源文件,默认国际化基础名为 messages

修改国际化配置基础名:

使用 th 修改页面信息:
		<h1 class="h3 mb-3 font-weight-normal" th:text="#{login.tip}">Please sign inh1>
		<label class="sr-only" th:text="#{login.username}">Usernamelabel>
		<input type="text" class="form-control" placeholder="Username" th:placeholder="#{login.username}" required="" autofocus="">
		<label class="sr-only" th:text="#{login.password}">Passwordlabel>
		<input type="password" class="form-control" placeholder="Password" th:placeholder="#{login.password}" required="">
国际信息的切换: 根据 request 请求头中的区域信息,通过 LocaleResolver 获取区域信息对象,所以可以重写 LocaleResolver:
- 页面发送不同语言请求
		<a class="btn btn-sm" th:href="@{/index.html(l=zh_CN)}">中文a>
		<a class="btn btn-sm" th:href="@{/index.html(l=en_US)}">Englisha>
- 重写 LocaleResolver 的方法,并将其添加到容器
		public class MyLocaleResolver implements LocaleResolver {
		    @Override
		    public Locale resolveLocale(HttpServletRequest httpServletRequest) {
		        String l = httpServletRequest.getParameter("l");
		        Locale locale = Locale.getDefault();
		        if(!StringUtils.isEmpty(l)){
		            String[] ss = l.split("_");
		            locale = new Locale(ss[0],ss[1]);
		        }
		        return locale;
		    }

		    @Override
		    public void setLocale(HttpServletRequest httpServletRequest, HttpServletResponse httpServletResponse, Locale locale) {
		    }
		}
		@Bean
	    public LocaleResolver localeResolver(){
	        return new MyLocaleResolver();
	    }
错误响应
SpringBoot 默认的页面:
 首先说下 SpringBoot 发送 4xx/5xx 错误的处理步骤:
发生错误 ErrorPageCustomizer 就会生效并来到 /error 请求,而 /error 请求会交给BasicErrorController 进行处理,而处理之后去到哪个页面是由 DefaultErrorViewResolver 解析得到的。
而这些组件都是由 ErrorMvcConfiguration 自动配置的:
- ErrorPageCustomizer

- BasicErrorController:

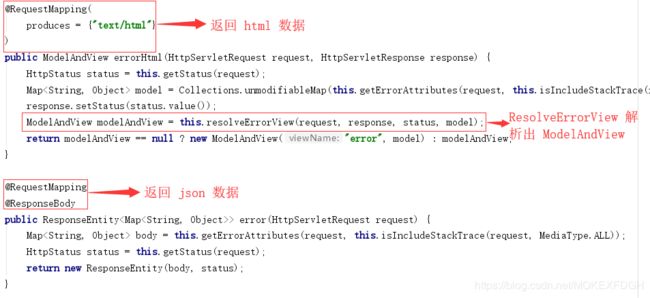
有根据客户端的不同,有两种处理方式:
- DefaultErrorViewResolver
BasicController 中解析出 modelandview 的方法:
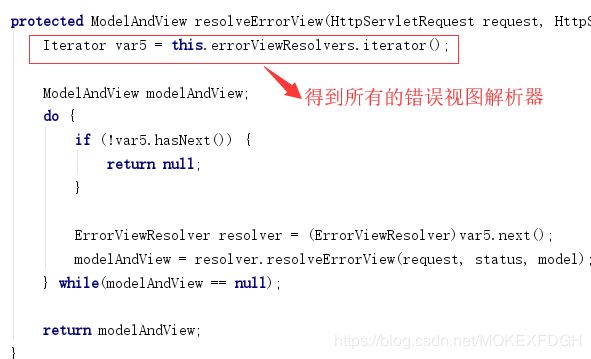 而 DefaultErrorViewResolver 就是默认的错误视图解析器:

 		private ModelAndView resolve(String viewName, Map<String, Object> model) {
			//默认SpringBoot可以去找到一个页面-> error/404
			String errorViewName = "error/" + viewName;
			//用模板引擎解析这个地址
	        TemplateAvailabilityProvider provider = this.templateAvailabilityProviders.getProvider(errorViewName, this.applicationContext);
	        /*
	        模板引擎可用的情况下返回到errorViewName指定的视图地址
	        模板引擎不可用,就在静态资源文件夹下找errorViewName对应的页面   error/404.html
	        */
	        return provider != null ? new ModelAndView(errorViewName, model) : this.resolveResource(errorViewName, model);
		}
- DefaultErrorAttributes:用来给错误页面共享信息(timestamp:时间戳、status:状态码、error:错误提示、exception:异常对象、message:异常消息、errors:JSR303等)
根据上面的分析:
1.自定义错误页面
默认请求是 error/状态码,所以:
- 有模板引擎的情况,所以我们将错误页面命名为 状态码.html 放在模板引擎文件夹里面的 error 文件夹下(可以使用 4xx/5xx 命名来匹配相同类型)
- 没有模板引擎的情况,则直接将命名后的页面放在静态文件夹中即可
- 以上都没有错误页面,则使用 SpringBoot 默认的错误提示页面
2.自定义错误JSON
- 自定义异常处理&返回定制json数据: 不同客户端出现异常都是返回 JSON 数据
		//@ControllerAdvice 主要是用于全局的异常拦截和处理,这里的异常可以使自定义异常也可以是JDK里面的异常
		@ControllerAdvice
		public class MyExceptionHandler {
		    @ResponseBody
		    @ExceptionHandler(UserNotExistException.class)//UserNotExistException为自定义异常
		    public Map<String,Object> handleException(Exception e){
		        Map<String,Object> map = new HashMap<>();
		        map.put("code","user.notexist");
		        map.put("message",e.getMessage());
		        return map;
		    }
		}
- 转发到/error进行自适应响应效果处理: 修改异常处理方式
	 	@ExceptionHandler(UserNotExistException.class)
	    public String handleException(Exception e, HttpServletRequest request){
	        Map<String,Object> map = new HashMap<>();
	        //传入我们自己的错误状态码  4xx 5xx,否则就不会进入定制错误页面的解析流程
	        request.setAttribute("javax.servlet.error.status_code",500);
	        map.put("code","user.notexist");
	        map.put("message",e.getMessage());
	        //request.setAttribute("ext",map);
	        return "forward:/error";
	    }
上面的这种方法其实没有将我们自己的 map 中的数据作为 json 返回,因为map并未被放到 DefaultErrorAttributes 中,所以我们可以将 map 放入到 request 中并自定义 ErrorAttributes:
		@Component
		public class MyErrorAttributes extends DefaultErrorAttributes {
		    @Override
		    public Map<String, Object> getErrorAttributes(RequestAttributes requestAttributes, boolean includeStackTrace) {
		        Map<String, Object> map = super.getErrorAttributes(requestAttributes, includeStackTrace);
		        map.put("test","moke");
		        //保存的map
		        Map<String,Object> ext = (Map<String,Object>)requestAttributes.getAttribute("ext",0);
		        map.put("ext",ext);
		        return map;
		    }
		}
Servlet 容器配置
由依赖可知,SpringBoot 默认使用 Tomcat 作为嵌入式的Servlet容器

而修改 Servlet 容器的相关配置有两种方式:
- 配置文件中修改(ServerProperties 底层调用的也是 EmbeddedServletContainerCustomizer):
		server:
			# 通用配置
			port: 8081
			context-path: /demo
			# tomcat 配置
			tomcat:
				uri-encoding: UTF-8
- 直接通过 EmbeddedServletContainerCustomizer 嵌入式 Servlet 容器定制器来修改:
		@Bean
		public EmbeddedServletContainerCustomizer embeddedServletContainerCustomizer(){
		    return new EmbeddedServletContainerCustomizer() {
		        //定制嵌入式的Servlet容器相关的规则
		        @Override
		        public void customize(ConfigurableEmbeddedServletContainer container) {
		            container.setPort(8082);
		        }
		    };
		}
注册三大组件:
之前我们是在 web.xml 中进行配置,而 SpringBoot 是一个 JAR。
- Servlet:ServletRegistrationBean
		@Bean
		public ServletRegistrationBean myServlet(){
		    ServletRegistrationBean registrationBean = new ServletRegistrationBean(new MyServlet(),"/myServlet");//映射我们的 Servlet
		    return registrationBean;
		}
- Filter:FilterRegistrationBean
		@Bean
		public FilterRegistrationBean myFilter(){
		    FilterRegistrationBean registrationBean = new FilterRegistrationBean();
		    registrationBean.setFilter(new MyFilter());//设置我们的过滤器
		    registrationBean.setUrlPatterns(Arrays.asList("/hello","/myServlet"));//拦截的请求
		    return registrationBean;
		}
- Listener:ServletListenerRegistrationBean
		@Bean
		public ServletListenerRegistrationBean myListener(){
		    ServletListenerRegistrationBean<MyListener> registrationBean = new ServletListenerRegistrationBean<>(new MyListener());
		    return registrationBean;
		}
其实 SpringBoot 对 DispatcherServlet的配置也是通过 ServletRegistrationBean 进行配置的,详见 DispatcherServletAutoConfiguration。
使用其他 Servlet 容器
前面使用 EmbeddedServletContainerCustomizer 进行配置的修改,通过 ConfigurableEmbeddedServletContainer 可以看到我们可使用的三种嵌入式容器:tomcat、undertow、jetty

从依赖入手,排除默认的 tomcat,并引入其他的 Servlet 容器:
		<dependency>
            <groupId>org.springframework.bootgroupId>
            <artifactId>spring-boot-starter-webartifactId>
            <exclusions>
                <exclusion>
                    <artifactId>spring-boot-starter-tomcatartifactId>
                    <groupId>org.springframework.bootgroupId>
                exclusion>
            exclusions>
        dependency>
        <dependency>
            <groupId>org.springframework.bootgroupId>
            <artifactId>spring-boot-starter-jettyartifactId>
        dependency>
嵌入式Servlet容器自动配置原理(EmbeddedServletContainerAutoConfiguration):
- 自动配置中由三种嵌入式容器进行条件的判断。例如 tomcat:
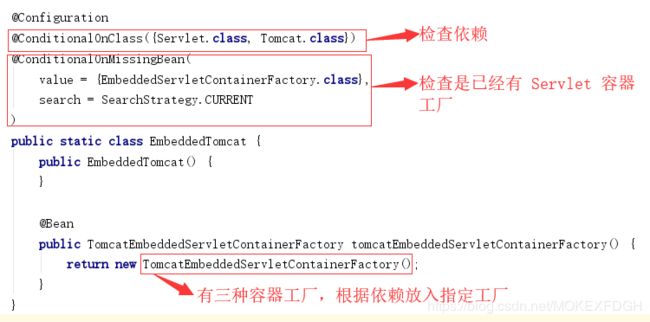
- 而容器工厂都有一个获取嵌入式 Servlet 容器的方法,在 SpringBoot 应用启动的时候会被 run()->refreshContext()->refresh()->onRefresh()->createEmbeddedServletContainer() 方法中调用:

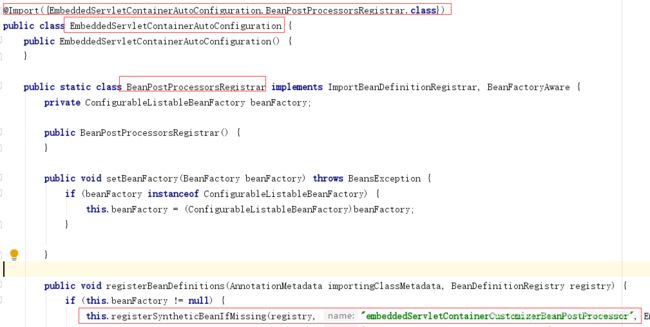
- 在容器初始化过程中,会注册一个 EmbeddedServletContainerCustomizerBeanPostProcessor 后置处理器,这个处理器会调用所有的 EmbeddedServletContainerCustomizer 定制器,当然也包括我们自定义的:
使用外部 Servlet 容器
- 创建一个war项目
- 将嵌入式的Tomcat指定为provided;
		<dependency>
		   <groupId>org.springframework.bootgroupId>
		   <artifactId>spring-boot-starter-tomcatartifactId>
		   <scope>providedscope>
		dependency>
- 必须编写一个SpringBootServletInitializer的子类,并调用configure方法
		public class ServletInitializer extends SpringBootServletInitializer {
		   @Override
		   protected SpringApplicationBuilder configure(SpringApplicationBuilder application) {
		       //传入SpringBoot应用的主程序
		      return application.sources(SpringBootJspApplication.class);
		   }
		}
- 启动服务器就可以使用
外部容器加载 Spring 应用的原理:
- 服务器启动(web应用启动)会创建当前web应用里面每一个jar包里面ServletContainerInitializer实例,加载spring web包下的SpringServletContainerInitializer
- 注解 @HandleType(WebApplicationInitializer) 会将所有 WebApplicationInitializer 传入到 onStartup 方法中,为每一个WebApplicationInitializer都调用自己的 onStartup 方法
- 加我们自定义的 SpringBootServletInitializer 也会被调用 onStartup 方法,而 onStartup 方法中会调用我们重写后的 configure 方法,将我们的 Spring 应用加载进服务器,并开启Ioc容器

