InabashscriptIamtryingtorunpythonandbashcommandboth.InsomewhereIwanttoexecutesomebashcommandinsideapythonloop.#!/bin/bashpython<
idea中lombok插件的安装与使用
我没想到原来他们都是一堆坏人
java开发语言
idea中lombok插件的安装与使用1.在pom文件中添加lombok依赖org.projectlomboklombokRELEASEprovided2.安装lombok插件依次选择:file->setting->plugins->marketpalce,搜索lombok,然后点击install3.在代码中使用lombok注解常用的lombok注解有@Data、@toString、@NoArgs
Idea创建项目并push到远程Git仓库
算法与编程之美
编程之美gitideagitpush
(1)Github或码云(Gitee)上新建代码仓库,并复制仓库地址;(2)Idea新建项目;(3)Idea配置本地Git仓库;(3.1)创建本地仓库VCS=>EnableVersionControlIntegration...;(3.2)弹出对话框下列列表选择Git;(4)选中左侧菜单中所有需要提交到版本库的红色标记文件,单击右键选择Git=>Add,使得这些文件变成绿色标记;(5)ctrl+k
【推荐】爽,在 IDE 中做 LeetCode 题目的插件
ideleetcode
大家好,我是V哥。今天给大家推荐一款神器插件,废话不多说,马上开整。leetcode-editor是一个可以在IDE中做LeetCode题目的插件仓库,以下是对该仓库的详细介绍:来看一下这个神器是啥基本信息名称:LeetcodeEditor支持平台:理论上支持IntelliJIDEA、PhpStorm、WebStorm、PyCharm、RubyMine、AppCode、CLion、GoLand、D
AI的发展历程,你知道是从什么时候开始的吗?
A达峰绮
人工智能ai经验分享
AI的发展历程是一段充满探索、突破与起伏的历史,以下是其主要阶段的介绍:诞生与早期探索阶段(20世纪50年代-60年代)基础理论奠基:1943年,美国神经生理学家沃伦·麦卡洛克和数学家沃尔特·皮茨发表了《Alogicalcalculusofideasimmanentinnervousactivity》论文,提出M-P模型,为神经网络的研究奠定了基础。1950年,阿兰·图灵发表《ComputingM
Spring学习之路:环境搭建、核心API与配置文件细节
qq_44766305
Springspringjava后端
1.软件版本1.JDK1.8+2.Maven3.5+3.IDEA2018+4.SpringFramework5.1.5官方网站www.spring.io2.环境搭建Spring的jar包#设置pom依赖可以去Maven中央仓库org.springframeworkspring-context5.1.4.RELEASESpring的配置文件1.配置文件的放置位置:任意位置,没有硬性要求2.配置文件命
springboot+vue实现登录功能
m0_67402096
面试学习路线阿里巴巴springbootvue.jsjava开发语言mvc
一、介绍搜索了csdn全站博客,关于springboot+vue的前后端分离实践项目很多,但是对于最基础登录功能的博客却是几年前的了。于是学习了好几个大神的文章后,自己通过实践解决了vue改版等众多问题后实现了登录功能。二、环境工具vue2.0element-uiaxiosvue-routervuexJavaspring-bootvscodeidea三、搭建后端spring-boot框架1、选择S
Java后端开发规范
糖心何包蛋爱编程
java开发语言
在Java后端开发中,遵循一套明确的规范和最佳实践是非常重要的,这不仅可以提高代码的质量和可维护性,还可以促进团队协作和项目的长期发展。因此,对于有志于学习Java语言的朋友而言,从学习初期便着力培养良好的代码编写习惯,是通往成功掌握这门语言的关键一步。一、开发环境1.Java82.IntelliJIDEA二、Java命名1.maven模块名小写,多个单词使用-连接。正确:example-moud
C++ 实现 ROS 2 点云欧几里得聚类
c++
C++实现ROS2点云欧几里得聚类在LivoxMid-360采集的sensor_msgs::msg::PointCloud2点云数据上进行欧几里得聚类(EuclideanClusterExtraction),具体流程如下:✅1.订阅PointCloud2并转换为pcl::PointCloud解释:sensor_msgs::msg::PointCloud2是ROS2点云消息格式,PCL不能直接处理。
Idea设置RunDashboard
架构师成长进阶空间
Javaintellijideawebstorm
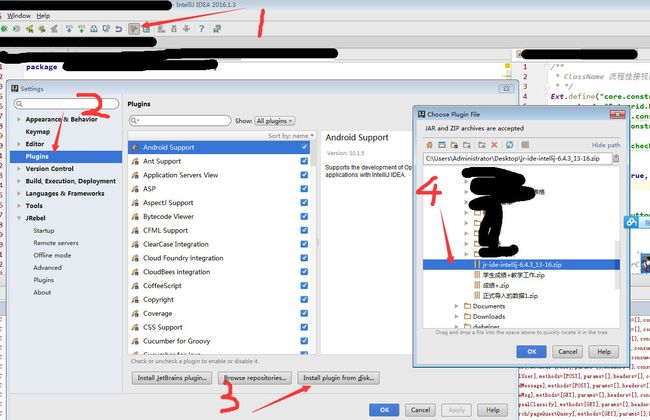
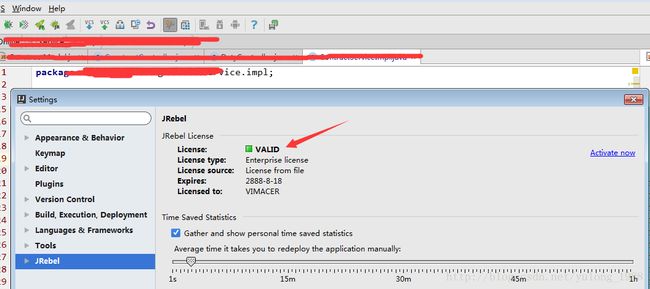
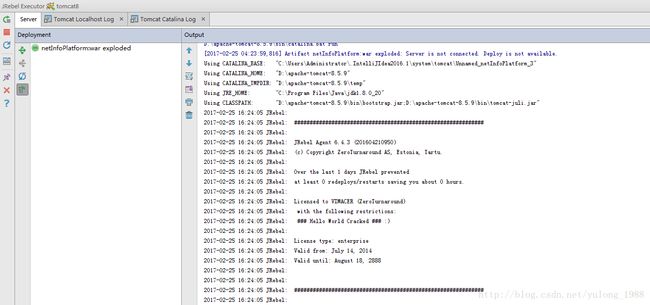
如何部署Java应用到服务器
DKPT
#软件开发服务器环境搭建服务器服务器
准备工作:确保服务器上安装了Java运行环境(JRE或JDK)。安装Web服务器,如ApacheTomcat、Jetty或WildFly。配置服务器网络,确保可以远程访问。打包Java应用:使用IDE(如IntelliJIDEA或Eclipse)或构建工具(如Maven或Gradle)将Java项目打包成WAR或JAR文件。上传应用到服务器:使用FTP、SCP或其他文件传输工具将打包好的文件上传到
替换word模板内容 Java实现
一头酸奶牛_
工具类java
文章目录第一步:准备文件第二步:将word文件另存为.xml格式第三步:放到idea中的一个目录下第四步:修改占位符第五步:代码示例第六步:效果图1第六步:效果图2第一步:准备文件这里以这个文件为例,在要替换的地方用占位符$replaceXX@替换。第二步:将word文件另存为.xml格式第三步:放到idea中的一个目录下这里已src目录为例第四步:修改占位符第五步:代码示例packagecom.
【项目实战】在IntelliJ IDEA中快速切换Git提交人信息(包括用户名和邮箱)
本本本添哥
005-研效与DevOps运维工具链010-IDE开发工具的使用intellij-ideagitelasticsearch
在IntelliJIDEA中快速切换Git提交人信息(包括用户名和邮箱)可通过以下两种方式实现,需注意必须同时修改Git配置才能生效,通过下述方法,可快速在IDEA中实现提交人信息的切换。建议优先使用终端命令,因其直接控制Git底层配置,兼容性更佳。方法一:通过IDEA图形界面修改(仅限当前项目)打开设置界面在IDEA右侧的Git面板中,点击Settings>VersionControl>Git>
Spring Boot+Vue项目从零入手
begei
面试学习路线阿里巴巴springbootvue.js后端
SpringBoot+Vue项目从零入手一、前期准备在搭建springboot+vue项目前,我们首先要准备好开发环境,所需相关环境和软件如下:1、node.js检测安装成功的方法:node-v2、vue检测安装成功的方法:vue-V3、VisualStudioCode这个软件是编写vue代码的工具,也可以使用idea,这个视情况而定。4、jdk检测安装成功的方法:java-version和jav
在 IntelliJ IDEA 中配置 Git
bxp1321
intellij-ideagitjava
1.确保已安装Git在配置之前,确保你的系统已经安装了Git。检查是否已安装Git:bash复制git--version如果未安装,请前往Git官网下载并安装。2.在IntelliJIDEA中配置Git打开IntelliJIDEA。进入设置:Windows/Linux:点击菜单栏的File>Settings。macOS:点击菜单栏的IntelliJIDEA>Preferences。找到Git配置:
基于springboot的旅游出行指南
超级无敌暴龙战士塔塔开
Java课设与毕设资源springboot旅游后端
文章目录项目介绍主要功能截图:部分代码展示设计总结项目获取方式作者主页:超级无敌暴龙战士塔塔开简介:Java领域优质创作者、简历模板、学习资料、面试题库【关注我,都给你】文末获取源码联系项目介绍基于springboot的旅游出行指南,java项目。eclipse和idea都能打开运行。推荐环境配置:eclipse/ideajdk1.8mavenmysql前端技术:vue,Ajax,Json后端技术
使用python进行单因素方差分析(ANOVA)和事后多重比较(LSD)
thinkwindows
数据分析python算法excel
#idea来源#在使用spss帮朋友做单因素分析时,发现个别数据需要调整到符合显著性的要求,在spss中修改数据,再在spss中操作步骤太麻烦,于是有了这个想法。程序思路1、将数据放到excel里,确定两列数据,Group(分组数据)和B(对应数据列)2、程序读取excel数据3、整理数据格式,将数据分组,将数据从宽格式转换为长格式,以便于进行ANOVA分析。4、执行单因素方差分析(ANOVA),
SpringBoot的两种启动方式原理
seven97_top
SpringBootspringboot后端java
使用内置tomcat启动配置案例启动方式IDEA中main函数启动mvnspringboot-runjava-jarXXX.jar使用这种方式时,为保证服务在后台运行,会使用nohupnohupjava-jar-Xms128m-Xmx128m-Xss256k-XX:+PrintGCDetails-XX:+PrintHeapAtGC-Xloggc:/data/log/web-gc.logweb.ja
IDEA(六) 配置SpringBoot项目Controller的请求按钮
不愿放下技术的小赵
#IDEAintellijidea
效果展示在开发SpringWeb应用的时候,让项目的controller中显示出执行按钮,如下图所示:操作步骤如果想让这个绿色的执行按钮出现,两个步骤:1.引入Maven坐标org.springframework.bootspring-boot-starter-actuator2.重启重新启动SpringBoot项目,这个按钮只有在项目启动的时候才会显示出来。猜测其原理是利用actutor的map
JetBrains IDEs和Visual Studio Code的对比
ZhangJiQun&MXP
2021论文2021AIpython教学vscodeide编辑器
JetBrainsIDEs和VisualStudioCode的对比JetBrainsIDEs是捷克JetBrains公司开发的一系列集成开发环境(IDE)。以下是具体介绍:IntelliJIDEA是JetBrains公司的一款产品主要产品IntelliJIDEA:一款功能强大且广泛应用的Java集成开发环境,有开源免费的社区版和商业收费的终极版。社区版可开发Java桌面和Android应用,终极版
Spring的setter方法注入和构造器注入的对比
蓝黑2020
SpringJavaspringjava
我们知道,Spring的依赖注入,有setter方法注入,实例变量注入,构造器注入等。Spring官方文档里,提到:依赖注入存在两种主要形式:构造器注入setter方法注入注:其实对于Spring注解,目前最常见的注入方式是实例变量注入,无需setter方法,直接在实例变量上添加@Autowired注解即可,详见我另一篇文档。但是实例变量注入是Spring不推荐的方法,在IntelliJIDEA里
Spring依赖注入提示:Field injection is not recommended
小小渔夫
SSM#1----Springspringjava后端
前言1.介绍今天在调试代码,发现IDEA提示@Autowired为警告(如上图所示),信息为:Fieldinjectionisnotrecommended。什么意思,Spring官方给的说法是:不再推荐使用字段注入。这是为啥?字段注入是我们平时工作中经常使用到的注入,一是简单,二是代码简洁,咋就不推荐了呢?下面我们来一探究竟====>>2.出现原因spring4.0开始不推荐使用属性注入,改为推荐
SpringBoot中的导入导出(SpringBoot导出word文档、Hutool导入excel、easypoi之easy导入数据库、导出excel文件、POI设置单元格式)
种豆走天下
springbootjavaspring
SpringBoot中的导入导出java导出word文档1先准备好一个导出Word文档的模板。例如:2.打开doc文件后,文件中的另存为,然后选择保存类型为2003版本的(*.xml)3、刚生成的xml文件里面比较乱,要整理一下,方法如下:使用Eclipse/idea,新建一个jsp,把xml里面的东西覆盖更新刚才的jsp,ctrl+Shift+F/ctrl+alt+L把文件整理一下,在拷贝出来,
利用Java爬虫获取衣联网商品详情:实战指南
Jason-河山
java爬虫开发语言
在电商领域,获取商品详情是数据分析和市场研究的重要环节。衣联网作为知名的电商平台,提供了丰富的服装商品资源。本文将详细介绍如何利用Java编写爬虫程序,通过商品ID获取衣联网商品详情。一、准备工作(一)环境搭建Java安装:确保已安装Java开发环境,推荐使用JDK11或更高版本。开发工具配置:使用IntelliJIDEA或Eclipse等Java开发工具,创建一个新的Maven项目。依赖库添加:
使用IDEA拉取GitLab项目
strong-1024
gitlab
使用组长提供的socket和账号密码登录内网的GitLab:打开IDEA新建项目,ProjectfromVersionControl在项目路径后面添加.git:
在windows上通过idea搭建doris fe的开发环境(失败案例,很多报错都是因为我是离线环境编译,还是得联网可能会顺利点)
fzip
DorisDoris在CentOS7编译
以下是基于Windows10+CentOS环境通过IntelliJIDEA搭建DorisFE开发环境的完整指南,整合多份部署文档的关键步骤和避坑要点:一、前置环境准备1.准备Linux环境,可以使用CentOS7或者8•操作步骤:更新系统包:yumgroupinstall-y"DevelopmentTools"yuminstall-yautomakebisonflexboost-devellibe
Apipost一站式API工具评测:整合Postman+Swagger+JMeter三大功能,打造全流程开发解决方案
作为一名Java开发者,始终追求开发过程的高效性。使用IntelliJIDEA编写代码只是开始。一般来说,代码完成后,我们会切换到Postman进行API调试。在确保API表现符合预期后,我们会使用Swagger为前端团队生成文档。最后,再使用JMeter进行性能和负载测试,以确保API工作流顺畅且自动化。Apipost=Postman+Swagger+JMeter然而,这种多工具的方法存在诸多挑
力扣hot100二刷——哈希、双指针、滑动窗口
钢板兽
手撕算法leetcode哈希算法算法面试
第二次刷题不在idea写代码,而是直接在leetcode网站上写,“逼”自己掌握常用的函数。标志掌握程度解释办法⭐Fully完全掌握看到题目就有思路,编程也很流利⭐⭐Basically基本掌握需要稍作思考,或者看到提示方法后能解答⭐⭐⭐Slightly稍微掌握需要看之前写过的代码才能想起怎么做多做⭐⭐⭐⭐absolutelyno完全没有掌握需要看题解才知道怎么做背⭐⭐⭐⭐⭐有难度的高频题需要看题解
Java直通车系列24【Spring Boot】(项目创建)
浪九天
Java直通车springbootspring开发语言java
目录使用SpringInitializr创建项目1.概念2.详细步骤步骤1:访问SpringInitializr网站步骤2:配置项目元数据步骤3:添加依赖步骤4:生成项目3.场景示例使用IDE插件创建项目1.概念2.详细步骤(以IntelliJIDEA为例)步骤1:打开IntelliJIDEA步骤2:选择项目类型步骤3:配置项目元数据步骤4:添加依赖步骤5:完成项目创建3.场景示例手动创建项目1.
计算机毕业设计springboot晋中学院失物招领系统的设计与实现unst3源码+系统+程序+lw文档+部署
呦呦网络
springbootjavamysql
计算机毕业设计springboot晋中学院失物招领系统的设计与实现unst3源码+系统+程序+lw文档+部署计算机毕业设计springboot晋中学院失物招领系统的设计与实现unst3源码+系统+程序+lw文档+部署本源码技术栈:项目架构:B/S架构开发语言:Java语言开发软件:ideaeclipse前端技术:Layui、HTML、CSS、JS、JQuery等技术后端技术:JAVA运行环境:Wi
Spring的注解积累
yijiesuifeng
spring注解
用注解来向Spring容器注册Bean。
需要在applicationContext.xml中注册:
<context:component-scan base-package=”pagkage1[,pagkage2,…,pagkageN]”/>。
如:在base-package指明一个包
<context:component-sc
传感器
百合不是茶
android传感器
android传感器的作用主要就是来获取数据,根据得到的数据来触发某种事件
下面就以重力传感器为例;
1,在onCreate中获得传感器服务
private SensorManager sm;// 获得系统的服务
private Sensor sensor;// 创建传感器实例
@Override
protected void
[光磁与探测]金吕玉衣的意义
comsci
这是一个古代人的秘密:现在告诉大家
信不信由你们:
穿上金律玉衣的人,如果处于灵魂出窍的状态,可以飞到宇宙中去看星星
这就是为什么古代
精简的反序打印某个数
沐刃青蛟
打印
以前看到一些让求反序打印某个数的程序。
比如:输入123,输出321。
记得以前是告诉你是几位数的,当时就抓耳挠腮,完全没有思路。
似乎最后是用到%和/方法解决的。
而今突然想到一个简短的方法,就可以实现任意位数的反序打印(但是如果是首位数或者尾位数为0时就没有打印出来了)
代码如下:
long num, num1=0;
PHP:6种方法获取文件的扩展名
IT独行者
PHP扩展名
PHP:6种方法获取文件的扩展名
1、字符串查找和截取的方法
1
$extension
=
substr
(
strrchr
(
$file
,
'.'
), 1);
2、字符串查找和截取的方法二
1
$extension
=
substr
面试111
文强chu
面试
1事务隔离级别有那些 ,事务特性是什么(问到一次)
2 spring aop 如何管理事务的,如何实现的。动态代理如何实现,jdk怎么实现动态代理的,ioc是怎么实现的,spring是单例还是多例,有那些初始化bean的方式,各有什么区别(经常问)
3 struts默认提供了那些拦截器 (一次)
4 过滤器和拦截器的区别 (频率也挺高)
5 final,finally final
XML的四种解析方式
小桔子
domjdomdom4jsax
在平时工作中,难免会遇到把 XML 作为数据存储格式。面对目前种类繁多的解决方案,哪个最适合我们呢?在这篇文章中,我对这四种主流方案做一个不完全评测,仅仅针对遍历 XML 这块来测试,因为遍历 XML 是工作中使用最多的(至少我认为)。 预 备 测试环境: AMD 毒龙1.4G OC 1.5G、256M DDR333、Windows2000 Server
wordpress中常见的操作
aichenglong
中文注册wordpress移除菜单
1 wordpress中使用中文名注册解决办法
1)使用插件
2)修改wp源代码
进入到wp-include/formatting.php文件中找到
function sanitize_user( $username, $strict = false
小飞飞学管理-1
alafqq
管理
项目管理的下午题,其实就在提出问题(挑刺),分析问题,解决问题。
今天我随意看下10年上半年的第一题。主要就是项目经理的提拨和培养。
结合我自己经历写下心得
对于公司选拔和培养项目经理的制度有什么毛病呢?
1,公司考察,选拔项目经理,只关注技术能力,而很少或没有关注管理方面的经验,能力。
2,公司对项目经理缺乏必要的项目管理知识和技能方面的培训。
3,公司对项目经理的工作缺乏进行指
IO输入输出部分探讨
百合不是茶
IO
//文件处理 在处理文件输入输出时要引入java.IO这个包;
/*
1,运用File类对文件目录和属性进行操作
2,理解流,理解输入输出流的概念
3,使用字节/符流对文件进行读/写操作
4,了解标准的I/O
5,了解对象序列化
*/
//1,运用File类对文件目录和属性进行操作
//在工程中线创建一个text.txt
getElementById的用法
bijian1013
element
getElementById是通过Id来设置/返回HTML标签的属性及调用其事件与方法。用这个方法基本上可以控制页面所有标签,条件很简单,就是给每个标签分配一个ID号。
返回具有指定ID属性值的第一个对象的一个引用。
语法:
&n
励志经典语录
bijian1013
励志人生
经典语录1:
哈佛有一个著名的理论:人的差别在于业余时间,而一个人的命运决定于晚上8点到10点之间。每晚抽出2个小时的时间用来阅读、进修、思考或参加有意的演讲、讨论,你会发现,你的人生正在发生改变,坚持数年之后,成功会向你招手。不要每天抱着QQ/MSN/游戏/电影/肥皂剧……奋斗到12点都舍不得休息,看就看一些励志的影视或者文章,不要当作消遣;学会思考人生,学会感悟人生
[MongoDB学习笔记三]MongoDB分片
bit1129
mongodb
MongoDB的副本集(Replica Set)一方面解决了数据的备份和数据的可靠性问题,另一方面也提升了数据的读写性能。MongoDB分片(Sharding)则解决了数据的扩容问题,MongoDB作为云计算时代的分布式数据库,大容量数据存储,高效并发的数据存取,自动容错等是MongoDB的关键指标。
本篇介绍MongoDB的切片(Sharding)
1.何时需要分片
&nbs
【Spark八十三】BlockManager在Spark中的使用场景
bit1129
manager
1. Broadcast变量的存储,在HttpBroadcast类中可以知道
2. RDD通过CacheManager存储RDD中的数据,CacheManager也是通过BlockManager进行存储的
3. ShuffleMapTask得到的结果数据,是通过FileShuffleBlockManager进行管理的,而FileShuffleBlockManager最终也是使用BlockMan
yum方式部署zabbix
ronin47
yum方式部署zabbix
安装网络yum库#rpm -ivh http://repo.zabbix.com/zabbix/2.4/rhel/6/x86_64/zabbix-release-2.4-1.el6.noarch.rpm 通过yum装mysql和zabbix调用的插件还有agent代理#yum install zabbix-server-mysql zabbix-web-mysql mysql-
Hibernate4和MySQL5.5自动创建表失败问题解决方法
byalias
J2EEHibernate4
今天初学Hibernate4,了解了使用Hibernate的过程。大体分为4个步骤:
①创建hibernate.cfg.xml文件
②创建持久化对象
③创建*.hbm.xml映射文件
④编写hibernate相应代码
在第四步中,进行了单元测试,测试预期结果是hibernate自动帮助在数据库中创建数据表,结果JUnit单元测试没有问题,在控制台打印了创建数据表的SQL语句,但在数据库中
Netty源码学习-FrameDecoder
bylijinnan
javanetty
Netty 3.x的user guide里FrameDecoder的例子,有几个疑问:
1.文档说:FrameDecoder calls decode method with an internally maintained cumulative buffer whenever new data is received.
为什么每次有新数据到达时,都会调用decode方法?
2.Dec
SQL行列转换方法
chicony
行列转换
create table tb(终端名称 varchar(10) , CEI分值 varchar(10) , 终端数量 int)
insert into tb values('三星' , '0-5' , 74)
insert into tb values('三星' , '10-15' , 83)
insert into tb values('苹果' , '0-5' , 93)
中文编码测试
ctrain
编码
循环打印转换编码
String[] codes = {
"iso-8859-1",
"utf-8",
"gbk",
"unicode"
};
for (int i = 0; i < codes.length; i++) {
for (int j
hive 客户端查询报堆内存溢出解决方法
daizj
hive堆内存溢出
hive> select * from t_test where ds=20150323 limit 2;
OK
Exception in thread "main" java.lang.OutOfMemoryError: Java heap space
问题原因: hive堆内存默认为256M
这个问题的解决方法为:
修改/us
人有多大懒,才有多大闲 (评论『卓有成效的程序员』)
dcj3sjt126com
程序员
卓有成效的程序员给我的震撼很大,程序员作为特殊的群体,有的人可以这么懒, 懒到事情都交给机器去做 ,而有的人又可以那么勤奋,每天都孜孜不倦得做着重复单调的工作。
在看这本书之前,我属于勤奋的人,而看完这本书以后,我要努力变成懒惰的人。
不要在去庞大的开始菜单里面一项一项搜索自己的应用程序,也不要在自己的桌面上放置眼花缭乱的快捷图标
Eclipse简单有用的配置
dcj3sjt126com
eclipse
1、显示行号 Window -- Prefences -- General -- Editors -- Text Editors -- show line numbers
2、代码提示字符 Window ->Perferences,并依次展开 Java -> Editor -> Content Assist,最下面一栏 auto-Activation
在tomcat上面安装solr4.8.0全过程
eksliang
Solrsolr4.0后的版本安装solr4.8.0安装
转载请出自出处:
http://eksliang.iteye.com/blog/2096478
首先solr是一个基于java的web的应用,所以安装solr之前必须先安装JDK和tomcat,我这里就先省略安装tomcat和jdk了
第一步:当然是下载去官网上下载最新的solr版本,下载地址
Android APP通用型拒绝服务、漏洞分析报告
gg163
漏洞androidAPP分析
点评:记得曾经有段时间很多SRC平台被刷了大量APP本地拒绝服务漏洞,移动安全团队爱内测(ineice.com)发现了一个安卓客户端的通用型拒绝服务漏洞,来看看他们的详细分析吧。
0xr0ot和Xbalien交流所有可能导致应用拒绝服务的异常类型时,发现了一处通用的本地拒绝服务漏洞。该通用型本地拒绝服务可以造成大面积的app拒绝服务。
针对序列化对象而出现的拒绝服务主要
HoverTree项目已经实现分层
hvt
编程.netWebC#ASP.ENT
HoverTree项目已经初步实现分层,源代码已经上传到 http://hovertree.codeplex.com请到SOURCE CODE查看。在本地用SQL Server 2008 数据库测试成功。数据库和表请参考:http://keleyi.com/a/bjae/ue6stb42.htmHoverTree是一个ASP.NET 开源项目,希望对你学习ASP.NET或者C#语言有帮助,如果你对
Google Maps API v3: Remove Markers 移除标记
天梯梦
google maps api
Simply do the following:
I. Declare a global variable:
var markersArray = [];
II. Define a function:
function clearOverlays() {
for (var i = 0; i < markersArray.length; i++ )
jQuery选择器总结
lq38366
jquery选择器
1 2 3 4 5 6 7 8 9 10 11 12 13 14 15 16 17 18 19 20 21 22 23 24 25 26 27 28 29 30 31 32 33 34 35 36 37 38 39 40
基础数据结构和算法六:Quick sort
sunwinner
AlgorithmQuicksort
Quick sort is probably used more widely than any other. It is popular because it is not difficult to implement, works well for a variety of different kinds of input data, and is substantially faster t
如何让Flash不遮挡HTML div元素的技巧_HTML/Xhtml_网页制作
刘星宇
htmlWeb
今天在写一个flash广告代码的时候,因为flash自带的链接,容易被当成弹出广告,所以做了一个div层放到flash上面,这样链接都是a触发的不会被拦截,但发现flash一直处于div层上面,原来flash需要加个参数才可以。
让flash置于DIV层之下的方法,让flash不挡住飘浮层或下拉菜单,让Flash不档住浮动对象或层的关键参数:wmode=opaque。
方法如下:
Mybatis实用Mapper SQL汇总示例
wdmcygah
sqlmysqlmybatis实用
Mybatis作为一个非常好用的持久层框架,相关资料真的是少得可怜,所幸的是官方文档还算详细。本博文主要列举一些个人感觉比较常用的场景及相应的Mapper SQL写法,希望能够对大家有所帮助。
不少持久层框架对动态SQL的支持不足,在SQL需要动态拼接时非常苦恼,而Mybatis很好地解决了这个问题,算是框架的一大亮点。对于常见的场景,例如:批量插入/更新/删除,模糊查询,多条件查询,联表查询,