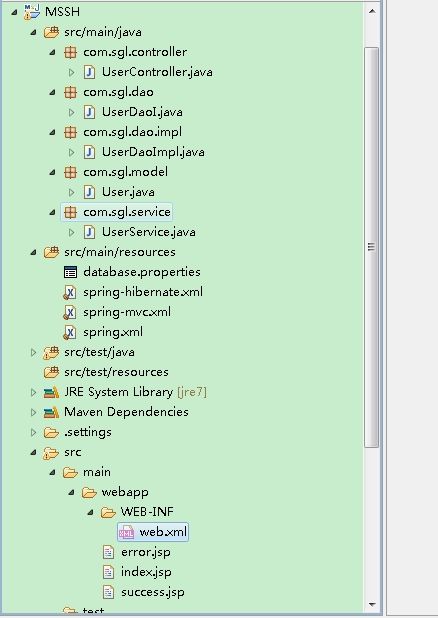
Maven搭建springMVC+spring+hibernate实现用户注册
之前写过《Maven搭建Struts2+spring+hibernate环境》系列,这次不再使用struts2做控制器,采用spring自己的springMVC框架实现。关于struts2+spring+hibernate的整合请看:http://blog.csdn.net/sgl731524380/article/details/8871446
首先,改写pom.xml文件,不需要struts2的相关jar了。
pom.xml
	4.0.0
	com.sgl
	MSSH
	war
	0.0.1-SNAPSHOT
	MSSH Maven Webapp
	http://maven.apache.org

		UTF-8


			log4j
			log4j
			1.2.17


			junit
			junit
			4.11


			javax.servlet
			javax.servlet-api
			3.1-b09
			provided


			mysql
			mysql-connector-java
			5.1.24


			com.mchange
			c3p0
			0.9.5-pre2


			org.springframework
			spring-core
			3.2.2.RELEASE


			org.springframework
			spring-context
			3.2.2.RELEASE


			org.springframework
			spring-jdbc
			3.2.2.RELEASE


			org.springframework
			spring-beans
			3.2.2.RELEASE


			org.springframework
			spring-web
			3.2.2.RELEASE


			org.springframework
			spring-expression
			3.2.2.RELEASE


			org.springframework
			spring-orm
			3.2.2.RELEASE


			org.springframework
			spring-webmvc
			3.2.2.RELEASE


			org.codehaus.jackson
			jackson-mapper-asl
			1.9.12


			org.hibernate
			hibernate-core
			4.2.0.Final


				maven-war-plugin


				maven-compiler-plugin

					1.6
					1.6
					utf-8


				maven-resources-plugin

					utf-8


				maven-javadoc-plugin

					utf-8


				maven-surefire-plugin
				2.7.2

					once
					-Dfile.encoding=UTF-8
删除struts.xml,新建spring-mvc.xml.
spring-mvc.xml
text/html;charset=UTF-8
UserController.java
package com.sgl.controller;

import java.util.Date;
import java.util.UUID;

import org.springframework.beans.factory.annotation.Autowired;
import org.springframework.stereotype.Controller;
import org.springframework.web.bind.annotation.RequestMapping;
import org.springframework.web.servlet.ModelAndView;

import com.sgl.model.User;
import com.sgl.service.UserService;

@Controller
public class UserController {
	@Autowired
	private UserService userService;
	@RequestMapping("/reg")
	public String register(){
		return "index";
	}
	@RequestMapping("/user")
	public ModelAndView addUser(User user) {
		ModelAndView mav=null;
		user.setId(UUID.randomUUID().toString());
		user.setRegtime(new Date());
		try {
			userService.addUser(user);
		//	request.setAttribute("user", user);
			mav = new ModelAndView();
			mav.setViewName("success");
			mav.addObject("user", user);
			mav.addObject("msg", "注册成功了,可以去登陆了");
			return mav;
		} catch (Exception e) {
			mav.setViewName("error");
			mav.addObject("user", null);
			mav.addObject("msg", "注册失败");
			return mav;
		}
	}

}
web.xml
		contextConfigLocation
		classpath:spring.xml,classpath:spring-hibernate.xml


		org.springframework.web.context.ContextLoaderListener


		encodingFilter
		org.springframework.web.filter.CharacterEncodingFilter

			encoding
			UTF-8


		encodingFilter
		/*


		spring mvc servlet
		springMvc
		org.springframework.web.servlet.DispatcherServlet

			spring mvc 配置文件
			contextConfigLocation
			classpath:spring-mvc.xml

		1


		springMvc
		*.html


		10


		index.jsp

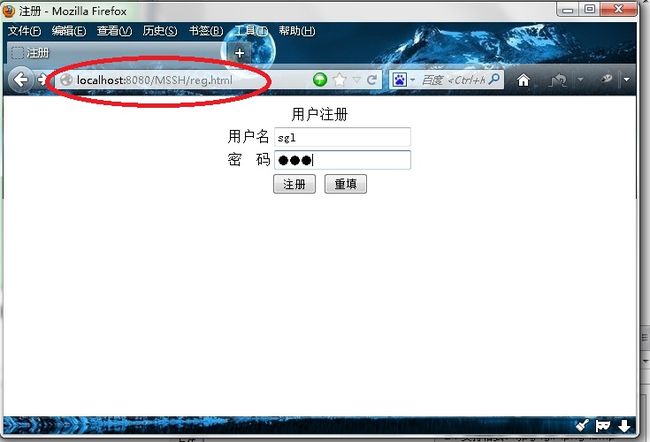
执行Maven install,没有错误,部署到服务器上,启动服务器,浏览器输入http://localhost:8080/MSSH/reg.html回车
至于为什么要是输入这个地址,请仔细查看UserController.java的@RequestMapping注解的配置,这是属于spingMVC的注解,在此不再详述其拦截-转发的过程。
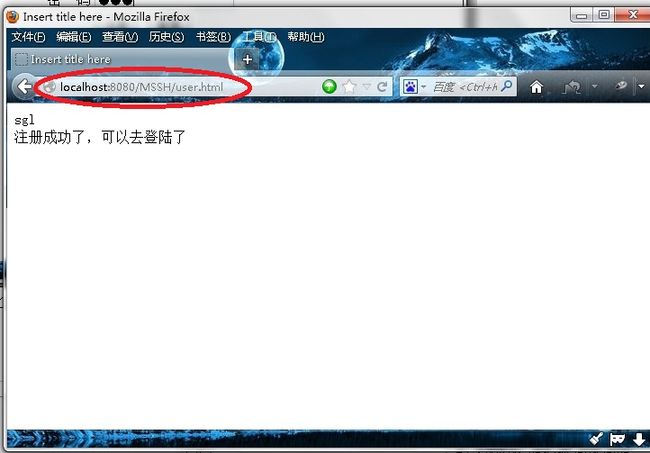
点击注册,注意浏览器地址的变化:
springMVC+spring+hibernate实现用户注册完成了。其中User的password我没有写,忘记持久到数据库了,需要的可以在User.java中加上password属性和set/get方法。毕竟这个MSSH项目只是演示如何搭建ssh框架,不是真实的项目。要是真实项目这样做,恐怕饭碗都要丢了。。

