Spring Cloud Config——Github
-
目录
Spring Cloud Config 官方文档
Spring Cloud Config 入门
实现Spring Cloud Config组件
什么是Spring Cloud Config
Spring Cloud Config架构图
Spring Cloud Config 实战
编写Config Server
如何创建Github项目
Config Server测试
/{application}/{profile}[/{label}]解析映射
Spring Cloud Config 访问规则解析
/{application}/{profile}[/{label}]
编写 Spring Cloud Client
初步搭建
往上构建1——传统方式获取配置信息@Value
往上构建2——配置服务器
问题详解
-
Spring Cloud Config 官方文档
doc:https://projects.spring.io/spring-cloud/spring-cloud.html#_spring_cloud_config
-
Spring Cloud Config 入门
-
实现Spring Cloud Config组件
- 百度 disconf
- 阿里 diamond
- 携程 apollo
https://github.com/search 可以数据diamond和apollo
-
什么是Spring Cloud Config
-
Spring Cloud Config架构图
每一个微服务都会集成一个Config Client,通过Config Server去获取相应环境
-
Spring Cloud Config 实战
-
编写Config Server
- 1 创建microservice-config-server项目中添加spring-cloud-config-server依赖
		org.springframework.boot
		spring-boot-starter-web


		org.springframework.cloud
		spring-cloud-config-server
- 2 主启动类ConfigServerApplication.java
@SpringBootApplication
@EnableConfigServer
public class ConfigServerApplication {

	public static void main(String[] args) {
		SpringApplication.run(ConfigServerApplication.class, args);
	}

}- 3 配置信息 application.yml
server:
port: 8080- 4 查看官方文档的 application.yml 配置模版
spring:
cloud:
config:
server:
git:
uri: https://github.com/spring-cloud-samples/config-repo
- 5 添加到项目名为microservice-config-server的application.yml配置信息中<补全>
server:
  port: 8080

spring:
  cloud:
    config:
      server:
        git:
uri: https://gitee.com/xuhaiyancoco/config-repo-51cto-video # 此为Github地址,你可以在Github上面创建一个项目-
如何创建Github项目
- 1 创建项目https://gitee.com/projects/new
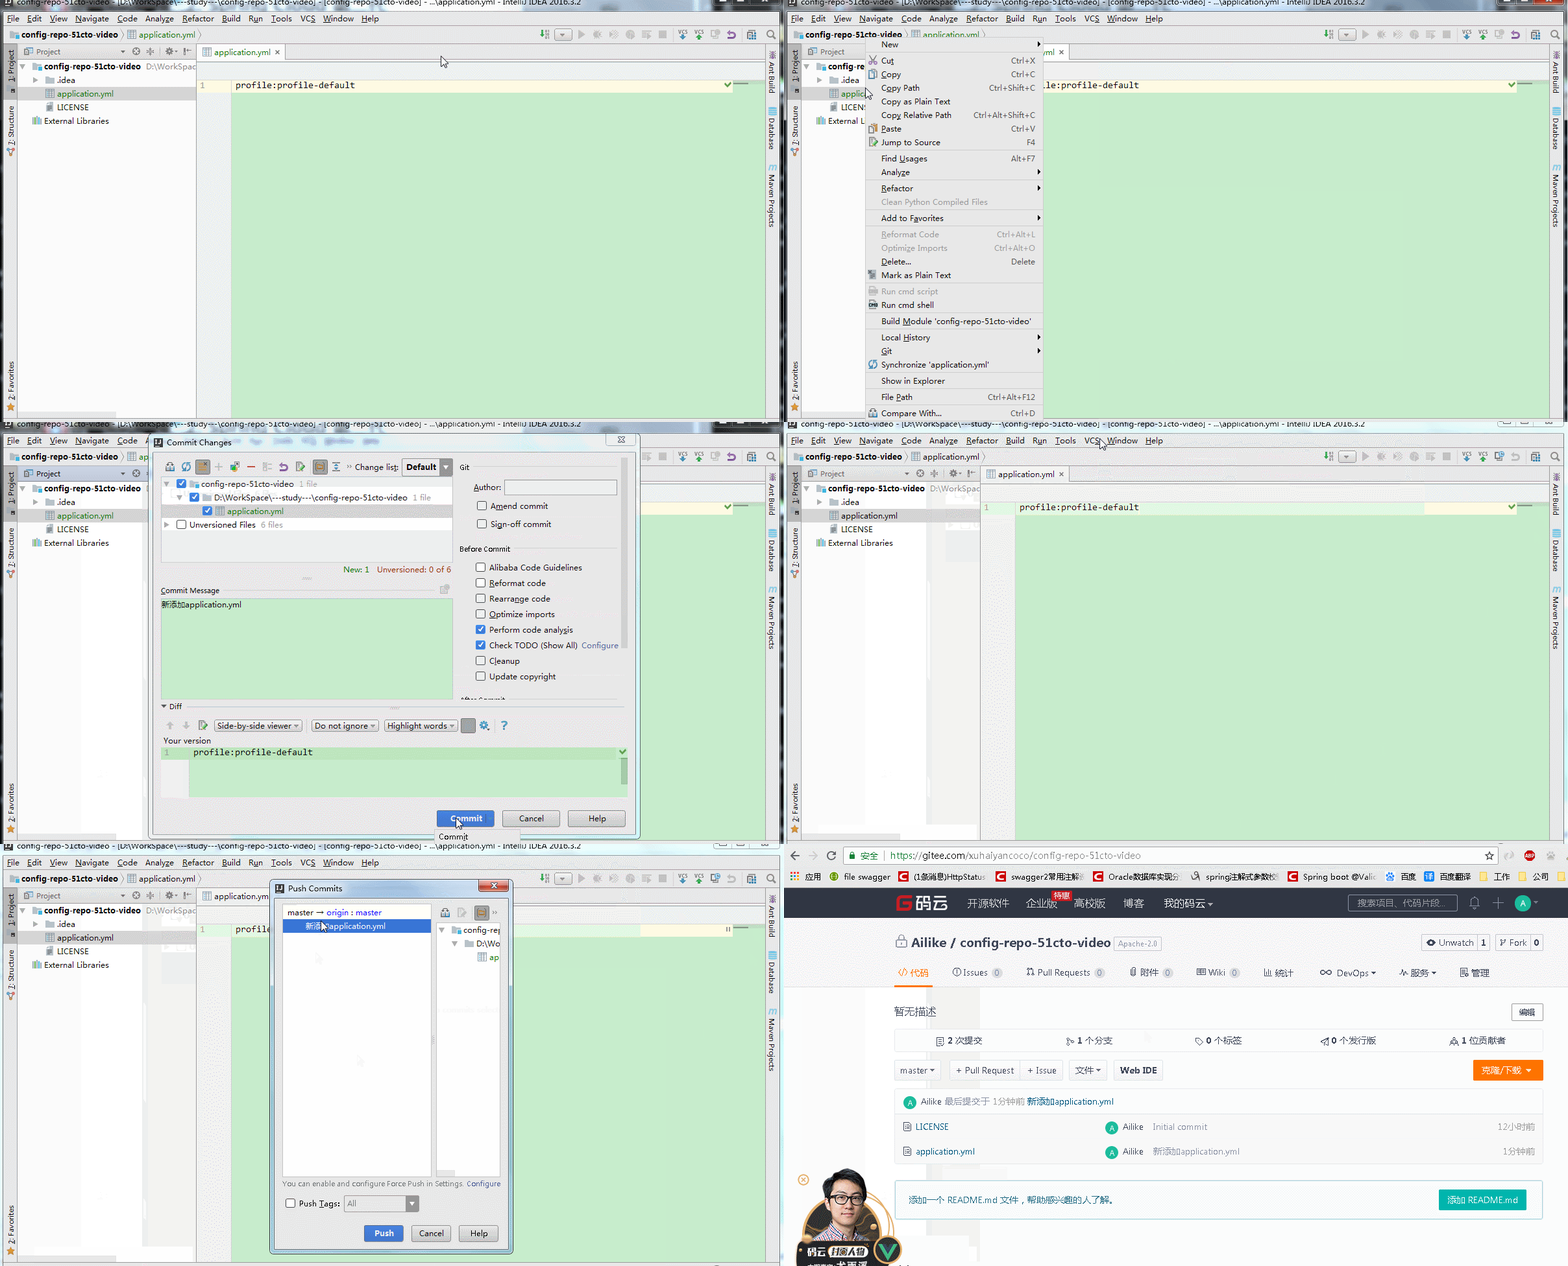
创建名为config-repo-51cto-video项目,开发语言为Java,添加 .gitignore、添加开源许可证,如:图例
- 2 将新创建的文件gitclone下来之后,往里面添加application.yml文件内容为↓↓↓↓↓↓,然后提交到git仓库上去!
profile: profile-default- 如何从Git上拉取代码操作GIF动态图演示
- 如何向Git提交代码操作GIF动态图演示
- 3 然后再将图示地址,拷贝到项目名为microservice-config-server的application.yml的spring.cloud.config.server.git.uri中,后面的.git可以不要
-
1 启动microserver-config-server项目,访问 localhost:8080,接下来我们访问git上面的yml配置文件↓↓↓↓↓↓
-
Config Server测试
问:如何访问架构图中的Git Repo呢?
答:要按照一定的规则,规则如下,例子:localhost:8080/abc-default.properties
/{application}/{profile}[/{label}]
/{application}-{profile}.yml
/{label}/{application}-{profile}.yml
/{application}-{profile}.properties
/{label}/{application}-{profile}.properties
问:abc 是什么呢?
答:就是 application,就是spring中配置的spring.application.names
问:profile 是什么呢?
答:就是所谓的环境
问:label 是什么呢?
答:就是git的lable,默认master,如:图示
综上所诉,我们的再次成功访问路径如下:
/{application}/{profile}[/{label}]
http://localhost:8080/abc/default[/master] 400http://localhost:8080/abc/default/master √
/{application}-{profile}.yml http://localhost:8080/abc-default.yml √
/{label}/{application}-{profile}.yml http://localhost:8080/master/abc-default.yml √
/{application}-{profile}.properties http://localhost:8080/abc-default.properties √
/{label}/{application}-{profile}.properties http://localhost:8080/master/abc-default.properties √
-
/{application}/{profile}[/{label}]解析映射
2.1 创建foorbar-dev.yml,content为
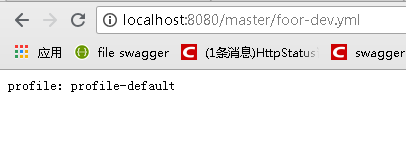
profile: profile-dev2.2 提交到git仓库,启动之后可以查看到console中都打印出了映射关系,再次我们在浏览器上输入localhost:8080/master/foor-dev.yml,会映射到具体的文件,注意我们上传的是foorbar-dev,此时访问的是不存在的就去找原来的文件了呢。
- 不存在的配置文件访问
- 存在的配置文件访问
SO 那么如果我们输入localhost:8080/master/foor-default.yml,显而易见Git中并没有这个文件,那么它会映射到什么呢?
profile: profile-default总结:从上面的操作中你会发现有优先级,先去找label中是否存在此文件,如果不存在此文件,回去application.yml去查找这个文件,如果还是没有就没办法了!!
具体详解:https://gitee.com/itmuch/spring-cloud-book/blob/master/2%20Spring%20Cloud/2.5%20%E9%85%8D%E7%BD%AE%E4%B8%AD%E5%BF%83.md
-
Spring Cloud Config 访问规则解析
-
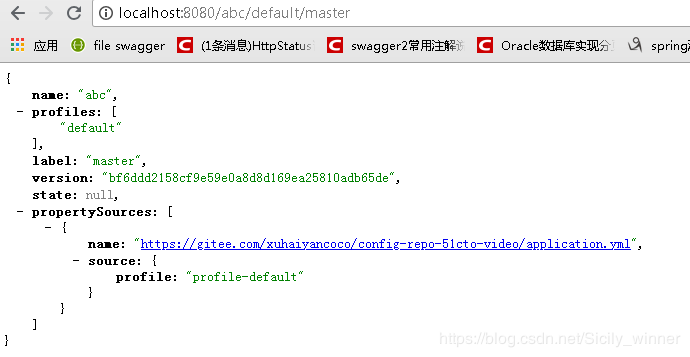
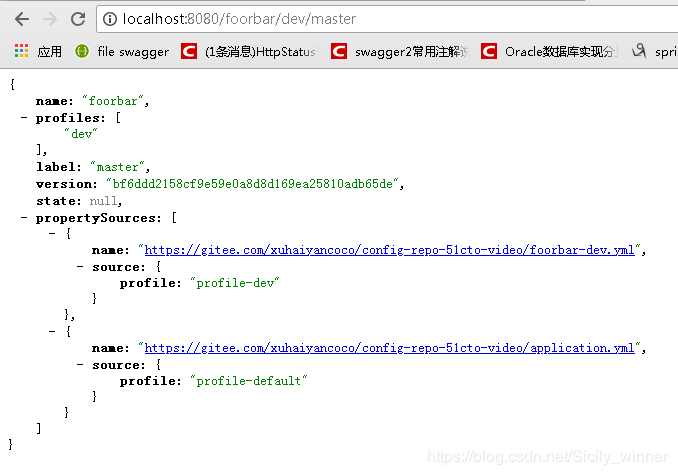
/{application}/{profile}[/{label}]
http://localhost:8080/abc/default/master
http://localhost:8080/foorbar/dev/master
-
编写 Spring Cloud Client
-
初步搭建
前言:怎么在微服务中获取配置文件,光使用URL并不是办法,doc:https://projects.spring.io/spring-cloud/spring-cloud.html#_spring_cloud_config_client
- 1 导入pom文件
        org.springframework.cloud
        spring-cloud-starter-config


		org.springframework.boot
		spring-boot-starter-web
- 2 主启动类ConfigClient.java
@SpringBootApplication
public class ConfigClient {

  public static void main(String[] args) {
    SpringApplication.run(ConfigClient.class, args);
  }
}
- 3 application.yml
server:
port: 8080-
往上构建1——传统方式获取配置信息@Value
- pom.xml
org.springframework.boot spring-boot-starter-web - 主启动类ConfigClientApplication.java
@SpringBootApplication public class ConfigClientApplication { public static void main(String[] args) { SpringApplication.run(ConfigClientApplication.class, args); } } - 创建ConfigClientController.java
@RestController public class ConfigClientController { @Value("${profile}") private String profile; @GetMapping("/profile") public String getProfile() { return profile; } } - application.yml
server: port: 8081 profile: abc - 返回结果
-
往上构建2——配置服务器
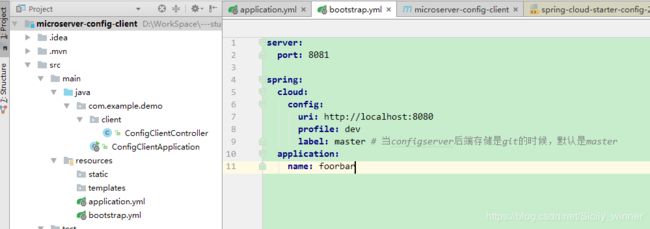
- 1) 首先我们将application.yml中的profile配置内容去掉,2)将pom,.xml中的start-config恢复<不然spring.cloud.config....不提示>,然后因为要连接config server我们要做一些处理,修改配置信息
server:
  port: 8081

spring:
  cloud:
    config:
      uri: http://localhost:8080
      profile: dev
      label: master # 当configserver后端存储是git的时候,默认是master
  application:
    name: foorbar
- 2 启动microserver-config-client,microserver-config-server连接Git Rep去访问到对应的文件,microserver-config-client去连接microserver-config-sever,去获取这个文件,从而得到配置的值!
2.1 报出异常
org.springframework.beans.factory.BeanCreationException: Error creating bean with name 'configClientController': Injection of autowired dependencies failed; nested exception is java.lang.IllegalArgumentException: Could not resolve placeholder 'profile' in value "${profile}"2.2 报出异常原因
![]()
2.3 报出异常解决办法,在microserver-config-client项目中创建bootstrap.yml添加如下所示
2.4 最终结果<成功加载Git上面的配置>
-
问题详解
问:本地的配置和服务器的配置会有冲突吗?
答:不会,以远程为准,也就是说启动的时候,找到profile就会注入到![]() ,不会去再覆盖了。本来就是单例,取到值之后就实例化了,再去覆盖自找麻烦哦。
,不会去再覆盖了。本来就是单例,取到值之后就实例化了,再去覆盖自找麻烦哦。
问:假设将bootstrap.yml的spring.application.name=footbar移动到application.yml里面,刚开始application.yml什么都没有,返回结果是什么?
总结:在bootstrap.yml配置spring.application.name=footbar,而bootstrap.yml是配置不想改的内容!!!!
问:如果将bootstrap.yml的spring.application.name=footbar去掉,返回结果是什么?
总结:返回的是application.yml内容,对于config server来说它尽量回去找对应的,如果找不到则默认!!!!spring.application.name 是虚拟主机名,可以利用eureka.instance.appname代替是一样的,但是一般来讲我们都是用spring.application.name。


