ELK日志分析平台实战(一)
一、实战环境
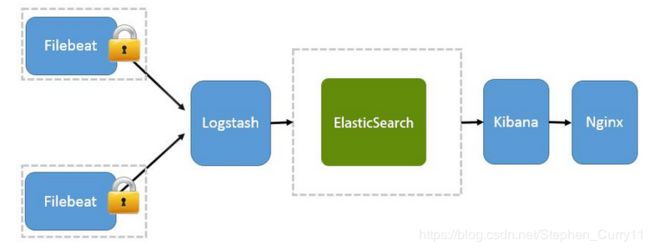
1、架构图
Filebeat作为日志采集器分别部署在Nginx服务器上,logstash作为日志过滤器单独部署在服务器上,es与Kibana部署在同一台服务器上,通过内网传输日志数据,Nginx代理Kibana可视化。
2、机器分布
192.168.117.136  nginx+filebeat
192.168.117.137  Nginx+filebeat
192.168.117.138  logstash
192.168.117.139  es+kibana+nginx(反向代理)
3、使用版本
java-1.8.0-openjdk
filebeat-5.2.2
logstash-5.2.2
elasticsearch-5.2.2
kibana-5.2.2
nginx-1.6.1
二、组件部署
1、更新jdk:在所有机器上安装java_1.8(elk各组件的启动依赖于JAVA1.8版本)
#先删除旧的java版本
for jdk_list in `rpm -qa | grep -E '^java'`
do
    rpm -e --nodeps ${jdk_list}
done
#安装新的java版本
yum install -y java-1.8.0-openjdk
2、配置yum源(所有机器)
rpm --import https://artifacts.elastic.co/GPG-KEY-elasticsearch

vim /etc/yum.repos.d/elk.repo

[elasticsearch-5.x]
name=Elasticsearch repository for 5.x packages
baseurl=https://artifacts.elastic.co/packages/5.x/yum
gpgcheck=1
gpgkey=https://artifacts.elastic.co/GPG-KEY-elasticsearch
enabled=1
autorefresh=1
type=rpm-md
3、安装配置filebeat(136 137机器)
#安装filebeat

yum install -y filebeat

#配置filebeat

vim /etc/filebeat/filebeat.yml
#编辑以下内容:
filebeat.prospectors:
- input_type: log
  paths:
    - /usr/local/nginx/logs/test_access.log   ##nginx日志文件位置##
  tags: ["nginx-accesslog"]      ##标签##
  document_type: nginxaccess
- input_type: log
  paths:
    - /var/log/messages      ##系统日志文件位置(可以不要)##
  tags: ["sys-messages"]      ##标签##
  document_type: sysmessages
tags: ["nginx-test-194"]
output.logstash:
  hosts: ["192.168.117.138:5044"]   ##logstash接口##
4、定义Nginx日志格式(136 137机器)
mv /usr/local/nginx/conf/nginx.conf /usr/local/nginx/conf/nginx_bak.conf #备份原配置文件#
vim /uer/local/nginx/conf/nginx.conf   ##Nginx配置文件最基本的内容##
#内容:
user  nginx;
worker_processes  1;
events {
    worker_connections  1024;
}
http {
    include       mime.types;
    default_type  application/octet-stream;
    log_format  main  $time_local | $remote_addr | $http_host | $http_x_forwarded_for | $request_method | $request_uri | $server_protocol | $status | $body_bytes_sent | $http_referer | $http_user_agent | $request_time |;
    access_log  logs/access.log  main;
    sendfile        on;
    keepalive_timeout  65;
    server {
        listen       80;
        server_name  localhost;
        location / {
            root   html;
            index  index.html index.htm;
        }
        error_page   500 502 503 504  /50x.html;
        location = /50x.html {
            root   html;
        }
    }
}
##可根据原版nginx.conf修改##
5、安装logstash(138机器)
#安装#
yum install -y logstash

##部署##

##编辑nginx日志过滤文件##

vim /etc/logstash/conf.d/nginx.conf
input {
    beats {
            port => 5044    ##filebeat接口##
    }
}

filter {
	if "nginx-accesslog" in [tags] {
        grok {
    			match => { "message" => "%{HTTPDATE:timestamp}\|%{IP:remote_addr}\|%{IPORHOST:http_host}\|(?:%{DATA:http_x_forwarded_for}|-)\|%{DATA:request_method}\|%{DATA:request_uri}\|%{DATA:server_protocol}\|%{NUMBER:status}\|(?:%{NUMBER:body_bytes_sent}|-)\|(?:%{DATA:http_referer}|-)\|%{DATA:http_user_agent}\|(?:%{DATA:request_time}|-)\|"}    ##匹配日志信息##
        }
        mutate {
                convert => ["status","integer"]
                convert => ["body_bytes_sent","integer"]
                convert => ["request_time","float"]
        }
        geoip {
                source=>"remote_addr"
        }
        date {
                match => [ "timestamp","dd/MMM/YYYY:HH:mm:ss Z"]
        }
        useragent {
                source=>"http_user_agent"
        }
}
	if "sys-messages"  in [tags] {
        grok {
                        match => { "message" => "%{SYSLOGLINE}" }
                        add_field => [ "received_at", "%{@timestamp}" ]
                        add_field => [ "received_from", "%{host}" ]
        }
        date {
                match => [ "timestamp", "MMM  d HH:mm:ss" ]
        }
        #ruby {
        #        code => "event['@timestamp'] = event['@timestamp'].getlocal"
        #}
}
}

output {
    elasticsearch {
      hosts => ["192.168.117.139:9200"]   ##es接口##
	    index => "logstash-%{type}-%{+YYYY.MM.dd}"   ##es索引名称定义##
	    document_type => "%{type}"
    }
}
##做logstash启动脚本软连接##
ln -s /usr/share/logstash/bin/logstash /usr/bin/logstash

##测试命令##
logstash -e 'input { stdin { } } output { stdout { codec => rubydebug } }'
##该命令表示允许在命令行接受数据,从而不用写测试脚本,输出也是在屏幕上##

##检查配置文件,相当于nginx -t作用##
logstash  -t -f /etc/logstash/conf.d/nginx-test.conf
6、安装es kibana 配置nginx反向代理(139机器)
##安装##
yum install -y elasticsearch kibana

##配置es##
##备份配置文件##
cp /etc/elasticsearch/elasticsearch.yml /etc/elasticsearch/elasticsearch.yml_bak
vim /etc/elasticsearch/elasticsearch.yml
#单点只需要修改一项即可:#
network.host: 0.0.0.0   ##修改监听地址##

##kibana安装在es本地,不需要任何配置#

##配置反向代理##

vim /usr/local/nginx/conf/nginx.conf
#http模块添加##
upstream kinaba {
                keepalive      400;
                #ip_hash;
                server  127.0.0.1:5601 max_fails=3  fail_timeout=30s;
        }
server  {
                    listen          8088;
                    server_name     192.168.1.198;
                    if (-d $request_filename) {
                        rewrite ^/(.*)([^/])$ http://$host/$1$2/ permanent;
                    }
                    location / {
                        proxy_pass              http://kinaba;
                        proxy_http_version 1.1;
                        proxy_set_header Connection "";
                        proxy_set_header        X-Real-IP  $remote_addr;
                        proxy_set_header        Host             $host;
                        proxy_set_header        X-Forwarded-For  $proxy_add_x_forwarded_for;
                    }
                    error_log           logs/kinaba._route_error.log;
                    access_log          logs/kinaba._route_access.log main;
}
7、分别启动各组件
#136 137#
/usr/local/nginx/sbin/nginx
systemctl start filebeat
systemctl enable filebeat

#138#
nohup logstash -f /etc/logstash/conf.d/nginx.conf --path.settings /etc/logstash &

#139#
systemctl start elasticseaech
systemctl start kibana
systemctl enable elasticsearch
systemctl enable kibana
/usr/local/nginx/sbin/nginx

#访问192.168.117.139:8088就可访问kibana统计可视化#
