运维之道 | MySQL主从复制、主主复制
MySQL主从复制、主主复制
主从复制:主库可写(会写入从库)可读,从库只能读
主主复制:两个库可写可读,一个库修改会写入另一个库
一、主从复制
1、准备两台服务器
主库服务器 192.168.1.140 master
从库服务器 192.168.1.141 slave
2、在两台机器安装mysql
MySQL 8.0 安装教程
——————————————————————————————————————
3、配置 master 主库服务器
a. 开启binlog
vi /etc/my.cnf

[myslqd]
server-id=1                         ## 机器的唯一标识 ##
log-bin=/var/lib/mysql/mysql-bin    ## 开启binlog)  ##
b.重启 service mysqld restart
[root@localhost ~]# systemctl restart mysqld
c.进入mysql,查看binlog是否开启成功
[root@localhost ~]# cd /var/lib/mysql
[root@localhost mysql]# ll
-rw-r-----. 1 mysql mysql      178 10月  5 08:34 binlog.000017
-rw-r-----. 1 mysql mysql      178 10月  5 09:17 binlog.000018
-rw-r-----. 1 mysql mysql      178 10月  5 09:49 binlog.000019
-rw-r-----. 1 mysql mysql      155 10月  5 09:49 binlog.000020
-rw-r-----. 1 mysql mysql      320 10月  5 09:49 binlog.index
d.创建用户并授权
[root@localhost mysql]# mysql -u root -p     #登录mysql#
mysql> create user 'villian'@'192.168.206.141' identified by '123456';       ##创建用户##
mysql> grant replication slave on *.* to 'villian'@'192.168.206.141';        ##用户授权##
——————————————————————————————————————
4、配置 slave 从库服务器
a.开启binlog
vi /etc/my.cnf

[myslqd]
server-id=2
relay-log-index=slave-relay-bin.index          ## 机器的唯一标识   ##
relay-log=slave-relay-bin                      ## 开启relaylog   ##

( ( server-id机器的唯一标识),后面两步是用来打开slave的relaylog功能的)
b.重启mysql
[root@localhost ~]# systemct restart mysqld
——————————————————————————————————————
5、建立主从关系
a.打开主库服务器登录mysql (获取File 和 Position)
[root@localhost ~]# mysql -u root -p          ##   登录mysql   ##
mysql> show master status;                    ## 查看master状态 ##
+------------------+----------+--------------+------------------+-------------------+
| File             | Position | Binlog_Do_DB | Binlog_Ignore_DB | Executed_Gtid_Set |
+------------------+----------+--------------+------------------+-------------------+
| mysql-bin.000001 |     1356 |              |                  |                   |
+------------------+----------+--------------+------------------+-------------------+
1 row in set (0.00 sec)
b.打开从库服务器登录mysql
[root@localhost ~]# mysql -u root -p          ## 登录mysql ##
mysql> show slave status\G;                   ## 查看状态  ##

状态未开启时进行如下设置:
mysql> change master to master_host=‘192.168.206.140’; ## 主节点 ##
mysql> change master to master_port=3306;         ## 主节点的端口号 ##
mysql> change master to master_user='villian';    ## 账号 ##
mysql> change master to master_password='123456'; ## 密码 ##
mysql> change master to master_log_file='mysql-bin.000001';  ## show master status 对应上述主库的日志  ##
mysql> change master to master_log_pos=1356;   ## show master status 对应上述主库的pos  ##
c.在从库服务器开启从节点
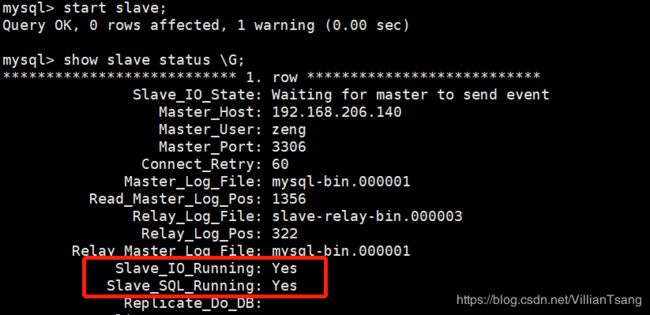
mysql> start slave;              ## 开启从节点 ##
mysql> show slave status\G;      ## 查看状态 ##

下图红色框框必须为开启状态
Slave_IO_Running  :负责与主机的io通信
Slave_SQL_Running :负责自己的slave mysql进程

注释:若使用克隆虚拟机,必须修改mysql UUID,否则会显示 Slave_IO_Running: NO
其他错误:1.网络不通; 2.密码不对; 3.pos不对; 4.防火墙没关; 5.server-id冲突;
————————— ####### 主从复制配置完成 ####### ———————————
二、主主复制
1、准备两台服务器
主库服务器 192.168.1.140 master
从库服务器 192.168.1.141 master
2、在两台机器安装mysql
MySQL 8.0 安装教程
——————————————————————————————————————
3、修改两个库服务器my.cnf配置文件
第一台:
[root@localhost mysql]# vi /etc/my.cnf
[mysqld]

server-id=1
log-bin=/var/lib/mysql/mysql-bin
auto_increment_increment=2
auto_increment_offset=1
第二台:
[root@localhost mysql]# vi /etc/my.cnf
[mysqld]

server-id=2
log-bin=/var/lib/mysql/mysql-bin
auto_increment_increment=2
auto_increment_offset=2
[root@localhost mysql]# systemctl restart mysqld ## 重启mysql ##
4、创建用户并授权(两个服务器都要创建)
[root@localhost mysql]# mysql -u root -p     #登录mysql#
mysql> create user 'villian'@'%' identified by '123456';     ##创建用户##
mysql> grant replication slave on *.* to 'villian'@'%';      ##用户授权##
5、建立关系
############# 第二台关联第一台 ##############
a.打开第一台机器登录mysql
mysql> show master status;    ##  查看状态  ##
+------------------+----------+--------------+------------------+-------------------+
| File             | Position | Binlog_Do_DB | Binlog_Ignore_DB | Executed_Gtid_Set |
+------------------+----------+--------------+------------------+-------------------+
| mysql-bin.000001 |     1356 |              |                  |                   |
+------------------+----------+--------------+------------------+-------------------+
1 row in set (0.00 sec)
b.打开第二台机器登录mysql,执行如下操作
change master to master_host='192.168.206.140'; // 主节点
change master to master_port=3306; //主节点的端口号
change master to master_user='villian1', // 账号
change master to master_password='123456', // 密码
change master to master_log_file='mysql-bin.000001', // show master status 对应的的日志
change master to master_log_pos=1356; // show master status 对应的
############# 第一台关联第二台 ##############
a.打开第二台机器登录mysql
mysql> show master status;    ##  查看状态  ##
+------------------+----------+--------------+------------------+-------------------+
| File             | Position | Binlog_Do_DB | Binlog_Ignore_DB | Executed_Gtid_Set |
+------------------+----------+--------------+------------------+-------------------+
| mysql-bin.000002 |     2072 |              |                  |                   |
+------------------+----------+--------------+------------------+-------------------+
1 row in set (0.00 sec)
b.打开第一台机器登录mysql,执行如下操作
change master to master_host=‘192.168.206.141’;    ## 主节点
change master to master_port=3306;                 ##主节点的端口号
change master to master_user='villian2';           ## 账号
change master to master_password='123456';// 密码
change master to master_log_file='mysql-bin.000002'; ## show master status 对应的的日志
change master to master_log_pos=2072;              ## show master status 对应的
6.启动库,执行start slave
mysql> start slave;
注释:若使用克隆虚拟机,必须修改mysql UUID,否则会显示 Slave_IO_Running: NO
其他错误:1.网络不通; 2.密码不对; 3.pos不对; 4.防火墙没关; 5.server-id冲突;
————————— ####### 主主复制配置完成 ####### ———————————