商品列表
时尚板鞋

New Balance 和 J.Crew 带来这款全新的联名鞋款,选用 New Balance 997 的创作雏形,宛如牛奶糖般的焦糖色泽作主配色,以及贯穿深棕色和奶油色系添增分明层次,以高规格的美制水准搭配牛巴革、麂皮和皮革等上乘材质作为鞋身用料,质感满满。
400元
剩余库存300件
上一页1页下一页
github地址:https://github.com/yaodebian/GoGoLe
初识java web,想在后端用java有一技之长。注:以下仅是自己的一个程序记录。
首先java web的动态页面是通过jsp来实现,但是由于近些年来,各种前端框架的流行,比如说最近中国内陆兴起的vuejs,它们都提供了很方便快捷的功能,故而仍然用java来编写动态网站看起来已经不切实际了,java更多的应该是用于服务器后台的编写。
本人处于好奇,接触了就了解下jsp的使用,故而拿这样一个简单的小项目来练练手。
一.需求分析
现在进入主题,首先我们做的是一个电商平台,那么这样一个平台由哪些东西组成呢?

由于我们这里只是用来练练手,故而我们这里的需求相对简单一些。
二.界面UI设计
有了需求分析,知道我们需要什么,我们可以将项目大致地构画出来,这里我们选择使用mockplus来进行设计。当然以下的设计仅仅是将简单的结构构话出来,我们这里因为是拿来练手的,实际上不会这么做,故而我们这里只设计三个页面,分别是登录页面、注册页面、首页。
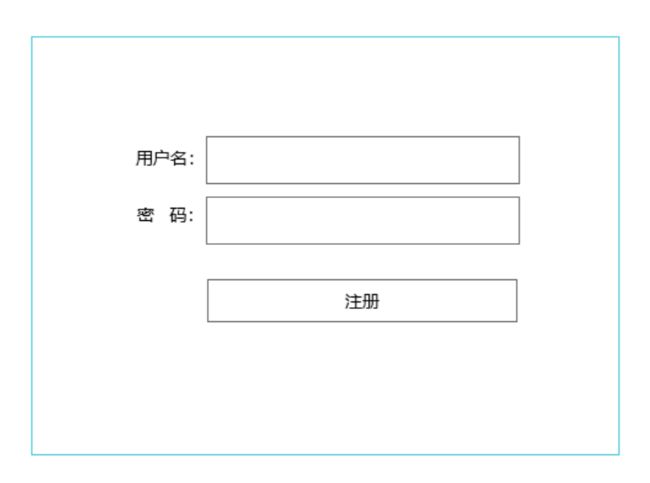
首先,设计登录注册页面:

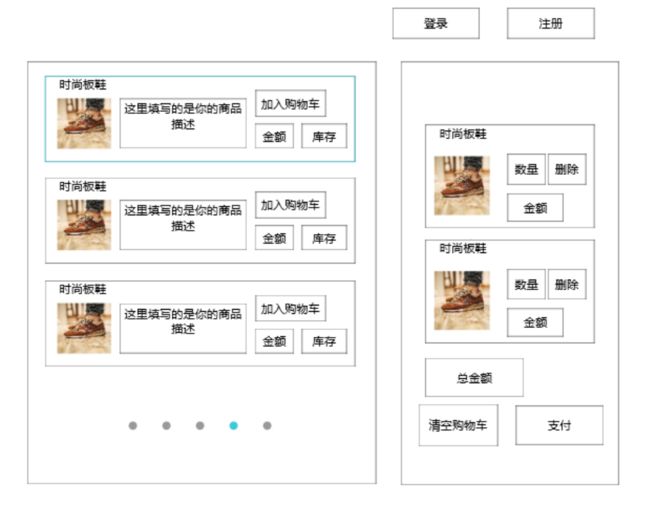
接着,就是设计首页,首页主要有三部分组成,用户账户状态、商品展示栏、购物车栏:
三.详细设计(逻辑设计)
首先我们需要数据才能进行各种业务逻辑的实现,故而我们先设计两张数据表:
用户表(user):

商品表(product)

然后就是一个逻辑结构的设计:
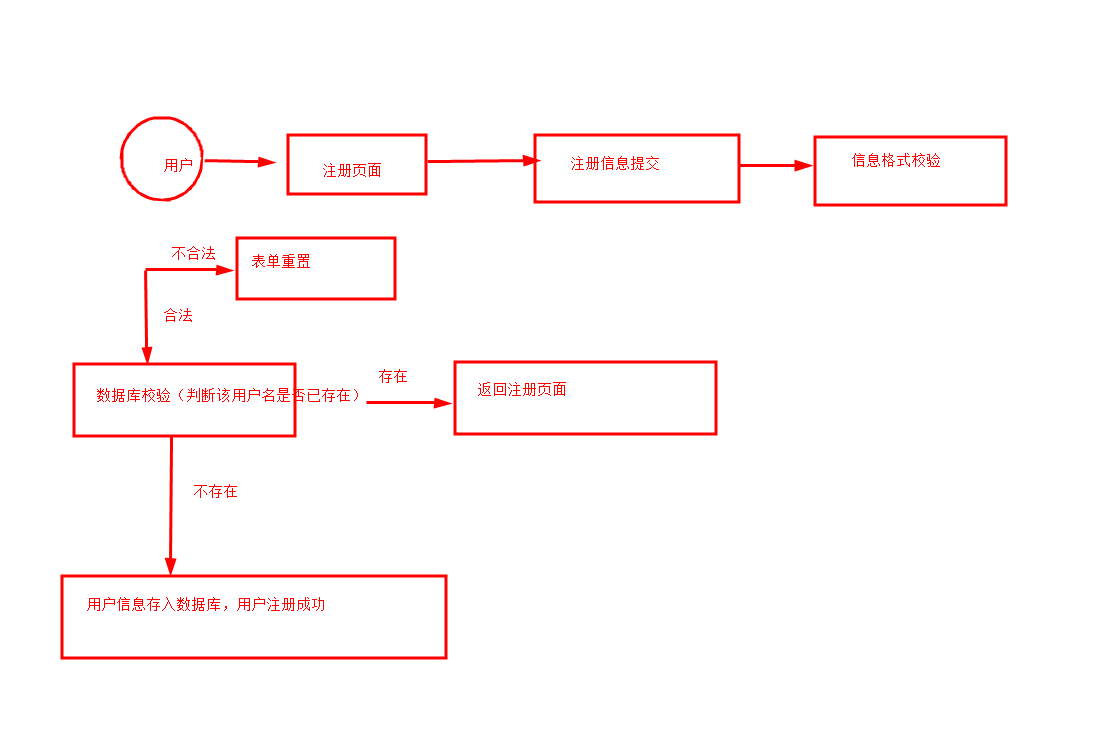
1.首先,我们需要设计的是用户的注册与登录逻辑:
注册:
登录:
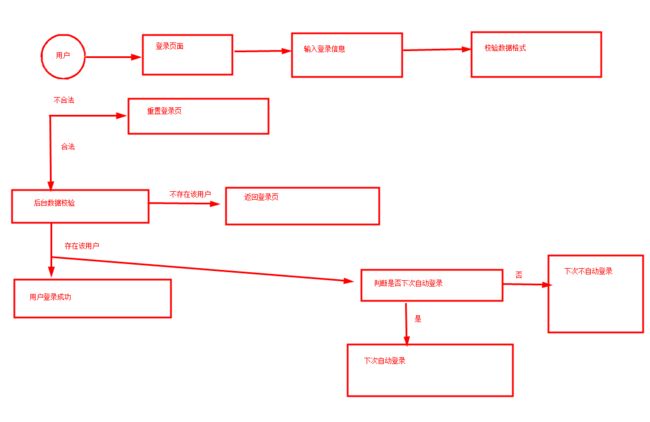
上面还漏了一个东西,就是当我们登录成功时,我们将用户的信息设置为session保存下来,这是为了防止我们刷新浏览器之后用户的登录状态丢失,我们可以通过判断是否设置了session而对用户的登录状态进行设置。
2.首页的业务逻辑
首页的业务逻辑这里我分了四部分:账户操作、商品列表操作、购物车操作、支付操作
四.编码
根据之前的相关需求设计,我们准备四个文件:index.jsp、login.jsp、reg.jsp、check.jsp,由于是针对JSP的练习,这里也不用servlet,所有ui呈现和逻辑都用jsp来完成。
index.jsp:平台首页,
login.jsp:登录页面,
reg.jsp:注册页面,
check.jsp:针对login和reg中的表单数据进行逻辑校验并进行反馈。
接下来,就是一步一步地将每一个页面都构建好:
首先,根据ui设计图将我们地ui界面写出来(不包括逻辑):
login.jsp:
登录
其展示页面如下:

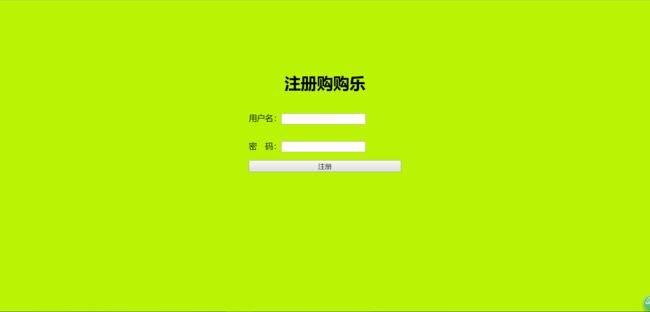
reg.jsp:
注册
效果图如下:
index.jsp:
一起购物吧
购购乐
登录
注册
商品列表
时尚板鞋
New Balance 和 J.Crew 带来这款全新的联名鞋款,选用 New Balance 997 的创作雏形,宛如牛奶糖般的焦糖色泽作主配色,以及贯穿深棕色和奶油色系添增分明层次,以高规格的美制水准搭配牛巴革、麂皮和皮革等上乘材质作为鞋身用料,质感满满。
400元
剩余库存300件
上一页1页下一页
效果图如下:

上面的效果图其实是基本完成的ui设计,但是在编写的过程中可能会优先进行功能的实现,ui的优化尽量前期简单,以可以编写逻辑功能代码为基础,而后期进行详细的ui界面优化。
接下来,进行逻辑代码的实现,首先我们的思路是:注册业务逻辑-->登录业务逻辑-->主页业务逻辑
按照这种思路,我们首先从注册和登录着手:
注册:这里我们要实现的即通过注册功能将用户的账户信息存储在数据库中,注册的表单代码为:
接下来,我们可能会按照正常的顺序,即先进行数据格式的校验,即通过正则表达式用js代码实现表单数据格式的校验,不过,这里我们先实现主要逻辑功能,即先转到check.jsp
登录:同注册,我们先将视线转移到check.jsp
其表单代码为:
那么现在我们单独将check.jsp来进行分析:
首先想想我们的思路是什么?注册登录页面的数据传过来之后,我们要将他们与数据库中的数据进行相应的比对,那么需要哪些东西:1.数据库连接操作;2.传过来的表单数据;3.数据比对操作;
我们按照上面的顺序来进行编写:
数据库连接-->
		//定义数据库 驱动程序
		public static final String dbDriver="org.gjt.mm.mysql.Driver";
		//数据库连接地址
		public static final String dbUrl="jdbc:mysql://localhost:3306/loginmanage";
		public static final String dbUser="root";
		public static final String dbPass="1111";
Connection conn=null; //数据库连接对象
PreparedStatement pstmt=null; //声明数据库操作
ResultSet rs=null; //声明数据结果集 String prePath=request.getHeader("Referer");
String fileName="";
String nick=request.getParameter("nick");
String password=request.getParameter("pass");
if(prePath!=null){
fileName=prePath.substring(27);//这里是获取发送请求的页面的文件名
}//根据文件名,我们进行不同的处理
if(fileName.equals("login.jsp")){//校验登录昵称与密码
//这里填写的是针对登录的相关数据校验
}
if(fileName.equals("reg.jsp")){//校验登录昵称与密码
//这里填写的是针对注册的相关数据校验
}针对上面一块逻辑,我们根据是登录还是注册,我们进行不同的处理:
登录处理:
try{
Class.forName(dbDriver);//加载驱动程序
conn=DriverManager.getConnection(dbUrl,dbUser,dbPass);//取得数据库连接
String sql="select password,userId from user where nick='"+nick+"'";
pstmt=conn.prepareStatement(sql); //实例化数据库操作对象
rs=pstmt.executeQuery(); //执行查询
String isAuto=request.getParameter("isAuto");//获取是否下次自动登录
if(rs.next()){
if(isAuto!=null&&isAuto.equals("autoLogin")){//如果登录框中勾选了下次自动登录,那么我们就要进行相关信息的cookie存储
Cookie c1=new Cookie("user",nick);
Cookie c2=new Cookie("userId",""+rs.getInt("userId"));
c1.setMaxAge(60);//设置cookie储存时间,过了时间之后,cookie失效
c2.setMaxAge(60);
response.setCharacterEncoding("UTF-8");
response.addCookie(c1);
response.addCookie(c2);
}
if(rs.getString(1).equals(password)){//判断是否验证成功,若成功,则跳转到主页,然后用session保存登录状态信息
response.sendRedirect("index.jsp");
session.setAttribute("isLogin", "ok");//登录状态
session.setAttribute("user", nick);//用户名
session.setAttribute("userId", ""+rs.getInt("userId"));//用户id,通过这个实现从数据库中读取数据
}
}
else{//校验失败,则返回登录页
response.sendRedirect("login.jsp");
}
}
catch(Exception e){
e.printStackTrace();
}
finally{//别忘了将相应的操作close()
if(rs!=null) {
rs.close();
}
if(pstmt!=null) {
pstmt.close();
}
if(conn!=null) {
conn.close();
}
}
注册处理:
try{
Class.forName(dbDriver);//加载驱动程序
conn=DriverManager.getConnection(dbUrl,dbUser,dbPass);//取得数据库连接
String sql="insert into user (nick,password) values('"+nick+"','"+password+"')";
pstmt=conn.prepareStatement(sql); //实例化数据库操作对象
int flag=pstmt.executeUpdate(); //执行数据 插入
out.println(flag);
if(flag==1){
response.sendRedirect("index.jsp");
session.setAttribute("isLogin", "ok");
session.setAttribute("user", nick);
rs=pstmt.getGeneratedKeys();//获取插入数据库的相应id以便将其存储到session中
int id=0;
if(rs.next()){
id=rs.getInt("userId");
session.setAttribute("userId", ""+id);
}
}
else{
response.sendRedirect("reg.jsp");
}
}
catch(Exception e){
e.printStackTrace();
}
finally{
if(rs!=null) {
rs.close();
}
if(pstmt!=null) {
pstmt.close();
}
if(conn!=null) {
conn.close();
}
}另外值得注意的是,如果有人直接访问check.jsp怎么办:
同样的,请求页面既不是login.jsp,也不是reg.jsp,那么首先我们先判断用户是否已经登录:
if(session.getAttribute("isLogin")!=null&&session.getAttribute("isLogin").equals("ok")){
response.sendRedirect("index.jsp");
}如果没用登录的情况下,我们执行“response.sendRedirect("login.jsp");”跳转到登录页面。
这个时候,我们已经登录到了首页。
主页业务逻辑:
首先我们这里要准备一些东西:
//定义数据库 驱动程序 这里的数据连接是为了之后能够进行相应的购物车操作
public static final String dbDriver="org.gjt.mm.mysql.Driver";
//数据库连接地址
public static final String dbUrl="jdbc:mysql://localhost:3306/loginmanage";
public static final String dbUser="root";
public static final String dbPass="111111";
		Connection conn=null;	//数据库连接对象
		PreparedStatement pstmt=null;	//声明数据库操作
ResultSet rs=null; //声明数据结果集 int pageIndex=1;//商品列表页码
int cartPrice=0;//购物车总价格
//这里的登录注销字符串是展示在登录状态展示区中的字段
String loginStr="登录";
String regStr="注销";现在进行登录状态的判断:
int isLogin=0;
if(session.getAttribute("isLogin")!=null&&session.getAttribute("isLogin").equals("ok")){//判断是否已经登录
isLogin=1;
loginStr=(String)session.getAttribute("user");
regStr="注销";
}
else{//判断是否需要自动登录账号
Cookie c[]=request.getCookies();
if(c!=null){
for(int i=0;i接下来将登录状态信息展示在页面中:(下面的onclick事件触发之后再讲)
购购乐
<%=loginStr %>
<%=regStr %>
既然用户已经登录,登录状态也已经展示在页面中,那么肯定还要有登出动作,由于页面的点击事件是由js来进行相应的监听与实现的,那么我们这里这样做(在事件处理函数中通过向页面post数据,页面通过接收这些数据进行相应的操作),在js代码中编写如下:
window.οnlοad=function(){
//登录处理
login=function(flag){
if(flag==1){
}
else{
location.href="login.jsp";
}
}
//注册处理
reg=function(flag){
if(flag==1){
ajax({
method : 'post',
url : 'index.jsp',
data : {
'logout' : "ok"
},
success : function (text) {
alert(text);
},
async : true
});
location.reload();
}
else{
location.href="reg.jsp";
}
}
//创建XhttpRequest对象
function createXHR() {
if (typeof XMLHttpRequest != 'undefined') {
return new XMLHttpRequest();
} else if (typeof ActiveXObject != 'undefined') {
var versions = [
'MSXML2.XMLHttp.6.0',
'MSXML2.XMLHttp.3.0',
'MSXML2.XMLHttp'
];
for (var i = 0; i < versions.length; i ++) {
try {
return new ActiveXObject(version[i]);
} catch (e) {
//跳过
}
}
} else {
throw new Error('您的浏览器不支持XHR对象!');
}
}
//ajax操作
function ajax(obj) {
var xhr = new createXHR();
obj.url = obj.url + '?rand=' + Math.random();
obj.data = params(obj.data);
console.log(obj.data);
if (obj.method === 'get') obj.url = obj.url.indexOf('?') == -1 ?
obj.url + '?' + obj.data : obj.url + '&' + obj.data;
if (obj.async === true) {
xhr.onreadystatechange = function () {
if (xhr.readyState == 4) callback();
};
}
xhr.open(obj.method, obj.url, obj.async);
if (obj.method === 'post') {
xhr.setRequestHeader('Content-Type', 'application/x-www-form-urlencoded');
xhr.send(obj.data);
} else {
xhr.send(null);
}
if (obj.async === false) {
callback();
}
function callback () {
if (xhr.status == 200) {
obj.success(xhr.responseText); //回调
} else {
alert('数据返回失败!状态代码:' + xhr.status + ',状态信息:' + xhr.statusText);
}
}
}
//名值对编码
function params(data) {
var arr = [];
for (var i in data) {
arr.push(encodeURIComponent(i) + '=' + encodeURIComponent(data[i]));
}
return arr.join('&');
}
}这样的话,整个登录注册登出的流程都已经实现,接下来就是具体的商品操作流程:
首先是商品列表,我们需要准备一个list变量将这些东西储存起来:
public class Pro{//商品对象
public int pId;
public String pName;
public int pCount;
public int price;
public String img;
public String desc;
}
ArrayList pros=new ArrayList();//商品列表 商品展示如下:(将商品列表从数据库中取出,并相应的填充在各元素中)
商品列表
<%
if(request.getParameter("page")!=null){
pageIndex=Integer.parseInt(request.getParameter("page"));
}
int index=(pageIndex-1)*4;
try{
Class.forName(dbDriver);//加载驱动程序
conn=DriverManager.getConnection(dbUrl,dbUser,dbPass);//取得数据库连接
String sql="select * from product order by pId asc limit "+index+",4";
pstmt=conn.prepareStatement(sql); //实例化数据库操作对象
rs=pstmt.executeQuery(); //执行查询
while(rs.next()){
%>
<%=rs.getString(2)%>
 %>)
<%=rs.getString(6) %>
<%=rs.getString(4)%>元
剩余库存<%=rs.getString(3) %>件
<%
Pro item=new Pro();
item.pId=rs.getInt("pId");
item.pName=rs.getString("pName");
item.price=rs.getInt("price");
item.pCount=rs.getInt("pCount");
item.img=rs.getString("img");
item.desc=rs.getString("desc");
pros.add(item);
}
}
catch(Exception e){
e.printStackTrace();
}
finally{
if(rs!=null) {
rs.close();
}
if(pstmt!=null) {
pstmt.close();
}
if(conn!=null) {
conn.close();
}
}
%>
上一页<%=pageIndex%>页下一页
接下来,我们要做的是分页:
上面我们看到有这样的语句(jsp代码开头):
if(request.getParameter("page")!=null){
pageIndex=Integer.parseInt(request.getParameter("page"));
}实际上也是同刚刚的对登录状态进行操作一样,然后我们在js中添加如下代码:
//上一页
pre=function(){
var pageElement=document.getElementById("page").innerHTML;
var page=parseInt(pageElement)-1;
if(page>=1){
getList(page);
location.reload();
}
else{
alert("已经是第一页了哦");
}
}
//下一页
next=function(){
var pageElement=document.getElementById("page").innerHTML;
var page=parseInt(pageElement)+1;
getList(page);
location.reload();
}
//商品列表刷新
getList=function(page){
ajax({
method : 'post',
url : 'index.jsp',
data : {
'page' : page
},
success : function (text) {
alert(text);
},
async : true
});
}然后是加入购物车:
这里我们先在页面开头添加:
ArrayList
ArrayList
然后在首页中添加如下Java代码:
if(request.getParameter("listIndex")!=null){
int cartIndex=Integer.parseInt(request.getParameter("listIndex"));
int tempIndex=carts.indexOf(pros.get(cartIndex));
if(tempIndex==-1){
carts.add(pros.get(cartIndex));
cartCount.add(1);
}
else{
Integer item=cartCount.get(tempIndex);
cartCount.set(tempIndex,(item+1));
}
}js中加入:
//加入购物车
intoCart=function(index){
ajax({
method : 'post',
url : 'index.jsp',
data : {
'listIndex' : index
},
success : function (text) {
alert(text);
},
async : true
});
location.reload();
}商品添加成功之后,就是将商品在购物车中进行展示:
可以看到,在购物车中我们有如下操作:改变商品数量、删除、清空购物车和支付。
对于前三项操作,我们只要在购物车商品展示之前,加入:
if(request.getParameter("cartIndex")!=null){
cartCount.set(Integer.parseInt(request.getParameter("cartIndex")),Integer.parseInt(request.getParameter("count")));
}
if(request.getParameter("delIndex")!=null){
carts.remove(Integer.parseInt(request.getParameter("delIndex")));
cartCount.remove(Integer.parseInt(request.getParameter("delIndex")));
}
if(request.getParameter("isClear")!=null){
System.out.println(request.getParameter("isClear"));
carts.clear();
cartCount.clear();
}js中加入:
//商品数量变化
couCh=function(index){
let count=document.getElementById("count").value;
ajax({
method : 'post',
url : 'index.jsp',
data : {
'count' : count,
'cartIndex':index
},
success : function (text) {
alert(text);
},
async : true
});
location.reload();
}
//将商品从购物车中移出
delCart=function(index){
ajax({
method : 'post',
url : 'index.jsp',
data : {
'delIndex':index
},
success : function (text) {
alert(text);
},
async : true
});
location.reload();
}
//清空购物车
clearCart=function(){
ajax({
method : 'post',
url : 'index.jsp',
data : {
'isClear':"ok"
},
success : function (text) {
alert(text);
},
async : true
});
location.reload();
}支付操作,我们在支付按钮后面进行添加:
if(request.getParameter("isPay")!=null){
String userId=(String)session.getAttribute("userId");
try{
Class.forName(dbDriver);//加载驱动程序
conn=DriverManager.getConnection(dbUrl,dbUser,dbPass);//取得数据库连接
String sql="update user set account=account-"+cartPrice+" where userId="+userId;
pstmt=conn.prepareStatement(sql); //实例化数据库操作对象
int flag=pstmt.executeUpdate();
if(flag==1){
for(int i=0;i //支付
pay=function(isLog){
if(isLog){
ajax({
method : 'post',
url : 'index.jsp',
data : {
'isPay' : "ok"
},
success : function (text) {
alert("支付成功!!!");
},
async : false
});
location.reload();
}
else{
alert("亲爱的用户,你好,请先登录后进行支付操作哦!!!")
}
}最后,不要忘记登录页面和注册页面的格式正则校验:
login.jsp:
<%@ page language="java" contentType="text/html; charset=UTF-8"
pageEncoding="UTF-8"%>
登录
<%
		if(session.getAttribute("isLogin")!=null&&session.getAttribute("isLogin").equals("ok")){
			response.sendRedirect("index.jsp");
		}
%>
reg.jsp:
<%@ page language="java" contentType="text/html; charset=UTF-8"
pageEncoding="UTF-8"%>
注册
<%
if(session.getAttribute("isLogin")!=null&&session.getAttribute("isLogin").equals("ok")){
response.sendRedirect("index.jsp");
}
%>
值得注意的是,其实按理来说,我们刷新了页面之后,页面应该跟刚打开页面是一样的,但是很明显的是,当我们刷新页面,index.jsp中的相关变量的值并没有进行初始化。