微信订阅号天气预报功能的实现(java版)
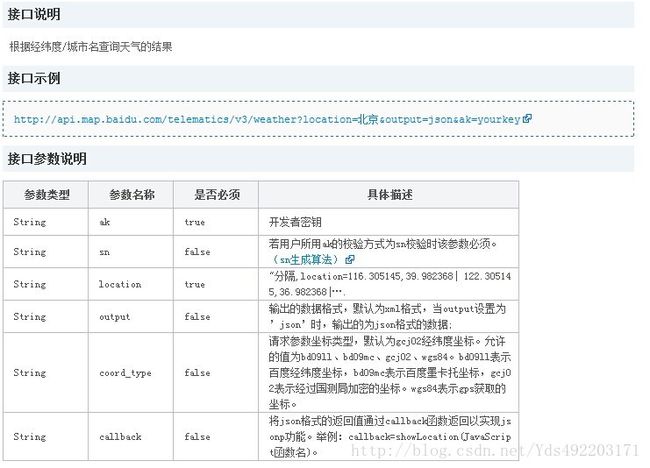
实现天气预报的功能我用的是车联网的api,所以首先我们在百度开发者中心api中找到车联网api,然后在左侧导航栏的接口说明找到天气查询的接口说明,如下图:
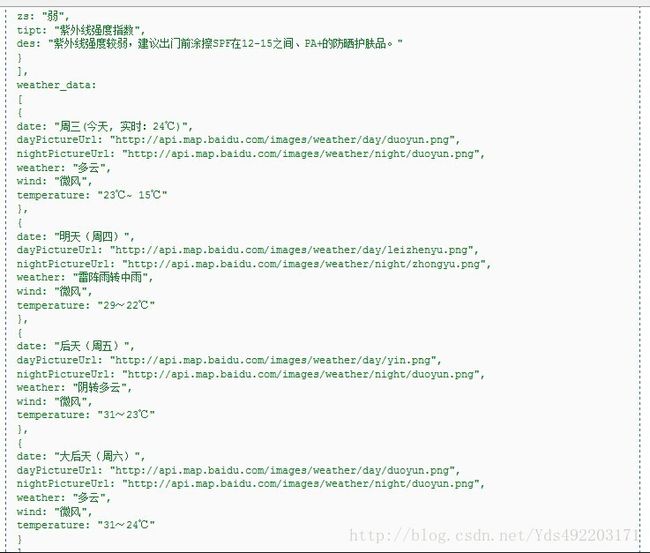
然后我们看到返回的json格式数据:
整套开发体系我是用的刘峰老师的那一套,然后是在他的那一套框架上开发的,大家有什么问题可以去看看他的,写的很详细的。接下来在搭建好的微信开发框架中,我们根据返回的json数据格式做相应的实现。首先写javabean层
package com.yc.bean;

import java.util.List;
import java.util.Map;

public class Weather {
	private String currentCity;//当前城市
	private List> index;//返回json中的index数组
	private List> weather_data;//返回的json数据中的weather_data数组

	public String getCurrentCity() {
		return currentCity;
	}
	public void setCurrentCity(String currentCity) {
		this.currentCity = currentCity;
	}
	public List> getIndex() {
		return index;
	}
	public void setIndex(List> index) {
		this.index = index;
	}
	public List> getWeather_data() {
		return weather_data;
	}
	public void setWeather_data(List> weather_data) {
		this.weather_data = weather_data;
	}


}
package com.yc.service;

import java.io.BufferedReader;
import java.io.InputStream;
import java.io.InputStreamReader;
import java.io.UnsupportedEncodingException;
import java.net.HttpURLConnection;
import java.net.URL;
import java.util.ArrayList;
import java.util.HashMap;
import java.util.List;
import java.util.Map;

import org.junit.Test;

import net.sf.json.JSONArray;
import net.sf.json.JSONObject;

import com.yc.bean.Weather;
import com.yc.message.resp.Article;
import com.yc.message.resp.NewsMessage;
import com.yc.utils.Constants;

public class WeatherService {

	/**
     * 发送http请求
     *
     * @param requestUrl 请求地址
     * @return String
     */
    private static String httpRequest(String requestUrl) {
        StringBuffer buffer = new StringBuffer();
        try {
            URL url = new URL(requestUrl);
            HttpURLConnection httpUrlConn = (HttpURLConnection) url.openConnection();
            httpUrlConn.setDoInput(true);
            httpUrlConn.setRequestMethod("GET");
            httpUrlConn.connect();
            // 将返回的输入流转换成字符串
            InputStream inputStream = httpUrlConn.getInputStream();
            InputStreamReader inputStreamReader = new InputStreamReader(inputStream, "utf-8");
            BufferedReader bufferedReader = new BufferedReader(inputStreamReader);

            String str = null;
            while ((str = bufferedReader.readLine()) != null) {
                buffer.append(str);
            }
            bufferedReader.close();
            inputStreamReader.close();
            // 释放资源
            inputStream.close();
            inputStream = null;
            httpUrlConn.disconnect();

        } catch (Exception e) {
            e.printStackTrace();
        }
        return buffer.toString();
    }

    public static Weather weatherDetect(String place){
    	Weather weather=new Weather();
    	//天气查询地址
    	String queryUrl=Constants.SENDPATH4;

    	try {
			//对url进行编码
				queryUrl = queryUrl.replace("LOCATION", java.net.URLEncoder.encode(place, "UTF-8"));

				//调用天气查询接口
				String json = httpRequest(queryUrl);
				//System.out.println(json);
				//解析返回的json
				JSONObject jsonObj=JSONObject.fromObject(json);
				JSONArray results=jsonObj.getJSONArray("results");

				//System.out.println(results.toString());

				JSONObject resultsObject=(JSONObject) results.get(0);

				JSONArray index=resultsObject.getJSONArray("index");
				JSONArray weather_data=resultsObject.getJSONArray("weather_data");

				List> indexList=new ArrayList>();
				for(int i=0;i map=new HashMap();
					map.put("title", info.getString("title"));
					map.put("zs", info.getString("zs"));
					map.put("tipt", info.getString("tipt"));
					map.put("des", info.getString("des"));

					indexList.add(map);
				}

				weather.setIndex(indexList);

				//System.out.println(weather.getIndex());

				List> weather_dataList=new ArrayList>();
				for(int i=0;i map=new HashMap();
					map.put("date", info.getString("date"));
					map.put("dayPictureUrl", info.getString("dayPictureUrl"));
					map.put("nightPictureUrl", info.getString("nightPictureUrl"));
					map.put("weather", info.getString("weather"));
					map.put("wind", info.getString("wind"));
					map.put("temperature", info.getString("temperature"));

					weather_dataList.add(map);
				}
				weather.setWeather_data(weather_dataList);

				//System.out.println(weather.getWeather_data());

		} catch (UnsupportedEncodingException e) {
			e.printStackTrace();
		}
		return weather;
    }

    public static void main(String[] args) {
    	weatherDetect("长沙").getIndex();
    	System.out.println(weatherDetect("长沙").getIndex());
    }

}
在这里我封装了一个类,专门放一个api调用连接的,之前在WeatherService调用的即SENDPATH4,后面的apikey大家可以换成自己在百度开发者的
package com.yc.utils;

/**
 * 一些常用的链接
 * @author Administrator
 *
 */
public class Constants {
	//手机号码归属地查询
	public static final String SENDPATH="http://webservice.webxml.com.cn/WebServices/MobileCodeWS.asmx/getMobileCodeInfo";

	//笑话
	public static final String SENDPATH2="http://api100.duapp.com/joke/?appkey=trialuser";

	//智能聊天
	//public static final String SENDPATH3="http://www.wendacloud.com/openapi/api?key=bbab79b3f2feaf07e40553265f112aae&info=";
	public static final String SENDPATH3="http://xiao.douqq.com/api.php?msg=";

	//天气查询
	public static final String SENDPATH4="http://api.map.baidu.com/telematics/v3/weather?location=LOCATION&output=json&ak=81218080E79C9685b35e757566d8cbe5";

	//热门影片
	public static final String SENDPATH5="http://api.map.baidu.com/telematics/v3/movie?qt=hot_movie&location=LOCATION&output=json&ak=81218080E79C9685b35e757566d8cbe5";

	//景点详情
	public static final String SENDPATH6="http://api.map.baidu.com/telematics/v3/travel_attractions?id=ID&output=json&ak=81218080E79C9685b35e757566d8cbe5";
}
以下是在调用类实现的调用:
//天气查询服务
            	else if(content.startsWith("天气")){
            		String keyWord = content.replaceAll("^天气", "").trim();
            		if ("".equals(keyWord)) {
                        textMessage.setContent(getWeatherUsage());
                        respMessage = MessageUtil.textMessageToXml(textMessage);
                    }else if(keyWord.startsWith("明后")){
                    	keyWord = keyWord.replaceAll("^明后", "").trim();
                    	Weather weather=new Weather();
                    	weather=WeatherService.weatherDetect(keyWord);
                    	List> weather_data=new ArrayList>();
                    	weather_data=weather.getWeather_data();

                    	// 创建图文消息
                        NewsMessage newsMessage = new NewsMessage();
                        newsMessage.setToUserName(fromUserName);
                        newsMessage.setFromUserName(toUserName);
                        newsMessage.setCreateTime(new Date().getTime());
                        newsMessage.setMsgType(MessageUtil.RESP_MESSAGE_TYPE_NEWS);
                        newsMessage.setFuncFlag(0);

                        List articleList = new ArrayList();
                        //多图文消息
                        Article article1 = new Article();
                        article1.setTitle(weather_data.get(1).get("date")+"\n"+weather_data.get(1).get("weather")+weather_data.get(1).get("wind")+weather_data.get(1).get("temperature"));
                        article1.setDescription("");
                        article1.setPicUrl(weather_data.get(1).get("dayPictureUrl"));
                        article1.setUrl("");

                        Article article2 = new Article();
                        article2.setTitle(weather_data.get(2).get("date")+"\n"+weather_data.get(2).get("weather")+weather_data.get(2).get("wind")+weather_data.get(2).get("temperature"));
                        article2.setDescription("");
                        article2.setPicUrl(weather_data.get(2).get("dayPictureUrl"));
                        article2.setUrl("");

                        Article article3 = new Article();
                        article3.setTitle("以上即为小编为您提供的"+keyWord+"未来两天的天气信息");
                        article3.setDescription("");
                        article3.setPicUrl("");
                        article3.setUrl("");

                        articleList.add(article1);
                        articleList.add(article2);
                        articleList.add(article3);
                        newsMessage.setArticleCount(articleList.size());
                        newsMessage.setArticles(articleList);
                        respMessage = MessageUtil.newsMessageToXml(newsMessage);
                    }

            		else{
                    	//获取返回的weather
                    	Weather weather=new Weather();
                    	weather=WeatherService.weatherDetect(keyWord);
                    	List> index=new ArrayList>();
                    	index=weather.getIndex();
                    	List> weather_data=new ArrayList>();
                    	weather_data=weather.getWeather_data();

                    	String des="";

                    	//将index里面数据的拼接
                    	for(int i=0;i articleList = new ArrayList();
                        //多图文消息
                        Article article1 = new Article();
                        article1.setTitle(keyWord+"   "+weather_data.get(0).get("date"));
                        article1.setDescription(weather_data.get(0).get("weather")+"\n"+weather_data.get(0).get("wind")+"\n"+weather_data.get(0).get("temperature")+"\n\n"+des);
                        article1.setPicUrl(weather_data.get(0).get("dayPictureUrl"));
                        article1.setUrl("");

                        articleList.add(article1);
                        newsMessage.setArticleCount(articleList.size());
                        newsMessage.setArticles(articleList);
                        respMessage = MessageUtil.newsMessageToXml(newsMessage);
                    }
} 可能本文写的不是很清楚,如果大家有问题的话可以扫下面二维码加我关注,订阅号里有联系方式的。大家可以一起交流,毕竟我也是菜鸟,自己做的订阅号,有不足的地方也还请指教!谢谢


