linux之selinux强制访问控制
selinux
selinux是强制访问控制的一种策略,可以指明某一个进程访问哪些资源,在传统的linux中,一切皆文件,由用户、组和权限来控制访问,在selinux中,一切皆对象,由存放在扩展属性领域的安全元素控制访问,所有文件、端口、进程都具备安全上下文
selinux影响着:(1)程序访问文件(2)程序访问功能(微信),进程本身功能,开关
查询selinux状态
命令:getenforce #查询结果有3种状态
1、enforcing #如果违反了策略,无法继续操作,表示强制
2、disabled #禁止
3、permissive #selinux有效,即是违法策略,依旧可以继续操作,但是会有警告,查看警告信息:cat /var/log/audit/audit.log
更改selinux状态
vim /etc/sysconfig/selinux #文件编辑
reboot #重启
测试:
[root@localhost ~]# getenforce
Disabled
[root@localhost ~]#vim /etc/sysconfig/selinux  #修改selinux=Enforcing
[root@localhost ~]#reboot  #重启
[root@localhost ~]# getenforce
Enforcing
临时改变selinux状态
setenforce 0 | 1 #临时改变selinux状态,其中0表示警告模式;1表示强制模式
getenforce 查看状态
查询结果:
Permissive #警告模式,警告不被拒绝
Enforcing #强制模式,拒绝并且警告
测试:
[root@localhost ~]# setenforce 0
[root@localhost ~]# getenforce
Permissive
[root@localhost ~]# setenforce 1
[root@localhost ~]# getenforce
Enforcing
selinux安全上下文管理
做selinux安全上下文时首先需要开启vsftpd,关闭firewalld
[root@localhost ~]# systemctl restart vsftpd
[root@localhost ~]# systemctl enable vsftpd
[root@localhost ~]# systemctl stop firewalld
[root@localhost ~]# systemctl disable firewalld
rm '/etc/systemd/system/basic.target.wants/firewalld.service'
rm '/etc/systemd/system/dbus-org.fedoraproject.FirewallD1.service'
1.安全上下文
ls -Z #查看文件的安全上下文
semanage fcontext -l #内核指定的所有文件的安全上下文的列表 ; 查看文件安全上下文(man semanage fontext)
测试:
服务端:
[root@localhost ~]# touch /mnt/haha1
[root@localhost ~]# mv /mnt/haha1 /var/ftp/haha1  #复制是新建的过程,移动是重命名的过程,文件系统权限和属性不会改变
[root@localhost ~]# getenforce
Enforcing
[root@localhost ~]# cd /var/ftp
[root@localhost ftp]# ls -Z
-rw-r--r--. root root unconfined_u:object_r:mnt_t:s0   haha1  #安全上下文为mnt_t
-rw-r--r--. root root system_u:object_r:public_content_t:s0 hellohello  #安全上下文为public_content_t
drwxr-xr-x. root root system_u:object_r:public_content_t:s0 pub
[root@localhost ftp]# semanage fcontext -l | grep /var/ftp  #内核记录的/var/ftp的安全上下文
/var/ftp(/.*)?                                     all files          system_u:object_r:public_content_t:s0
/var/ftp/bin(/.*)?                                 all files          system_u:object_r:bin_t:s0
/var/ftp/etc(/.*)?                                 all files          system_u:object_r:etc_t:s0
/var/ftp/lib(/.*)?                                 all files          system_u:object_r:lib_t:s0
/var/ftp/lib/ld[^/]*\.so(\.[^/]*)*                 regular file       system_u:object_r:ld_so_t:s0
2.修改安全上下文
2.1.临时修改
chcon [-R] [-t type] 目录|文件 #临时修改安全上下文,在修改了selinux状态后重启系统,安全上下文会变回来
测试:
服务端:
[root@localhost ~]# mkdir /haha2  #建立目录haha2
[root@localhost ~]# touch /haha2/hahafile  #给haha2里面建立文件
[root@localhost ~]# ls -Zd /haha2  #查看haha2的安全上下文
drwxr-xr-x. root root unconfined_u:object_r:default_t:s0 /haha2
[root@localhost ~]# ls -Zd /var/ftp  #查看ftp的安全上下文
drwxr-xr-x. root root system_u:object_r:public_content_t:s0 /var/ftp
[root@localhost ~]# semanage fcontext -l | grep /haha2  #内核记录过的/haha2的安全上下文
[root@localhost ~]# semanage fcontext -l | grep /var/ftp  #内核记录过的/var/ftp的安全上下文
/var/ftp(/.*)?                                     all files          system_u:object_r:public_content_t:s0
/var/ftp/bin(/.*)?                                 all files          system_u:object_r:bin_t:s0
/var/ftp/etc(/.*)?                                 all files          system_u:object_r:etc_t:s0
/var/ftp/lib(/.*)?                                 all files          system_u:object_r:lib_t:s0
/var/ftp/lib/ld[^/]*\.so(\.[^/]*)*                 regular file       system_u:object_r:ld_so_t:s0
[root@localhost ~]# chcon -t public_content_t /haha2 -R  #修改/haha2的安全上下文public_content_t
[root@localhost ~]# ls -Zd /haha2  #查看安全上下文
drwxr-xr-x. root root unconfined_u:object_r:public_content_t:s0 /haha2
客户端:
[root@localhost ~]# lftp 172.25.254.196
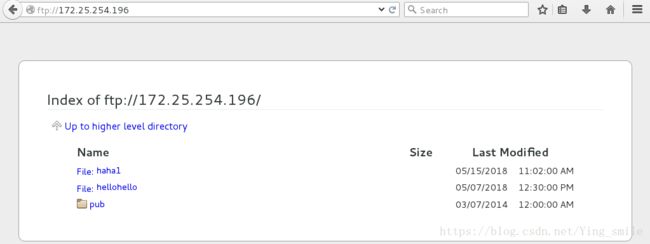
lftp 172.25.254.196:~> ls  #可以查看到haha1
-rw-r--r--    1 0        0               0 May 15 11:02 haha1
-rw-r--r--    1 0        0               0 May 07 12:30 hellohello
drwxr-xr-x    2 0        0              33 Mar 07  2014 pub
lftp 172.25.254.196:/> quit
服务端:
[root@localhost ~]# vim /etc/sysconfig/selinux  #修改selinux的状态为disabled
[root@localhost ~]# reboot  #重启
disabled
[root@localhost ~]# vim /etc/sysconfig/selinux  #修改selinux的状态为enforcing
[root@localhost ~]# reboot  #重启
Enforcing
[root@localhost ~]# ls -Zd /haha2  #/haha2的安全上下文又改变回来,说明chcon -t的修改是临时的
drwxr-xr-x. root root unconfined_u:object_r:default_t:s0 /haha2
客户端:
[root@localhost ~]# lftp 172.25.254.196
lftp 172.25.254.196:~> ls   #看不到文件haha1,因为haha1的安全上下文不符
-rw-r--r--    1 0        0               0 May 07 12:30 hellohello
drwxr-xr-x    2 0        0              33 Mar 07  2014 pub
lftp 172.25.254.196:/> quit
2.2.永久修改
semanage fcontext -a -t type 目录|文件 #永久修改安全上下文,-a 添加,-t 指定类型,重启之后不会改变修改
restorecon -Rv 目录 #刷新上下文,并显示过程
测试:
服务端:
[root@localhost ~]# vim /etc/vsftpd/vsftpd.conf  #将匿名用户访问的家目录改成/haha2,anon_root=/haha2为文件中添加的内容
[root@localhost ~]# systemctl restart vsftpd
[root@localhost ~]# semanage fcontext -a -t public_content_t '/haha2(/.*)?'  #永久修改/haha2的安全上下文,(/.*)指目录的所有文件,其中/haha2(/.*)?==/haha2/*
[root@localhost ~]# semanage fcontext -l | grep /haha2  #内核记录过的/haha2安全上下文
/haha2(/.*)?                                       all files          system_u:object_r:public_content_t:s0
[root@localhost ~]# restorecon -FvvR /haha2/  #F刷新,vv显示列表
restorecon reset /haha2 context unconfined_u:object_r:default_t:s0->system_u:object_r:public_content_t:s0
restorecon reset /haha2/hahafile context unconfined_u:object_r:default_t:s0->system_u:object_r:public_content_t:s0
[root@localhost ~]# vim /etc/sysconfig/selinux  #改变selinux状态
disabled
[root@localhost ~]# reboot  #重启
[root@localhost ~]# vim /etc/sysconfig/selinux  #改变selinux状态为enforcing
enforcing
[root@localhost ~]# reboot  #重启
[root@localhost ~]# ls -Z /haha2  #查看/haha2的安全上下文没有变回去,说明是永久修改
-rw-r--r--. root root system_u:object_r:public_content_t:s0 hahafile
客户端:
[root@localhost ~]# lftp 172.25.254.196
lftp 172.25.254.196:~> ls  可以查看到haha2里面的文件
-rw-r--r--    1 0        0               0 May 15 12:18 hahafile
lftp 172.25.254.196:/> quit
当seliunx出错时,执行touch /.autorelabel,在根底下建立.autorelabel文件(相当于selinux 自动初始化),然后重启系统,selinux恢复
selinux布尔值
开启selinux后,系统进程会默认加载布尔值,相当于开关,修改布尔值时,selinux在enforcing模式下
setsebool -p 需要修改的内容 布尔值on|off #修改selinux布尔值
getsebool -a | 名称 #查看当前系统所有布尔值
测试:
测试前提是ftp服务默认本地用户有可写功能
[root@localhost ~]# getenforce
Enforcing
[root@localhost ~]# getsebool -a | grep ftp  #查看ftp的selinux布尔值
ftp_home_dir --> off
ftpd_anon_write --> off
ftpd_connect_all_unreserved --> off
ftpd_connect_db --> off
ftpd_full_access --> off
ftpd_use_cifs --> off
ftpd_use_fusefs --> off
ftpd_use_nfs --> off
ftpd_use_passive_mode --> off
httpd_can_connect_ftp --> off
httpd_enable_ftp_server --> off
sftpd_anon_write --> off
sftpd_enable_homedirs --> off
sftpd_full_access --> off
sftpd_write_ssh_home --> off
tftp_anon_write --> off
tftp_home_dir --> off
[root@localhost ~]# lftp 172.25.254.196 -u student  #本地用户连接
Password:
lftp [email protected]:~> put /etc/passwd   #因为ftp的用户家目录的布尔值是关闭状态,所以不能上传文件
put: Access failed: 553 Could not create file. (passwd)
lftp [email protected]:~> quit
[root@localhost ~]# setsebool -P ftp_home_dir on  #修改ftp_home_dir布尔值为on
[root@localhost ~]# getsebool -a | grep ftp  #查看是否修改
ftp_home_dir --> on
ftpd_anon_write --> off
ftpd_connect_all_unreserved --> off
ftpd_connect_db --> off
ftpd_full_access --> off
ftpd_use_cifs --> off
ftpd_use_fusefs --> off
ftpd_use_nfs --> off
ftpd_use_passive_mode --> off
httpd_can_connect_ftp --> off
httpd_enable_ftp_server --> off
sftpd_anon_write --> off
sftpd_enable_homedirs --> off
sftpd_full_access --> off
sftpd_write_ssh_home --> off
tftp_anon_write --> off
tftp_home_dir --> off
[root@localhost ~]# lftp 172.25.254.196 -u student  #本地用户连接
Password:
lftp [email protected]:~> put /etc/passwd  #可以上传文件
2044 bytes transferred
lftp [email protected]:~> quit
监控selinux冲突
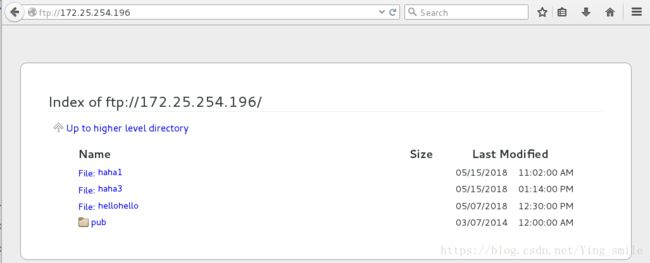
当新建文件|目录时,在浏览器查看ftp://ip,查看不到新建文件、目录,并且产生日志
/var/log/messages #查看报错后,程序提供解决方案
/var/log/audit/audit.log #查看报错信息
其中提供解决方案的不是系统而是一个软件程序,但此工具不安全,只是解决当前不能访问的问题;查找安装包:rpm -qa | grep setrouble ;如果删除此工具,在日志/var/log/messages下是不会提供方案,但是/var/log/audit/audit.log中可以看到日志
测试:
[root@localhost ~]# vim /etc/vsftpd/vsftpd.conf  #关闭用户家目录修改
[root@localhost ~]# systemctl restart vsftpd.service
[root@localhost ~]# > /var/log/messages
[root@localhost ~]# cat /var/log/messages
[root@localhost ~]# touch /mnt/haha3
[root@localhost ~]# mv /mnt/haha3 /var/ftp/
[root@localhost ~]# cat /var/log/messages  #查看日志,有解决方案
Then execute:
restorecon -v '$FIX_TARGET_PATH'   #日志内容过多,这里只显示解决方案这一行
[root@localhost ~]# restorecon -v /var/ftp/*  #根据解决方案解决冲突
restorecon reset /var/ftp/haha3 context unconfined_u:object_r:mnt_t:s0->unconfined_u:object_r:public_content_t:s0
删除根据日志生成解决方案的软件后
[root@localhost ~]# touch /mnt/haha4
[root@localhost ~]# mv /mnt/haha4 /var/ftp/
[root@localhost ~]# > /var/log/audit/audit.log
[root@localhost ~]# > /var/log/messages
[root@localhost ~]# cat /var/log/messages  #内容里面没有解决方案
[root@localhost ~]# cat /var/log/audit/audit.log  #可以查看到日志
type=AVC msg=audit(1526390706.734:180): avc:  denied  { getattr } for  pid=2601 comm="vsftpd" path="/haha4" dev="vda1" ino=8843659 scontext=system_u:system_r:ftpd_t:s0-s0:c0.c1023 tcontext=unconfined_u:object_r:mnt_t:s0 tclass=file
type=SYSCALL msg=audit(1526390706.734:180): arch=c000003e syscall=6 success=no exit=-13 a0=7f19f059a640 a1=7f19f05a27c0 a2=7f19f05a27c0 a3=2020202020203020 items=0 ppid=2599 pid=2601 auid=4294967295 uid=14 gid=50 euid=14 suid=14 fsuid=14 egid=50 sgid=50 fsgid=50 tty=(none) ses=4294967295 comm="vsftpd" exe="/usr/sbin/vsftpd" subj=system_u:system_r:ftpd_t:s0-s0:c0.c1023 key=(null)
type=AVC msg=audit(1526390712.816:181): avc:  denied  { getattr } for  pid=2601 comm="vsftpd" path="/haha4" dev="vda1" ino=8843659 scontext=system_u:system_r:ftpd_t:s0-s0:c0.c1023 tcontext=unconfined_u:object_r:mnt_t:s0 tclass=file
type=SYSCALL msg=audit(1526390712.816:181): arch=c000003e syscall=6 success=no exit=-13 a0=7f19f059a640 a1=7f19f05a27c0 a2=7f19f05a27c0 a3=2020202020203020 items=0 ppid=2599 pid=2601 auid=4294967295 uid=14 gid=50 euid=14 suid=14 fsuid=14 egid=50 sgid=50 fsgid=50 tty=(none) ses=4294967295 comm="vsftpd" exe="/usr/sbin/vsftpd" subj=system_u:system_r:ftpd_t:s0-s0:c0.c1023 key=(null)
[root@localhost ~]# yum install setroubleshoot-server-3.2.17-2.el7.x86_64  #安装该软件
修改http服务的端口标签
在/etc/httpd/conf/httpd.conf文件中可以修改http端口,修改时需要selinux在enforcing模式下
semanage port -l #查看端口标签
semanage port -a -t 类型 -p tcp 端口号 #添加端口
测试:
[root@localhost ~]# vim /etc/httpd/conf/httpd.conf
[root@localhost ~]# systemctl restart httpd  #因为新添加的端口不在默认端口里面所以重启失败
Job for httpd.service failed. See 'systemctl status httpd.service' and 'journalctl -xn' for details.
[root@localhost ~]# setenforce 0  #将selinux改为警告模式
[root@localhost ~]# systemctl restart httpd  #可以重启httpd
[root@localhost ~]# semanage port -l | grep http  #查看端口
http_cache_port_t              tcp      8080, 8118, 8123, 10001-10010
http_cache_port_t              udp      3130
http_port_t                    tcp      80, 81, 443, 488, 8008, 8009, 8443, 9000
pegasus_http_port_t            tcp      5988
pegasus_https_port_t           tcp      5989
[root@localhost ~]# semanage port -a -t http_port_t -p tcp 666  #添加端口号
[root@localhost ~]# semanage port -l | grep http
http_cache_port_t              tcp      8080, 8118, 8123, 10001-10010
http_cache_port_t              udp      3130
http_port_t                    tcp      666, 80, 81, 443, 488, 8008, 8009, 8443, 9000
pegasus_http_port_t            tcp      5988
pegasus_https_port_t           tcp      5989
[root@localhost ~]# setenforce 1  #修改selinux为强制模式
[root@localhost ~]# systemctl restart httpd  #可以重启httpd


