Programming Exercise 6:Support Vector Machines
大家好,我是Mac Jiang,今天和大家分享一下coursera网站上Stanford University的Machine Learning公开课(吴恩达老师)课程第六次作业:Programming Exercise 6:Support Vector Machines。写这篇博客的目的是为在课程学习中遇到困难的同学提供一些帮助,同时帮助自己巩固这周的课程内容。欢迎博友转载此文章,但希望您在转载之前与我联系并标明文章的出处,谢谢!
由于Programming Exercise 6的作业内容可以分为两大块,即1Support Vector Machines 2Span Classification.其中,第一块主要是描述SVM算法的具体实现过程,是本周课程内容的基础,第二块垃圾邮件分类是基于第一块代码的基础上的具体实际应用。由于文章篇幅有限,本文只讲述第一部分Support Vector Machines的实现过程,第二部分的内容我将在下一篇博客中给出,地址为http://blog.csdn.net/a1015553840/article/details/50826728。
好的,话不多说,开始讲述第一部分的实现过程。
数据集有:ex6data1.mat
ex6data2.mat
ex6data3.mat
实现过程与函数:ex6.m ---控制实验的进程,不用修改
svmTrain.m ---训练SVM算法,是已经开发完善的包,不用修改,直接调用
svmPredict.m ---对新样本进行预测,已开发的包,不用修改,直接调用
plotData.m ----绘制2D图像,不用修改,直接调用
visualizeBoundaryLinear,visualizeBoundaty.m ----可视化决策线,不用修改,直接调用
linearKernel.m ----线性核函数(无核函数),是以完善的包,不用修改,直接调用
guassianKernel.m ----高斯核函数,需要修改
dataset3Params.m ---这个是计算最优C,sigma的函数,需要修改
所以,这部分实验我们实际上只要修改两个文件就可以了,非常简单。
1.好的,我们先看算法的实现流程,实现流程是在ex6.m这个文件中:
%% Initialization
clear ; close all; clc
%% =============== Part 1: Loading and Visualizing Data ================
%  We start the exercise by first loading and visualizing the dataset.
%  The following code will load the dataset into your environment and plot
%  the data.
%

fprintf('Loading and Visualizing Data ...\n')

% Load from ex6data1:
% You will have X, y in your environment
load('ex6data1.mat');

% Plot training data
plotData(X, y);

fprintf('Program paused. Press enter to continue.\n');
pause;

%% ==================== Part 2: Training Linear SVM ====================
%  The following code will train a linear SVM on the dataset and plot the
%  decision boundary learned.
%

% Load from ex6data1:
% You will have X, y in your environment
load('ex6data1.mat');

fprintf('\nTraining Linear SVM ...\n')

% You should try to change the C value below and see how the decision
% boundary varies (e.g., try C = 1000)
C = 1;
model = svmTrain(X, y, C, @linearKernel, 1e-3, 20);
visualizeBoundaryLinear(X, y, model);

fprintf('Program paused. Press enter to continue.\n');
pause;

%% =============== Part 3: Implementing Gaussian Kernel ===============
%  You will now implement the Gaussian kernel to use
%  with the SVM. You should complete the code in gaussianKernel.m
%
fprintf('\nEvaluating the Gaussian Kernel ...\n')

x1 = [1 2 1]; x2 = [0 4 -1]; sigma = 2;
sim = gaussianKernel(x1, x2, sigma);

fprintf(['Gaussian Kernel between x1 = [1; 2; 1], x2 = [0; 4; -1], sigma = 0.5 :' ...
         '\n\t%f\n(this value should be about 0.324652)\n'], sim);

fprintf('Program paused. Press enter to continue.\n');
pause;

%% =============== Part 4: Visualizing Dataset 2 ================
%  The following code will load the next dataset into your environment and
%  plot the data.
%

fprintf('Loading and Visualizing Data ...\n')

% Load from ex6data2:
% You will have X, y in your environment
load('ex6data2.mat');

% Plot training data
plotData(X, y);

fprintf('Program paused. Press enter to continue.\n');
pause;

%% ========== Part 5: Training SVM with RBF Kernel (Dataset 2) ==========
%  After you have implemented the kernel, we can now use it to train the
%  SVM classifier.
%
fprintf('\nTraining SVM with RBF Kernel (this may take 1 to 2 minutes) ...\n');

% Load from ex6data2:
% You will have X, y in your environment
load('ex6data2.mat');

% SVM Parameters
C = 1; sigma = 0.1;

% We set the tolerance and max_passes lower here so that the code will run
% faster. However, in practice, you will want to run the training to
% convergence.
model= svmTrain(X, y, C, @(x1, x2) gaussianKernel(x1, x2, sigma));
visualizeBoundary(X, y, model);

fprintf('Program paused. Press enter to continue.\n');
pause;

%% =============== Part 6: Visualizing Dataset 3 ================
%  The following code will load the next dataset into your environment and
%  plot the data.
%

fprintf('Loading and Visualizing Data ...\n')

% Load from ex6data3:
% You will have X, y in your environment
load('ex6data3.mat');

% Plot training data
plotData(X, y);

fprintf('Program paused. Press enter to continue.\n');
pause;

%% ========== Part 7: Training SVM with RBF Kernel (Dataset 3) ==========

%  This is a different dataset that you can use to experiment with. Try
%  different values of C and sigma here.
%

% Load from ex6data3:
% You will have X, y in your environment
load('ex6data3.mat');

% Try different SVM Parameters here
[C, sigma] = dataset3Params(X, y, Xval, yval);

% Train the SVM
model= svmTrain(X, y, C, @(x1, x2) gaussianKernel(x1, x2, sigma));
visualizeBoundary(X, y, model);

fprintf('Program paused. Press enter to continue.\n');
pause;
可以看到,实现过程可以分为七个部分:
part1:loading and visualizing data ---导入ex6data1.mat数据集,并做出样本分布图
part2:Traning linear SVM -利用已存在的linearKernal.m和svmTrian.m对数据集1训练线性SVM,做出决策线
part3:Impletementing Gaussian Kernel -调用guassian Kernel计算x1,x2之间的相似程度,此处需完善guassianKernel.m
part4:Visualizing Dataset 2 -导入ex6data2.mat,对立面的数据进行可视化,即做出样本分布图
part5:Training SVM with RBF Kernel(Dataset 2) - 利用guassiankernel.m ,svmTrain.m对数据集2计算SVM,做出决策线
part6:Visual Dataset 3 - 导入ex6data3.mat,对数据进行可视化,及做出样本分布图
part7:Training SVM with RBF kernel(dataset 3) -在dataset3Params.m中计算得到最优参数C,sigma,并利用它训练高斯核函数的SVM,做出决策线,此处要完善dataset3Params.m
注意:part1,part2针对的是ex6dataset1.mat,利用的是线性核函数,目的是让我们了解线性核函数的作用和使用过程
part3,part4,part5针对的是ex6dataset2.mat,利用的是高斯核函数,目的是让我们了解高斯核函数的作用和使用过程
part6,part7针对的是ex6dataset3.mat,利用的是高斯核函数,给出8种C的值,8种sigma的值,共64种组合,通过计算错误率找出最优组合
2.完善guassianKernel.m(此处需要编写代码!!!)
function sim = gaussianKernel(x1, x2, sigma)
%RBFKERNEL returns a radial basis function kernel between x1 and x2
%   sim = gaussianKernel(x1, x2) returns a gaussian kernel between x1 and x2
%   and returns the value in sim

% Ensure that x1 and x2 are column vectors
x1 = x1(:); x2 = x2(:);

% You need to return the following variables correctly.
sim = 0;
% ====================== YOUR CODE HERE ======================
% Instructions: Fill in this function to return the similarity between x1
%               and x2 computed using a Gaussian kernel with bandwidth
%               sigma
%
%
x12 = x1 - x2;                                            %计算x1 - x2的向量,放在x12中
temp = -x12' * x12 / (2 * sigma * sigma);                 %计算指数部分,其中x1 - x2的模的平方可以利用向量x12'*x12的方式计算,计算速度快
sim = exp(temp);                                          %计算Guassian Kernel值
% =============================================================
end
这里注意,计算x(i) - x(j)的模的平方时候可以直接用x12'*x12向量计算(x12表示x(i)-x(j)),利用向量的方法可以加快计算速度。
3.完善dataset3Params.m(此处需要完善代码!!!)
function [C, sigma] = dataset3Params(X, y, Xval, yval)
% You need to return the following variables correctly.
% ====================== YOUR CODE HERE ======================
% Instructions: Fill in this function to return the optimal C and sigma
%               learning parameters found using the cross validation set.
%               You can use svmPredict to predict the labels on the cross
%               validation set. For example,
%                   predictions = svmPredict(model, Xval);
%               will return the predictions on the cross validation set.
%
%  Note: You can compute the prediction error using
%        mean(double(predictions ~= yval))
%
C_array = [0.01;0.03;0.1;0.3;1;3;10;30];     %C数组
sigma_array = [0.01;0.03;0.1;0.3;1;3;10;30]; %sigma数组
error_array = zeros(8,8);                    %创造错误率数组,第(i,j)个元素表示C(i),sigma(j)对应的错误率
error_min = 10000;                           %记录当前最小错误率

for i = 1:8,
    for j = 1:8,
        model= svmTrain(X, y, C_array(i), @(x1, x2) gaussianKernel(x1, x2, sigma_array(j)));   %以C(i),sigma(j)为参数训练SVM,(X,y)为训练样本
        predictions = svmPredict(model, Xval);                                     %利用上面训练得到的model对交叉验证样本进行预测
        error_array(i,j) =  mean(double(predictions ~= yval));                     %记录错误率
        if(error_array(i,j) < error_min)                                           %如果当前的错误率更小,则记录他,并记录此时的C和sigma
            error_min = error_array(i,j);
            C = C_array(i);
            sigma = sigma_array(j);
        end
    end
end
fprintf('The training C    The training sigma    error\n');                 %打印出不同C,sigma下对应的误差率,方便我们查找验证算法的正确性
for i = 1:8,
    for j = 1:8,
       fprintf('%f   %f   %f\n',C_array(i),sigma_array(j),error_array(i,j));               %打印C(i),sigma(j)对应的误差率
    end
end
fprintf('%f and %f perform best, the error is %f',C,sigma,error_min);                      %打印找到的最优C,sigma,以及得到的最小错误率
% =========================================================================
end
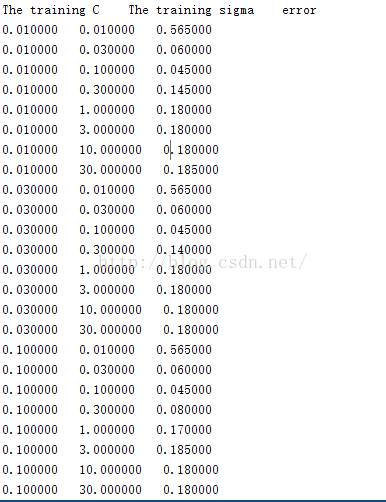
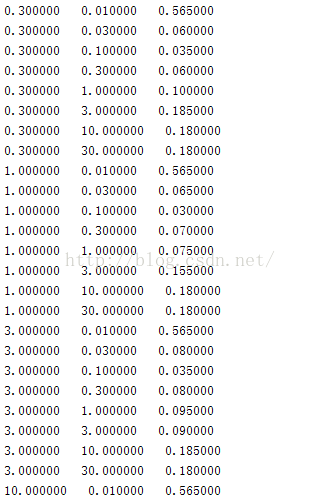
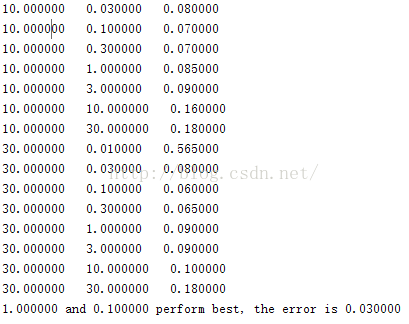
实验要求给出8钟C和sigma的值[0.01,0.03,0.1,0.3,1,3,10,30],C与sigma之间有8*8=64种组合,实验要求对这64种组合分别利用训练样本(X,y)进行训练,得到训练model,然后利用交叉验证样本(Xval,yval)计算训练得到的模型对交叉验证样本的预测错误率,选择64种组合中错误率最小的一种。
实验得到的C,sigma,error的训练结果为:
这样我们就完成了第一大块 Support Vector Machines的实验代码编写,第二大Spam Classification的实验代码我将在接下来的博客中给出。可能我的写的代码不是最好的,如果同学们有什么更好的想法,请留言联系,谢谢!
From:http://blog.csdn.net/a1015553840/article/details/50824397


