Eclipse中创建并运行Servlet项目
最近看了写http协议的学习资料,因此想要实现下andriod平台和服务器通信,那就servlet吧,哎哟,还不错哦!顺便说下,我这个servlet服务是想获得用户名和密码进行校验,然后反给客户端状态码;数据库啥的没来得及做,周末时间还是短了点......
Eclipse的java环境搭建好了
1.下载tomcat,解压版的,这里我用的是以前下载的apache-tomcat-6.0.35,解压到任意盘=>C:\apache-tomcat-6.0.35;
2.下载tomcat插件,解压到Eclipse插件目录=>H:\eclipse\plugins目录,启动Eclipse就可以看见小猫了;
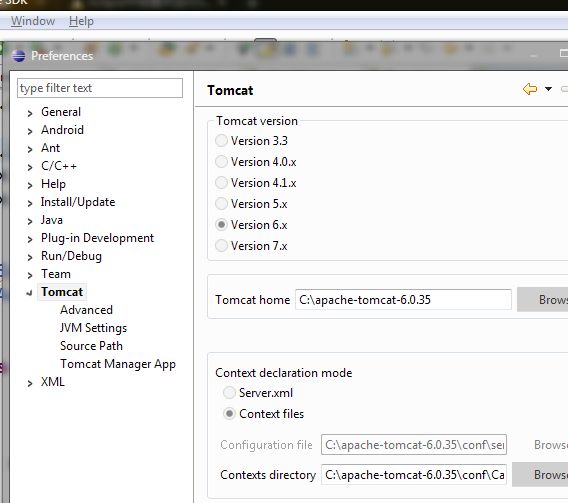
3.Eclipse下的Window->Preferences->Tomcat设置下版本和tomcat主目录,版本别搞错了!省的麻烦...

完成,其实就是这么简单,点击下“启动小猫”就可以启动了,只要没显示什么异常,没显示空指针的log;而是显示了启动时间就ok了;
4.新建一个tomcat工程,我的是TaxiServlet;
5.在 TaxiServlet/WEB-INF/src下新建一个包,我的是com.servlet.login;
6.在包下新建类,我的是LoginAction.java,内容稍后说;
7.在WEB-INF下新建web.xml文件;
8.首先LoginAction.java内容可以如下:
9.web.xml内容:
这里 我客户端的用户名和密码是通过post请求的,因此doPost方法会被调用;doGet方法可以测试下网页,用http://127.0.0.1:port/servlet工程名称/url-pattern虚拟路径 进行测试;
我的工程:
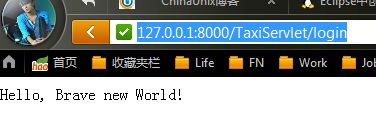
测试以下: http://127.0.0.1:8000/TaxiServlet/login

web.xml的详细配置大家可以网上搜搜,我也是经过测试才了解怎么回事的,很多网络并没有说明到底怎么回事?因此对于我这样的初学者总是很疑惑的,相信只有了解了本质才知道,也才能写出好的code...也进步最快,,,,,,
我的doPost方法将用于andriod应用程序登录时校验,数据库校验慢慢完善...先这样
感谢网友的分享,通过你们我学到了很多东西.... 网友 http://www.linuxidc.com/Linux/2012-06/63935.htm ,其它就不举例了,嘿嘿...
对了还要说下tomcat的配置,不然可能会出现404错误;C:\apache-tomcat-6.0.35\conf\tomcat-users.xml文件一般来说默认用户配置都是注释着的,你需要配置至少一个用户,我的如下:
其它的根据需要来吧....
配置端口号:
C:\apache-tomcat-6.0.35\conf\ server.xml用来配置端口号,如果你电脑安装了n多软件,可能默认的8080端口无法使用,记得进去找到它,改改哈!多练习练习就熟了,,,编程也是写字..
Eclipse的java环境搭建好了
1.下载tomcat,解压版的,这里我用的是以前下载的apache-tomcat-6.0.35,解压到任意盘=>C:\apache-tomcat-6.0.35;
2.下载tomcat插件,解压到Eclipse插件目录=>H:\eclipse\plugins目录,启动Eclipse就可以看见小猫了;
3.Eclipse下的Window->Preferences->Tomcat设置下版本和tomcat主目录,版本别搞错了!省的麻烦...

完成,其实就是这么简单,点击下“启动小猫”就可以启动了,只要没显示什么异常,没显示空指针的log;而是显示了启动时间就ok了;
4.新建一个tomcat工程,我的是TaxiServlet;
5.在 TaxiServlet/WEB-INF/src下新建一个包,我的是com.servlet.login;
6.在包下新建类,我的是LoginAction.java,内容稍后说;
7.在WEB-INF下新建web.xml文件;
8.首先LoginAction.java内容可以如下:
9.web.xml内容:
点击(此处)折叠或打开
- <?xml version="1.0" encoding="utf-8"?>
- <!DOCTYPE web-app PUBLIC "-//Sun Microsystems, Inc.//DTD Web Application 2.3//EN" "http://java.sun.com/dtd/web-app_2_3.dtd">
-
- <web-app>
- <servlet>
- <servlet-name>login</servlet-name> <!-- 名字随便 -->
- <servlet-class>com.servlet.login.LoginAction</servlet-class> <!-- servlet类名-->
- </servlet>
-
- <servlet-mapping>
- <servlet-name>login</servlet-name>
- <url-pattern>/login</url-pattern> <!-- url访问虚拟路径,最后我们就是通过工程名/login进行访问的,像这样http://127.0.0.1:8000/LoginAction/login-->
- </servlet-mapping>
-
- </web-app>
这里 我客户端的用户名和密码是通过post请求的,因此doPost方法会被调用;doGet方法可以测试下网页,用http://127.0.0.1:port/servlet工程名称/url-pattern虚拟路径 进行测试;
我的工程:
点击(此处)折叠或打开
- package com.servlet.login;
-
- import java.io.*;
- import javax.servlet.http.*;
- import javax.servlet.*;
-
- /**
- * 登录模块校验Servlet
- * @author Administrator
- *
- */
- public class LoginAction extends HttpServlet {
- /**
- *
- */
- private static final long serialVersionUID = 1L;
-
- public LoginAction()
- {
- super();
- }
-
- protected void doGet(HttpServletRequest req, HttpServletResponse res)
- throws ServletException, IOException {
- res.setContentType("text/html;charset=utf-8");
- req.setCharacterEncoding("utf-8");
- res.setCharacterEncoding("utf-8");
-
- PrintWriter out = res.getWriter();
- out.println("Hello, Brave new World!");
- out.close();
- }
-
- protected void doPost(HttpServletRequest req, HttpServletResponse res)
- throws ServletException, IOException {
- if (null == req)
- {
- return;
- }
- res.setContentType("text/html;charset=utf-8");
- req.setCharacterEncoding("utf-8");
- res.setCharacterEncoding("utf-8");
-
- PrintWriter out = res.getWriter();
- String username = req.getParameter("user_name");
- String password = req.getParameter("password");
- if (username.equals("admin"))
- {
- if (password.equals("123"))
- {
- out.println("0"); ///< 正确
- }
- else
- {
- out.println("2"); ///< 密码错误
- }
- }
- else
- {
- out.println("1"); ///< 用户名错误
- }
- out.flush();
- out.close();
- }
- }

web.xml的详细配置大家可以网上搜搜,我也是经过测试才了解怎么回事的,很多网络并没有说明到底怎么回事?因此对于我这样的初学者总是很疑惑的,相信只有了解了本质才知道,也才能写出好的code...也进步最快,,,,,,
我的doPost方法将用于andriod应用程序登录时校验,数据库校验慢慢完善...先这样
感谢网友的分享,通过你们我学到了很多东西.... 网友 http://www.linuxidc.com/Linux/2012-06/63935.htm ,其它就不举例了,嘿嘿...
对了还要说下tomcat的配置,不然可能会出现404错误;C:\apache-tomcat-6.0.35\conf\tomcat-users.xml文件一般来说默认用户配置都是注释着的,你需要配置至少一个用户,我的如下:
点击(此处)折叠或打开
- <?xml version='1.0' encoding='utf-8'?>
- <!--
- Licensed to the Apache Software Foundation (ASF) under one or more
- contributor license agreements. See the NOTICE file distributed with
- this work for additional information regarding copyright ownership.
- The ASF licenses this file to You under the Apache License, Version 2.0
- (the "License"); you may not use this file except in compliance with
- the License. You may obtain a copy of the License at
-
- http://www.apache.org/licenses/LICENSE-2.0
-
- Unless required by applicable law or agreed to in writing, software
- distributed under the License is distributed on an "AS IS" BASIS,
- WITHOUT WARRANTIES OR CONDITIONS OF ANY KIND, either express or implied.
- See the License for the specific language governing permissions and
- limitations under the License.
- -->
- <tomcat-users>
- <!--
- NOTE: By default, no user is included in the "manager-gui" role required
- to operate the "/manager/html" web application. If you wish to use this app,
- you must define such a user - the username and password are arbitrary.
- -->
- <!--
- NOTE: The sample user and role entries below are wrapped in a comment
- and thus are ignored when reading this file. Do not forget to remove
- <!.. ..> that surrounds them.
- -->
- <!--
- <role rolename="tomcat"/>
- <role rolename="role1"/>
- <role rolename="manager"/>
- <user username="admin" password="admin" roles="manager"/>
- <user username="tomcat" password="tomcat" roles="tomcat"/>
- <user username="both" password="tomcat" roles="tomcat,role1"/>
- <user username="role1" password="tomcat" roles="role1"/>
- -->
- <role rolename="manager"/>
- <user username="admin" password="admin" roles="manager"/>
- </tomcat-users>
配置端口号:
C:\apache-tomcat-6.0.35\conf\ server.xml用来配置端口号,如果你电脑安装了n多软件,可能默认的8080端口无法使用,记得进去找到它,改改哈!多练习练习就熟了,,,编程也是写字..