Oracle12C EMCC部署安装
在oracle 11g之前,管理集群一般都是用GC,但是到了 12c,为了适应“云”架构,oracle推出了新的集群管理软件EMCC,相比之前的GC而言,功能强大。
EMCC的部署方式跟oracle 11g GC的部署方式很类似,服务端安装OMS服务,客户端安装agent代理服务,OMS收集客户端的统计信息都是通过代理来完成的。
EMCC的部署同样也需要一个资料库来存储信息,资料库可以使用11g库,也可以使用12c库。
资料库部署:
这里选择使用12c(12.1.0.2)版本作为EMCC资料库。
安装oracle12C
系统要求:
磁盘至少6.4G
内存至少2G
配置yum源
安装软件包:
yum -y install binutils compat-libcap1 compat-libstdc++ gcc gcc-c++ glibc glibc-devel ksh libgcc libstdc++ libstdc++-devel libaio libaio-devel libXext libXtst libX11 libXau libxcb libXi make sysstat 设置内核参数:
fs.aio-max-nr = 1048576
fs.file-max = 6815744
kernel.shmall = 2097152
kernel.shmmax = 536870912
kernel.shmmni = 4096
kernel.sem = 250 32000 100 128
net.ipv4.ip_local_port_range = 9000 65500
net.core.rmem_default = 262144
net.core.rmem_max = 4194304
net.core.wmem_default = 262144
net.core.wmem_max = 1048586
Enter the following command to change the current values of the kernel parameters:
/sbin/sysctl -p安装目录级权限:
# mkdir -p /u01/app/
# chown -R oracle:oinstall /u01/app/
# chmod -R 775 /u01/app/
用户及用户组设置:
id oracle
uid=440(oracle) gid=200(oinstall) groups=201(dba),202(oper)
环境变量设置:
TMP=/tmp; export TMP

TMPDIR=$TMP; export TMPDIR

ORACLE_BASE=/u01/app/oracle; export ORACLE_BASE

ORACLE_HOME=$ORACLE_BASE/product/12.1.0/db_1; export ORACLE_HOME

ORACLE_SID=jhdb; export ORACLE_SID

ORACLE_TERM=xterm; export ORACLE_TERM

PATH=/usr/sbin:$PATH; export PATH

PATH=$ORACLE_HOME/bin:$PATH; export PATH

LD_LIBRARY_PATH=$ORACLE_HOME/lib:/lib:/usr/lib; export LD_LIBRARY_PATH

CLASSPATH=$ORACLE_HOME/JRE:$ORACLE_HOME/jlib:$ORACLE_HOME/rdbms/jlib; export CLASSPATH
开始安装:
xhost +
su - oracle
./runInstaller
创建实例:
./dbca
选择高级安装(Advanced Mode)
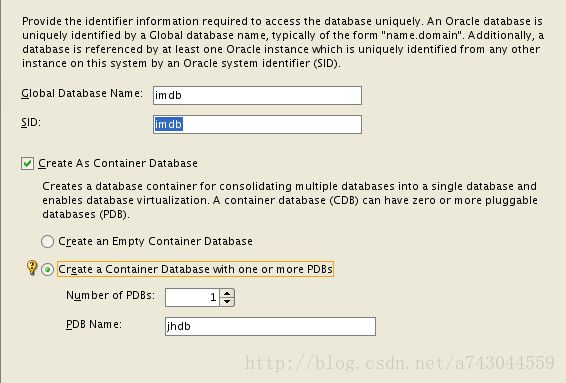
Golbal database name:imdb
SID:imdb
创建pdbs ,当然也可以手工创建,手工创建请参考我另外一个文章:
http://mp.blog.csdn.net/mdeditor/79400588
EMCC部署:
1、系统预设:
系统内核参数调整
在/etc/sysctl.conf中添如下内核参数:
kernel.shmmax = 4294967296删除EM配置:
$ORACLE_HOME/bin/emca -deconfig dbcontrol db -repos drop安装编译依赖软件包
yum -y install glibc-devel-2.17-55.el7.i686.rpm修改数据库配置参数,不然会报错误:
alter system set processes= 500 scope=spfile;

alter system set session_cached_cursors=500 scope=spfile;

alter system set shared_pool_size=650M scope=spfile;

alter system set job_queue_processes=22 scope=spfile;

alter database add logfile size 320M;

alter system set open_cursors=350 scope=spfile;

alter system set sga_target=2g scope=spfile;

ALTER SYSTEM SET pga_aggregate_target=1G SCOPE=SPFILE;

alter system set parallel_max_servers = 20 scope=both;
2、选择高级安装模式
3、选择安装路径
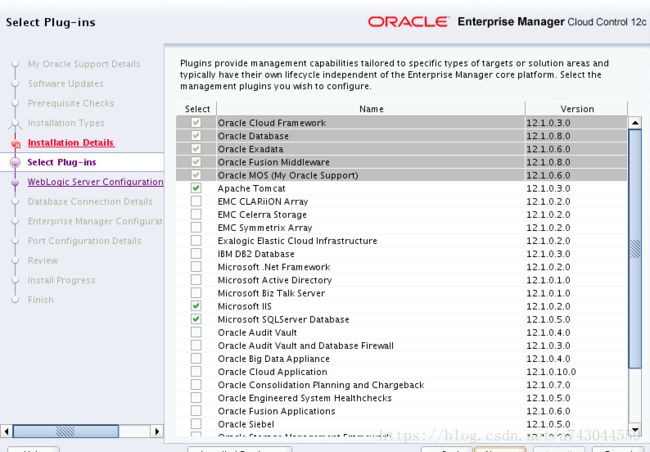
4、选择安装插件
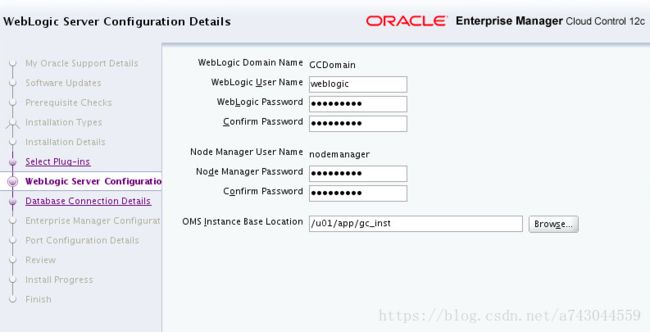
5、web服务配置
6、EMCC资料库配置,如果选择CDB作为资料库,需要使用pdb来作为资料库。
pdb在创建完成默认是关闭状态,需要打开。
alter pluggable database emrep open;EMCC添加目标:
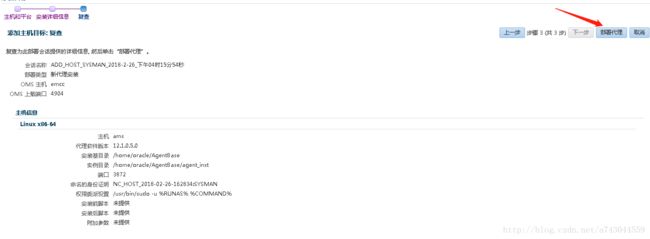
在11g之前的库安装代理,一般都是通过在客户端登陆服务端发布的网址来下载安装包,然后在客户端安装代理。但是在12c的时候,安装代理要方便很多,直接在服务端推送代理到客户端,在推送之前需要设置客户端和服务端之间的互信,需要注意的是需要配置彼此的主机名。
1 .

2 .

client中增加server的/etc/hosts配置,server中增加client的/etc/hosts。
10.37.2.254 jhim
10.37.2.33  emcc
10.37.2.111 ams
2 . 服务端推送代理的时候需要输入客户端登录名,为了安全起见,需要设置sudo,在客户端设置sudo权限:
[root@localhost ~]# ls /usr/local/bin/sudo
ls: cannot access /usr/local/bin/sudo: No such file or directory
[root@localhost ~]# whereis sudo
sudo: /usr/bin/sudo /etc/sudo.conf /usr/share/man/man8/sudo.8.gz
[root@localhost ~]# ln -s /usr/bin/sudo /usr/local/bin/sudo
[root@localhost ~]# cp -p /etc/sudoers /etc/sudoers.bak
修改Defaults:oracle !requiretty
新增oracle ALL=(ALL) ALL
修改Defaults visiblepw
[root@localhost ~]# vi /etc/sudoers
#
# Refuse to run if unable to disable echo on the tty. This setting should also be
# changed in order to be able to use sudo without a tty. See requiretty above.
#
Defaults   visiblepw
#
# Disable "ssh hostname sudo ", because it will show the password in clear.
#         You have to run "ssh -t hostname sudo ".
#
Defaults:oracle    !requirettyll
oracle  ALL=(ALL) ALL
在服务端运行如下脚本,配置互信,为后面推送代理程序做准备:
[oracle@EMCC ~]$ /u01/app/oms/oms/oui/prov/resources/scripts/sshUserSetup.sh -setup -user oracle -hosts jhim输入两次‘yes’,ssh 互信直接空格下一步,最后需要输入客户端oracle密码。
3 . 填写客户端主机信息

5 . 服务端监控推送日志:
[oracle@EMCC ~]$ tail -f /u01/app/gc_inst/em/EMGC_OMS1/sysman/agentpush/2018-02-26_15-28-56-PM/applogs/jhim_deploy.log
2018-02-26_15-42-31:INFO:done executing the action: CollectLog on node: jhim
2018-02-26_15-42-31:INFO:action: CollectLog is SUCCESS
2018-02-26_15-42-31:INFO:updating status SUCCESS for action name CollectLog with key: CollectLog
2018-02-26_15-42-31:INFO:sudo exists value true
2018-02-26_15-42-31:INFO:sudo privilege value true
2018-02-26_15-42-31:INFO:==SUDO EXISTS true SUDO PRIV true
2018-02-26_15-42-31:INFO:====CALLING ACTIONdoCleanup
2018-02-26_15-42-31:INFO:updating status IN_PROGRESS for action name Cleanup with key: Cleanup
2018-02-26_15-42-31:INFO:Removing staging directory /home/oracle/AgentBase/ADATMP_2018-02-26_15-28-56-PM
2018-02-26_15-42-31:INFO:locked account and shellout enabled. So cd /tmp and remove directory
2018-02-26_15-42-31:INFO:Using root utl given by user /usr/bin/sudo -u %RUNAS% %COMMAND%
2018-02-26_15-42-31:INFO:Action description 在主机 jhim 上执行命令 /usr/bin/sudo -K
2018-02-26_15-42-31:INFO:Attempt :1 pty required false  with no inputs
2018-02-26_15-42-32:INFO:/usr/bin/sudo -K execution was successful on host jhim
2018-02-26_15-42-32:INFO:output:
2018-02-26_15-42-32:INFO:error-stream:
2018-02-26_15-42-32:INFO:exit-code: 0
2018-02-26_15-42-32:INFO:pdp command with shell out /usr/bin/sudo -u oracle  /bin/sh -c 'cd /tmp && /bin/rm -rf /home/oracle/AgentBase/ADATMP_2018-02-26_15-28-56-PM'
2018-02-26_15-42-32:INFO:Action description 在主机 jhim 上执行命令 /usr/bin/sudo -u oracle  /bin/sh -c 'cd /tmp && /bin/rm -rf /home/oracle/AgentBase/ADATMP_2018-02-26_15-28-56-PM'
2018-02-26_15-42-32:INFO:Attempt :1 pty required false  with inputs
2018-02-26_15-42-34:INFO:/usr/bin/sudo -u oracle  /bin/sh -c 'cd /tmp && /bin/rm -rf /home/oracle/AgentBase/ADATMP_2018-02-26_15-28-56-PM' execution was successful on host jhim
2018-02-26_15-42-34:INFO:output:
2018-02-26_15-42-34:INFO:error-stream:
2018-02-26_15-42-34:INFO:exit-code: 0
2018-02-26_15-42-34:INFO:Action description 在主机 jhim 上执行命令 /usr/bin/sudo -K
2018-02-26_15-42-34:INFO:Attempt :1 pty required false  with no inputs
2018-02-26_15-42-35:INFO:/usr/bin/sudo -K execution was successful on host jhim
2018-02-26_15-42-35:INFO:output:
2018-02-26_15-42-35:INFO:error-stream:
2018-02-26_15-42-35:INFO:exit-code: 0
2018-02-26_15-42-35:INFO:done executing the action: Cleanup on node: jhim
2018-02-26_15-42-35:INFO:action: Cleanup is SUCCESS
2018-02-26_15-42-35:INFO:updating status SUCCESS for action name Cleanup with key: Cleanup
2018-02-26_15-42-35:INFO:TIME TAKEN by NewAgentDeployer on host jhim is 0: hrs 3: mins 5 sec
2018-02-26_15-42-35:INFO:PERF:HOSTNAME:jhim:NewAgentDeployer_EXECUTION_TIME:185634
2018-02-26_15-42-35:INFO:HOST:jhim
2018-02-26_15-42-35:INFO:Destroying Logger
2018-02-26_15-42-35:INFO:======================================New Agent Deployer END ====================================
2018-02-26_15-42-35:INFO:Clearing EMSecurityContext EMExecutionContext in BaseDeployerOps
错误1 :
页面推送安装agent报错:
 2018-02-27_07-45-27:INFO:/usr/bin/sudo -u oracle  /bin/sh -c '/u01/app/AgentBase/ADATMP_2018-02-27_07-31-40-AM/agentDeploy.sh -ignorePrereqs ORACLE_HOSTNAME=ams AGENT_BASE_DIR=/u01/app/AgentBase OMS_HOST=emcc EM_UPLOAD_PORT=4904 AGENT_INSTANCE_HOME=/u01/app/AgentBase/agent_inst b_doDiscovery=false b_startAgent=false b_forceInstCheck=true AGENT_PORT=3872' execution failed on host ams
2018-02-27_07-45-27:INFO:Pattern ERROR: found in file /u01/app/gc_inst/em/EMGC_OMS1/sysman/agentpush/2018-02-27_07-31-40-AM/logs/ams/install.log Line ERROR: Agent Configuration Failed
2018-02-27_07-45-27:INFO:Error Message found  Agent Configuration Failed
2018-02-27_07-45-27:INFO: ACTION 在主机 ams 上执行命令 /u01/app/AgentBase/ADATMP_2018-02-27_07-31-40-AM/agentDeploy.sh -ignorePrereqs ORACLE_HOSTNAME=ams AGENT_BASE_DIR=/u01/app/AgentBase OMS_HOST=emcc EM_UPLOAD_PORT=4904 AGENT_INSTANCE_HOME=/u01/app/AgentBase/agent_inst b_doDiscovery=false b_startAgent=false b_forceInstCheck=true AGENT_PORT=3872
2018-02-27_07-45-27:INFO: OUT null
2018-02-27_07-45-27:INFO: ERR  Agent Configuration Failed
2018-02-27_07-45-27:INFO: EXIT CODE1
2018-02-27_07-45-27:INFO:InvocationTargetException Exception
2018-02-27_07-45-27:INFO:Printing Exception :java.lang.reflect.InvocationTargetException
        at sun.reflect.NativeMethodAccessorImpl.invoke0(Native Method)
        at sun.reflect.NativeMethodAccessorImpl.invoke(NativeMethodAccessorImpl.java:39)
        at sun.reflect.DelegatingMethodAccessorImpl.invoke(DelegatingMethodAccessorImpl.java:25)
        at java.lang.reflect.Method.invoke(Method.java:597)
        at oracle.sysman.core.agentpush.ui.deployer.BaseDeployerOps.executeActions(BaseDeployerOps.java:2111)
        at oracle.sysman.core.agentpush.ui.deployer.NewAgentDeployer.deploy(NewAgentDeployer.java:48)
        at oracle.sysman.core.agentpush.ui.deployfwk.DeploymentWorker.run(DeploymentWorker.java:26)
        at oracle.sysman.util.threadPoolManager.WorkerThread.run(Worker.java:311)
Caused by: CommandException: err:  Agent Configuration Failed  out: null exitcode: 1
 stacktrace:
null
        at oracle.sysman.core.agentpush.ui.deployer.DeployerOps.executeCommandOnNodeInteractive(DeployerOps.java:1227)
        at oracle.sysman.core.agentpush.ui.deployer.DeployerOps.executeCommandOnNodeInteractiveUsingRunAs(DeployerOps.java:1047)
        at oracle.sysman.core.agentpush.ui.deployer.DeployerOps.executeCommandOnNodeInteractiveUsingRunAs(DeployerOps.java:945)
        at oracle.sysman.core.agentpush.ui.deployer.DeployerOps.executeCmdOnNode(DeployerOps.java:652)
        at oracle.sysman.core.agentpush.ui.deployer.DeployerOps.executeCmdOnNode(DeployerOps.java:609)
        at oracle.sysman.core.agentpush.ui.deployer.BaseDeployerOps.doInstall(BaseDeployerOps.java:656)
        ... 8 more

2018-02-27_07-45-27:INFO:=========Command Exception :错误消息: Agent Configuration Failed

 退出代码 :1
2018-02-27_07-45-27:INFO:Updating Action Installwith Status FAILED and error Message :错误消息: Agent Configuration Failed

 退出代码 :1 and problem 在主机 ams 上执行命令 /u01/app/AgentBase/ADATMP_2018-02-27_07-31-40-AM/agentDeploy.sh -ignorePrereqs ORACLE_HOSTNAME=ams AGENT_BASE_DIR=/u01/app/AgentBase OMS_HOST=emcc EM_UPLOAD_PORT=4904 AGENT_INSTANCE_HOME=/u01/app/AgentBase/agent_inst b_doDiscovery=false b_startAgent=false b_forceInstCheck=true AGENT_PORT=3872 失败 and recommendation 修复错误的原因并重试此操作
2018-02-27_07-45-27:INFO:=================action status is not empty FAILED
EMCC 通过页面推送代理有bug,建议使用手动安装方式来避免。
问题2:
oms 资料库部署在linux 6.6上,想监控windows 主机,发现代理不兼容。
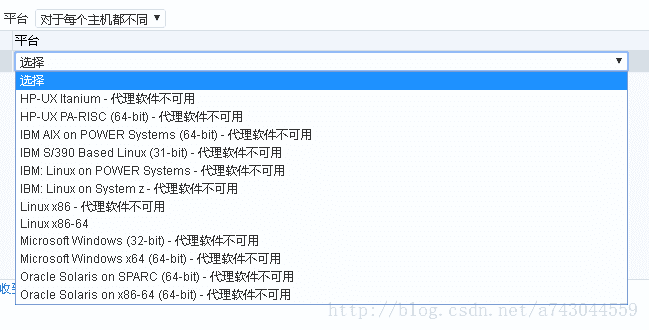
看到这里,需要升级代理程序,由于没有mos账号,所以不能联机升级,只能脱机升级,
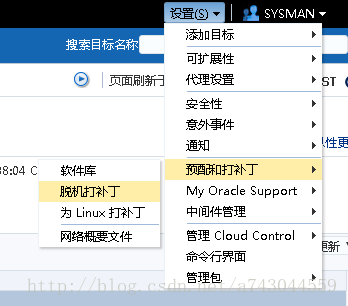
脱机打补丁需要首先下载em资料库,先升级em然后通过em去连接升级oms补丁。

按照提示升级。
把下载的补丁包上传到OMS服务器,登录到OMS服务器执行 :
oracle@EMCC bin]$ ./emcli login -username=sysman
Enter password

Login successful
[oracle@EMCC bin]$ ./emcli import_update_catalog -file=/home/p9348486_112000_Generic.zip -omslocal
