Spring系列(二)ICO、DI、AOP的概念与理解
spring是为了解决企业应用开发的复杂性而创建的,是一个轻量级的控制反转**(IOC)[指的是将对象的创建权反转给Spring,作用是实现了程序的解耦合]和面向切面(AOP)**的容器框架。
并不局限于三层架构中的某一层,具体的是对象的容器,帮我们“管理”项目中所有的对象。
一、IOC控制反转
1.1、IOC概念
Java程序中的每个业务逻辑至少需要两个或以上的对象来协作完成,通常,每个对象在使用他的合作对象时,自己均要使用像new object() 这样的语法来完成合作对象的申请工作,当对象越来越多的时候你会发现:对象间的耦合度高了。而IOC的思想是:Spring容器来实现这些相互依赖对象的创建、协调工作。对象只需要关系业务逻辑本身就可以了。从这方面来说,对象如何得到他的协作对象的责任被反转了,由容器控制程序之间的关系,把控件权交给了外部容器。
网上有个比较形象的例子:找女朋友,之前我们常见的情况是,到处去找漂亮、身材好、贤惠的MM,然后再去打听她们的QQ号、电话、爱好等。然后谈恋爱,这里每一个操作都可以理解为一个new object,使用完了之后还要负责销毁对象,删除痕迹,对象始终会和其他的接口和类耦合起来。
IOC的工作原理,类似于通过婚介找女朋友,你希望找像林志玲一样的,然后我们把这个”代号“反馈给婚介所,婚介所提供一个mm,这个mm具有林志玲一样的大长腿、声音嗲。然后我们去和他恋爱、结婚。甚甚至于这些恋爱、结婚都可以找类似于恋爱专家、婚庆之类。如果我们选的人不符合要求,我们就抛出异常。
Spring所倡导的开发方式就是如此,所有的类都会在Spring容器中登记,告诉Spring你是个什么东西,你需要什么东西。然后Spring会在系统运行到适当的时候,把东西主动给你。所有的类的创建、销毁都有spring来控制,也就是说控制对象生存周期的不再是引用他的对象,而是spring。
1.2、Spring提供的两种不同类型的容器
Spring 容器使用依赖注入(DI)来管理组成一个应用程序的组件。这些对象被称为 Spring Beans。
通过阅读配置元数据提供的指令,容器知道对哪些对象进行实例化,配置和组装。配置元数据可以通过 XML,Java 注释或 Java 代码来表示。
- Spring BeanFactory 容器
这是一个最简单的容器,它主要的功能是为依赖注入 (DI) 提供支持,这个容器接口在 org.springframework.beans.factory.BeanFactor 中被定义。 BeanFactory 和相关的接口,比如BeanFactoryAware仍旧保留在 Spring 中,主要目的是向后兼容已经存在的和那些 Spring 整合在一起的第三方框架。
最常使用的XmlBeanFactory
//HelloWorld定义
public class HelloWorld {
   private String message;
   public void setMessage(String message){
    this.message  = message;
   }
   public void getMessage(){
    System.out.println("Your Message : " + message);
   }
}
//Main方法
import org.springframework.beans.factory.InitializingBean;
import org.springframework.beans.factory.xml.XmlBeanFactory;
import org.springframework.core.io.ClassPathResource;
public class MainApp {
   public static void main(String[] args) {
      XmlBeanFactory factory = new XmlBeanFactory
                             (new ClassPathResource("Beans.xml"));
      HelloWorld obj = (HelloWorld) factory.getBean("helloWorld");
      obj.getMessage();
   }
}
第一步利用框架提供的 XmlBeanFactory() API 去生成工厂 bean 以及利用 ClassPathResource() API 去加载在路径 CLASSPATH 下可用的 bean 配置文件。XmlBeanFactory() API 负责创建并初始化所有的对象,即在配置文件中提到的 bean。
第二步利用第一步生成的 bean 工厂对象的 getBean() 方法得到所需要的 bean。 这个方法通过配置文件中的 bean ID 来返回一个真正的对象,该对象最后可以用于实际的对象。一旦得到这个对象,就可以利用这个对象来调用任何方法。
Beans.xml 展开源码
<?xml version="1.0" encoding="UTF-8"?>
<beans xmlns="http://www.springframework.org/schema/beans"
    xmlns:xsi="http://www.w3.org/2001/XMLSchema-instance"
    xsi:schemaLocation="http://www.springframework.org/schema/beans
    http://www.springframework.org/schema/beans/spring-beans-3.0.xsd">

   <bean id="helloWorld" class="com.tutorialspoint.HelloWorld">
       <property name="message" value="Hello World!"/>
   </bean>

</beans>
如果你已经完成上面的内容,接下来,让我们运行这个应用程序。你将从控制台看到以下信息:
Your Message : Hello World!
- Spring ApplicationContext 容器
ApplicationContext 包含 BeanFactory 所有的功能,一般情况下,相对于 BeanFactory,ApplicationContext 会更加优秀。当然,BeanFactory 仍可以在轻量级应用中使用,比如移动设备或者基于 applet 的应用程序。
最常被使用的 ApplicationContext 接口实现:
- FileSystemXmlApplicationContext:该容器从 XML 文件中加载已被定义的
bean。在这里,你需要提供给构造器 XML 文件的完整路径。 - ClassPathXmlApplicationContext:该容器从 XML 文件中加载已被定义的 bean。在这里,你不需要提供
XML 文件的完整路径,只需正确配置 CLASSPATH 环境变量即可 - WebXmlApplicationContext:该容器会在一个 web 应用程序的范围内加载在 XML 文件中已被定义的 bean。
二、DI依赖注入
2.1、DI概念
ICO的一个重点是在系统运行中,动态的向某个对象提供它所需要的其他对象,实现这个就是通过DI(依赖注入)来实现的。
接上一个例子,你需要一个林志玲,但是林志玲不仅仅是一个名字,她有大长腿、嗲声音等等,IOC给我们提供林志玲的时候就要把这些属性(以来的其他对象)给带上。
结合到java来说,我们知道一般java提供给属性有两种方式,构造函数里的参数和setter和getter。
一样的DI依赖注入一般也是两种
- 基于构造函数的依赖注入
- 基于设置函数的依赖注入(getter和setter)
2.2、依赖注入的具体使用实例
2.2.1 基于构造函数的依赖注入
public class TextEditor {
   private SpellChecker spellChecker;
   public TextEditor(SpellChecker spellChecker) {
      System.out.println("Inside TextEditor constructor." );
      this.spellChecker = spellChecker;
   }
   public void spellCheck() {
      spellChecker.checkSpelling();
   }
}
public class SpellChecker {
   public SpellChecker(){
      System.out.println("Inside SpellChecker constructor." );
   }
   public void checkSpelling() {
      System.out.println("Inside checkSpelling." );
   }
}
import org.springframework.context.ApplicationContext;
import org.springframework.context.support.ClassPathXmlApplicationContext;
public class MainApp {
   public static void main(String[] args) {
      ApplicationContext context =
             new ClassPathXmlApplicationContext("Beans.xml");
      TextEditor te = (TextEditor) context.getBean("textEditor");
      te.spellCheck();
   }
}
<?xml version="1.0" encoding="UTF-8"?>

<beans xmlns="http://www.springframework.org/schema/beans"
    xmlns:xsi="http://www.w3.org/2001/XMLSchema-instance"
    xsi:schemaLocation="http://www.springframework.org/schema/beans
    http://www.springframework.org/schema/beans/spring-beans-3.0.xsd">

   <!-- Definition for textEditor bean -->
   <bean id="textEditor" class="com.tutorialspoint.TextEditor">
      <constructor-arg ref="spellChecker"/>
   </bean>

   <!-- Definition for spellChecker bean -->
   <bean id="spellChecker" class="com.tutorialspoint.SpellChecker">
   </bean>

</beans>
等价于
SpellChecker spellChecker = new SpellChecker();
TextEditor textEditor = new TextEditor(spellChecker);
textEditor.spellCheck();
2.2.2 基于设置函数的依赖注入
public class TextEditor {
   private SpellChecker spellChecker;
   // a setter method to inject the dependency.
   public void setSpellChecker(SpellChecker spellChecker) {
      System.out.println("Inside setSpellChecker." );
      this.spellChecker = spellChecker;
   }
   // a getter method to return spellChecker
   public SpellChecker getSpellChecker() {
      return spellChecker;
   }
   public void spellCheck() {
      spellChecker.checkSpelling();
   }
}
public class SpellChecker {
   public SpellChecker(){
      System.out.println("Inside SpellChecker constructor." );
   }
   public void checkSpelling() {
      System.out.println("Inside checkSpelling." );
   }
}
import org.springframework.context.ApplicationContext;
import org.springframework.context.support.ClassPathXmlApplicationContext;
public class MainApp {
   public static void main(String[] args) {
      ApplicationContext context =
             new ClassPathXmlApplicationContext("Beans.xml");
      TextEditor te = (TextEditor) context.getBean("textEditor");
      te.spellCheck();
   }
}
<?xml version="1.0" encoding="UTF-8"?>

<beans xmlns="http://www.springframework.org/schema/beans"
    xmlns:xsi="http://www.w3.org/2001/XMLSchema-instance"
    xsi:schemaLocation="http://www.springframework.org/schema/beans
    http://www.springframework.org/schema/beans/spring-beans-3.0.xsd">

   <!-- Definition for textEditor bean -->
   <bean id="textEditor" class="com.tutorialspoint.TextEditor">
      <property name="spellChecker" ref="spellChecker"/>
   </bean>

   <!-- Definition for spellChecker bean -->
   <bean id="spellChecker" class="com.tutorialspoint.SpellChecker">
   </bean>

</beans>
等价于:
SpellChecker spellChecker = new SpellChecker();
TextEditor textEditor = new TextEditor();
textEditor.setSpellChecker(spellChecker);
textEditor.spellCheck();
你应该注意定义在基于构造函数注入和基于设值函数注入中的 Beans.xml 文件的区别。唯一的区别就是在基于构造函数注入中,我们使用的是〈bean〉标签中的〈constructor-arg〉元素,而在基于设值函数的注入中,我们使用的是〈bean〉标签中的〈property〉元素。
三:深入剖析Spring运行机制
以上的从XML中读取bean,依赖注入流程是怎么运行的,我们这里定义一个Bean类,这个类用来存放一个Bean拥有的属性
/* Bean Id */
private String id;
/* Bean Class */
private String type;
/* Bean Property */
private Map<String, Object> properties = new HashMap<String, Object>();
一个Bean包括id,type,和Properties。
Spring 就开始加载我们的配置文件了,将我们配置的信息保存在一个HashMap中,HashMap的key就是Bean 的 Id ,HasMap 的value是这个Bean,只有这样我们才能通过context.getBean(“a”)这个方法获得A这个类。
举个栗子:Spirng可以注入基本类型,而且可以注入像List,Map这样的类型,接下来就让我们以Map为例看看Spring是怎么保存
<bean id="test" class="Test">
	<property name="testMap">
		<map>
			<entry key="a">
				<value>1</value>
			</entry>
			<entry key="b">
				<value>2</value>
			</entry>
		</map>
	</property>
</bean>
Spring如何保存?spring解析使用的是dom4j
if (beanProperty.element("map") != null) {
		Map<String, Object> propertiesMap = new HashMap<String, Object>();
		Element propertiesListMap = (Element) beanProperty
				.elements().get(0);
		Iterator<?> propertiesIterator = propertiesListMap
				.elements().iterator();
		while (propertiesIterator.hasNext()) {
			Element vet = (Element) propertiesIterator.next();
			if (vet.getName().equals("entry")) {
				String key = vet.attributeValue("key");
				Iterator<?> valuesIterator = vet.elements()
						.iterator();
				while (valuesIterator.hasNext()) {
					Element value = (Element) valuesIterator.next();
					if (value.getName().equals("value")) {
						propertiesMap.put(key, value.getText());
					}
					if (value.getName().equals("ref")) {
						propertiesMap.put(key, new String[] { value
								.attributeValue("bean") });
					}
				}
			}
		}
		bean.getProperties().put(name, propertiesMap);
	}
接下来就进入最核心部分了,让我们看看Spring 到底是怎么依赖注入的吧,其实依赖注入的思想也很简单,它是通过反射机制实现的,在实例化一个类时,它通过反射调用类中set方法将事先保存在HashMap中的类属性注入到类中。让我们看看具体它是怎么做的吧。
首先实例化一个类,像这样
public static Object newInstance(String className) {
	Class<?> cls = null;
	Object obj = null;
	try {
		cls = Class.forName(className);
		obj = cls.newInstance();
	} catch (ClassNotFoundException e) {
		throw new RuntimeException(e);
	} catch (InstantiationException e) {
		throw new RuntimeException(e);
	} catch (IllegalAccessException e) {
		throw new RuntimeException(e);
	}
	return obj;
}
利用反射实例化一个类 展开源码
接着它将这个类的依赖注入进去,像这样
public static void setProperty(Object obj, String name, String value) {
	Class<? extends Object> clazz = obj.getClass();
	try {
		String methodName = returnSetMthodName(name);
		Method[] ms = clazz.getMethods();
		for (Method m : ms) {
			if (m.getName().equals(methodName)) {
				if (m.getParameterTypes().length == 1) {
					Class<?> clazzParameterType = m.getParameterTypes()[0];
					setFieldValue(clazzParameterType.getName(), value, m,
							obj);
					break;
				}
			}
		}
	} catch (SecurityException e) {
		throw new RuntimeException(e);
	} catch (IllegalArgumentException e) {
		throw new RuntimeException(e);
	} catch (IllegalAccessException e) {
		throw new RuntimeException(e);
	} catch (InvocationTargetException e) {
		throw new RuntimeException(e);
	}
}
最后它将这个类的实例返回给我们,我们就可以用了。我们还是以Map为例看看它是怎么做的,代码里面是创建一个HashMap并把该HashMap注入到需要注入的地方。
创建Map并注入
if (value instanceof Map) {
	Iterator<?> entryIterator = ((Map<?, ?>) value).entrySet().iterator();
	Map<String, Object> map = new HashMap<String, Object>();
	while (entryIterator.hasNext()) {
		Entry<?, ?> entryMap = (Entry<?, ?>) entryIterator.next();
			if (entryMap.getValue() instanceof String[]) {
				map.put((String) entryMap.getKey(),getBean(((String[]) entryMap.getValue())[0]));
				}
			}
		BeanProcesser.setProperty(obj, property, map);
	}
这样我们就可以用Spring 给我们创建的类了,Spring能做到的远不止这些,这个示例程序仅仅提供了Spring最核心的依赖注入功能中的一部分。
四、面向切面AOP
4.1、AOP概念
4.1.1 引入背景
对于一个企业级应用来说,主要处理的是整个核心业务流程,这是我们主要关注的。但是同时一个应用也需要很多非核心但是必不可少的功能,例如应用的安全性,日志,可以说对于一个应用的多个功能来说都需要这些辅助性的功能。现在我们想要这些辅助功能,同时又不想在每一个业务核心功能中都加入一次这些功能,那么是否有什么好的办法?AOP基本上就是为了解决这个问题而来的。
需要明确的一点是切面编程落实到软件工程其实是为了更好地模块化,而不仅仅是为了减少重复代码。
4.1.2 整体理解
AOP是aspect-oriented programming的简称,即面向切面编程。首先不用管面向切面这个概念,如上所述,在项目中像日志、安全和事务管理这些功能很重要,但是我们希望它们做的是辅助其他应用的功能从而使其他应用专注于自己领域的业务问题 。
通过 AOP 等机制,我们可以把横跨多个不同模块的代码抽离出来,让模块本身变得更加内聚,进而业务开发者可以更加专注于业务逻辑本身。从迭代能力上来看,我们可以通过切面的方式进行修改或者新增功能,这种能力不管是在问题诊断还是产品能力扩展中,都非常有用。
Spring AOP 引入了其他几个关键概念:
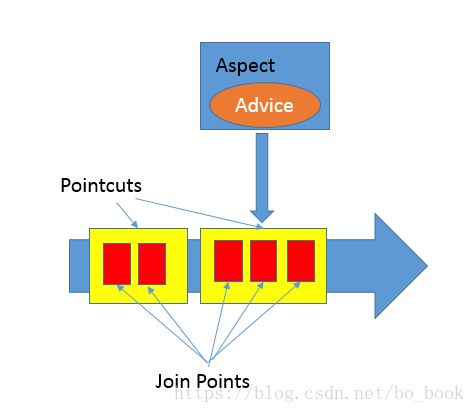
- Aspect,通常叫作切面,它是跨不同 Java 类层面的横切性逻辑。在实现形式上,既可以是 XML
文件中配置的普通类,也可以在类代码中用“@Aspect”注解去声明。在运行时,Spring
框架会创建类似Advisor来指代它,其内部会包括切入的时机(Pointcut)和切入的动作(Advice)。 - Join Point,它是 Aspect 可以切入的特定点,在 Spring 里面只有方法可以作为 Join Point。
- Advice,通知定义了切面是什么以及何时使用它。通知做了两件事情:1、告诉我们切面要完成的工作;2、什么时候执行这个工作。是在某个方法被调用之前?还是之后?还是之前和之后都要通知到?还是在方法抛出异常的时候?
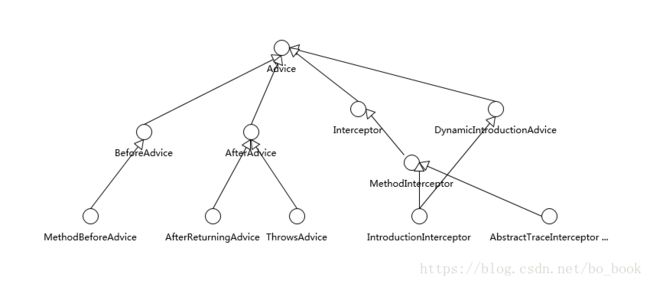
有以下五种通知类型。
Before——在方法被调用之前调用通知通知。
After——在方法完成之后调用通知,无路方法执行是否成功。
After-returning——在方法成功执行之后调用通知。
After-throwing——在方法抛出异常后调用通知。
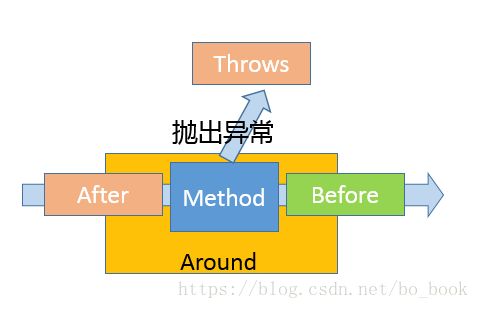
Around——通知调用时间跨越了方法,也就是被通知的方法应当在通知中间的某个时间段内,而在调用这个方法之前和之后的时间通知也都做了一些事情的。

其中,BeforeAdvice 和 AfterAdvice 包括它们的子接口是最简单的实现。而 Interceptor 则是所谓的拦截器,用于拦截住方法(也包括构造器)调用事件,进而采取相应动作,所以 Interceptor 是覆盖住整个方法调用过程的 Advice。通常将拦截器类型的 Advice 叫作 Around,在代码中可以使用“@Around”来标记,或者在配置中使用< aop:around >。
如果从时序上来看,则可以参考下图,理解具体发生的时机。

- Pointcut,它负责具体定义 Aspect 被应用在哪些 Join Point,可以通过指定具体的类名和方法名来实现,或者也可以使用正则表达式来定义条件。
你可以参看下面的示意图,来进一步理解上面这些抽象在逻辑上的意义。

- Join Point 仅仅是可利用的机会。
- Pointcut 是解决了切面编程中的 Where 问题,让程序可以知道哪些机会点可以应用某个切面动作。
- 而 Advice 则是明确了切面编程中的 What,也就是做什么;同时通过指定 Before、After 或者 Around,定义了***When***,也就是什么时候做。
4.1.3 主流的AOP框架
AOP框架在连接点模型上有强弱之分。前面讲连接点的时候说到过切面织入的时机和方式可能是修改方法时,也可能是修改字段时,也可能是在构造器方法时,根据不同的连接点织入方式有三种主流框架。
- AspectJ
- JBoss AOP
- Spring AOP
编译期——切面在目标类编译时被织入。这种方式需要特殊的编译器。AspectJ的织入编译器就是以这种方式织入切面的。
类加载期——切面在目标类加载到JVM时被织入。这种方式需要特殊的类加载器(ClassLoader),AspectJ 5 的 LTW(load-time weaving)就以这种方式织入。
运行期——切面在应用运行的某个时刻被织入。一般情况下,在织入切面时AOP容器会为目标对象动态地创建一个代理对象。Spring AOP 就是以这种方式织入切面的。
###4.1.4 Spring AOP在运行期间通知对象
Spring的切面织入的方式是在运行期才通知目标对象,即在运行期才将切面织入到Spring管理的bean中,此时Spring会利用动态代理原理创建一个代理对象。如下图所示,切面织入后产生的代理类封装了目标类,通知了某个方法要调用它的时候,这个代理会首先拦截到这个调用,然后将调用转发给真正的目标bean。在调用目标bean方法之前,代理会执行切面逻辑。
4.2、实例解析
Spring 支持 @Aspectj注解 的方法和基于配置的方法来实现自定义切面。
4.2.1 基于XML配置的方式实现AOP
1、导入相应的jar包和配置
XML中导入 spring-aop架构,如下所述:
<?xml version="1.0" encoding="UTF-8"?>
<beans xmlns="http://www.springframework.org/schema/beans"
    xmlns:xsi="http://www.w3.org/2001/XMLSchema-instance"
    xmlns:aop="http://www.springframework.org/schema/aop"
    xsi:schemaLocation="http://www.springframework.org/schema/beans
    http://www.springframework.org/schema/beans/spring-beans-3.0.xsd
    http://www.springframework.org/schema/aop
    http://www.springframework.org/schema/aop/spring-aop-3.0.xsd ">
   <!-- bean definition & AOP specific configuration -->
</beans>
你还需要在你的应用程序的 CLASSPATH 中使用以下 AspectJ 库文件。
- aspectjrt.jar
- aspectjweaver.jar
- aspectj.jar
- aopalliance.jar
2、定义通知
public class Logging {
   /**
    * This is the method which I would like to execute
    * before a selected method execution.
    */
   public void beforeAdvice(){
      System.out.println("Going to setup student profile.");
   }
   /**
    * This is the method which I would like to execute
    * after a selected method execution.
    */
   public void afterAdvice(){
      System.out.println("Student profile has been setup.");
   }
   /**
    * This is the method which I would like to execute
    * when any method returns.
    */
   public void afterReturningAdvice(Object retVal){
      System.out.println("Returning:" + retVal.toString() );
   }
   /**
    * This is the method which I would like to execute
    * if there is an exception raised.
    */
   public void AfterThrowingAdvice(IllegalArgumentException ex){
      System.out.println("There has been an exception: " + ex.toString());
   }
}
Logging.java 文件的内容。这实际上是通知的一个示例,它定义了类型的通知,定义了what和when.
3、具体定义的切点
public class Student {
   private Integer age;
   private String name;
   public void setAge(Integer age) {
      this.age = age;
   }
   public Integer getAge() {
      System.out.println("Age : " + age );
      return age;
   }
   public void setName(String name) {
      this.name = name;
   }
   public String getName() {
      System.out.println("Name : " + name );
      return name;
   }
   public void printThrowException(){
       System.out.println("Exception raised");
       throw new IllegalArgumentException();
   }
}
4、beanx.xml
Beans.xml配置
?xml version="1.0" encoding="UTF-8"?>
<beans xmlns="http://www.springframework.org/schema/beans"
    xmlns:xsi="http://www.w3.org/2001/XMLSchema-instance"
    xmlns:aop="http://www.springframework.org/schema/aop"
    xsi:schemaLocation="http://www.springframework.org/schema/beans
    http://www.springframework.org/schema/beans/spring-beans-3.0.xsd
    http://www.springframework.org/schema/aop
    http://www.springframework.org/schema/aop/spring-aop-3.0.xsd ">

   <aop:config>
      <aop:aspect id="log" ref="logging">
         <aop:pointcut id="selectAll"
         expression="execution(* com.tutorialspoint.*.*(..))"/>
         <aop:before pointcut-ref="selectAll" method="beforeAdvice"/>
         <aop:after pointcut-ref="selectAll" method="afterAdvice"/>
         <aop:after-returning pointcut-ref="selectAll"
                              returning="retVal"
                              method="afterReturningAdvice"/>
         <aop:after-throwing pointcut-ref="selectAll"
                             throwing="ex"
                             method="AfterThrowingAdvice"/>
      </aop:aspect>
   </aop:config>

   <!-- Definition for student bean -->
   <bean id="student" class="com.tutorialspoint.Student">
      <property name="name"  value="Zara" />
      <property name="age"  value="11"/>
   </bean>

   <!-- Definition for logging aspect -->
   <bean id="logging" class="com.tutorialspoint.Logging"/>

</beans>
其中expression="execution(* com.tutorialspoint..(…))"定义了切入点,可以通过替换使用真实类和方法名称的切入点定义中的星号()来定义你的切入点来缩小你的执行范围。
expression="execution( com.tutorialspoint.Student.getName(…))
5、具体实现运行
MainApp.java
package com.tutorialspoint;
import org.springframework.context.ApplicationContext;
import org.springframework.context.support.ClassPathXmlApplicationContext;
public class MainApp {
   public static void main(String[] args) {
      ApplicationContext context =
             new ClassPathXmlApplicationContext("Beans.xml");
      Student student = (Student) context.getBean("student");
      student.getName();
      student.getAge();
      student.printThrowException();
   }
}
6、运行结果
运行结果 折叠源码
Going to setup student profile.
Name : Zara
Student profile has been setup.
Returning:Zara
Going to setup student profile.
Age : 11
Student profile has been setup.
Returning:11
Going to setup student profile.
Exception raised
Student profile has been setup.
There has been an exception: java.lang.IllegalArgumentException
.....
other exception content
4.2.2 基于注解的方式实现AOP
和4.2.1思路一致,具体实现方式不一样
1、Logging.java 定义
import org.aspectj.lang.annotation.Aspect;
import org.aspectj.lang.annotation.Pointcut;
import org.aspectj.lang.annotation.Before;
import org.aspectj.lang.annotation.After;
import org.aspectj.lang.annotation.AfterThrowing;
import org.aspectj.lang.annotation.AfterReturning;
import org.aspectj.lang.annotation.Around;
@Aspect
public class Logging {
   /** Following is the definition for a pointcut to select
    *  all the methods available. So advice will be called
    *  for all the methods.
    */
   @Pointcut("execution(* com.tutorialspoint.*.*(..))")
   private void selectAll(){}
   /**
    * This is the method which I would like to execute
    * before a selected method execution.
    */
   @Before("selectAll()")
   public void beforeAdvice(){
      System.out.println("Going to setup student profile.");
   }
   /**
    * This is the method which I would like to execute
    * after a selected method execution.
    */
   @After("selectAll()")
   public void afterAdvice(){
      System.out.println("Student profile has been setup.");
   }
   /**
    * This is the method which I would like to execute
    * when any method returns.
    */
   @AfterReturning(pointcut = "selectAll()", returning="retVal")
   public void afterReturningAdvice(Object retVal){
      System.out.println("Returning:" + retVal.toString() );
   }
   /**
    * This is the method which I would like to execute
    * if there is an exception raised by any method.
    */
   @AfterThrowing(pointcut = "selectAll()", throwing = "ex")
   public void AfterThrowingAdvice(IllegalArgumentException ex){
      System.out.println("There has been an exception: " + ex.toString());
   }
}
2、Beans.xml 定义
<?xml version="1.0" encoding="UTF-8"?>
<beans xmlns="http://www.springframework.org/schema/beans"
    xmlns:xsi="http://www.w3.org/2001/XMLSchema-instance"
    xmlns:aop="http://www.springframework.org/schema/aop"
    xsi:schemaLocation="http://www.springframework.org/schema/beans
    http://www.springframework.org/schema/beans/spring-beans-3.0.xsd
    http://www.springframework.org/schema/aop
    http://www.springframework.org/schema/aop/spring-aop-3.0.xsd ">

    <aop:aspectj-autoproxy/>

   <!-- Definition for student bean -->
   <bean id="student" class="com.tutorialspoint.Student">
      <property name="name"  value="Zara" />
      <property name="age"  value="11"/>
   </bean>

   <!-- Definition for logging aspect -->
   <bean id="logging" class="com.tutorialspoint.Logging"/>

</beans>
4.3、实现原理和使用场景
4.3.1 实现原理
基本流程:底层是基于 JDK 动态代理或者 cglib 字节码操纵等技术,运行时动态生成被调用类型的子类等,并实例化代理对象,实际的方法调用会被代理给相应的代理对象。这部分会有一篇专门讲这个。
4.3.2 使用场景
Authentication 权限
Caching 缓存
Context passing 内容传递
Error handling 错误处理
Lazy loading 懒加载
Debugging 调试
logging, tracing, profiling and monitoring 记录跟踪 优化 校准
Performance optimization 性能优化
Persistence 持久化
Resource pooling 资源池
Synchronization 同步
Transactions 事务