使用requests模拟登录知乎
# -*- coding:UTF-8 -*-
参考 https://github.com/weldon2010/Python/blob/master/login_zhihu.py
import requests, time
import hmac, json 需要的模块从js中可以看到
from hashlib import sha1 这个也是
hm.update(str.encode(clientId))
hm.update(str.encode(source))
hm.update(str.encode(timestamp))
print(str(hm.hexdigest()))
return str(hm.hexdigest())

源码如下:
参考 https://github.com/weldon2010/Python/blob/master/login_zhihu.py
import requests, time
import hmac, json 需要的模块从js中可以看到
from hashlib import sha1 这个也是
"""
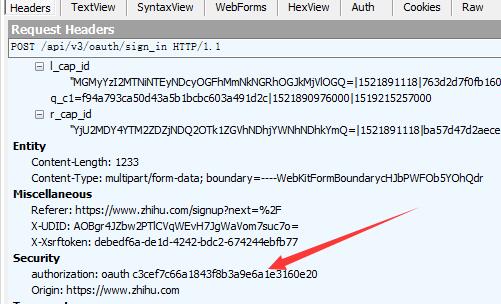
打开 抓包工具 使用错误的密码登录查看实际的post地址,和post需要的数据
"""
在开发者工具中 ctrls+shift+f 搜索 上图对应的client_id 可以得到
authorization:"oauth c3cef7c66a1843f8b3a9e6a1e3160e20" 还有其他的可以看到这个值是固定的
时间戳 应该都知道该怎么做
如果不是频繁登录可以不用管验证码的值,但是post时要带上这个值
这两个可以都不用,这里只是列出如何获取
def get_signature(grantType, clientId, source, timestamp):
''' 处理signature'''hm = hmac.new(b'd1b964811afb40118a12068ff74a12f4', None, sha1)
# 这个数字在js中查找 40 位,猜位sha1,js里面也显示的位sha1
hm.update(str.encode(grantType)) # 括号中是转为字节 这几个的顺序hm.update(str.encode(clientId))
hm.update(str.encode(source))
hm.update(str.encode(timestamp))
print(str(hm.hexdigest()))
return str(hm.hexdigest())

源码如下:
# -*- coding:UTF-8 -*-

import requests, time
import hmac, json  #这几个需要导入的可以从js中获取,加密需要的
from bs4 import BeautifulSoup
from hashlib import sha1

def handle_signature(grantType, clientId, source, timestamp):
    ''' 处理签名 '''

    hm = hmac.new(b'd1b964811afb40118a12068ff74a12f4', None, sha1) # 这个数字在js中查找
    hm.update(str.encode(grantType)) # 括号中是转为字节  这几个的顺序  js中指定的顺序,不可以更改
    hm.update(str.encode(clientId))
    hm.update(str.encode(source))
    hm.update(str.encode(timestamp))
    print(str(hm.hexdigest()))
    return str(hm.hexdigest())


def login(username, password, s,header):
    ''' 处理login '''
    grantType = 'password'
    clientId = 'c3cef7c66a1843f8b3a9e6a1e3160e20'
    source = 'com.zhihu.web'
    timestamp = str(int(time.time()*1000))

    data = {
        "client_id": clientId,
        "grant_type": grantType,
        "timestamp": timestamp,
        "source": source,
        "signature": handle_signature(grantType, clientId, source, timestamp),  # 获取签名
        "username": username,
        "password": password,
        "lang": "cn",
        "captcha": "",  # 获取图片验证码
        "ref_source": "homepage",
        "utm_source": ""
    }

    print("=========: " + str(data))
    print("-" * 50)
    resp2 = s.get('https://www.zhihu.com/api/v3/oauth/captcha?lang=en', headers=header)  # 拿cookie
    print(resp2.text)
    resp = s.post('https://www.zhihu.com/api/v3/oauth/sign_in', data, headers=headers).text
    print(resp)
    print("-" * 50)
    return resp


if __name__ == "__main__":
    session = requests.Session()
    headers = {'User-Agent': 'Mozilla/5.0 (Windows NT 10.0; WOW64) AppleWebKit/537.36 (KHTML, like Gecko) Chrome/65.0.3325.181 Safari/537.36',
               'authorization': 'oauth c3cef7c66a1843f8b3a9e6a1e3160e20',
               "X-UDID": "AOCg84o2cw2PTtM0fuSB6i0YkxbJybCDVLs=",
               # "Referer":"https://www.zhihu.com/signup?next=%2F"
               # 通过看headers中的数据,可以把感觉有用的都加上
               }

    login('1833910716', '89068920.com', session, headers)  # 用户名密码换自己的就好了
    resp = session.get('https://www.zhihu.com/inbox', headers=headers)  # 登录进去了
    print(resp.text)

