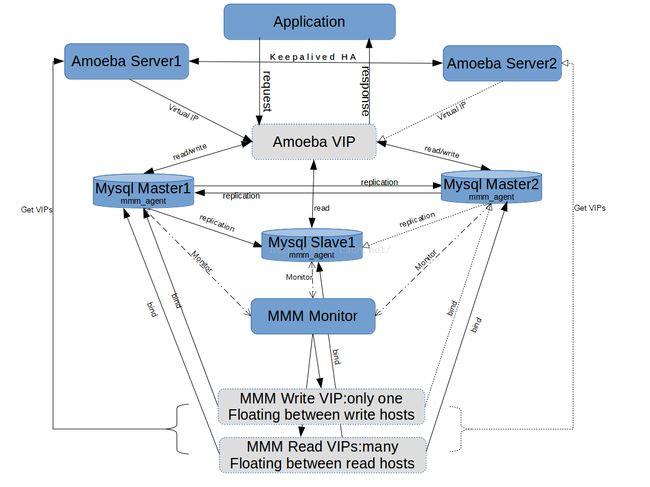
amoeba+mmm搭建mysql高可用负载均衡集群
架构优点:(1)99%高可用;
(2)读写分离,负载均衡;
(3)自动故障切换(4)自动切换主从
架构缺点:(1)需要在每一个mysql节点安装mmm-agent,新加入节点之后要修改每一台的mmm_common.conf配置文件
(2)amoeba目前无人维护,这是最大的安全隐患。
1.架构图

2.所需软件
名称 版本 下载地址
mysql server mysql Ver 14.14 Distrib 5.6.27, for Linux (x86_64) yum源安装,yum源地址:http://dev.mysql.com/get/mysql57-community-release-el6-7.noarch.rpm
mysql-mmm 2.2.1 yum源安装
amoeba amoeba-mysql-3.0.5-RC https://sourceforge.net/projects/amoeba/files/
3.机器配置与ip地址
机器名 ip地址 配置 用途
amoeba1 192.168.2.155/192.168.10.30 4G,4C amoeba+mmm_monitor+keepalived (主)
amoeba2 192.168.2.156/192.168.10.31 4G,4C amoeba+mmm_monitor+keepalived (备)
db1 192.168.10.155(与常用2段隔离,排除网络干扰) 8G,4C mysql master1+mmm_agent
db2 192.168.10.156 8G,4C mysql master2+mmm_agent
db3 192.168.10.157 8G,4C mysql slave1+mmm_agent
4.虚拟地址规划
虚拟ip地址 IP角色 功能描述
192.168.10.88 可写IP 可以连接此ip进行读写,此地址应该被配置成可在mysql master hosts之间飘移,但是不会飘移到slave上
192.168.10.12 只读IP 可以连接此ip进行读,此地址可以被配置成可在所有的mysql server中漂移
192.168.10.13 只读IP 可以连接此ip进行读,此地址可以被配置成可在所有的mysql server中漂移
192.168.10.14 只读IP 可以连接此ip进行读,此地址可以被配置成可在所有的mysql server中漂移
5.安装,配置mysql server
(1)获取官方yum源: wget http://dev.mysql.com/get/mysql57-community-release-el6-7.noarch.rpm
(2)安装源:yum install mysql57-community-release-el6-7.noarch.rpm
(3)默认yum安装的是5.7,我们修改yum源,下载5.6的mysql server
(4)进入yum源配置文件:cd /etc/yum.repos.d/
(5)找到并编辑:vim mysql-community.repo
找到下面这些内容:enabled=1就是可用,把[mysql56-community]段的enabled=0改为enabled=1,相应的把[mysql57-community]段的改为0,保存退出
# Enable to use MySQL 5.6
[mysql56-community]
name=MySQL 5.6 Community Server
baseurl=http://repo.mysql.com/yum/mysql-5.6-community/el/6/$basearch/
enabled=0
gpgcheck=1
gpgkey=file:///etc/pki/rpm-gpg/RPM-GPG-KEY-mysql
[mysql57-community]
name=MySQL 5.7 Community Server
baseurl=http://repo.mysql.com/yum/mysql-5.7-community/el/6/$basearch/
enabled=1
gpgcheck=1
gpgkey=file:///etc/pki/rpm-gpg/RPM-GPG-KEY-mysql
(6)查找安装包(会更新源,时间几分钟,看你的网速咯):yum list |grep mysql
(7)如果顺利就会看到这一行:mysql-community-server.x86_64 5.6.27-2.el6
(8)没错就是它,安装:yum install -y mysql-community-server.x86_6
(9)启动(这一步会自动初始化一些内容):service mysqld start
(10)修改root密码:mysqladmin -uroot --password ‘xxxxx’
(11)修改配置文件,我测试时候的配置文件(除了server-id=1这个参数在db2上为2,在db3上为3,其他参数都一样):
[mysqld]
datadir=/var/lib/mysql
socket=/var/lib/mysql/mysql.sock
#validate-password=OFF
back_log=1024
max_connections = 10000
max_connect_errors = 1000
read_buffer_size = 4M
query_cache_size = 64M
key_buffer_size=400M
max_allowed_packet=128M
innodb_flush_log_at_trx_commit=0
innodb_log_file_size = 200M
innodb_log_files_in_group = 3
innodb_buffer_pool_size = 2048M
innodb_log_buffer_size = 16M
query_cache_size = 0
#init_connect='SET autocommit=0'
innodb_lock_wait_timeout = 50
# Disabling symbolic-links is recommended to prevent assorted security risks
symbolic-links=0
# Recommended in standard MySQL setup
sql_mode=NO_ENGINE_SUBSTITUTION,STRICT_TRANS_TABLES
#replication setting
server-id=1
log-bin=mysql-bin
relay-log=mysql-relay-bin
binlog-ignore-db=mysql
binlog-ignore-db=performance_schema
binlog-ignore-db=information_schema
#for mmm setting mmm会在可写的机器上执行read_only=0,所以我们先把所有的机器都设置为只读,只读不包括root,replication用户
read_only=1
#log
#general_log=1
#general_log_file=/var/log/mysql_row.log
[mysqld_safe]
log-error=/var/log/mysqld.log
pid-file=/var/run/mysqld/mysqld.pid
6.从最上面的架构图中可以看出,这里只有一个主主(db1,db2),一个主从(db1,db3),下面分别配置主主,主从
7.mysql主主复制配置
(1)分别编辑db1,db2配置文件:配置非常简单,只增加三行(db2的唯一不同:server-id=2)
server-id=1
log-bin=mysql-bin
relay-log=mysql-relay-bin
binlog-ignore-db=mysql
binlog-ignore-db=performance_schema
binlog-ignore-db=information_schema
(2)手动同步数据
(3)mysql>FLUSH TABLES WITH READ LOCK
(4)不要退出终端,另外开一个,用mysqldump工具导出所有数据库数据,到db2数据库中
(5)在db1(192.168.10.155)的mysql上授权:grant replication slave on *.* to 'repl_user'@'192.168.10.156' identified by 'repl_password';
(6)查看db1的master状态,设置从(db2机器的mysql)的时候需要
mysql> show master status;
+------------------+----------+--------------+------------------+-------------------+
| File | Position | Binlog_Do_DB | Binlog_Ignore_DB | Executed_Gtid_Set |
+------------------+----------+--------------+------------------+-------------------+
| mysql-bin.000001 | 336 | | | |
+------------------+----------+--------------+------------------+-------------------+
(7)在db2中设置master参数,(master_log_file,master_log_pos,都来自上一步)
mysql> change master to master_host='192.168.10.156', master_user='repl_user',master_password='repl_passwd',master_log_file='mysql-bin.000001',master_log_pos=336;
(8)启动db2从的复制
mysql>slave start;
(9)查看从的状态
mysql>show slave status\G;
Slave_IO_Running: Yes
Slave_SQL_Running: Yes
Seconds_Behind_Master: 0
看到这几行说明复制成功。
(10)把db1设置为db2的从
方法同上,重复(5)-(9),只是把db1和db2,相应的IP地址互换即可,注意重复第(7)的时候master_log_file,master_log_pos是db2的master status了。
8.把db3(192.168.10.157)设置为db1的从
方法通与7步类似,重复其中的(1)-(7)步,只是把db2和192.168.10.156换成db3和192.168.10.157。
9.至此,mysql的设置全部完成。
10.设置MMM,实现高可用,读写分离,负载均衡
可以看到我们的先前数据库架构不是高可用的:如果db1宕机,只能手工切换主备,还要把db3的master切换为db2。所以我们用MMM来实现自动切换主备,主从。
在amoeba1(192.168.10.30)上安装MMM
yum install -y mysql-mmm.noarch mysql-mmm-agent.noarch mysql-mmm-monitor.noarch mysql-mmm-tools.noarch
分别在db1,db2,db3(每个mysql节点)上安装mysql-mmm-agent.noarch
yum install -y mysql-mmm-agent.noarch
在所有mysql节点进行监控和代理用户授权
mysql> grant all privileges on *.* to mmm_agent@'192.168.10.%' identified by 'agent_password';
mysql> grant all privileges on *.* to mmm_monitor@'192.168.10.%' identified by 'monitor_password';
在amoeba1上配置/etc/mysql-mmm/mmm_common.conf
active_master_role writer
cluster_interface eth0
pid_path /var/run/mysql-mmm/mmm_agentd.pid
bin_path /usr/libexec/mysql-mmm/
replication_user repl_user
replication_password repl_passwd
agent_user mmm_agent
agent_password agent_password
ip 192.168.10.155
mode master
peer db2
ip 192.168.10.156
mode master
peer db1
ip 192.168.10.157
mode slave
hosts db1, db2
ips 192.168.10.88
mode exclusive
hosts db1, db2, db3
ips 192.168.10.12, 192.168.10.13, 192.168.10.14
mode balanced
在amoeba1上配置/etc/mysql-mmm/mmm_mon.conf
include mmm_common.conf
ip 127.0.0.1
pid_path /var/run/mysql-mmm/mmm_mond.pid
bin_path /usr/libexec/mysql-mmm
status_path /var/lib/mysql-mmm/mmm_mond.status
ping_ips 192.168.10.155, 192.168.10.156, 192.168.10.157
auto_set_online 1
#flap_duration 3600
#flap_count 3
# The kill_host_bin does not exist by default, though the monitor will
# throw a warning about it missing. See the section 5.10 "Kill Host
# Functionality" in the PDF documentation.
#
# kill_host_bin /usr/libexec/mysql-mmm/monitor/kill_host
#
monitor_user mmm_monitor
monitor_password monitor_password
debug 0
复制/etc/mysql-mmm/mmm_common.conf到所有mysql节点
scp /etc/mysql-mmm/mmm_common.conf root@db1:/etc/mysql-mmm
scp /etc/mysql-mmm/mmm_common.conf root@db2:/etc/mysql-mmm
scp /etc/mysql-mmm/mmm_common.conf root@db3:/etc/mysql-mmm
在所有mysql节点上启动agent
/etc/init.d/mysql-mmm-agent start
在amoeba1上起动monitor
/etc/init.d/mysql-mmm-monitor start
在amoeba1上查看状态:mmm_control show
db1(192.168.10.155) master/ONLINE. Roles: reader(192.168.10.12), writer(192.168.10.88)
db2(192.168.10.156) master/ONLINE. Roles: reader(192.168.10.13)
db3(192.168.10.157) slave/ONLINE. Roles: reader(192.168.10.14)
可以看到虚拟地址192.168.10.12,192.168.10.13,192.168.10.14,192.168.10.88已经绑定到相应机器的相应网络设备上(ip addr命令可以看到虚拟ip),并且192.168.10.12,192.168.10.13,192.168.10.14可以在db1,db2,db3机器之间飘移,但是192.168.10.88只能在db1,db2之间飘移。如果db1,db3宕机,那么,VIP应该是这样分配的:
db1(192.168.10.155) master/ADMIN_OFFLINE. Roles:
db2(192.168.10.156) master/ONLINE. Roles: reader(192.168.10.12), reader(192.168.10.13), reader(192.168.10.14), writer(192.168.10.88)
db3(192.168.10.157) slave/ADMIN_OFFLINE. Roles:
如果db3启动,它的主从复制的master会自动切换到db2上去。
11.安装配置amoeba
这里只是里用MMM虚拟了读写分离的VIP地址,如果要真正实现读写分离,而不用该应用程序代码,要里用amoeba
授权root用户从amoeba1,amoeba2上访问mysql
分别在每个mysql节点上执行:mysql> grant all privileges on *.* to root@'%' identified by '123456';
下载安装
在https://sourceforge.net/projects/amoeba/files/下载编译好的二进制包,解压即可使用
编辑conf/amoeba.xml 和dbServers.xml
vim conf/amoeba.xml
vim conf/dbServers.xml
读VIP只有多个
写VIP只有一个
读负载均衡方式
12.在amoeba1机器上安装配置keepalived,在amoeba1机器上安装配置keepalived,amoeba
keepalived安装配置,网上教程很多,这里不再描述,keepalived只是实现ameoba的高可用。
13.在任意192.168.2或者192.168.10段机器上都可以访问mysql
mysql -uroot -p123456 -hamoeba1 -P3306
14.打开mysql的general_log,观察,执行三个读的操作是在db1,db2,db3上轮流执行,而写只在db1(VIP:192.168.10.88)上
打开general_log的方式(mysql 5.6)在/etc/my.cnf中添加:
general_log=1
general_log_file=/var/log/mysql_row.log