21.4在centos6上搭建一个PXE执行环境
介绍:基于网络自动化安装操作系统centos6.9的配置实验
红帽官方安装指导文档链接
此实验只借用了前面的21.1半自动化安装centos6,centos7中的实验1制作的ks6.cfg文件;另本实验和前面的实验环境没有任何关联,所有服务从新配置
虚拟机新建一个仅主机模式的网卡如图1
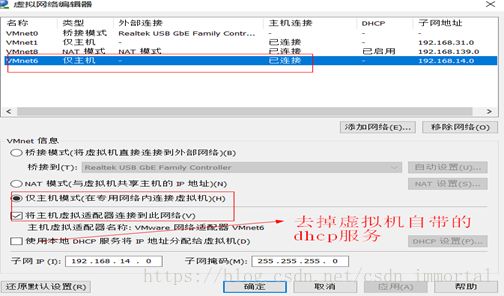
图1
centos6的网络适配器如图2,只有一个仅主机模式网卡且在VMnet6中
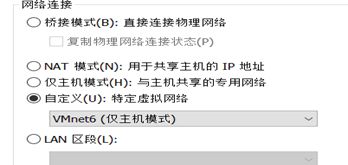
图2
如图3,图4,是windows10中VMnet6的信息,打开ipv4属性后ip为192.168.14.1
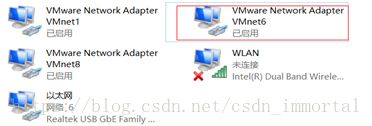
图3
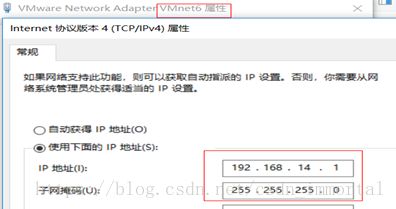
图4
在centos6中的网卡eth1中将其配置文件/etc/sysconfig/network-scripts/ifcfg-Auto_eth1更改如下
[root@centos6 network-scripts ]#cat ifcfg-Auto_eth1
HWADDR=00:0C:29:37:0C:A3
TYPE=Ethernet
BOOTPROTO=none
IPADDR=192.168.14.6
PREFIX=24
DEFROUTE=yes
IPV4_FAILURE_FATAL=yes
IPV6INIT=no
NAME="Auto eth1"
UUID=ccbb119a-5796-489f-bf60-229b061b84d8
ONBOOT=yes
LAST_CONNECT=1531492685
则在windows10中的xshell:ssh 192.168.14.6可以连接上centos6了。继续做实验
1、统一安装需要的服务
[root@centos6 ~ ]#yum install dhcp tftp-server httpd syslinux-nonlinux
centos7中的syslinux在centos6中为syslinux-nonlinux
2、配置httpd服务中的yum源
[root@centos6 os ]#pwd
/var/www/html/centos/6/os
[root@centos6 os ]#rm -rf x86_64/
[root@centos6 os ]#ln -s /misc/cd/ x86_64
[root@centos6 os ]#ll
total 0
lrwxrwxrwx 1 root root 8 Jul 16 22:28 x86_64 -> /misc/cd/
应答文件ks6.cfg
[root@centos6 html ]#mkdir ksdir
[root@centos6 html ]#mv ks6.cfg ksdir/
3、配置dhcp服务
[root@centos6 html ]#rpm -ql dhcp
[root@centos6 html ]#cp /usr/share/doc/dhcp-4.1.1/dhcpd.conf.sample /etc/dhcp/dhcpd.conf
添加如下内容,原来有的不用删除
# This is a very basic subnet declaration.
subnet 192.168.14.0 netmask 255.255.255.0{
range 192.168.14.100 192.168.14.110;
next-server "192.168.14.6";
filename "pxelinux.0";
[root@centos6 html ]#service dhcpd start
Starting dhcpd: [FAILED]
语法检查:多了一个双引号,centos7中此处是有双引号的
[root@centos6 html ]#service dhcpd configtest
Internet Systems Consortium DHCP Server 4.1.1-P1
Copyright 2004-2010 Internet Systems Consortium.
All rights reserved.
For info, please visit https://www.isc.org/software/dhcp/
/etc/dhcp/dhcpd.conf line 38: 192.168.14.6 (262): expecting IP address or hostname
next-server "192.168.14.6"
^
/etc/dhcp/dhcpd.conf line 38: expecting a parameter or declaration
next-server "192.168.14.6";
^
去掉双引号
[root@centos6 html ]#service dhcpd configtest
Syntax: OK
[root@centos6 html ]#service dhcpd start
Starting dhcpd: [ OK ]
4、tftp-server
[root@centos6 ~ ]#rpm -ql tftp-server
/etc/xinetd.d/tftp
/usr/sbin/in.tftpd
/usr/share/doc/tftp-server-0.49
/usr/share/doc/tftp-server-0.49/CHANGES
/usr/share/doc/tftp-server-0.49/README
/usr/share/doc/tftp-server-0.49/README.security
/usr/share/doc/tftp-server-0.49/README.security.tftpboot
/usr/share/man/man8/in.tftpd.8.gz
/usr/share/man/man8/tftpd.8.gz
/var/lib/tftpboot
tftp为非独立服务
[root@centos6 ~ ]#chkconfig --list
***省略***
xinetd 0:off 1:off 2:off 3:on 4:on 5:on 6:off
ypbind 0:off 1:off 2:off 3:off 4:off 5:off 6:off
xinetd based services:
chargen-dgram: off
chargen-stream: off
daytime-dgram: off
daytime-stream: off
discard-dgram: off
discard-stream: off
echo-dgram: off
echo-stream: off
rsync: off
tcpmux-server: off
telnet: on
tftp: off
[root@centos6 ~ ]#chkconfig tftp on 此处也可以修改文件/etc/xinetd.d/tftp中disable=no
[root@centos6 ~ ]#service xinetd start
[root@centos6 ~ ]#ss -nul
State Recv-Q Send-Q Local Address:Port Peer Address:Port
UNCONN 0 0 *:67 *:*
UNCONN 0 0 *:68 *:*
UNCONN 0 0 *:69 *:*
67dhcp服务器端口,68dhcp客户端端口,69tftp端口
5、/media/isolinux
[root@centos6 tftpboot ]#pwd
/var/lib/tftpboot
[root@centos6 tftpboot ]#cp /media/isolinux/* . #centos7pxe安装只复制了ISOLinux下的initrd.img和vmlinuz
[root@centos6 tftpboot ]#ls
boot.cat grub.conf isolinux.bin memtest TRANS.TBL vmlinuz
boot.msg initrd.img isolinux.cfg splash.jpg vesamenu.c32
[root@centos6 tftpboot ]#
删除用不到的(这些文件在光盘引导会用到),此处用的是pxelinux.0
[root@centos6 tftpboot ]#rm -rf grub.conf isolinux.bin memtest TRANS.TBL boot.cat
[root@centos6 tftpboot ]#ls
boot.msg initrd.img isolinux.cfg splash.jpg vesamenu.c32 vmlinuz
[root@centos6 tftpboot ]#mkdir pxelinux.cfg/
[root@centos6 tftpboot ]#mv isolinux.cfg pxelinux.cfg/default
--------------------
#centos7pxe安装还多复制一个menu.c32,不过此处用isolinux目录下的vesamenu.c32代替
[root@centos6 tftpboot ]#rpm -ql syslinux-nonlinux
[root@centos6 tftpboot ]#cp /usr/share/syslinux/pxelinux.0 .
6、修改启动菜单
[root@centos6 tftpboot ]#vim pxelinux.cfg/default
default vesamenu.c32
#prompt 1
timeout 600
display boot.msg
menu background splash.jpg
menu title Welcome to CentOS 6.9!
menu color border 0 #ffffffff #00000000
menu color sel 7 #ffffffff #ff000000
menu color title 0 #ffffffff #00000000
menu color tabmsg 0 #ffffffff #00000000
menu color unsel 0 #ffffffff #00000000
menu color hotsel 0 #ff000000 #ffffffff
menu color hotkey 7 #ffffffff #ff000000
menu color scrollbar 0 #ffffffff #00000000
label auto
menu label ^Auto Install an system
menu default
kernel vmlinuz
append initrd=initrd.img ks=http://192.168.14.6/ksdir/ks6.cfg
label manual
menu label Manual Install system with ^basic video driver
kernel vmlinuz
append initrd=initrd.img repo=http://192.168.14.6/centos/6/os/x86_64
label local
menu label Boot from ^local drive
localboot 0xffff
7、检查
[root@centos6 tftpboot ]#tree
.
├── boot.msg
├── initrd.img
├── pxelinux.0
├── pxelinux.cfg
│ └── default
├── splash.jpg
├── vesamenu.c32
└── vmlinuz
1 directory, 7 files
利用 21.3centos7 PXE自动安装操作系统 中安装完成的centos7系统,把网络适配器改为如图5,(也可以新建一个虚拟机)
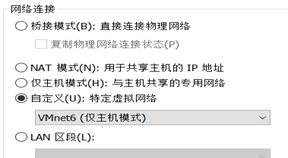
图5
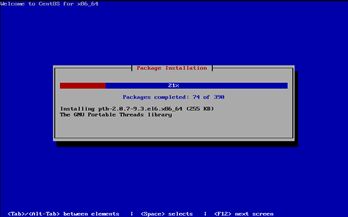
重启,光盘启动,现在网卡启动,如图6,回车,探测dhcp服务申请ip后,如图7,图8
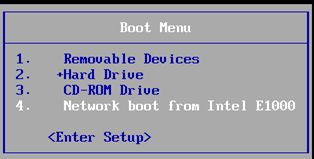
图6
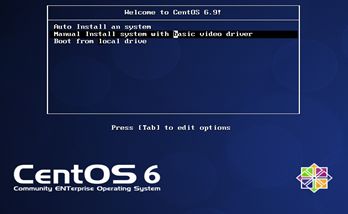
图8
