OkHttp深入学习(二)——网络
转载请注明出处:
http://blog.csdn.net/evan_man/article/details/51180863
在上一篇 《OkHttp深入学习(一)——初探》
中对OkHttpClient中的使用和Dispatcher进行了学习,无论我们是发送同步请求还是异步请求,最终都会通过调用RealCall的getResponseWithInterceptorChain()方法来获取request对应的response。本篇就从该方法开始,来分析OkHttp是如何实现网络通信的。
RealCall.class
首先直接看getResponseWithInterceptorChain()的源码。
getResponseWithInterceptorChain()@RealCall.class
private Response getResponseWithInterceptorChain(boolean forWebSocket) throws IOException {
    Interceptor.Chain chain = new ApplicationInterceptorChain(0, originalRequest, forWebSocket); //是我们传进来的Request
    return chain.proceed(originalRequest);
}class ApplicationInterceptorChain implements Interceptor.Chain{
private final int index;
private final Request request;
private final boolean forWebSocket;
ApplicationInterceptorChain(int index, Request request, boolean forWebSocket) {
this.index = index;
this.request = request;
this.forWebSocket = forWebSocket;
}
public Response proceed(Request request) throws IOException {
if (index < client.interceptors().size()) {
Interceptor.Chain chain = new ApplicationInterceptorChain(index + 1, request, forWebSocket);
Interceptor interceptor = client.interceptors().get(index);
Response interceptedResponse = interceptor.intercept(chain); //该方法内部会出现chain.proceed语句,即实现递归调用
return interceptedResponse; //最终上面的所有
}
return getResponse(request, forWebSocket);//当递归到最内层时,才会调用到该方法,完成实际的网络请求
}
}
ApplicationInterceptorChain内部类还算简单,里面有一个index和一个request对象。proceed方法使用了递归,将用户的请求通过拦截器一层一层的包装最后得到一个全新的请求,在递归的最底层即所有的拦截器已经执行完毕后,则调用getResponse方法获取response,通过该请求得到的请求结果最后又利用拦截器一层层的包装最终得到一个全新的网络请求结果。
直接这样说可能不太好理解,下面给出一个普通的拦截器使用例子:
class LoggingInterceptor implements Interceptor {
  @Override public Response intercept(Interceptor.Chain chain) throws IOException {
    Request request = chain.request();
    long t1 = System.nanoTime();
    logger.info(String.format("Sending request %s on %s%n%s",
        request.url(), chain.connection(), request.headers()));
    Response response = chain.proceed(request);
    long t2 = System.nanoTime();
    logger.info(String.format("Received response for %s in %.1fms%n%s",
        response.request().url(), (t2 - t1) / 1e6d, response.headers()));
    return response;
  }
}
ApplicationInterceptorChain拦截器的效果图如下。

chain.proceed方法的最底层是通过调用getResponse方法获得对应的response,接着看看该部分的源码。
getResponse()@RealCall.class
Response getResponse(Request request, boolean forWebSocket) throws IOException {
    //step1 根据request的body设置request的http报头
    RequestBody body = request.body();
    if (body != null) {
      Request.Builder requestBuilder = request.newBuilder();
      MediaType contentType = body.contentType();
      if (contentType != null) {
        requestBuilder.header("Content-Type", contentType.toString());
      }
      long contentLength = body.contentLength();
      if (contentLength != -1) {
        requestBuilder.header("Content-Length", Long.toString(contentLength));
        requestBuilder.removeHeader("Transfer-Encoding");
      } else {
        requestBuilder.header("Transfer-Encoding", "chunked");
        requestBuilder.removeHeader("Content-Length");
      }
      request = requestBuilder.build();
    }

    //step2 给每个request创建一个HttpEngine,由该引擎负责网络请求
    engine = new HttpEngine(client, request, false, false, forWebSocket, null, null, null);
    int followUpCount = 0;
    while (true) {
      if (canceled) {
        engine.releaseStreamAllocation();
        throw new IOException("Canceled");
      }

      boolean releaseConnection = true;
      try {
        engine.sendRequest();
        engine.readResponse();
        releaseConnection = false;
      } catch (RequestException e) {
        // The attempt to interpret the request failed. Give up.
        throw e.getCause();
      } catch (RouteException e) {
        // The attempt to connect via a route failed. The request will not have been sent.
        HttpEngine retryEngine = engine.recover(e.getLastConnectException(), null);
        if (retryEngine != null) {
          releaseConnection = false;
          engine = retryEngine;
          continue;
        }
        // Give up; recovery is not possible.
        throw e.getLastConnectException();
      } catch (IOException e) {
        // An attempt to communicate with a server failed. The request may have been sent.
        HttpEngine retryEngine = engine.recover(e, null);
        if (retryEngine != null) {
          releaseConnection = false;
          engine = retryEngine;
          continue;
        }
        // Give up; recovery is not possible.
        throw e;
      } finally {
        // We're throwing an unchecked exception. Release any resources.
        if (releaseConnection) {
          StreamAllocation streamAllocation = engine.close();
          streamAllocation.release();
        }
      }
      //正常情况下,前面已经正常执行了engine.sendRequest();  engine.readResponse();
      Response response = engine.getResponse();
      if (followUp == null) {
        if (!forWebSocket) {
          engine.releaseStreamAllocation();//成功获取到链接时将StreamAllocation和Connection解绑
        }
        return response;
      }
      //step3 正常情况下上面已经返回response,下面是一些异常情况的处理
      ........
    } //end of while(true)
}HttpEngine.class
首先看一下该类的构造器
HttpEngine()@HttpEngine.class
public HttpEngine(OkHttpClient client, Request request, boolean bufferRequestBody,
      boolean callerWritesRequestBody, boolean forWebSocket, StreamAllocation streamAllocation,
      RetryableSink requestBodyOut, Response priorResponse) {
    this.client = client;
    this.userRequest = request;
    this.bufferRequestBody = bufferRequestBody;
    this.callerWritesRequestBody = callerWritesRequestBody;
    this.forWebSocket = forWebSocket;
    this.streamAllocation = streamAllocation != null
        ? streamAllocation
        : new StreamAllocation(client.connectionPool(), createAddress(client, request));
    this.requestBodyOut = requestBodyOut;
    this.priorResponse = priorResponse;
  }
sendRequest()@HttpEngine.class
public void sendRequest() throws RequestException, RouteException, IOException {
    ....
    Request request = networkRequest(userRequest); //note1
    InternalCache responseCache = Internal.instance.internalCache(client); //note2
    Response cacheCandidate = responseCache != null? responseCache.get(request) : null;

    long now = System.currentTimeMillis();
    cacheStrategy = new CacheStrategy.Factory(now, request, cacheCandidate).get(); //note3
    networkRequest = cacheStrategy.networkRequest;
    cacheResponse = cacheStrategy.cacheResponse;
    if (responseCache != null) { //OkHttpClient具备缓存功能
      responseCache.trackResponse(cacheStrategy);
    }
    if (cacheCandidate != null && cacheResponse == null) { //在OkHttpClient缓存中得到response当时经过缓存策略分析该response无效
      closeQuietly(cacheCandidate.body()); // The cache candidate wasn't applicable. Close it.
    }
    // 网络请求为空,且本地命中的缓存也为空,则返回错误的504http报文
    if (networkRequest == null && cacheResponse == null) {
      userResponse = new Response.Builder()
          .request(userRequest)
          .priorResponse(stripBody(priorResponse))
          .protocol(Protocol.HTTP_1_1)
          .code(504)
          .message("Unsatisfiable Request (only-if-cached)")
          .body(EMPTY_BODY)
          .build();
      return;
    }
    //网络请求为空,本地命中的缓存也不为空,返回本地命中的response
    if (networkRequest == null) {
      userResponse = cacheResponse.newBuilder()
          .request(userRequest)
          .priorResponse(stripBody(priorResponse))
          .cacheResponse(stripBody(cacheResponse))
          .build();
      userResponse = unzip(userResponse);
      return;
    }

    //note4
    boolean success = false;
    try {
      httpStream = connect();
      httpStream.setHttpEngine(this);

      if (writeRequestHeadersEagerly()) {
        long contentLength = OkHeaders.contentLength(request);
        if (bufferRequestBody) {
          if (contentLength > Integer.MAX_VALUE) {
            throw new IllegalStateException("Use setFixedLengthStreamingMode() or "
                + "setChunkedStreamingMode() for requests larger than 2 GiB.");
          }

          if (contentLength != -1) {
            // Buffer a request body of a known length.
            httpStream.writeRequestHeaders(networkRequest);
            requestBodyOut = new RetryableSink((int) contentLength);
          } else {
            // Buffer a request body of an unknown length. Don't write request headers until the
            // entire body is ready; otherwise we can't set the Content-Length header correctly.
            requestBodyOut = new RetryableSink();
          }
        } else {
          httpStream.writeRequestHeaders(networkRequest);
          requestBodyOut = httpStream.createRequestBody(networkRequest, contentLength);
        }
      }
      success = true;
    } finally {
      // If we're crashing on I/O or otherwise, don't leak the cache body.
      if (!success && cacheCandidate != null) {
        closeQuietly(cacheCandidate.body());
      }
    }
  }
2、对于InternalCache responseCache = Internal.instance.internalCache(client),一脸的懵逼,之前从来没有见过,不过不要方,它在我们构建OkHttpClient的时候被初始化的!让我们回头撸一把OkHttpClient,果然发现有下面的一段内容, Internal.instance = new Internal() { .....}。这下我们就知道Internal.instance对象在构造OkHttpClient的时候就创建好了。实际上Internal.instance.internalCache(client)等价于 client.internalCache();即得到一个缓存操作符。随后调用缓存操作符的get方法得到对应的缓存结果。
3、cacheStrategy = new CacheStrategy.Factory(now, request, cacheCandidate).get();利用一定的缓存策略对request和cacheCandidate进行处理,并对HttpEngine中的networkRequest和cacheResponse对象进行赋值。如果得到的networkRequest==null,表明缓存策略认为该请求不需要访问网络,如果cacheResponse==null表明该请求在缓存中没有找到想要的结果。可能有童鞋不太懂为何要这样做,其实举个栗子就懂了,就是比如我们本地有缓存内容,但是可能该内容存放时间太长已经过期了,系统不能再使用该缓存,需要重新去网上下载。如果对该部分比较感兴趣参考下一篇博客 《OkHttp深入学习(三)——Cache》,本节不对其进行详细说明。
4、经过上面的分析如果没有从缓存中得到预期的结果,那么需要通过网络得到预期的response。首先执行的是
httpStream = connect();
该方法
内部调用streamAllocation.newStream()方法;骚年你还记得吗?streamAllocation是在构造HttpEngine时创建的对象。调用的构造器为new StreamAllocation(client.connectionPool(), createAddress(client, request)); 对于OkHttpClient的链接池connectionPool部分参考后面的OkHttpClient.class部分的分析。构造完StreamAllocation之后调用其newStream方法。得到一个HttpStream对象,该对象是一个已经跟服务器端进行了三次握手的链接,通过该对象就能向服务器发送接收Http报文数据。对于connect()后面的内容,一般情况我们不太会遇到,下面直接开始分析readResponse()方法
readResponse()@HttpEngine.class
public void readResponse() throws IOException {
    if (userResponse != null) {
      return; // 已经通过缓存获取到了响应
    }
    if (networkRequest == null && cacheResponse == null) {
      throw new IllegalStateException("call sendRequest() first!");
    }
    if (networkRequest == null) {
      return; // No network response to read.
    }
    //note1
    Response networkResponse;
    if (forWebSocket) {
      httpStream.writeRequestHeaders(networkRequest);
      networkResponse = readNetworkResponse();
    } else if (!callerWritesRequestBody) {
      networkResponse = new NetworkInterceptorChain(0, networkRequest).proceed(networkRequest);
    } else {
      // Emit the request body's buffer so that everything is in requestBodyOut.
      if (bufferedRequestBody != null && bufferedRequestBody.buffer().size() > 0) {
        bufferedRequestBody.emit();
      }

      // Emit the request headers if we haven't yet. We might have just learned the Content-Length.
      if (sentRequestMillis == -1) {
        if (OkHeaders.contentLength(networkRequest) == -1
            && requestBodyOut instanceof RetryableSink) {
          long contentLength = ((RetryableSink) requestBodyOut).contentLength();
          networkRequest = networkRequest.newBuilder()
              .header("Content-Length", Long.toString(contentLength))
              .build();
        }
        httpStream.writeRequestHeaders(networkRequest);
      }

      // Write the request body to the socket.
      if (requestBodyOut != null) {
        if (bufferedRequestBody != null) {
          // This also closes the wrapped requestBodyOut.
          bufferedRequestBody.close();
        } else {
          requestBodyOut.close();
        }
        if (requestBodyOut instanceof RetryableSink) {
          httpStream.writeRequestBody((RetryableSink) requestBodyOut);
        }
      }

      networkResponse = readNetworkResponse();
    }
    //note 2
    receiveHeaders(networkResponse.headers());
    //note 3
    // If we have a cache response too, then we're doing a conditional get.
    if (cacheResponse != null) {
      if (validate(cacheResponse, networkResponse)) {
        userResponse = cacheResponse.newBuilder()
            .request(userRequest)
            .priorResponse(stripBody(priorResponse))
            .headers(combine(cacheResponse.headers(), networkResponse.headers()))
            .cacheResponse(stripBody(cacheResponse))
            .networkResponse(stripBody(networkResponse))
            .build();
        networkResponse.body().close();
        releaseStreamAllocation();//调用streamAllocation.release();方法,作用就是将StreamAllocation和内部的connection脱离关系

        // Update the cache after combining headers but before stripping the
        // Content-Encoding header (as performed by initContentStream()).
        InternalCache responseCache = Internal.instance.internalCache(client);
        responseCache.trackConditionalCacheHit();
        responseCache.update(cacheResponse, stripBody(userResponse));
        userResponse = unzip(userResponse);
        return;
      } else {
        closeQuietly(cacheResponse.body());
      }
    }
    //note 4
    userResponse = networkResponse.newBuilder()
        .request(userRequest)
        .priorResponse(stripBody(priorResponse))
        .cacheResponse(stripBody(cacheResponse))
        .networkResponse(stripBody(networkResponse))
        .build();
    //note 5
    if (hasBody(userResponse)) {
      maybeCache();
      userResponse = unzip(cacheWritingResponse(storeRequest, userResponse));
    }
  }
2、将得到的networkResponse中的cookies存入OkHttpClient中的cookieJar对象中,该对象默认是空的,即不能存入任何url的cookie,如果我们在构造OkHttpClient的时候给予它一个CookieJar那么OkHttpClient就会将每次获得的cookie都存入我们定义的CookieJar中。一般是把url作为key,cookies作为value。
3、如果该Request在OkHttpC中的缓存中存在对应的Response,则更新该缓存
4、利用获得的networkResponse给userResponse赋值
5、根据得到的Response判断是否存入缓存
因为上面得到的Response来自于方法readNetworkResponse(),那么接下来我们来分析一下该方法是如何工作的。
readNetworkResponse()@HttpEngine.class
private Response readNetworkResponse() throws IOException {
    httpStream.finishRequest();
    Response networkResponse = httpStream.readResponseHeaders()
        .request(networkRequest)
        .handshake(streamAllocation.connection().handshake())
        .header(OkHeaders.SENT_MILLIS, Long.toString(sentRequestMillis))
        .header(OkHeaders.RECEIVED_MILLIS, Long.toString(System.currentTimeMillis()))
        .build();
    if (!forWebSocket) {
      networkResponse = networkResponse.newBuilder()
          .body(httpStream.openResponseBody(networkResponse))
          .build();
    }
    if ("close".equalsIgnoreCase(networkResponse.request().header("Connection"))
        || "close".equalsIgnoreCase(networkResponse.header("Connection"))) {
      streamAllocation.noNewStreams();
    }
    return networkResponse;
  }
getResponse()@HttpEngine.class
public Response getResponse() {
    if (userResponse == null) throw new IllegalStateException();
    return userResponse;
}StreamAllocation.class
public StreamAllocation(ConnectionPool connectionPool, Address address) {
    this.connectionPool = connectionPool;
    this.address = address;
    this.routeSelector = new RouteSelector(address, routeDatabase());
  }
routeDatabase()@StreamAllocation.class
private RouteDatabase routeDatabase() {
    return Internal.instance.routeDatabase(connectionPool);
}public HttpStream newStream(int connectTimeout, int readTimeout, int writeTimeout,
boolean connectionRetryEnabled, boolean doExtensiveHealthChecks)
throws RouteException, IOException {
try {
RealConnection resultConnection = findHealthyConnection(connectTimeout, readTimeout, //note1
writeTimeout, connectionRetryEnabled, doExtensiveHealthChecks);
HttpStream resultStream; //note2
if (resultConnection.framedConnection != null) {
resultStream = new Http2xStream(this, resultConnection.framedConnection); //在这里支持HTTP/2 and SPDY黑科技
} else {
resultConnection.socket().setSoTimeout(readTimeout);
resultConnection.source.timeout().timeout(readTimeout, MILLISECONDS);
resultConnection.sink.timeout().timeout(writeTimeout, MILLISECONDS);
resultStream = new Http1xStream(this, resultConnection.source, resultConnection.sink); //支持1.1协议;
}
synchronized (connectionPool) {
stream = resultStream;
return resultStream;
}
} catch (IOException e) {
throw new RouteException(e);
}
}
2、根据请求的协议不同创建不同的HttpStream,一般情况下我们创建的都是Http1xStream对象,即Http1.X协议。
该对象功能就是对request中的数据按照对应的http协议中的格式暴力的通过sink写入到管道流中,对response中的数据通过source读取并进行解析。
该部分的重点转移到了方法findHealthyConnection方法,往下看。
findHealthyConnection()@StreamAllocation.class
while (true) {
      RealConnection candidate = findConnection(connectTimeout, readTimeout, writeTimeout,
          connectionRetryEnabled);
      // If this is a brand new connection, we can skip the extensive health checks.
      synchronized (connectionPool) {
        if (candidate.successCount == 0) {
          return candidate;
        }
      }
      // Otherwise do a potentially-slow check to confirm that the pooled connection is still good.
      if (candidate.isHealthy(doExtensiveHealthChecks)) {
        return candidate;
      }
      connectionFailed(new IOException());
}
findConnection()@StreamAllocation.class
private RealConnection findConnection(int connectTimeout, int readTimeout, int writeTimeout,
      boolean connectionRetryEnabled) throws IOException, RouteException {
    Route selectedRoute;
    synchronized (connectionPool) {
      if (released) throw new IllegalStateException("released");
      if (stream != null) throw new IllegalStateException("stream != null");
      if (canceled) throw new IOException("Canceled");
      //note 1
      RealConnection allocatedConnection = this.connection;
      if (allocatedConnection != null && !allocatedConnection.noNewStreams) {
        return allocatedConnection;
      }

      //note 2
      RealConnection pooledConnection = Internal.instance.get(connectionPool, address, this);
      if (pooledConnection != null) {
        this.connection = pooledConnection;
        return pooledConnection;
      }
      selectedRoute = route;
      //如果是第一次走到这里 则route为null
    }

    if (selectedRoute == null) {
      selectedRoute = routeSelector.next();
       //note 3
      synchronized (connectionPool) {
        route = selectedRoute;
      }
    }
    RealConnection newConnection = new RealConnection(selectedRoute);
     //note 4
    acquire(newConnection);
    //note 5
    synchronized (connectionPool) {
      Internal.instance.put(connectionPool, newConnection);
      //note 6
      this.connection = newConnection;
      if (canceled) throw new IOException("Canceled");
    }

    newConnection.connect(connectTimeout, readTimeout, writeTimeout, address.connectionSpecs(), connectionRetryEnabled);
     //note7
    routeDatabase().connected(newConnection.route());
    //note 8
    return newConnection;
  }
2、从线程池中获取一个RealConnection对象,等价于直接调用connectionPool.get(address, streamAllocation),如果获取到了RealConnection则直接返回该RealConnection。step1和step2得到的RealConnection都是已经跟服务器完成了三次握手链接的连接。
3、利用routeSelector.next()方法得到一个route对象;routeSelector在构造StreamAllocation时创建的跟我们的request是绑定的;每个链接都需要选择一个代理,IP地址,TLS。
4、通过得到的route对象构建一个RealConnection对象,该route包含了客户请求链接的ip地址和端口号等信息。
5、connection.allocations.add(new WeakReference<>(this)); 为当前StreamAllocation创建一个弱引用,添加到RealConnection的allocation中,即增加其引用计数。
6、将上面创建的RealConnection添加到OkHttpClient的ConnectionPool链接池中。
7、调用RealConnection的connect方法,
创建链接,
完成跟目标地址的的三次握手。
8、将newConnection对应的route从routeDatabase中移除出去,routeDatabase实际上维护一个集合,里面存入的route都是failed
最后给大家科普StreamAllocation最后一个方法,该方法用于回收StreamAllocation对应的Connection。调用StreamAllocation的noNewStreams和release方法都会调用到该方法。
一般在任务执行结束后都会通过HttpEngine的releaseStreamAllocation()方法间接调用StreamAllocation的deallocate方法将RealConnection和StreamAllocation进行解绑。
deallocate@S
treamAllocation.class
private void deallocate(boolean noNewStreams, boolean released, boolean streamFinished) {
    RealConnection connectionToClose = null;
    synchronized (connectionPool) {
      if (streamFinished) {
        this.stream = null;
      }
      if (released) {
        this.released = true;
      }
      if (connection != null) {
        if (noNewStreams) {
          connection.noNewStreams = true; //noNewStreams表明该链接不能提供给新Stream使用
        }
        if (this.stream == null && (this.released || connection.noNewStreams)) {
          release(connection); //note1
          if (connection.allocations.isEmpty()) { //note2
            connection.idleAtNanos = System.nanoTime();
            if (Internal.instance.connectionBecameIdle(connectionPool, connection)) { //note3
              connectionToClose = connection;
            }
          }
          connection = null;
        }
      }
    }
    if (connectionToClose != null) { //note4
      Util.closeQuietly(connectionToClose.socket());
    }
  }
2、Connection的Allocation队列如果为空,表明该RealConnection没有被任何StreamAllocation使用。
3、Internal.instance.connectionBecameIdle(connectionPool, connection)等价于pool.connectionBecameIdle(connection); 该方法内部判断connection.noNewStreams为真,即该Connection不能给新的stream提供服务,则将该Connection从Connectionpool中移除出去,同时返回true。否则让Connectionpool的清理线程去处理,返回false。
4、第三步中返回结果为真,即RealConnection已经从ConnectionPool中移除,则在此处强制调用socket的close方法,关闭套接字,回收网络资源。
继续往下走,那就是RealConnection对象的创建和其connected方法的实现。RealConnection这也是我们所能走到的最底层的类了。胜利的曙光要来了~
RealConnection.class
private Socket rawSocket; //最底层socket
public Socket socket; //应用层socket
public final List> allocations = new ArrayList<>();
public RealConnection(Route route) {
    this.route = route;
}public void connect(int connectTimeout, int readTimeout, int writeTimeout,List connectionSpecs, boolean connectionRetryEnabled) throws RouteException {
if (protocol != null) throw new IllegalStateException("already connected");
RouteException routeException = null;
ConnectionSpecSelector connectionSpecSelector = new ConnectionSpecSelector(connectionSpecs);
Proxy proxy = route.proxy();
Address address = route.address();
if (route.address().sslSocketFactory() == null
&& !connectionSpecs.contains(ConnectionSpec.CLEARTEXT)) {
throw new RouteException(new UnknownServiceException(
"CLEARTEXT communication not supported: " + connectionSpecs));
}
while (protocol == null) {
try {
//note1
rawSocket = proxy.type() == Proxy.Type.DIRECT || proxy.type() == Proxy.Type.HTTP
? address.socketFactory().createSocket() //对于ssl的情况
: new Socket(proxy);
//note 2 上面调用的方法已经很底层了!!使用的是jdk中的内容了
connectSocket(connectTimeout, readTimeout, writeTimeout, connectionSpecSelector);
} catch (IOException e) {
......
}
}
}
2、调用 connectSocket方法。
connectSocket()@RealConnection.class
private void connectSocket(int connectTimeout, int readTimeout, int writeTimeout, ConnectionSpecSelector connectionSpecSelector) throws IOException {
    rawSocket.setSoTimeout(readTimeout);
    try {
      //note 1
      Platform.get().connectSocket(rawSocket, route.socketAddress(), connectTimeout);
    } catch (ConnectException e) {
      throw new ConnectException("Failed to connect to " + route.socketAddress());
    }
    //note 2
    source = Okio.buffer(Okio.source(rawSocket));
    sink = Okio.buffer(Okio.sink(rawSocket));
    if (route.address().sslSocketFactory() != null) {
      connectTls(readTimeout, writeTimeout, connectionSpecSelector);
    } else {
      protocol = Protocol.HTTP_1_1;
      socket = rawSocket;
    }
    if (protocol == Protocol.SPDY_3 || protocol == Protocol.HTTP_2) {
      socket.setSoTimeout(0); // Framed connection timeouts are set per-stream.
      FramedConnection framedConnection = new FramedConnection.Builder(true)
          .socket(socket, route.address().url().host(), source, sink)
          .protocol(protocol)
          .listener(this)
          .build();
      framedConnection.sendConnectionPreface();
      // Only assign the framed connection once the preface has been sent successfully.
      this.allocationLimit = framedConnection.maxConcurrentStreams();
      this.framedConnection = framedConnection;
    } else {
      this.allocationLimit = 1;
    }
  }
1、Platform.get()等价于Platform.findPlatform();结果是根据平台的不同得到不同的Platform对象,使用Class.forName方法获取对应的类对象;下面假设平台是Android平台。Platform. get(). connectSocket() 方法等价于调用socket.connect(address, connectTimeout); 完成了TCP三次握手
2、source = Okio.buffer(Okio.source(rawSocket));就是从rawSocket获得一个InputStream再用buffer包装一下。
sink = Okio.buffer(Okio.sink(rawSocket));
就是从rawSocket获得一个OutputStream再用buffer包装一下。
到此为止我们已经获得了跟服务器通信的链路。
在本节结束之前我们最后对ConnectionPool和RouteSelector进行介绍
ConnectionPool.class
private static final Executor executor = new ThreadPoolExecutor(0 /* corePoolSize */,
      Integer.MAX_VALUE /* maximumPoolSize */, 60L /* keepAliveTime */, TimeUnit.SECONDS,
      new SynchronousQueue(), Util.threadFactory("OkHttp ConnectionPool", true));
//该类跟Dispatcher.class一样创建了一个线程池,用于维护管理RealConnection
final RouteDatabase routeDatabase = new RouteDatabase();
//该对象创建一个RouteDataBase对象,是一个路由数据库,该数据库其实很简单,里面维护了一个private final Set failedRoutes = new LinkedHashSet<>()集合。存放失败的路由数据
private final Deque connections = new ArrayDeque<>();
//该集合是ConnectionPool用于存储当前系统经历过三次握手可用的RealConnection
ConnectionPool()@ConnectionPool.class
public ConnectionPool() {
    this(5, 5, TimeUnit.MINUTES);
}
public ConnectionPool(int maxIdleConnections, long keepAliveDuration, TimeUnit timeUnit) {
    this.maxIdleConnections = maxIdleConnections;  //最大空闲连接数
    this.keepAliveDurationNs = timeUnit.toNanos(keepAliveDuration);
    // Put a floor on the keep alive duration, otherwise cleanup will spin loop.
    if (keepAliveDuration <= 0) {
      throw new IllegalArgumentException("keepAliveDuration <= 0: " + keepAliveDuration);
    }
  }
创建的连接池默认维护5条自由链接,且自由链接空闲时间最多为5分钟。RealConnection是否是自由态由RealConnection中存储的Allocations集合的大小决定。如果RealConnection.noNewStream==true则表明该RealConnection拒绝为新StreamAllocation服务,往往意味着等待被回收。
get()@ConnectionPool.class
RealConnection get(Address address, StreamAllocation streamAllocation) {
    assert (Thread.holdsLock(this));
    for (RealConnection connection : connections) {
      if (connection.allocations.size() < connection.allocationLimit //note1
          && address.equals(connection.route().address) //note2
          && !connection.noNewStreams) { //note3
        streamAllocation.acquire(connection); //note4
        return connection;
      }
    }
    return null;
  }
该方法的作用就是尝试从集合connections中获取到一个可重复利用的RealConnection。
1、connection.allocations.size() < connection.allocationLimit;判断该RealConnection所服务的StreamAllocation数量是否小于门限值。
2、address.equals(connection.route().address);该Connection的hostname地址等于方法参数的address值。
3、connection.noNewStreams能否被其它StreamAllocation。
4、streamAllocation.acquire(connection);等价于 connection.allocations.add(streamAllocation) ,将StreamAllocation添加到RealConnection的allocations集合中。增加RealConnection的引用计数。当该引用计数为0时考虑回收该RealConnection。
put()@ConnectionPool.class
void put(RealConnection connection) {
    assert (Thread.holdsLock(this));
    if (!cleanupRunning) {
      cleanupRunning = true;
      executor.execute(cleanupRunnable);//note1
    }
    connections.add(connection);//note2
  }
1、对connections集合进行维护,cleanupRunnable的run方法内部会执行cleanup方法,下面我们将对其进行介绍
2、将RealConnection加入到ConnectionPool的connects集合
cleanup()@ConnectionPool.class
long cleanup(long now) {
    int inUseConnectionCount = 0;
    int idleConnectionCount = 0;
    RealConnection longestIdleConnection = null;
    long longestIdleDurationNs = Long.MIN_VALUE;
    // Find either a connection to evict, or the time that the next eviction is due.
    synchronized (this) {
      for (Iterator i = connections.iterator(); i.hasNext(); ) {
        RealConnection connection = i.next();
        // note1
        if (pruneAndGetAllocationCount(connection, now) > 0) {
          inUseConnectionCount++;
          continue;
        }
        idleConnectionCount++;
        // If the connection is ready to be evicted, we're done.
        long idleDurationNs = now - connection.idleAtNanos; //note 2
        if (idleDurationNs > longestIdleDurationNs) {
          longestIdleDurationNs = idleDurationNs;
          longestIdleConnection = connection;
        }
      } // end of for
      if (longestIdleDurationNs >= this.keepAliveDurationNs
          || idleConnectionCount > this.maxIdleConnections) { //note3
        connections.remove(longestIdleConnection);
      } else if (idleConnectionCount > 0) {
        //返回下次正常情况下次需要检查的等待时间
        return keepAliveDurationNs - longestIdleDurationNs;
      } else if (inUseConnectionCount > 0) {
        //返回下次正常情况下次需要检查的等待时间
        return keepAliveDurationNs;
      } else {
        //池中没有自由链接,也没有正在使用的链接
        cleanupRunning = false;
        return -1;
      }
    }
    closeQuietly(longestIdleConnection.socket()); //note4
    // Cleanup again immediately.
    return 0;
  }
Connectionpool维护其链接池中链接;该方法是在cleanupRunnable中的run方法中被调用。
1、缩减和获得与该Connection绑定的StreamAllocation数量,如果数量不为0,证明该RealConnection正在被某个StreamAllocation使用,否则进行下面的步骤。
2、获取该Connection的自由时间,如果该链接自由时间超过当前系统所记录的Connection最长自由时间,则刷新当前记录最大值。这是标记过程
3、执行到这里,已经得到了当前系统空闲线程等待的最长时间,如果该时间大于系统设定的最大自由时间或自由链接数大于系统所能维护的最大自由链接数,则将该RealConnection从链接池中移除出去。
4、执行到这里,表明刚刚有一个链接从连接池中被移出,此处将关闭该RealConnection对应的socket,即执行socket.close().
connectionBecameIdle@ConnectionPool.class
boolean connectionBecameIdle(RealConnection connection) {
    assert (Thread.holdsLock(this));
    if (connection.noNewStreams || maxIdleConnections == 0) {
      connections.remove(connection);
      return true;
    } else {
      notifyAll(); // Awake the cleanup thread: we may have exceeded the idle connection limit.
      return false;
    }
  }
该方法在StreamAllocation的deallocate中被调用。用于将connection回收,或者将RealConnection变成自由态。
我们对ConnectionPool做个小结:
Connection pool 创建了一个线程池,用于维护池中的自由链接数,RealConnection采用引用计数的方法判断一个Connection是否是自由态,如果RealConnection的Allocations集合为空则判断为自由态。最后采用标记清除的算法实现对废弃RealConnection的垃圾回收。当自由态链接数大于门限或者链接空闲时间超过门限值时则对该RealConnection资源进行回收,具体工作就是将RealConnection从ConnectionPool的connections集合中移出,底层调用socket.close()关闭网络连接。
RouteSelector.class
在StreamAllocation的findConnection方法中在构造RealConnection之前是需要获得一个route对象的,而route对象的获取是通过调用routeSelector的next方法来获取的。该route对象包含了我的url请求对应的ip地址和对应端口号。
  /* State for negotiating the next proxy to use. */
  private List proxies = Collections.emptyList();
  private int nextProxyIndex;
  /* State for negotiating the next socket address to use. */
  private List inetSocketAddresses = Collections.emptyList();
  private int nextInetSocketAddressIndex;
  private final List postponedRoutes = new ArrayList<>();
RouteSelector()@ RouteSelector.class
public RouteSelector(Address address, RouteDatabase routeDatabase) {
    this.address = address;
    this.routeDatabase = routeDatabase;
    resetNextProxy(address.url(), address.proxy());
}
该构造其中的Address参数是在HttpEngine构建StreamAllocation时创建的,创建方法是通过调用HttpEngine的createAddress(client, request)方法来获得的,方法参数分别为OkHttpClient和Request。在RouteSelector的构造器中会调用resetNextProxy方法,参数为客户请求的url和对应的代理,一般情况刚开始时代理是空。
resetNextProxy()@ RouteSelector.class
private void resetNextProxy(HttpUrl url, Proxy proxy) {
    if (proxy != null) {
      //note1
      proxies = Collections.singletonList(proxy);
    } else {
      proxies = new ArrayList<>();
      List selectedProxies = address.proxySelector().select(url.uri()); //note2
      if (selectedProxies != null) proxies.addAll(selectedProxies);
      // Finally try a direct connection. We only try it once!
      proxies.removeAll(Collections.singleton(Proxy.NO_PROXY));
      proxies.add(Proxy.NO_PROXY);
    }
    nextProxyIndex = 0;
}
1、如果代理不为空,则直接对proxies赋值
2、address.proxySelector()等价于client.proxySelector(),后者默认等价于ProxySelector.getDefault()等价于new java,net.ProxySelectorImpl();经历这么一堆等价于其实简单讲就是调用address.proxySelector()等于创建一个java,net.ProxySelectorImpl()对象。随后调用该对象的select方法获取与该url对应的Proxy
下面我们就来看看next方法具体完成的操作。
next()@ RouteSelector.class
public Route next() throws IOException {
    if (!hasNextInetSocketAddress()) {
      if (!hasNextProxy()) {
        if (!hasNextPostponed()) {
          //前面三个队列都为空
          throw new NoSuchElementException();
        }//end if 3
        return nextPostponed();//返回最后一个之前失败的route
      }//end if 2
      lastProxy = nextProxy();//note1
    }//end if 1
    lastInetSocketAddress = nextInetSocketAddress(); //note 2
    Route route = new Route(address, lastProxy, lastInetSocketAddress);  //note 3
    if (routeDatabase.shouldPostpone(route)) {  //note 4
      postponedRoutes.add(route); //note 5
      return next(); //note 6
    }
    return route; //返回可以用的route
  }
1、首先运行到这里,获取下一个代理,同时刷新集合inetSocketAddresses的数据
2、获取到InetSocketAddress
3、利用前面得到的代理和SocketAddress构造一个Route
4、查找route是否存在于routeDatabase中,即检验生成的route是不是可用
5、step4返回真,该route加入到postponedRoutes集合中,如果最后所有的代理都试过了还是不行,则还会将该route重新再尝试一次
6、递归调用
nextProxy()@ RouteSelector.class
private Proxy nextProxy() throws IOException {
    if (!hasNextProxy()) {
      throw new SocketException("No route to " + address.url().host()
          + "; exhausted proxy configurations: " + proxies);
    }
    Proxy result = proxies.get(nextProxyIndex++);//note1
    resetNextInetSocketAddress(result);
    return result;
}
从Proxies对象中获取一个Proxy对象。proxies的值是在resetNextProxy()方法中获得的
resetNextInetSocketAddress()@ RouteSelector.class
private void resetNextInetSocketAddress(Proxy proxy) throws IOException {
    // Clear the addresses. Necessary if getAllByName() below throws!
    inetSocketAddresses = new ArrayList<>();
    String socketHost;
    int socketPort;
    if (proxy.type() == Proxy.Type.DIRECT || proxy.type() == Proxy.Type.SOCKS) {
      socketHost = address.url().host();
      socketPort = address.url().port();
    } else {
      SocketAddress proxyAddress = proxy.address();
      if (!(proxyAddress instanceof InetSocketAddress)) {
        throw new IllegalArgumentException(
            "Proxy.address() is not an " + "InetSocketAddress: " + proxyAddress.getClass());
      }
      InetSocketAddress proxySocketAddress = (InetSocketAddress) proxyAddress;
      socketHost = getHostString(proxySocketAddress);
      socketPort = proxySocketAddress.getPort();
    }
    //获取得到Address对应的IP和Port
    if (socketPort < 1 || socketPort > 65535) {
      throw new SocketException("No route to " + socketHost + ":" + socketPort
          + "; port is out of range");
    }
    if (proxy.type() == Proxy.Type.SOCKS) {
      inetSocketAddresses.add(InetSocketAddress.createUnresolved(socketHost, socketPort));
    } else {
      // Try each address for best behavior in mixed IPv4/IPv6 environments.
      List addresses = address.dns().lookup(socketHost);  //DNS查询的结果 url对应多个ip地址和端口号
      for (int i = 0, size = addresses.size(); i < size; i++) {
        InetAddress inetAddress = addresses.get(i);
        inetSocketAddresses.add(new InetSocketAddress(inetAddress, socketPort));
      }
    }
    nextInetSocketAddressIndex = 0;
}
至此我们对于okhttp的网络通信功能的实现进行了了解,下面对本节进行一下总结:
1、该部分的层次关系有这样的形式:httpEngine->httpStream->RealConnection。
2、无论是同步还是异步的请求最终都是通过getResponseWithInterceptorChain()方法来获得对应的Response。在真实的网络请求之前会使用ApplicationInterceptorChain拦截器对请求进行拦截。之后利用request和OkHttpClient创建一个HttpEngine对象,该对象持有有一个对StreamAllocation对象的引用,通过调用该对象的engine.sendRequest()方法发送请求,通过调用engine.readResponse();方法读取响应数据,同时给HttpEngine中的userResponse域赋值,最后通过engine.getResponse()返回HttpEngine中的userResponse域。
3、
engine.sendRequest()方法,
在通过HttpEngine的sendRequest方法发送请求的到网络上时,会
先去OkHttpClient的Cache中
查找是否有对应的Response数据,如果有则直接对userResponse进行赋值并返回,如果没有则通过StreamAllocation的newStream方法获得的HttpStream对象,随后利用该对象访问网络的响应。StreamAllocation的newstream方法首先
从OKHttpClient中的链接池connection
s中尝试获取到RealConnection对象,如果没有获得则利用Route对象创建一个RealConnection,该route是由OkHttpClient和request共同构建得到的,里面有请求主机的对应IP和端口等信息,随后调用该对象的connect方法,操作一个socket完成跟指定主机三次握手。随后将该connection加入到OkHttpClient的链接池中。将上面得到的RealConnection根据不同的Http协议创建不同的HttpStream对象,该对象的作用是根据不同的Http协议,将用户的请求转换成特定的格式后通过RealConnection写入到对应ip的服务端中,然后对通过RealConnection读取到的数据进行解析。
4、engine.readResponse()方法,该方法首先检测usrResponse是否为空,即是否通过上面的sendRequest方法已经获得了缓存Response,有则直接返回usrResponse,如果没有获得则
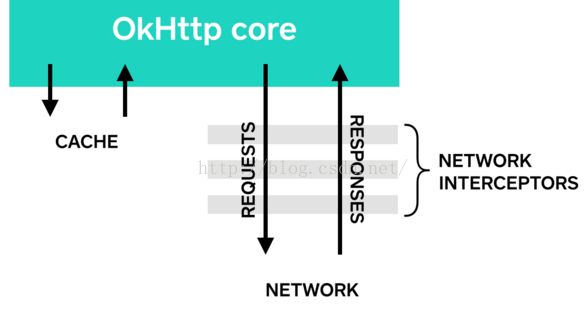
一般情况下会通过networkResponse = new NetworkInterceptorChain(0, networkRequest).proceed(networkRequest)获得Response。该部分与ApplicationInterceptorChain的功能类似,只是拦截的位置出现变化,这些拦截器更加靠近网络发送时的位置,越底层。所有拦截器执行结束后,通过调用 readNetworkResponse()方法得到网络返回数据,该方法内部通过HttpStream向服务端写入和读取数据。随后对返回数据的cookies进行存储,并判断是否加入缓存中,最后将结果赋值给userResponse。
在下一节我们将对okhttp的缓存机制进行深入的了解《OkHttp深入学习(三)——Cache的实现》