Spring实战——构建Spring Web应用程序
本篇博客记载搭建springmvc的过程,使用Java将DispatcherServlet配置在Servlet容器中,而不是使用web.xml 进行配置。
注意:使用Java配置仅适用于支持servlet3.0的服务器,如Tomcat7或者更高版本。
项目使用Maven搭建:
      UTF-8
      4.2.6.RELEASE


      junit
      junit
      3.8.1
      test


            org.springframework
            spring-core
            ${spring.version}


            org.springframework
            spring-context
            ${spring.version}


            org.springframework
            spring-web
            ${spring.version}


            org.springframework
            spring-webmvc
            ${spring.version}


            org.springframework
            spring-orm
            ${spring.version}


		    org.springframework
		    spring-aspects
		    ${spring.version}


		    org.hibernate
		    hibernate-validator
		    4.3.1.Final
一、Spring MVC起步
1、先看一个图:
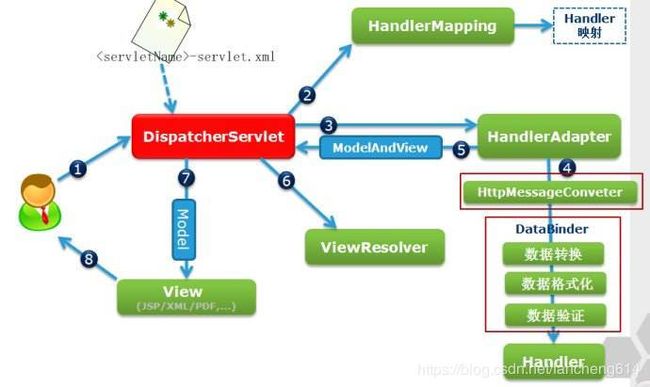
上图是SpringMVC请求流程图解。SpringMVC请求流程如下:
①请求离开浏览器,会带着用户所请求内容的信息到DispatcherServlet。
②DispatcherServlet会查询一个或多个处理器映射(handlerMapping)来确定请求的下一站在哪里。然后会将请求发给 SpringMVC控制器(Controller)。
③选择了合适的控制器之后,DispatcherServlet就将请求发给Controller,然后请求会卸下负载(就是带的用户请求信息) 耐心等待Controller处理这些信息。
④控制器在处理完请求之后,通常会产生一些信息,控制器将这些信息打包成模型,并标示出用于渲染数据的视图。
⑤DispatcherServlet将会使用视图解析器来将逻辑视图名匹配为一个特定的视图实现。然后将数据渲染在视图上(JSP)。
二、搭建SpringMVC
1、配置DispatcherServlet
package com.mfc.config;

import org.springframework.web.servlet.support.AbstractAnnotationConfigDispatcherServletInitializer;

/**
 * @author 74790
 * 2018-12-23 17:27:39
 * 使用javaConfig替代web.xml搭建springmvc
 *
 * 继承AbstractAnnotationConfigDispatcherServletInitializer抽象类之后,
 * 当部署在Servlet3.0容器中的时候,容器会自动发现它,并用它来配置Servlet上下文
 */
public class WebApplicationConfig extends
			AbstractAnnotationConfigDispatcherServletInitializer {

	//指定Spring配置,用于扫描组件
	@Override
	protected Class[] getRootConfigClasses() {
		// TODO Auto-generated method stub
		return new Class[]{RootConfig.class};
	}

	//指定SpringMVC配置
	@Override
	protected Class[] getServletConfigClasses() {
		// TODO Auto-generated method stub
		return new Class[]{WebConfig.class};
	}

	//将DispatcherServlet映射到"/"
	@Override
	protected String[] getServletMappings() {
		return new String[]{"/"};
	}
}
2、配置Springmvc:WebConfig.java
package com.mfc.config;

import org.springframework.context.annotation.Bean;
import org.springframework.context.annotation.ComponentScan;
import org.springframework.context.annotation.Configuration;
import org.springframework.web.servlet.ViewResolver;
import org.springframework.web.servlet.config.annotation.DefaultServletHandlerConfigurer;
import org.springframework.web.servlet.config.annotation.EnableWebMvc;
import org.springframework.web.servlet.config.annotation.WebMvcConfigurerAdapter;
import org.springframework.web.servlet.view.InternalResourceViewResolver;

/**
 * @author 74790
 * 2018-12-23 17:37:04
 * SpringMvc配置
 * @EnableWebMvc : 启用springmvc
 * @ComponentScan : 扫描controller所在的包
 */
@Configuration
@EnableWebMvc
@ComponentScan("com.mfc.ctrl")
public class WebConfig extends WebMvcConfigurerAdapter{

	//配置JSP视图解析器
	@Bean
	public ViewResolver viewResolver(){
		InternalResourceViewResolver resolver = new InternalResourceViewResolver();
		resolver.setPrefix("/");
		resolver.setSuffix(".jsp");
		resolver.setExposeContextBeansAsAttributes(true);
		return resolver;
	}
	//配置静态资源的处理
	@Override
	public void configureDefaultServletHandling(DefaultServletHandlerConfigurer configurer) {
		configurer.enable();
	}
}
3、配置扫描组件的文件:RootConfig.java
package com.mfc.config;

import org.springframework.context.annotation.ComponentScan;
import org.springframework.context.annotation.ComponentScan.Filter;
import org.springframework.context.annotation.Configuration;
import org.springframework.context.annotation.FilterType;
import org.springframework.web.servlet.config.annotation.EnableWebMvc;

@Configuration
@ComponentScan(basePackages={"com.mfc"},
excludeFilters = {@Filter(type=FilterType.ANNOTATION, value=EnableWebMvc.class)})
public class RootConfig {

}
此时、SpringMVC框架已经搭建起来了。
三、SpringMVC之前没有注意的用法
1、从Controller传递数据模型到视图中的方法
①如果使用model.addAttribute(tUser); 没有给键的话,Spring会推断键的值。一般使用还是建议使用 model.addAttribute("tUser", tUser);
②Controller中的Model可以使用Map代替。
	@RequestMapping("testParam1")
	public String testParam1(@RequestParam("id")String id, Model model){
		System.out.println("传过来的参数是:"+id);
		model.addAttribute("id", id);
		TUser tUser = new TUser();
		//此时键会被spring推断为:tUser
		model.addAttribute(tUser);
		//此时键为:tUser
		model.addAttribute("tUser", tUser);
		return "userList";
	}
@RequestMapping("testParam1")
public String testParam1(@RequestParam("id")String id, Map model){
System.out.println("传过来的参数是:"+id);
model.put("id", id);
TUser tUser = new TUser();
model.put("tUser", tUser);
return "userList";
} 2、前端向Controller中传递参数除了使用@RequestParam还可以使用@PathVariable。
	测试URL挂参数
	测试URL挂参数
@Controller
@RequestMapping("/tUserCtrl")
public class TUserCtrl {
@RequestMapping("testParam1")
public String testParam1(@RequestParam("id")String id, Model model){
System.out.println("传过来的参数是:"+id);
model.addAttribute("id", id);
return "userList";
}
@RequestMapping("/testParam2/{id}")
public String testParam2(@PathVariable("id") String id, Model model){
System.out.println("传过来的参数是:"+id);
model.addAttribute("id", id);
return "userList";
}
}
3、使用@Valid验证表单:
| 注解 | 描述 |
| @AssertFalse | 所注解的元素必须是Boolean类型,并且值为false |
| @AssertTrue | 所注解的元素必须是Boolean类型,并且值为true |
| @DecimalMax | 所注解的元素必须是数字,并且他的值要小于或者等于给定的BigDecimalString值 |
| @DecimalMin | 所注解的元素必须是数字,并且他的值要大于或者等于给定的BigDecimalString值 |
| @Digits | 所注解的元素必须是数字,并且它的值必须有指定的位数 |
| @Future | 所注解的元素必须是一个将来的日期 |
| @Max | 所注解的元素必须是一个数字,并且它的值要小于或者等于给定的值 |
| @Min | 所注解的元素必须是一个数字,并且它的值要大于或者等于给定的值 |
| @NotNull | 所注解元素的值必须不能为null |
| @Null | 所注解元素的值必须为null |
| @Past | 所注解的值必须是一个已过去的日期 |
| @Pattern | 所注解的元素的值必须匹配给定的正则表达式 |
| @Size | 所注解的元素的值必须是String、集合或数组,并且它的长度要符合给定的范围 |
①使用校验注解的实体类:
package com.mfc.entity;
import javax.validation.constraints.Size;
import com.sun.istack.internal.NotNull;

public class TUser {

	//非空,5到16的字符
	@NotNull
	@Size(min=5,max=16)
	private String userName;

	@NotNull
	@Size(min=5,max=16)
	private String pass;

	public String getUserName() {
		return userName;
	}

	public void setUserName(String userName) {
		this.userName = userName;
	}

	public String getPass() {
		return pass;
	}

	public void setPass(String pass) {
		this.pass = pass;
	}
}
②实现校验的Controller
	@RequestMapping("addUser")
	public String addUser(@Valid TUser tUser, Errors errors){
		//校验表单输入
		if(errors.hasErrors()){
			return "index";
		}
		System.out.println("校验通过,下面是获取的密码:");
		System.out.println(tUser.getPass());
		return "redirect:/tUserCtrl/findAllUser.do";
	}
③页面表单代码