CentOS-6.7安装KVM及创建ubuntu14.04-server虚拟机
CentOS-6.7安装KVM及创建ubuntu14.04-server虚拟机
1、安装环境说明
- 物理主机
- 笔记本电脑 windows 7
- 物理网卡 ip 192.168.8.154
- 第一层虚拟平台
- VMWare 12.00 + CentOS 6.7
- 虚拟网卡NAT ip 192.168.160.236
- 第二层虚拟平台
- KVM + Ubuntu 14.04 server
- 虚拟网卡 bridge ip 192.168.160.222
2、CentOS 6.7安装KVM
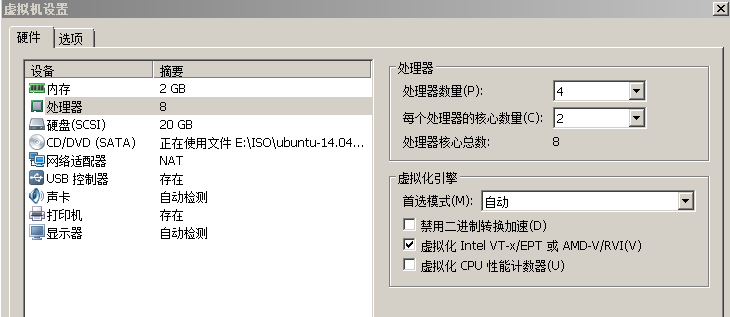
- 开启CPU的虚拟化功能
如下图所示,在虚拟机设置的cpu选项里勾选“”虚拟化intel VT …“”
- 安装KVM
# yum install qemu-kvm qemu-kvm-tools virt-manager libvirt -y
# service libvirtd start
# service libvirtd status
# chkconfig libvirtd on- 检查kvm模块安装情况
# lsmod | grep kvm
kvm_intel             55656  0
kvm 345460 1 kvm_intel- 检查安装结果
# virsh -c qemu:///system list3、HOST主机Centos系统网络配置
KVM的虚拟机的网络配置主要有NAT和Bridge两种,考虑到当前部署环境采用了2层虚拟平台,尽量采用比较简化的网络配置,所以选取了bridge的模式,下面介绍如何配置host centos系统的网络接口
- 配置网卡eth0
修改/etc/sysconfig/network-scripts/ifcfg-eth0
DEVICE=eth0
HWADDR=00:0C:29:93:66:94
TYPE=Ethernet
UUID=449c081b-b0fe-42e4-bfe2-860b51e42575
ONBOOT=yes
NM_CONTROLLED=no
BRIDGE=br0- 配置桥接接口br0
修改/etc/sysconfig/network-scripts/ifcfg-br0
DEVICE="br0"
ONBOOT="yes"
TYPE="Bridge"
BOOTPROTO=static
IPADDR=192.168.160.236
NETMASK=255.255.255.0
GATEWAY=192.168.160.2
DEFROUTE=yes- 重启网络服务
# service network restart- 检查配置结果
# ifconfig
br0       Link encap:Ethernet  HWaddr 00:0C:29:93:66:94
          inet addr:192.168.160.236  Bcast:192.168.160.255  Mask:255.255.255.0
          inet6 addr: fe80::20c:29ff:fe93:6694/64 Scope:Link
          UP BROADCAST RUNNING MULTICAST  MTU:1500  Metric:1
          RX packets:36890 errors:0 dropped:0 overruns:0 frame:0
          TX packets:37601 errors:0 dropped:0 overruns:0 carrier:0
          collisions:0 txqueuelen:0
          RX bytes:11208846 (10.6 MiB)  TX bytes:15028640 (14.3 MiB)

eth0      Link encap:Ethernet  HWaddr 00:0C:29:93:66:94
          inet6 addr: fe80::20c:29ff:fe93:6694/64 Scope:Link
          UP BROADCAST RUNNING MULTICAST  MTU:1500  Metric:1
          RX packets:159608 errors:0 dropped:0 overruns:0 frame:0
          TX packets:90148 errors:0 dropped:0 overruns:0 carrier:0
          collisions:0 txqueuelen:1000
          RX bytes:176410321 (168.2 MiB)  TX bytes:19391196 (18.4 MiB)
- 添加iptables访问规则
# iptables -I INPUT 1 -p tcp --dport 5910 -j ACCEPT4、安装虚拟机 Ubuntu 14.04 server
- 创建虚拟机
# virt-install --name ubuntu \
  --ram 1024 \
  --vnc --vncport=5910 \
  --disk path=/var/local/kvm_disk_ubuntu,size=10 \
  --network bridge=br0 \
  --cdrom /var/liba/ubuntu-14.04.5-server-amd64.iso \
  -d
参数简单说明:
–name: 虚拟机名称
–ram: 虚拟机内存大小
– vnc – vncport :指定vnc远程访问的端口
–disk: 硬盘参数,硬盘文件的路径和大小(GB)
–network: 虚拟机网卡采用桥接的方式连接br0
–cdrom: 虚拟光驱的配置及镜像文件路径
-d: 从光驱启动系统(第一次启动安装系统时需要)
安装过程中可能会碰到安装路径识别的问题ERROR Couldn’t find hvm kernel for Ubuntu tree.
修改文件/usr/lib/python2.6/site-packages/virtinst/OSDistro.py
906行:
i386替换成amd64
- 虚拟机配置文件检查
配置文件路径在/etc/libvert/qemu/ubuntu.xml,最好不要直接改配置文件,通过如下命令来修改配置
# virsh edit ubuntu
<domain type='kvm'>
  <name>ubuntuname>
  <uuid>9b36bc51-1490-4cee-0f84-6c6a27145f94uuid>
  <memory unit='KiB'>1048576memory>
  <currentMemory unit='KiB'>1048576currentMemory>
  <vcpu placement='static'>1vcpu>
  <os>
    <type arch='x86_64' machine='rhel6.6.0'>hvmtype>
    <boot dev='cdrom'/>
  os>
  <features>
    <acpi/>
    <apic/>
    <pae/>
  features>
  <clock offset='utc'/>
  <on_poweroff>destroyon_poweroff>
  <on_reboot>restarton_reboot>
  <on_crash>restarton_crash>
  <devices>
    <emulator>/usr/libexec/qemu-kvmemulator>
    <disk type='file' device='disk'>
      <driver name='qemu' type='raw' cache='none'/>
      <source file='/var/local/kvm_disk_ubuntu'/>
      <target dev='hda' bus='ide'/>
      <address type='drive' controller='0' bus='0' target='0' unit='0'/>
    disk>
    <disk type='file' device='cdrom'>
      <driver name='qemu' type='raw'/>
      <source file='/var/local/ubuntu-14.04.5-server-amd64.iso'/>
      <target dev='hdc' bus='ide'/>
      <readonly/>
      <address type='drive' controller='0' bus='1' target='0' unit='0'/>
    disk>
    <controller type='usb' index='0' model='ich9-ehci1'>
      <address type='pci' domain='0x0000' bus='0x00' slot='0x04' function='0x7'/>
    controller>
    <controller type='usb' index='0' model='ich9-uhci1'>
      <master startport='0'/>
      <address type='pci' domain='0x0000' bus='0x00' slot='0x04' function='0x0' multifunction='on'/>
    controller>
    <controller type='usb' index='0' model='ich9-uhci2'>
      <master startport='2'/>
      <address type='pci' domain='0x0000' bus='0x00' slot='0x04' function='0x1'/>
    controller>
    <controller type='usb' index='0' model='ich9-uhci3'>
      <master startport='4'/>
      <address type='pci' domain='0x0000' bus='0x00' slot='0x04' function='0x2'/>
    controller>
    <controller type='ide' index='0'>
      <address type='pci' domain='0x0000' bus='0x00' slot='0x01' function='0x1'/>
    controller>
    <interface type='bridge'>
      <mac address='52:54:00:09:90:bf'/>
      <source bridge='br0'/>
      <address type='pci' domain='0x0000' bus='0x00' slot='0x03' function='0x0'/>
    interface>
    <serial type='pty'>
      <target port='0'/>
    serial>
    <console type='pty'>
      <target type='serial' port='0'/>
    console>
    <input type='mouse' bus='ps2'/>
    <graphics type='vnc' port='5910' autoport='no' listen='0.0.0.0'>
      <listen type='address' address='0.0.0.0'/>
    graphics>
    <video>
      <model type='cirrus' vram='9216' heads='1'/>
      <address type='pci' domain='0x0000' bus='0x00' slot='0x02' function='0x0'/>
    video>
    <memballoon model='virtio'>
      <address type='pci' domain='0x0000' bus='0x00' slot='0x05' function='0x0'/>
    memballoon>
  devices>
domain>- 检查及启动虚拟机
# virsh list --all
 Id    Name                           State
----------------------------------------------------
 7     ubuntu                         running
虚拟机相关操作
# virsh destroy ubuntu \\强制关闭
# virsh start ubuntu \\启动- 通过VNC访问虚拟机
由于安装的是CentOS minimal ,不带图形界面,所以只能采用另外一台VMWare平台上的虚拟机(Ubuntu 16.04 desktop)来访问:
在Ubuntu 16.04 desktop上安装vncviewer,并远程访问:
# apt-get install vncviewer
# vncviewer 192.168.160.236:5910  \\ vnc port
此时会在桌面弹出一个窗口连接我们刚刚创建的ubuntu虚拟机,界面停留在系统安装上,然后按照正常的步骤安装ubuntu即可
安装完成后,进入ubuntu系统(可能需要vnc重连),配置网络地址:
编辑/etc/network/interfaces
# This file describes the network interfaces available on your system
# and how to activate them. For more information, see interfaces(5).

# The loopback network interface
auto lo
iface lo inet loopback

# The primary network interface
auto eth0
iface eth0 inet static
address 192.168.160.222
netmask 255.255.255.0
gateway 192.168.160.2
重启网卡
# ifdown eth0
# ifup eth0
# ifconfig
eth0      Link encap:Ethernet  HWaddr 52:54:00:09:90:bf
          inet addr:192.168.160.222  Bcast:192.168.160.255  Mask:255.255.255.0
          inet6 addr: fe80::5054:ff:fe09:90bf/64 Scope:Link
          UP BROADCAST RUNNING MULTICAST  MTU:1500  Metric:1
          RX packets:85970 errors:0 dropped:0 overruns:0 frame:0
          TX packets:35444 errors:0 dropped:0 overruns:0 carrier:0
          collisions:176808 txqueuelen:1000
          RX bytes:119515460 (119.5 MB)  TX bytes:2989853 (2.9 MB)

lo        Link encap:Local Loopback
          inet addr:127.0.0.1  Mask:255.0.0.0
          inet6 addr: ::1/128 Scope:Host
          UP LOOPBACK RUNNING  MTU:65536  Metric:1
          RX packets:0 errors:0 dropped:0 overruns:0 frame:0
          TX packets:0 errors:0 dropped:0 overruns:0 carrier:0
          collisions:0 txqueuelen:1
          RX bytes:0 (0.0 B)  TX bytes:0 (0.0 B)
安装open-ssh使用ssh远程登录虚拟机
# apt-get install openssh-server
# ssh [email protected]