Centos 7.2搭建HTTP服务,并进行相关配置
1、安装apache服务器并访问
建议复制一份 http.conf文件
cp /etc/httpd/conf/httpd.conf /etc/httpd/conf/httpd.conf.bak
若以下内容的子步骤未提及firewalld和SElinux,请关闭
安装httpd服务器
#yum -y install httpd

关闭防火墙
#systemctl stop firewalld
#systemctl disable firewalld

启动httpd服务,并设置开机启动
#systemctl start httpd
#systemctl enable httpd
2、开启apache服务的用户认证功能
若以下内容的子步骤未提及firewalld和SElinux,请关闭
通过配置Order、Deny from、Allow from 来限制客户机
allow、deny :先"允许"后"拒绝" ,默认拒绝所有为明确的客户机地址。
deny、allow:先"拒绝"后"允许",默认允许所有为明确的客户机地址
修改httpd配置文件
#vi /etc/httpd/conf/httpd.conf
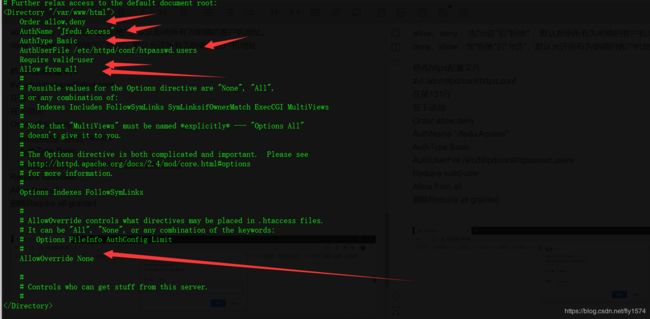
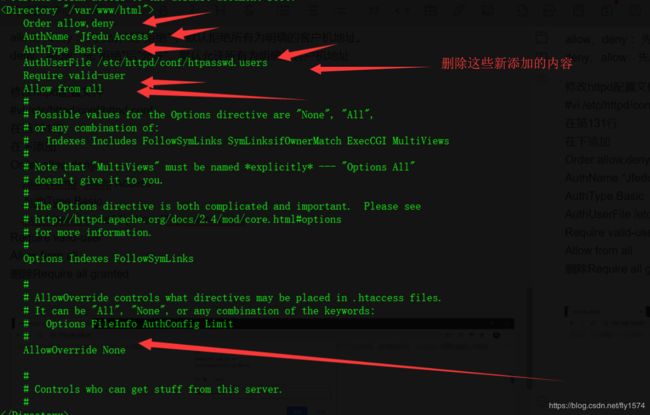
在第131行
在下添加
Order allow,deny
AuthName "Jfedu Access"  #定义受保护领域的名称
AuthType Basic   #设置认证类型,Basic表示基本认证
AuthUserFile /etc/httpd/conf/htpasswd.users   #设置用于用户账号,密码的认证文件路径
Require valid-user  #要求认证文件存在的用户才能访问
Allow from all
此处已有,无需添加此行
AllowOverride None #是否允许覆盖访问控制

删除Require all granted
保存退出,并重启httpd服务
使用htpassword创建认证用户
htpasswd -c /etc/httpd/conf/htpasswd.users test1 #创建认证用户
3、在开启SELinux的情况下更改Web网站的发布目录
若以下内容的子步骤未提及firewalld和SElinux,请关闭
请准备一个新的httpd服务的配置文件
换句话说 就是修改httpd服务器的网站根目录
开启SELINUX
#vi /etc/selinux/config
将SELINUX后面修改为 SELINUX=enforcing 保存退出即可,如下

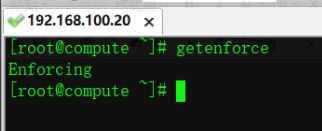
修改SElinux之后 重启系统后生效,输入getenforce即可查看是否生效
修改httpd配置文件,指定apache服务器的根目录
#vi /etc/httpd/conf/httpd.conf

跳转到119行,修改WEB网页根目录
DocumentRoot “/var/www/testdir”
在双引号中的为Web服务器的网页根目录,本次测试将在/var/www/下创建一个testdir目录作为web的测试根目录,修改完成后保存退出

我们在/var/www/testdir中新建一个index.html文件进行测试

重启httpd服务器,浏览器输入IP地址进行测试访问,(请注意如果无法访问,请重启电脑)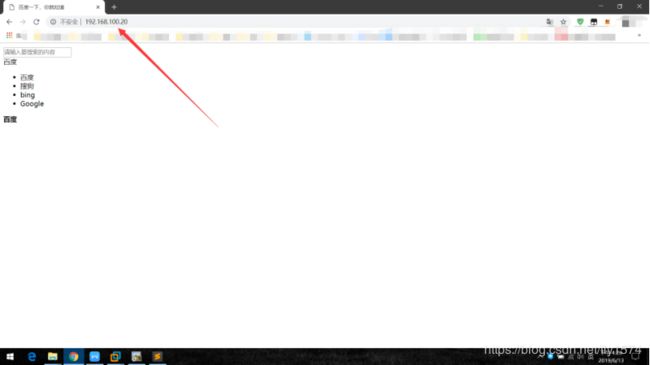
4、设置个人主页,
请准备一个新的httpd服务的配置文件,不要接着上面做
#vi /etc/httpd/conf.d/userdir.conf
将17行添加注释,24行去掉注释如下,保存退出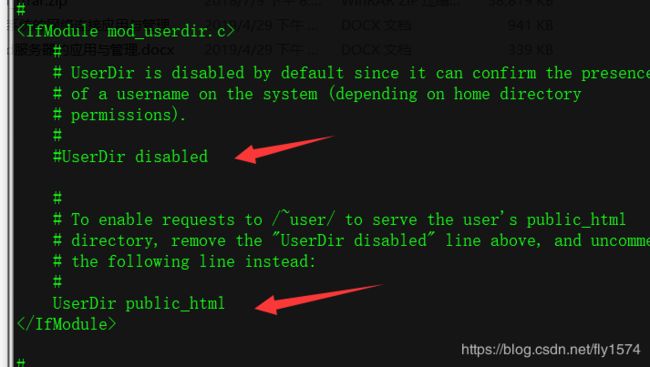
创建测试用户 test1 并设置密码
#useradd test1
#passwd test1

切换到test1用户
#su test1

进入test1的根目录
#cd /home/test1/
![]()
创建public_html,并输入如下命令
echo "This is a test" > public_html/index.html
返回root用户
对test1用户的家目录赋予权限
#chmod 711 /home/test1

打开SELinux的httpd个人主页功能
输入如下命令
setsebool -P httpd_enabled_homedirs=on
生成httpd的test1用户的密码
htpasswd -c /etc/httpd/passwd.txt test1
编辑用户文件vi /etc/httpd/conf.d/userdir.conf
#vi /etc/httpd/conf.d/userdir.conf

移动到文件末行,删除原有的三行配置文件

添加如下内容
    AllowOverride all
    authname "test1 home"
    authuserfile "/etc/httpd/passwd.txt"
    authtype basic
    require user test1

重启httpd服务器
#systemctl restart httpd
浏览器访问,输入如下地址,(请注意如果无法访问,请重启电脑)
192.168.100.20/~test1/index.html
5、基于虚拟IP地址的网页设置:
请准备一个新的httpd服务的配置文件,不要接着上面做
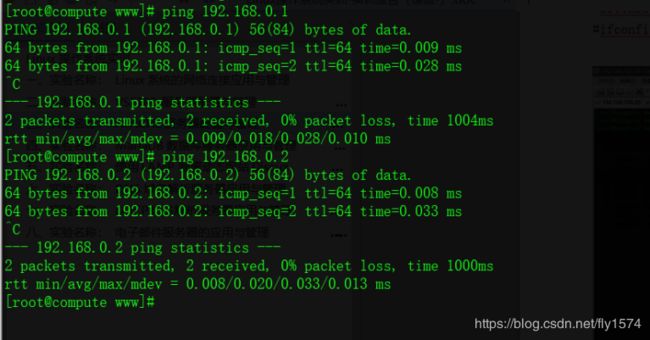
使用ifconfig命令对网卡创建虚拟IP地址
命令如下(请根据实际情况进行配置):
#ifconfig eth1:0 192.168.0.1 netmask 255.255.255.0
#ifconfig eth1:1 192.168.0.2 netmask 255.255.255.0
创建虚拟ip网站目录
#mkdir /var/testdir/
#mkdir -p /var/testdir/test1/
#mkdir -p /var/testdir/test2/
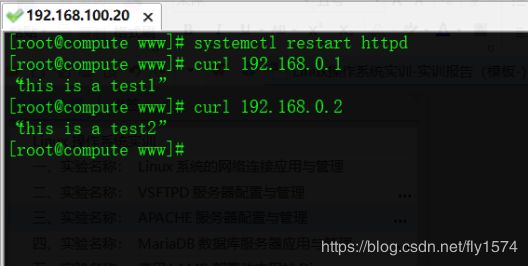
输入测试内容:
#echo “this is a test1” > /var/testdir/test1/index.html
#echo “this is a test2” > /var/testdir/test2/index.html
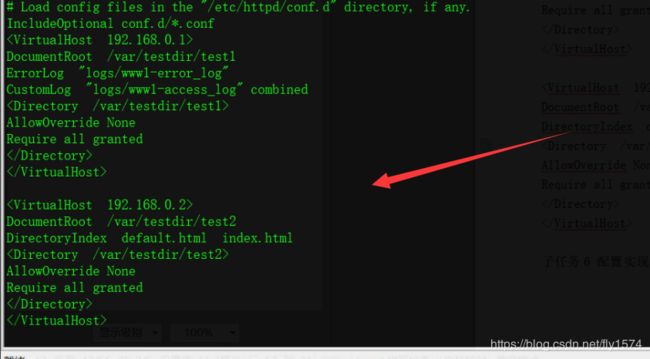
编辑/etc/httpd/conf/httpd.conf在配置文件底部添加如下内容
DocumentRoot  /var/testdir/test1
ErrorLog  "logs/www1-error_log"
CustomLog  "logs/www1-access_log" combined

AllowOverride None
Require all granted


DocumentRoot  /var/testdir/test2
DirectoryIndex  default.html  index.html

AllowOverride None
Require all granted
重启httpd服务
解释:由于ifconfig对eth1创建的是虚拟子网,所以物理主机无法通过浏览器进行访问,只有虚拟机也就是虚拟IP的宿主机才能进行访问
6、配置基于域名的虚拟主机
Apache基于域名的虚拟主机配置
注意:此处依旧是虚拟IP地址,所以物理宿主机无法访问
请准备一个新的httpd服务的配置文件,不要接着上面做
编辑域名转发配置文件,此处的IP地址是本机的IP地址,无需额外更改添加
#vi /etc/hosts 添加如下内容:
192.168.100.20 www.test1.com
192.168.100.20 www.test2.com
192.168.100.20 www.test3.com
第96行,添加如下内容
ServerName www.test1.com:80
ServerName www.test2.com:80
ServerName www.test3.com:80
在文件末尾添加如下参数,指定访问目录以及域名
DocumentRoot /var/www/html/test1
ServerName www.test1.com


DocumentRoot /var/www/html/test2
ServerName www.test2.com


DocumentRoot /var/www/html/test3
ServerName www.test3.com
创建虚拟域名主机的web目录
#cd /var/www/html/

#mkdir test1 test2 test3
添加网页显示内容:
#echo “域名虚拟主机1” > test1/index.html
#echo “域名虚拟主机2” > test2/index.html
#echo “域名虚拟主机3” > test3/index.html
重启httpd服务,并使用curl进行测试访问
#curl www.test1.com
#curl www.test2.com
#curl www.test3.com


