自定义View之仿手机淘宝的物流时间轴
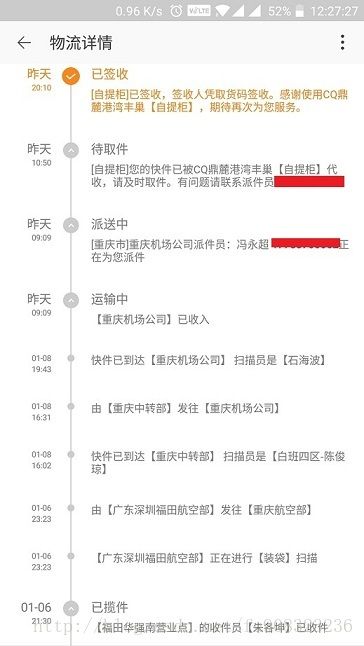
手机淘宝中的物流时间轴
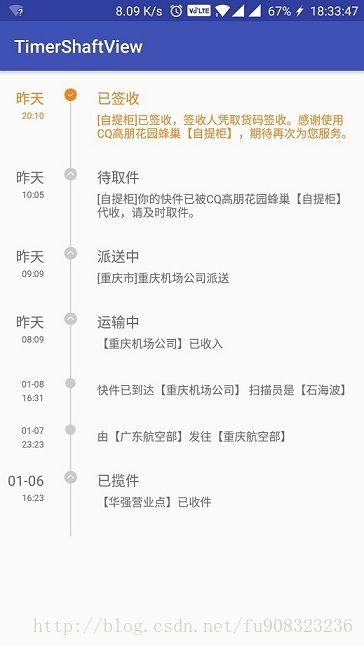
仿照后的效果图
这个效果看上去稍微有一点复杂,其实非常的简单,甚至根本不需要重写onDraw方法什么的,在自定义View中也算是最简单的一种自定义方式——组合控件。
本文目的
使读者了解简单的时间轴是如何实现的,碰到需要时间轴的地方能很容易的想到实现思路,主要是起到一个抛砖引玉的目的,后面就能自己写出更酷炫的时间轴。
源码地址
https://github.com/qq908323236/TimerShaftView
整体思路
利用RecyclerView,不设置分割线,使ItemView中的“时间轴”连起来,看上去就像是一个整体。
我也看到有人用RecyclerView来实现的,但是他是用的RecyclerView的ItemDecoration来直接绘制轴的,虽然也能很好的实现,但是感觉有些难度,实现起来稍微复杂一点,对新手也不太适合,而本文就非常适合初学者来学习如何用组合控件的方式来自定义控件。
具体实现
添加依赖:
因为用的RecyclerView,所以我们首先需要添加依赖
compile ‘com.android.support:recyclerview-v7:26.1.0’
LogisticsBean
用到RecyclerView那就需要数据集合了,所以这里我就写个实体类来存放数据。
public class LogisticsBean {
    private String date;            //日期
    private String time;            //时间
    private int state;              //状态
    private String title;           //标题
    private String content;         //内容

    public LogisticsBean(String date, String time, int state, String title, String content) {
        this.date = date;
        this.time = time;
        this.state = state;
        this.title = title;
        this.content = content;
    }

    //...省略get,set
}
Item布局
<LinearLayout xmlns:android="http://schemas.android.com/apk/res/android"
    android:layout_width="match_parent"
    android:layout_height="match_parent"
    android:orientation="horizontal">

    <LinearLayout
        android:layout_width="50dp"
        android:layout_height="wrap_content"
        android:gravity="right"
        android:orientation="vertical">

        <TextView
            android:id="@+id/tv_date"
            android:layout_width="wrap_content"
            android:layout_height="wrap_content"
            android:text="昨天"
            android:textSize="16sp" />

        <TextView
            android:id="@+id/tv_time"
            android:layout_width="wrap_content"
            android:layout_height="wrap_content"
            android:layout_marginTop="2dp"
            android:text="20:10"
            android:textSize="10sp" />

    LinearLayout>

    <LinearLayout
        android:layout_width="30dp"
        android:layout_height="match_parent"
        android:layout_marginLeft="15dp"
        android:layout_marginRight="15dp"
        android:gravity="center_horizontal"
        android:orientation="vertical">

        <ImageView
            android:id="@+id/iv_state"
            android:layout_width="wrap_content"
            android:layout_height="wrap_content"
            android:src="@mipmap/arrow_gray" />

        <View
            android:layout_width="1dp"
            android:layout_height="match_parent"
            android:background="@color/grey" />


    LinearLayout>

    <LinearLayout
        android:layout_width="wrap_content"
        android:layout_height="wrap_content"
        android:layout_marginRight="10dp"
        android:orientation="vertical">

        <TextView
            android:id="@+id/tv_title"
            android:layout_width="wrap_content"
            android:layout_height="wrap_content"
            android:text="运输中"
            android:textSize="16sp" />

        <TextView
            android:id="@+id/tv_content"
            android:layout_width="wrap_content"
            android:layout_height="wrap_content"
            android:layout_marginTop="5dp"
            android:text="快件已到达【重庆机场公司】 扫描员是【石海波】"
            android:textSize="13sp" />

        <View
            android:layout_width="match_parent"
            android:layout_height="30dp" />
    LinearLayout>


LinearLayout>
最外层是一个水平方向的LinearLayout,然后是三个垂直方向的LinearLayout,第二个垂直的LinearLayout中就是我们的“轴”,这个LinearLayout的宽要固定,高用match_parent,然后里面的“轴线”也要match_parent,并且这个LinaerLayout要水平居中,这样我们就能让线起来,需要注意的是线是用这个标签来写的,当时把V写成小写的v了,编译能通过,运行就报错,找了很久才找到是这个问题。
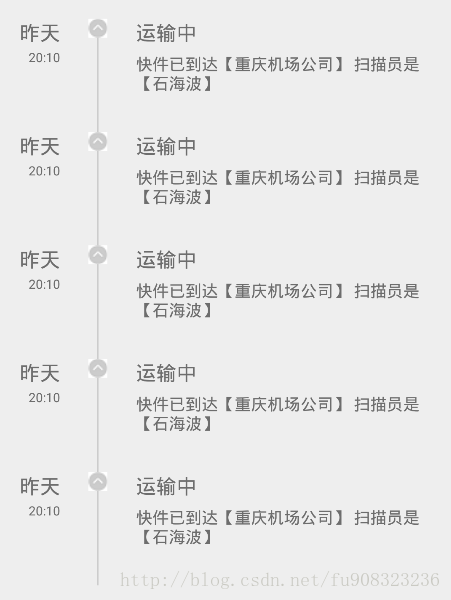
那么如果加在RecyclerView中,有多个item的时候效果是什么样的呢?请看图:

咦、是不是有点样子了呢。实现起来是不是非常的简单啊,下面就把整个代码贴出来。
MainActivity.xml
<LinearLayout xmlns:android="http://schemas.android.com/apk/res/android"
    xmlns:app="http://schemas.android.com/apk/res-auto"
    xmlns:tools="http://schemas.android.com/tools"
    android:layout_width="match_parent"
    android:layout_height="match_parent"
    android:orientation="vertical"
    tools:context="com.fu.timershaftview.MainActivity">

    <ScrollView
        android:layout_width="match_parent"
        android:layout_height="match_parent">

        <LinearLayout
            android:layout_width="match_parent"
            android:layout_height="match_parent"
            android:orientation="vertical">

            <android.support.v7.widget.RecyclerView
                android:id="@+id/recyclerview"
                android:layout_width="match_parent"
                android:layout_height="match_parent"
                android:layout_marginBottom="20dp"
                android:layout_marginTop="20dp" />

        LinearLayout>
    ScrollView>


LinearLayout>
这里为什么用个ScrollView,是因为我把RecyclerView的滑动个禁用掉了,然后再加上ScrollView就能把所有的item都显示出来,不复用,反正item也没几个,当然如果是很长的时间轴,那为了性能就需要复用了,所以这也是本文的扩展的地方。
MainActivity.java
public class MainActivity extends AppCompatActivity {

    private RecyclerView recyclerView;

    @Override
    protected void onCreate(Bundle savedInstanceState) {
        super.onCreate(savedInstanceState);
        setContentView(R.layout.activity_main);
        recyclerView = findViewById(R.id.recyclerview);
        LinearLayoutManager linearLayoutManager = new LinearLayoutManager(this) {
            @Override
            public boolean canScrollVertically() {
                return false;   //设置false 就是禁止RecyclerView滑动
            }
        };
        recyclerView.setLayoutManager(linearLayoutManager);

        //模拟数据集
        ArrayList logisticsBeans = new ArrayList<>();
        logisticsBeans.add(new LogisticsBean("昨天", "20:10", 1, "已签收", "[自提柜]已签收,签收人凭取货码签收。感谢使用CQ高朋花园蜂巢【自提柜】,期待再次为您服务。"));
        logisticsBeans.add(new LogisticsBean("昨天", "10:05", 0, "待取件", "[自提柜]你的快件已被CQ高朋花园蜂巢【自提柜】代收,请及时取件。"));
        logisticsBeans.add(new LogisticsBean("昨天", "09:09", 0, "派送中", "[重庆市]重庆机场公司派送"));
        logisticsBeans.add(new LogisticsBean("昨天", "08:09", 0, "运输中", "【重庆机场公司】已收入"));
        logisticsBeans.add(new LogisticsBean("01-08", "16:31", 0, "", "快件已到达【重庆机场公司】 扫描员是【石海波】"));
        logisticsBeans.add(new LogisticsBean("01-07", "23:23", 0, "", "由【广东航空部】发往【重庆航空部】"));
        logisticsBeans.add(new LogisticsBean("01-06", "16:23", 0, "已揽件", "【华强营业点】已收件"));

        MyAdapter adapter = new MyAdapter(this, logisticsBeans);
        recyclerView.setAdapter(adapter);
    }
}
MyAdapter.java
public class MyAdapter extends RecyclerView.Adapter.MyViewHolder> {

    private Context mContext;
    private ArrayList mDatas;

    public MyAdapter(Context context, ArrayList datas) {
        this.mContext = context;
        this.mDatas = datas;
    }

    @Override
    public MyViewHolder onCreateViewHolder(ViewGroup parent, int viewType) {
        View view = LayoutInflater.from(mContext).inflate(R.layout.item_timer, null);
        return new MyViewHolder(view);
    }

    @Override
    public void onBindViewHolder(MyViewHolder holder, int position) {
        LogisticsBean data = mDatas.get(position);
        holder.tv_date.setText(data.getDate());
        holder.tv_time.setText(data.getTime());
        holder.tv_title.setText(data.getTitle());
        holder.tv_content.setText(data.getContent());

        if (position == 0) {
            //最上面的一条颜色是橙色,其他的是灰色了
            holder.tv_date.setTextColor(mContext.getResources().getColor(R.color.orange));
            holder.tv_time.setTextColor(mContext.getResources().getColor(R.color.orange));
            holder.tv_title.setTextColor(mContext.getResources().getColor(R.color.orange));
            holder.tv_content.setTextColor(mContext.getResources().getColor(R.color.orange));
        }

        //控制图片的显示
        if (data.getState() == 1) {
            //1完成
            holder.iv_state.setImageResource(R.mipmap.ok_orange);
        } else {
            if (TextUtils.isEmpty(data.getTitle())) {
                holder.iv_state.setImageResource(R.mipmap.dot);
            } else {
                if (position == 0) {
                    holder.iv_state.setImageResource(R.mipmap.arrow_orange);
                } else {
                    holder.iv_state.setImageResource(R.mipmap.arrow_gray);
                }
            }
        }

        //控制日期字体大小的显示
        if (TextUtils.isEmpty(data.getTitle())) {
            holder.tv_title.setVisibility(View.GONE);
            holder.tv_date.setTextSize(10);
        }
    }

    @Override
    public int getItemCount() {
        return mDatas.size();
    }

    class MyViewHolder extends RecyclerView.ViewHolder {

        TextView tv_date;
        TextView tv_time;
        ImageView iv_state;
        TextView tv_title;
        TextView tv_content;

        public MyViewHolder(View itemView) {
            super(itemView);
            tv_date = itemView.findViewById(R.id.tv_date);
            tv_time = itemView.findViewById(R.id.tv_time);
            iv_state = itemView.findViewById(R.id.iv_state);
            tv_title = itemView.findViewById(R.id.tv_title);
            tv_content = itemView.findViewById(R.id.tv_content);
        }
    }

}
主要的逻辑肯定就是在onBindViewHolder里面了,来控制显示的颜色,图片等等,也非常的简单。
最后感谢每一位读我文章的人~


