【Spring集成】-Spring配置JaxWs
一.JaxWs简介
JAX-WS规范是一组XML web services的JAVA API,JAX-WS允许开发者可以选择RPC-oriented或者message-oriented 来实现自己的web services。在 JAX-WS中,一个远程调用可以转换为一个基于XML的协议例如SOAP,在使用JAX-WS过程中,开发者不需要编写任何生成和处理SOAP消息的代码。JAX-WS的运行时实现会将这些API的调用转换成为对应的SOAP消息。在服务器端,用户只需要通过Java语言定义远程调用所需要实现的接口SEI(service endpoint interface),并提供相关的实现,通过调用JAX-WS的服务发布接口就可以将其发布为WebService接口。在客户端,用户可以通过JAX-WS的API创建一个代理(用本地对象来替代远程的服务)来实现对于远程服务器端的调用.
二.Spring配置JaxWs 服务端
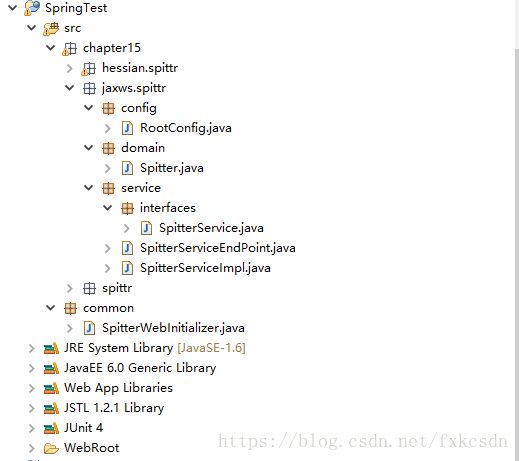
项目整体结构图
第一步:创建实体类Spitter
实体类一定要有无参构造函数,JaxWs在用反射时会调用,否则报错,属性也要有对应的set方法。
package chapter15.jaxws.spittr.domain;

import java.io.Serializable;

public class Spitter implements Serializable {
	private static final long serialVersionUID = 1L;

  private Long id;
  private String username;
  private String password;

  public Spitter(){}

  public Spitter(Long id, String username, String password) {
    this.id = id;
    this.username = username;
    this.password = password;
  }

  public Long getId() {
    return id;
  }

  public String getUsername() {
    return username;
  }

  public String getPassword() {
    return password;
  }

public static long getSerialversionuid() {
	return serialVersionUID;
}

public void setId(Long id) {
	this.id = id;
}

public void setUsername(String username) {
	this.username = username;
}

public void setPassword(String password) {
	this.password = password;
}


}
第二步:编写接口和接口实现类
接口上@WebService注解表明这个接口是一个服务接口,targetNamespace属性是服务的命名空间,name是服务的名称,当客户端调用这个服务时,就是通过服务地址,命名空间和服务名称来确定这个服务。
@WebMethod注解表明这个方法是服务方法,operationName属性制定这个服务方法名称,这个名称必须和服务实现类中的服务方法名称一致,否则,客户端调用会找不到这个服务方法。
package chapter15.jaxws.spittr.service.interfaces;

import javax.jws.WebMethod;
import javax.jws.WebService;

import chapter15.jaxws.spittr.domain.Spitter;

@WebService(targetNamespace = "http://service.spittr.jaxws.chapter15/", name = "SpitterService")
public interface SpitterService {
	@WebMethod(operationName="findByUsername2")
  public abstract Spitter findByUsername(String username);

}
接口实现类:
@Component注解是为了让Spring自动发现装配这个Bean
package chapter15.jaxws.spittr.service;

import org.springframework.stereotype.Component;

import chapter15.jaxws.spittr.domain.Spitter;
import chapter15.jaxws.spittr.service.interfaces.SpitterService;

@Component
public class SpitterServiceImpl implements SpitterService{

	@Override
	public Spitter findByUsername(String username) {
		Spitter s=new Spitter();
		s.setUsername(username);
		s.setPassword("123");
		return s;
	}

}
第三步:编写服务实现类:
@WebService注解表明这是一个服务类,serviceName属性设置这个服务类的服务名称,@SOAPBing(style=Style.RPC)这个注解不能少,防止jdk版本问题而导致的异常。@Component让Spring将其装配成一个组件,因为只有被@WebService注解的组件,才会被SimpleJaxWsServiceExporter发现并导出为服务类。@WebMethod(operationName="findByUsername2")表明这是服务操作,operationName设置这个操作名称,前面的SpitterService接口中的@WebMethod(operationName="findByUsername2")必须和这个操作名称一致。
package chapter15.jaxws.spittr.service;

import javax.jws.WebMethod;
import javax.jws.WebService;
import javax.jws.soap.SOAPBinding;
import javax.jws.soap.SOAPBinding.Style;
import org.springframework.beans.factory.annotation.Autowired;
import org.springframework.stereotype.Component;

import chapter15.jaxws.spittr.domain.Spitter;
import chapter15.jaxws.spittr.service.interfaces.SpitterService;

@Component
@WebService(serviceName="SpitterService")
//防止jdk版本问题
@SOAPBinding(style=Style.RPC)
public class SpitterServiceEndPoint{
	@Autowired
	private SpitterService spitterService;

	@WebMethod(operationName="findByUsername2")
	public Spitter findByUsername(String username) {
		Spitter st=spitterService.findByUsername(username);
		return st;
	}

}
最后一步:将上面服务类发布为服务
只有被@WebService注解的组件,才会被SimpleJaxWsServiceExporter发现并导出为服务类。setBaseAddress设置发布的服务的地址和端口号,端口号不能已经被占用,否则报错。
package chapter15.jaxws.spittr.config;


import org.springframework.context.annotation.ComponentScan;
import org.springframework.context.annotation.Bean;
import org.springframework.context.annotation.Configuration;
import org.springframework.remoting.jaxws.SimpleJaxWsServiceExporter;


@Configuration
@ComponentScan(basePackages={"chapter15.jaxws.spittr"})
public class RootConfig {

	 @Bean
	  public SimpleJaxWsServiceExporter jaxWsExporter(){
		  SimpleJaxWsServiceExporter s=new SimpleJaxWsServiceExporter();
		  s.setBaseAddress("http://localhost:8088/");
		  return s;
	  }
}
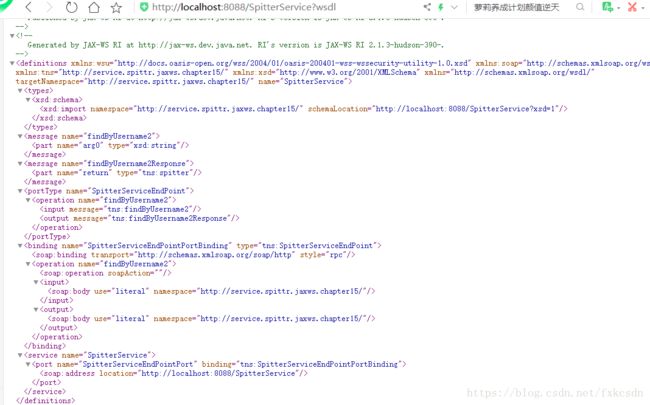
如果发布成功在地址栏输入http://localhost:8088/SpitterService?wsdl会出现下面结果:表明服务已经发布成功,这是一个xml文档,message节点表示findByUsername2操作输入输出结果和参数类型;portType节点表示服务可用的操作,本例只有一个操作就是findByUsername2;binding元素的transport指明传输协议,这里是http协议operation 指明要暴露给外界调用的操作。use属性指定输入输出的编码方式,这里没有指定编码。Service元素指定了服务名称和服务的访问路径。
三:spring配置JaxWs客户端
1.新建客户端项目SpringClientTest,把Spring需要的类导入,同时把服务端的接口是实体类打包成Jar文件导入;
2.新建配置类
package chapter15.spittr.config;

import java.net.MalformedURLException;
import java.net.URL;

import org.springframework.context.annotation.Bean;
import org.springframework.context.annotation.ComponentScan;
import org.springframework.context.annotation.Configuration;
import org.springframework.remoting.jaxws.JaxWsPortProxyFactoryBean;

import chapter15.jaxws.spittr.service.interfaces.SpitterService;

@Configuration
@ComponentScan(basePackages={"chapter15.spittr"})

public class RootConfig {
	@Bean
	  public JaxWsPortProxyFactoryBean getSpitterService() throws MalformedURLException{
		  JaxWsPortProxyFactoryBean rmiProxy=new JaxWsPortProxyFactoryBean();
		  URL url=new URL("http://localhost:8088/SpitterService?wsdl");
		  rmiProxy.setWsdlDocumentUrl(url);
	      rmiProxy.setServiceInterface(SpitterService.class);
	      rmiProxy.setServiceName("SpitterService");
	      rmiProxy.setPortName("SpitterServiceEndPointPort");
	      rmiProxy.setNamespaceUri("http://service.spittr.jaxws.chapter15/");
		  return rmiProxy;
	  }


}
我们可以看到,为 JaxWsPortProxyFactoryBean 设置几个属性就可以工作了。 wsdlDocumentUrl 属性标识了远程 Web 服务定义文件的位置。 JaxWsPortProxyFactory bean 将使用这个位置上可用的 WSDL 来为服务创建代理。由 JaxWsPortProxyFactoryBean 所生成的代理实现了 serviceInterface 属性所指定的 SpitterService 接口。剩下的三个属性的值通常可以通过查看服务的 WSDL 来确定,即在上图中在浏览器输入http://localhost:8088/SpitterService?wsdl展示的xml文档。serviceName属性标识远程服务的服务名称,portName属性标识端口,nameSpaceUri标识命名空间。
3.新建测试类,使用Junit4测试类库,需导入
package chapter15.spittr.test;

import org.junit.Test;
import org.junit.runner.RunWith;
import org.springframework.beans.factory.annotation.Autowired;
import org.springframework.test.context.ContextConfiguration;
import org.springframework.test.context.junit4.SpringJUnit4ClassRunner;

import chapter15.jaxws.spittr.domain.Spitter;
import chapter15.jaxws.spittr.service.interfaces.SpitterService;
import chapter15.spittr.config.RootConfig;

@RunWith(SpringJUnit4ClassRunner.class)
@ContextConfiguration(classes=RootConfig.class)
public class JaxwsTest {

	@Autowired
	SpitterService spitterService;

	@Test
	public void getSpitter(){
		String name="habuma";
		Spitter spitter=spitterService.findByUsername(name);
		System.out.println(spitter.getUsername()+","+spitter.getPassword());
	}

}
四:总结
以上纯手打,欢迎大家提出改进意见!谢谢!

