Android组件化+MVP+RxJava+Retrofit+Dagger2项目框架FlyTour新闻客户端使用详解
欢迎加星,打call https://github.com/geduo83/FlyTour
在使用中有任何问题,请留言,或加入Android、Java开发技术交流群
QQ群:810970432
email:[email protected]
版权声明:本文来自门心叼龙的博客,属于原创内容,转载请注明出处:https://menxindiaolong.blog.csdn.net/article/details/90693153
框架地址:https://github.com/geduo83/FlyTour
FlyTour新闻客户端是Android组件化+MVP+RxJava+Retrofit+Dagger2项目框架,工程架构采用gradle配置实现组件化,模块的架构采用典型的MVP架构,帮助你快速的搭建自己的App项目开发框架,以便把主要的精力放在自己的项目的业务功能实现上,另外在长期的工作实践中总结整理大量的实用工具类在项目lib_common组件的util包当中方便大家调用
更新日志:
FlyTour2.0.0 2019-05-30
以新闻资讯为功能,对app的界面进行了全新的改版,由新闻列表展示、新闻详情展示、新闻添加、新闻类型添加、删除这几个简单的功能组成,基本上覆盖了整个框架的所有核心的、常用的一些功能
- 新闻类型添加、删除、展示
- 新闻添加、展示
- 支持是否启用ToolBar
- 支持自定义ToolBar
- 支持loading加载数据
- 支持透明loading的加载数据
- 支持显示无数据
- 支持网络网络错误显示
- 支持Fragment的懒加载
- 支持最基本的下拉刷新、上拉加载更多
- 支持自定义HeadView和FootView
- 支持自动刷新
- 支持启用、禁用下拉刷新
- 支持启用、进攻上拉加载更多
- 通用小菊花样式DaisyRefreshLayout
- 通用小箭头样式ArrowRefreshLayout
FlyTour1.1.0 2019-03-34
- 增加了功能组件日期选择器lib_time_picker
- MVP功能的一些优化
FlyTour1.0.0 2019-01-26
- 初始版本,以车辆运动轨迹大数据采集为功能简单的实现了组件化和MVP的基本功能
功能演示
- 新闻下来刷新、无数据、无网络、新闻详情展示
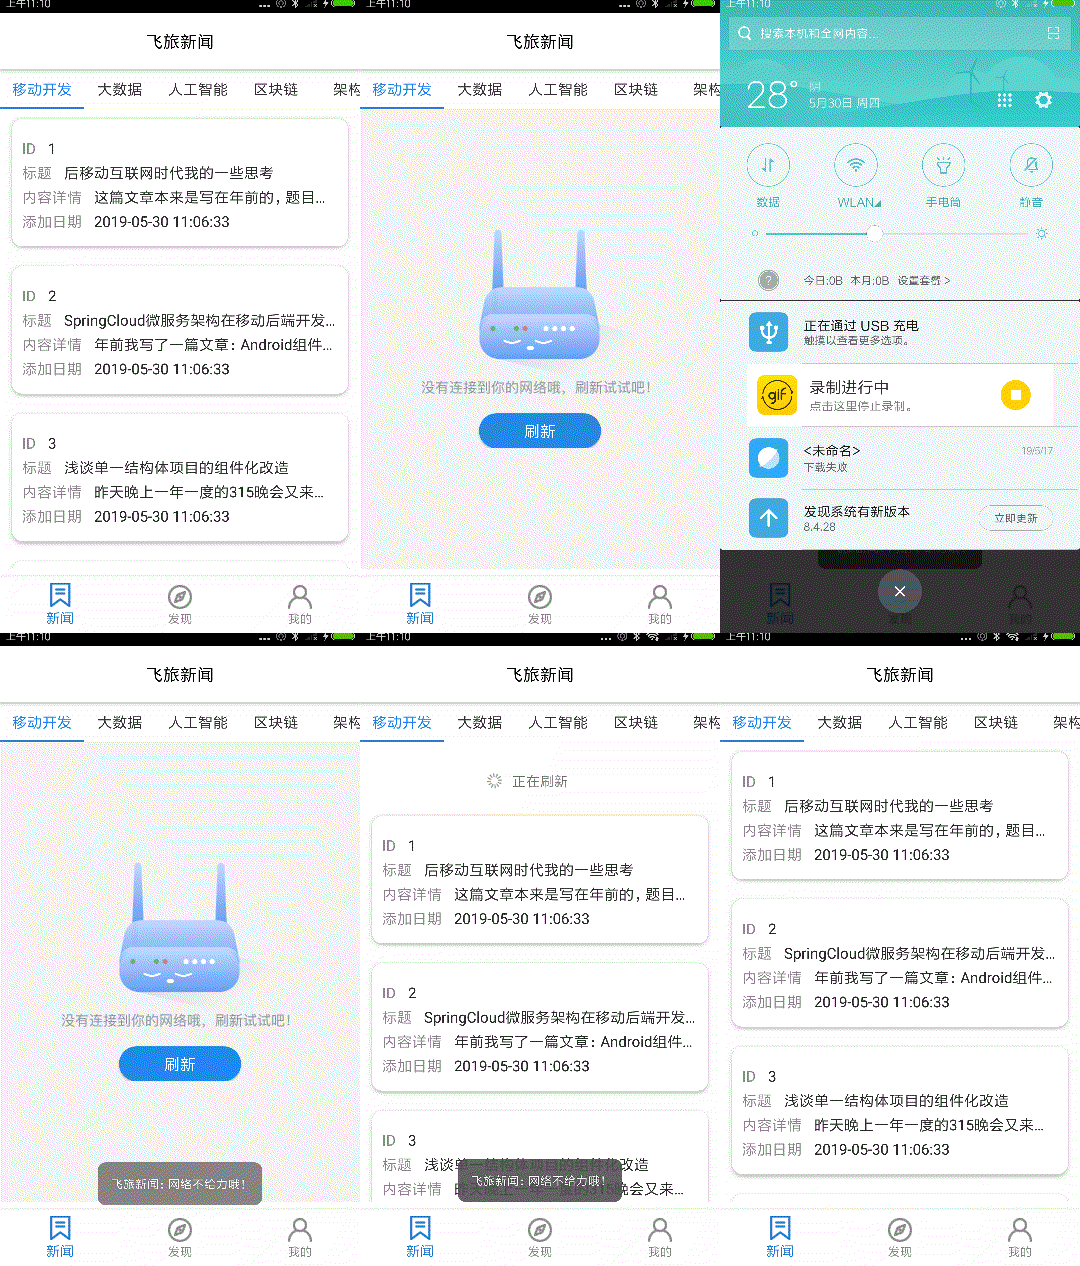 * 新闻类型添加、新闻添加
主要功能
核心公共组件lib_common
七的核心公用基类
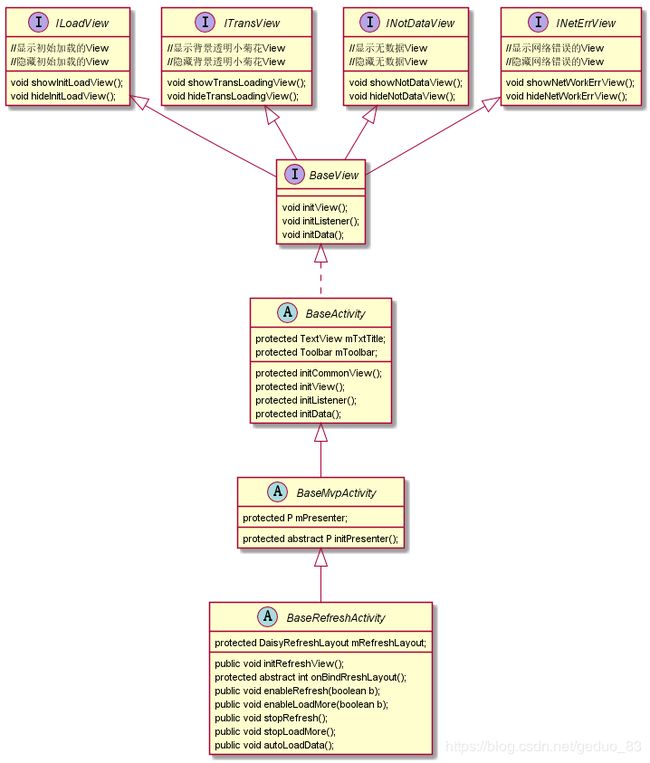
- BaseActivity
public abstract class BaseActivity extends RxAppCompatActivity implements BaseView {
...
}
- BaseMvpActivity
public abstract class BaseMvpActivity> extends BaseActivity {
...
}
- BaseRefreshActivity
public abstract class BaseRefreshActivity, P extends BaseRefreshPresenter, T> extends BaseMvpActivity implements BaseRefreshView {
}
- BaseFragment
- BaseMvpFragment
- BaseRefreshFragment
- BaseAdapter
功能特色:
- 支持是否使用ToolBar
public boolean enableToolbar() {
    return true;
}
- 支持自定义ToolBar
public int onBindToolbarLayout() {
   return R.layout.common_toolbar;
}
- 支持loading加载数据
  public void showInitLoadView() {
        showInitLoadView(true);
    }

    public void hideInitLoadView() {
        showInitLoadView(false);
    }
- 支持透明loading的加载数据
  @Override
    public void showTransLoadingView() {
        showTransLoadingView(true);
    }

    @Override
    public void hideTransLoadingView() {
        showTransLoadingView(false);
    }
- 支持显示无数据
    public void showNoDataView() {
        showNoDataView(true);
    }

    public void showNoDataView(int resid) {
        showNoDataView(true, resid);
    }

    public void hideNoDataView() {
        showNoDataView(false);
    }
- 支持网络网络错误显示
public void hideNetWorkErrView() {
        showNetWorkErrView(false);
    }

    public void showNetWorkErrView() {
        showNetWorkErrView(true);
    }
- 支持Fragment的懒加载
  private void lazyLoad() {
        //这里进行双重标记判断,必须确保onCreateView加载完毕且页面可见,才加载数据
         if (isViewCreated && isViewVisable) {
            initData();
            //数据加载完毕,恢复标记,防止重复加载
            isViewCreated = false;
            isViewVisable = false;
        }
    }
    //默认不启用懒加载
    public boolean enableLazyData() {
        return false;
    }
上拉下拉功能组件 lib_refresh_layout
- 支持最基本的下拉刷新、上拉加载更多
- 支持自定义HeadView和FootView
- 支持自动刷新
- 支持启用、禁用下拉刷新
- 支持启用、进攻上拉加载更多
- 通用小菊花样式DaisyRefreshLayout
- 通用小箭头样式ArrowRefreshLayout
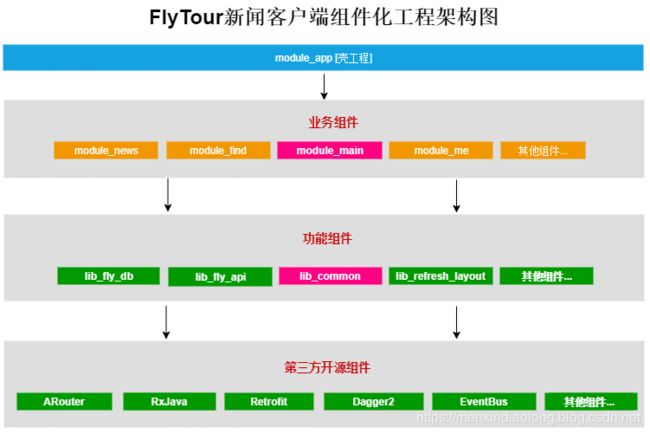
项目架构
- 集成模式:所有的业务组件被“app壳工程”依赖,组成一个完整的APP;
- 组件模式:可以独立开发业务组件,每一个业务组件就是一个APP;
- app壳工程:负责管理各个业务组件,和打包apk,没有具体的业务功能;
- 业务组件:根据公司具体业务而独立形成一个的工程;
- 功能组件:提供开发APP的某些基础功能,例如打印日志、下拉刷新控件等;
- Main组件:属于业务组件,指定APP启动页面、主界面;
- Common组件:属于功能组件,支撑业务组件的基础,提供多数业务组件需要的功能
MVP架构
Fragment的类关系图
Fragment的类关系图和Activity类似具体详见common组件下的base包和mvp包
组件化实现:
FlyTour新闻客户端使用阿里ARouter作为路由,实现组件与组件的通信跳转
集成模式和组件模式转换
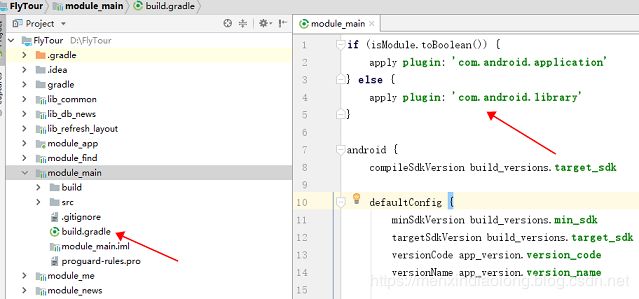
Module的属性是在每个组件的 build.gradle 文件中配置的,当我们在组件模式开发时,业务组件应处于application属性,这时的业务组件就是一个 Android App,可以独立开发和调试;而当我们转换到集成模式开发时,业务组件应该处于 library 属性,这样才能被我们的“app壳工程”所依赖,组成一个具有完整功能的APP
先打开FlyTour工程的根目录下找到gradle.properties 文件,然后将 isModule 改为你需要的开发模式(true/false), 然后点击 “Sync Project” 按钮同步项目
isModule=false
if (isModule.toBoolean()) {
    apply plugin: 'com.android.application'
} else {
    apply plugin: 'com.android.library'
}
组件之间AndroidManifest合并问题
我们可以为组件开发模式下的业务组件再创建一个 AndroidManifest.xml,然后根据isModule指定AndroidManifest.xml的文件路径,让业务组件在集成模式和组件模式下使用不同的AndroidManifest.xml,这样表单冲突的问题就可以规避了
已module_main组件为例配置如下:

sourceSets {
        main {
            if (isModule.toBoolean()) {
                manifest.srcFile 'src/main/module/AndroidManifest.xml'
            } else {
                manifest.srcFile 'src/main/AndroidManifest.xml'
            }
        }
}
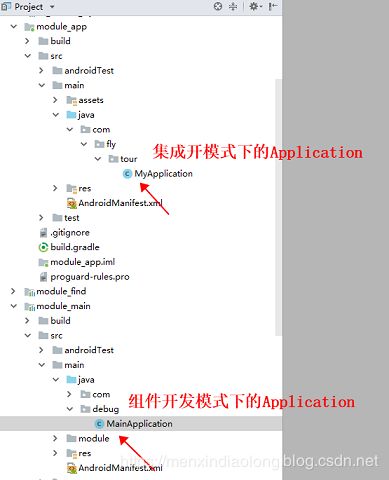
组件模式下的Application
在每个组件的debug目录下创建一个Application并在module下的AndroidManifest.xml进行配置
配图:
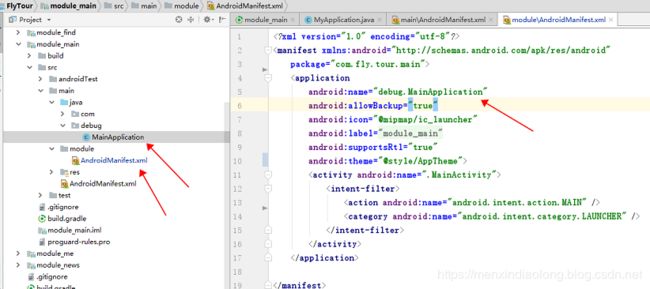
集成开发模式下的Application
问题反馈
欢迎加星,打call https://github.com/geduo83/FlyTour
在使用中有任何问题,请留言,或加入Android、Java开发技术交流群
- QQ群:810970432
- email:[email protected]

关于作者
var geduo_83 = {
    nickName  : "门心叼龙",
    site : "http://www.weibo.com/geduo83"
 }
License
Copyright (C)  menxindiaolong, FlyTour Framework Open Source Project

Licensed under the Apache License, Version 2.0 (the "License");
you may not use this file except in compliance with the License.
You may obtain a copy of the License at

     http://www.apache.org/licenses/LICENSE-2.0

Unless required by applicable law or agreed to in writing, software
distributed under the License is distributed on an "AS IS" BASIS,
WITHOUT WARRANTIES OR CONDITIONS OF ANY KIND, either express or implied.
See the License for the specific language governing permissions and
limitations under the License.
